
Home/HighLevel/Guides/Build the client onboarding workflow
HighLevel Guides · Volume 07 · Workflows
How to build a client onboarding workflow in GoHighLevel that runs the first hour for you.
A new client signs and the first hour decides how they feel about you. This build makes HighLevel handle that hour. By the end you will have one workflow that fires on a tag or a form, welcomes the client, branches on what they told you, assigns an owner and alerts your team, with the settings locked down so it runs clean. HighLevel is the same platform many people still search for as GoHighLevel.
What you are building
What you are building and what it does.
One workflow in the Automation section. It starts the moment a contact gets your onboarding tag or submits your onboarding form. It sends a welcome email from a template you control, checks a field the client filled in and sends them down the right branch, assigns the contact to a team member, and pushes an internal notification to the people who need to act. Workflow settings control reentry, sending hours and sender details so the whole thing runs the same way every time. The companion page is build a client onboarding workflow, and the wider process is in the client onboarding system for agencies. If you are choosing a plan for the agency, see GoHighLevel pricing and the plans compared page.
- A workflow that starts on a Contact Tag or a Form Submitted trigger, your choice
- A welcome email that goes out automatically and pulls in the client's details with merge tags
- An If/Else branch that routes clients based on a field from the form
- Every new client assigned to a user, split equally if you pick more than one
- An internal notification to your team by email, in app, SMS or WhatsApp
- Workflow settings that control reentry, sending hours and sender details
Before you start
Before you start have these ready.
Ten minutes of prep keeps you from stopping halfway through the build.
- A subaccount with access to the Workflow Builder under Automation
- The exact tag name you will use to start onboarding, or the form you will trigger from, already created in the account
- One contact field or custom field on the form that you can branch on, such as the service the client picked
- A welcome email template, or the copy you want to put into one
- The users who will own new clients, already added to the account
- Valid phone numbers and email addresses on every team member who will get notifications, and a connected WhatsApp integration if you plan to use that channel
- A test contact you can tag or submit the form with
Part 01 of 06
Create the workflow and pick what starts it.
Every workflow starts with a trigger. You have two good choices for onboarding: a tag you or your team add when a client signs, or the onboarding form the client fills in. Pick one here. You can add the other later as a second trigger.
- Go to Automation in the left hand menu.
- Click + Create Workflow at the top right and choose a starter option.
- Click Add New Trigger.
- To start from a tag, select Contact Tag from the list, then set the Filter for tag action to the tag added event and choose your onboarding tag.
- To start from a form instead, select Form Submitted from the dropdown, name the trigger, and set the Form Is filter to your onboarding form.
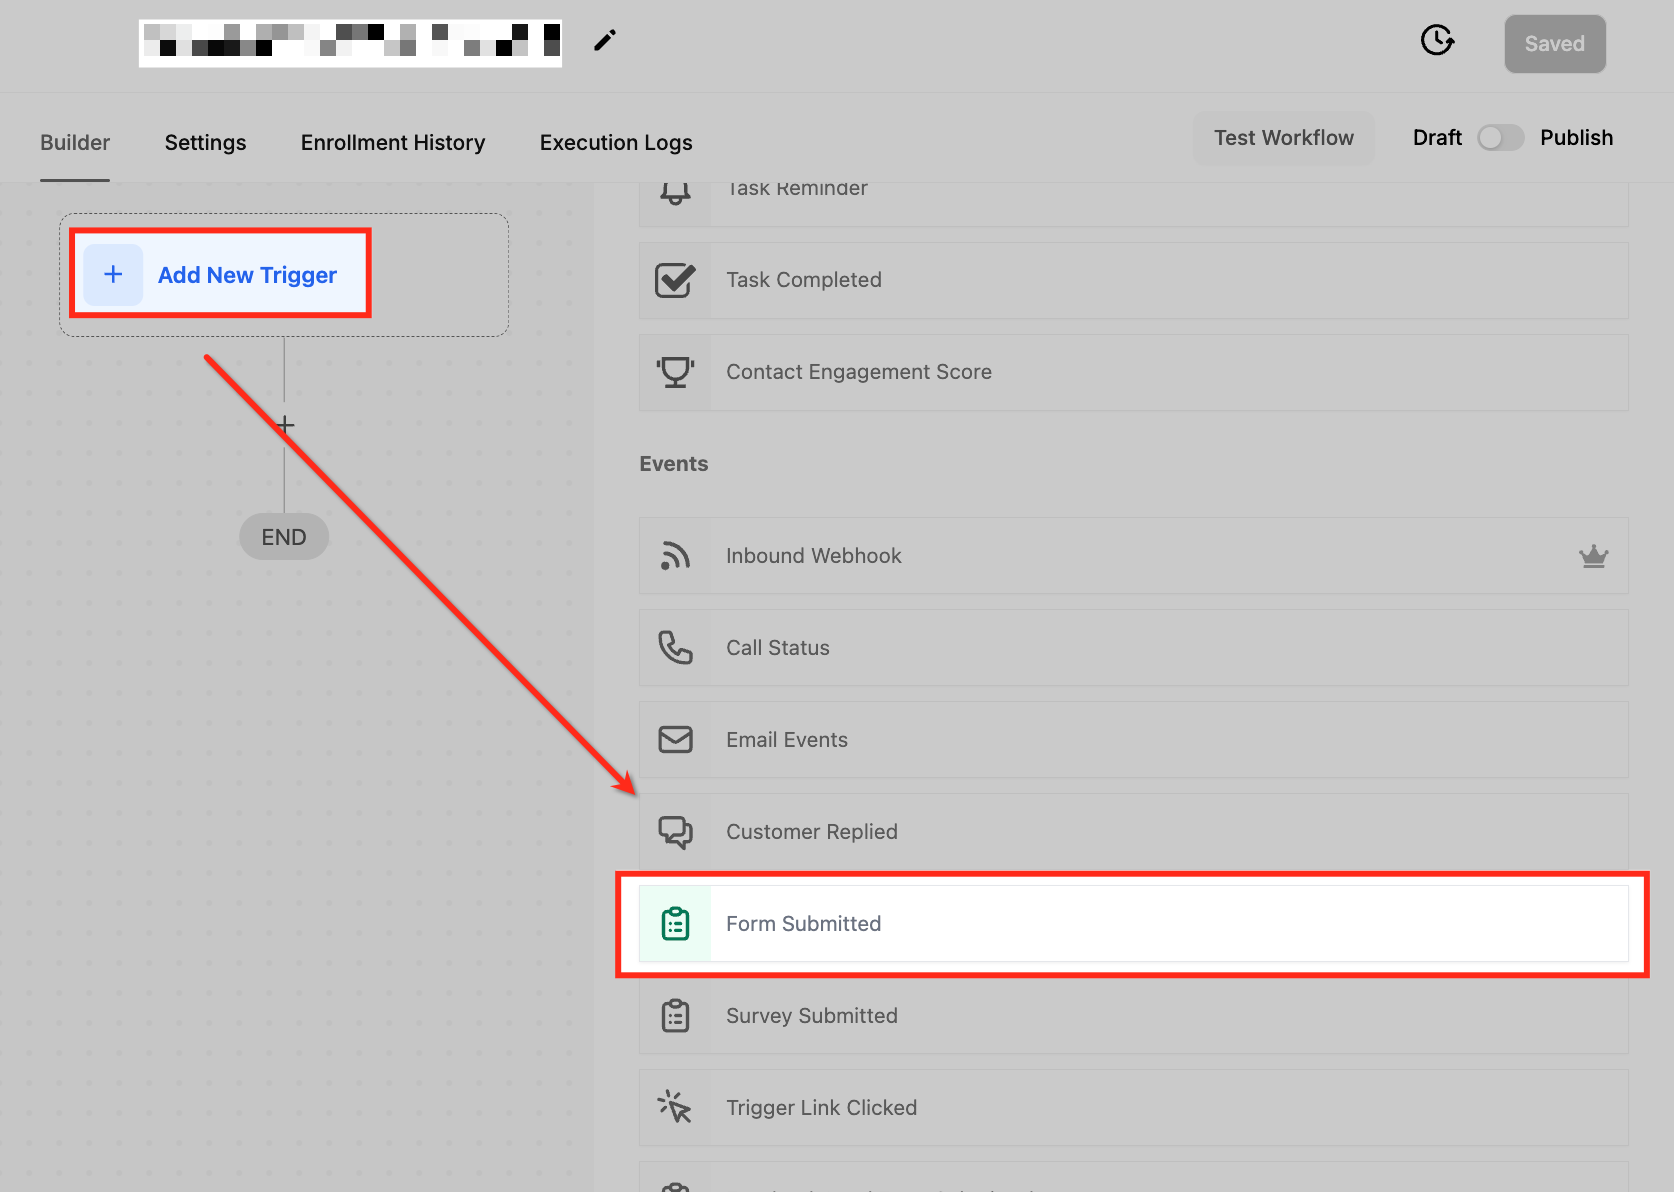
The Form Is filter points the trigger at one form. - Click Save the Trigger.
Part 02 of 06
Send the welcome email from inside the workflow.
The welcome email is the first thing the client sees, so it goes right after the trigger. The Send Email action opens the email template builder inside the workflow, so you build and edit the template without leaving the screen.
- Click the + button on the workflow line under your trigger.
- Select Send Email from the action list.
- Pick the template you want to use, or create a new one in the email template builder that opens inside the action.
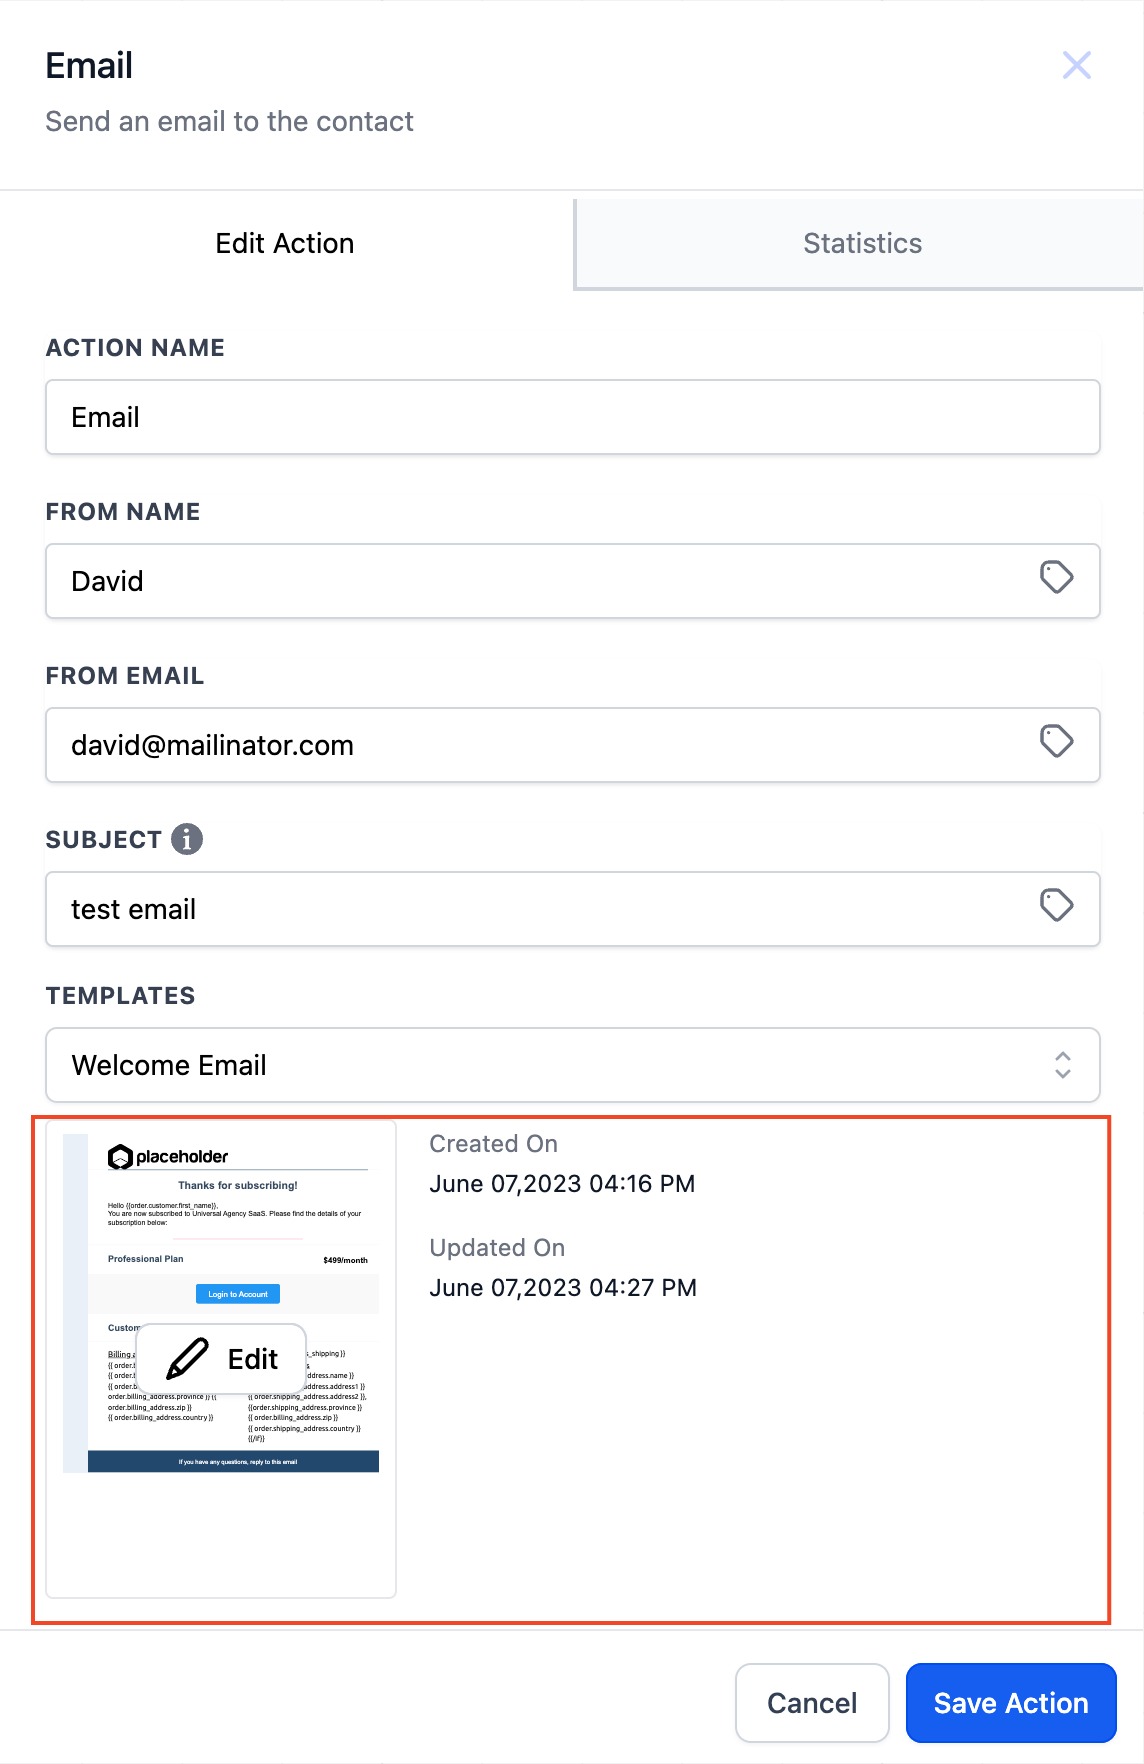
Edit the template without leaving the workflow. - Write the welcome message and personalize it with merge tags such as {{contact.name}} and {{contact.email}}, plus any custom fields linked to your form.
- Confirm the selected template is the one you meant to edit before you save.
- Save the action.
Part 03 of 06
Branch on what the client told you with If/Else.
Not every client needs the same next step. The If/Else action reads a field on the contact, such as the service they chose on the form, and sends them down the matching branch. The None branch catches everyone else, so nobody falls through.
- Click the + icon under the Send Email action.
- Select If / Else from the action list.
- Choose Build My Own to write the condition yourself.
- Select the field you want to evaluate, such as the custom field from your onboarding form.
- Choose the operator and set the comparison value.
- Click Add Segment if you need a second condition, and use AND / OR to control how they combine.
- Rename the None branch so your team knows it is the fallback, and add the fallback actions you want there.
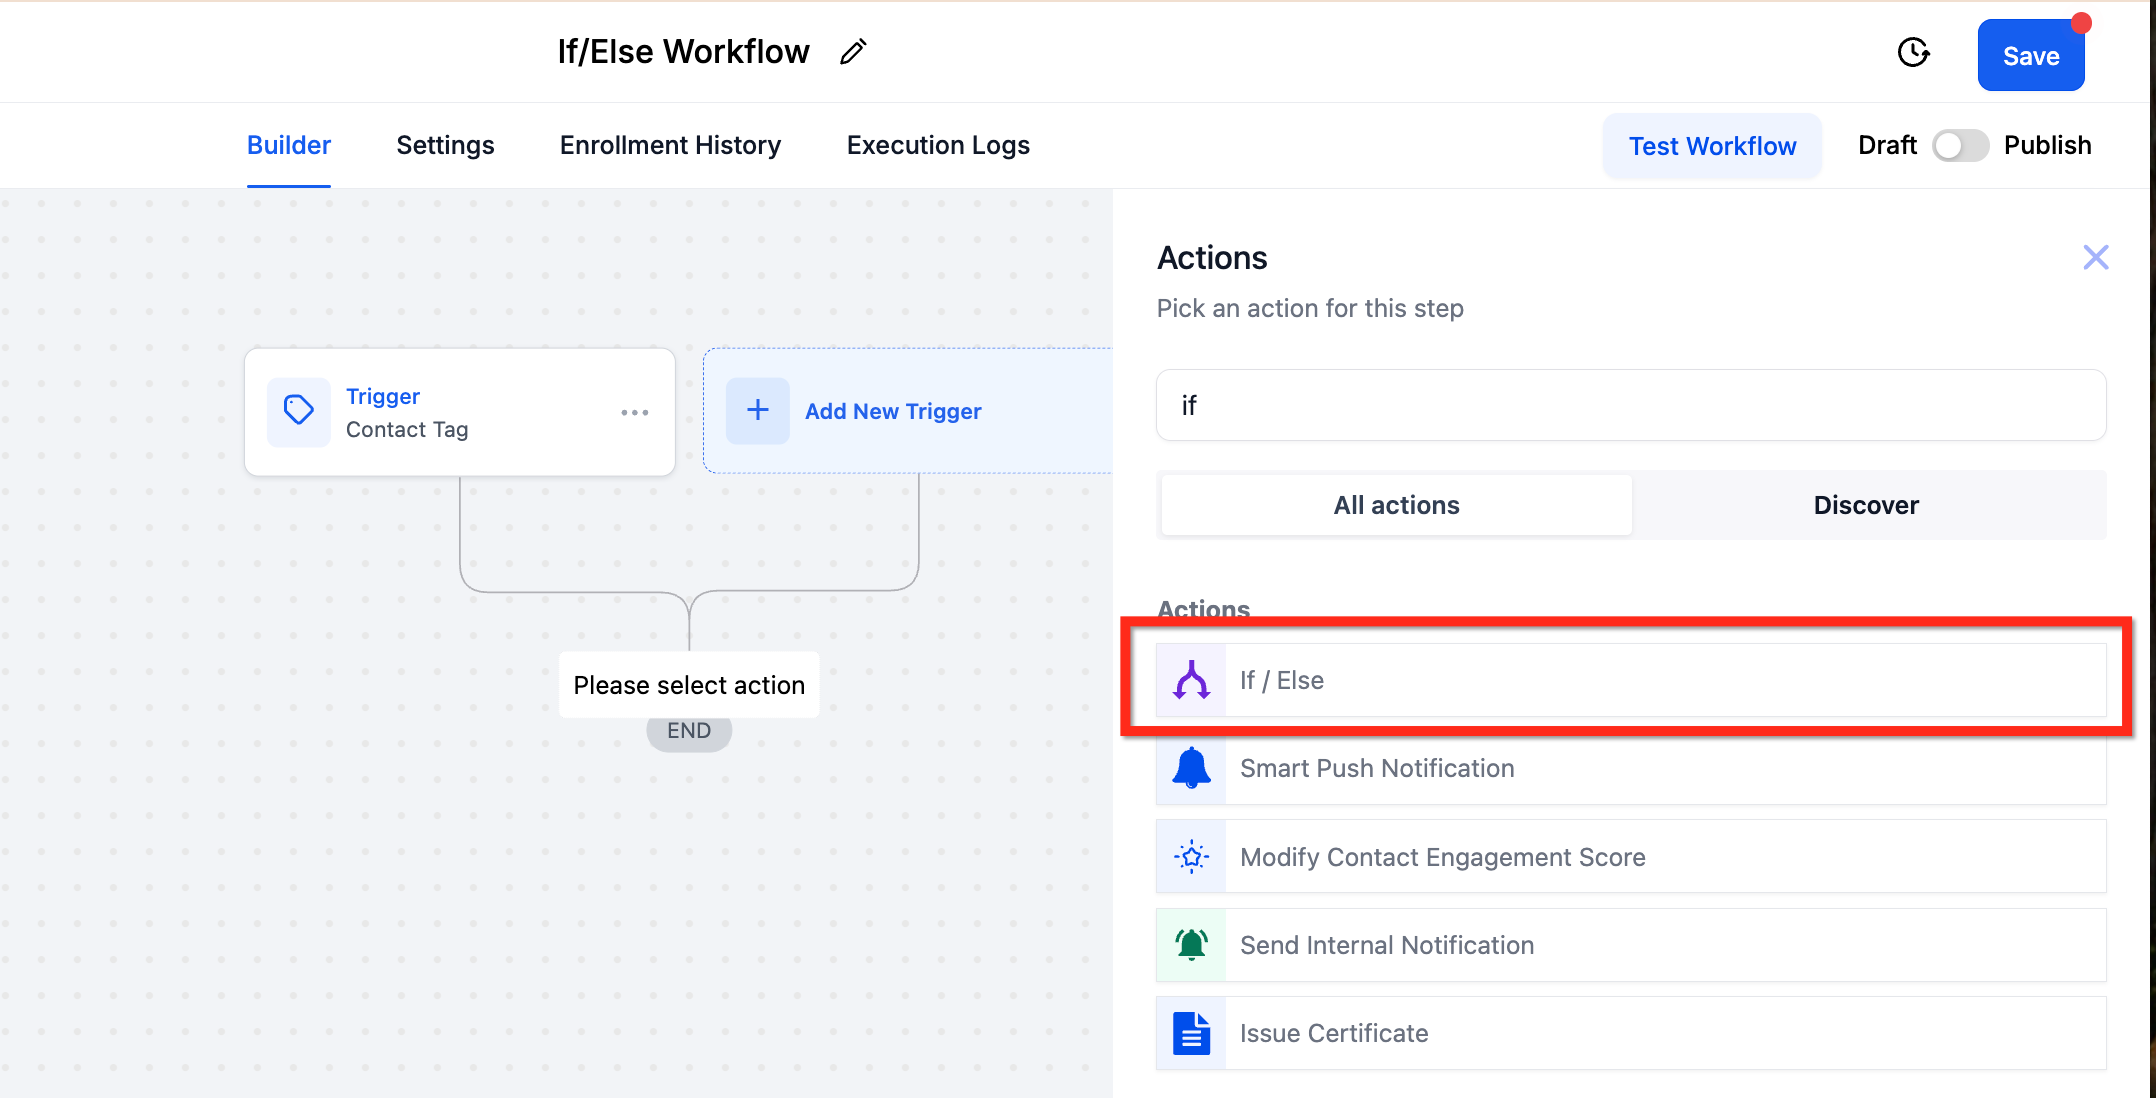
The None branch is created automatically and cannot be removed.
Part 04 of 06
Assign the client to the person who owns them.
A new client needs an owner on day one. The Assign To User action gives each contact a team member automatically. Pick one user for a single owner or several to split new clients between them.
- Click the + icon on the branch where the client should get an owner, or above the If/Else if every client gets one.
- Select Assign To User.
- Enter a descriptive Action Name.
- Use the dropdown to select one or more users.
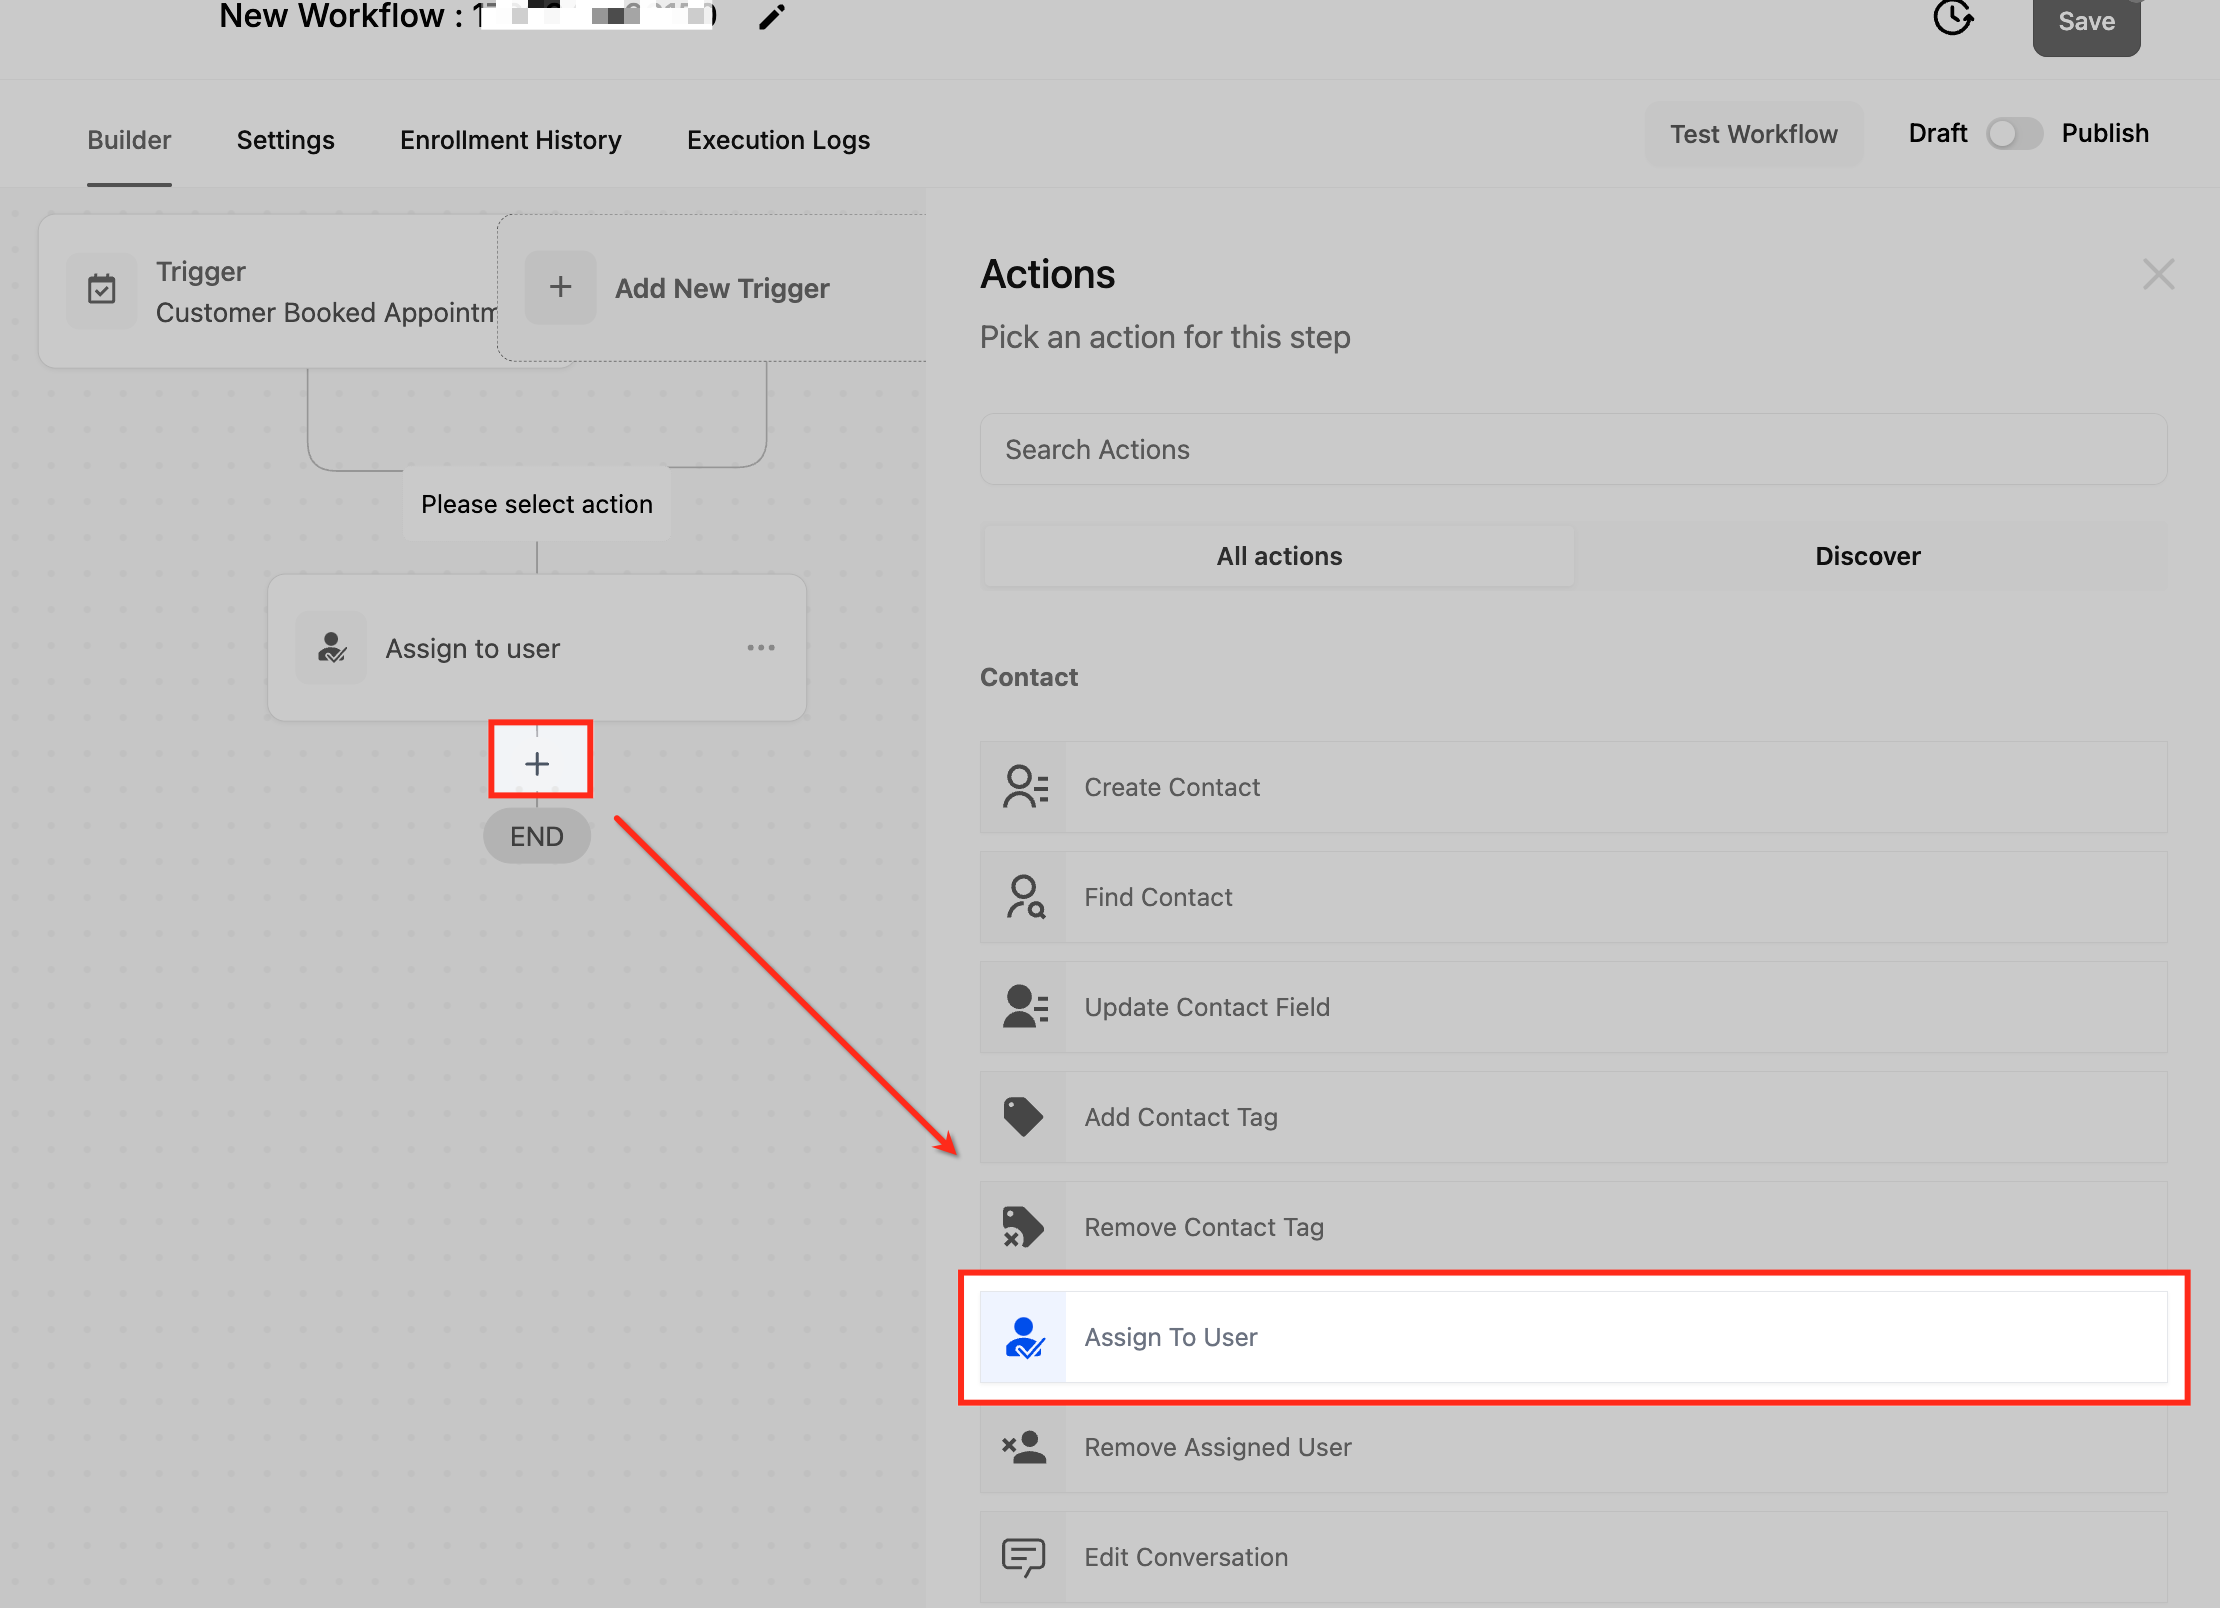
Pick the users and how to split new clients between them. - Set Split Traffic to Equally, or choose Unevenly and set the ratio for each user.
- Turn on Only Apply To Unassigned Contacts if you do not want the workflow to overwrite an owner the contact already has.
- Leave the user ID mode on Standard and save the action.
Part 05 of 06
Tell the team a new client just landed.
The client is welcomed and assigned. Now the team needs to know. The Send Internal Notification action pushes an alert by email, in app, SMS or WhatsApp to the users you choose, including the user who was just assigned.
- Click the + button under the Assign To User action.
- Scroll down and select Send Internal Notification.
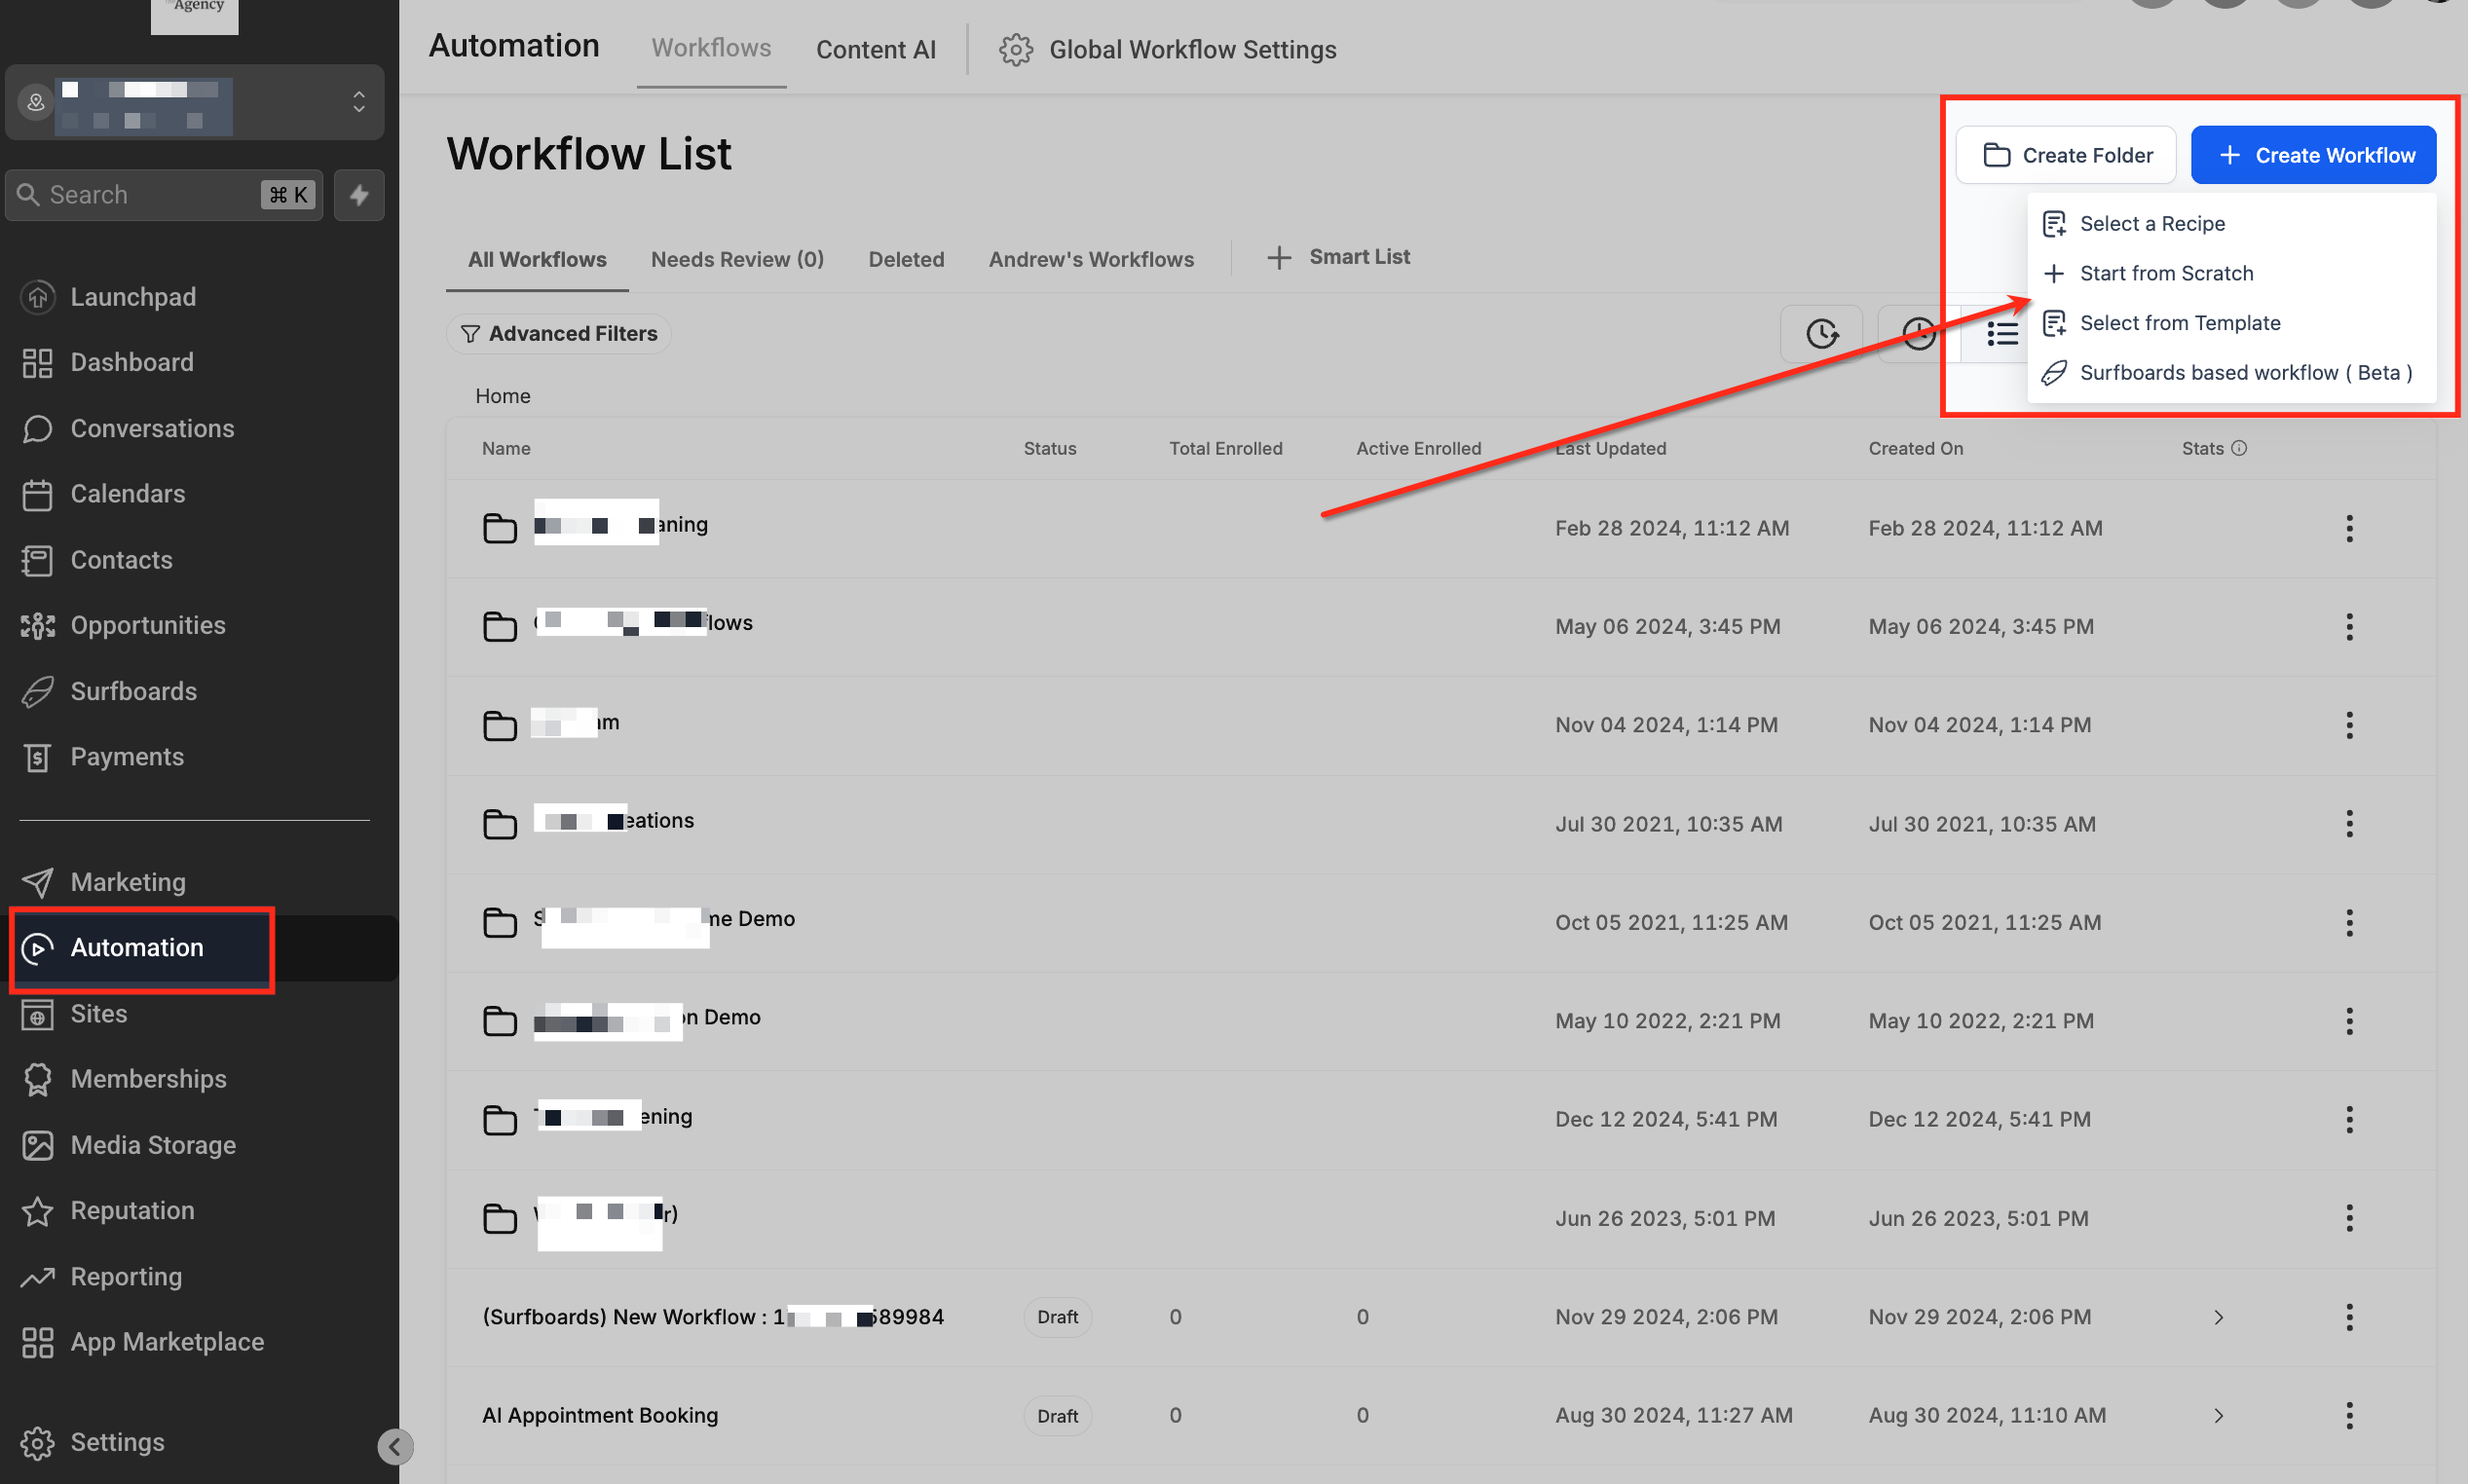
Match the channel to how fast the team needs to act. - Enter a clear Action Name.
- Choose the Notification Type: Email, In App, SMS or WhatsApp.
- Set To User Type to the people who should get it, such as the assigned user, all admins or a team.
- Write the Message with dynamic tags so the alert names the client, and set the Subject or Title for the channel you picked.
- Save the action.
Part 06 of 06
Lock down the settings and publish.
Workflow settings are the master controls for this workflow. They decide whether a client can go through onboarding twice, when messages can go out, and who they come from. Set them before you publish.
- Inside the Workflow Builder, click the Settings tab at the top of the page.
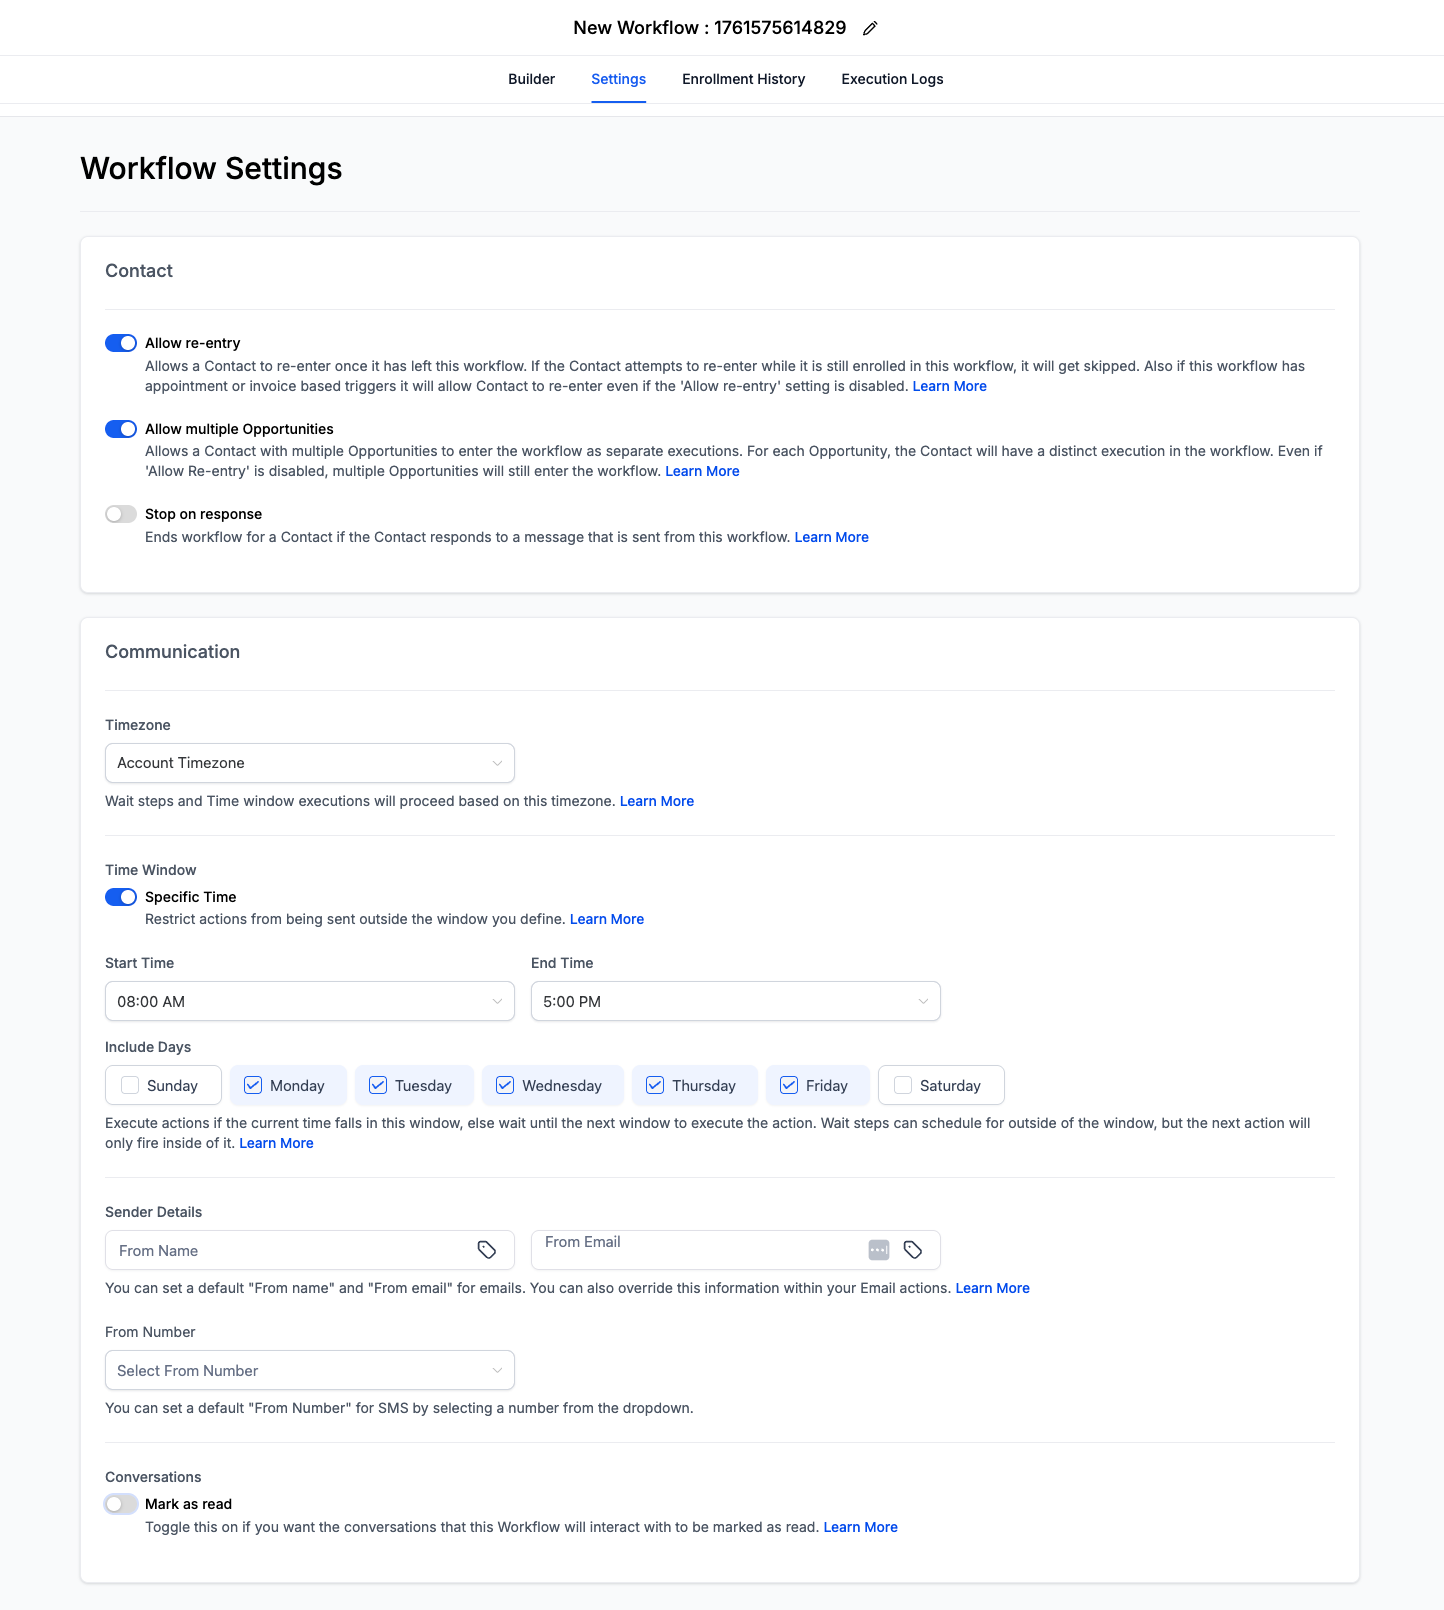
Settings apply to the whole workflow, not to single steps. - Turn Allow Reentry off so a client goes through onboarding only once.
- Decide on Stop on Response. Leave it off for onboarding, because a reply should not pull the client out before they are assigned.
- Set the Timezone to the account timezone or the contact timezone.
- Set a Time Window if you want the welcome email to go out only during business hours. Internal actions like assigning a user are not limited by it.
- Fill in Sender Details with the from name, email and phone you want on every message from this workflow.
- Go back to the builder and switch the Draft toggle to Publish once the test in the next section passes.
Test it
Test it before a real client hits it.
Run the built in test first, then run one real pass with your test contact.
- Click Test Workflow in the top right corner of the builder, select your test contact, and click Run Test. Every step should complete without an error.
- Add the onboarding tag to your test contact, or submit the onboarding form as that contact. The contact should appear in the workflow.
- Check the test contact's inbox. The welcome email should arrive with the merge tags filled in.
- Open the test contact's record. The owner field should show one of the users you selected in Assign To User.
- Check the channel you picked for the internal notification. The alert should name the client.
- Submit the form again with a different value in the branching field and confirm the contact goes down the other branch.
- Turn on the Stats View toggle in the builder to confirm the trigger enrolled the contact and each action ran.
When a step fails
When it does not work check these first.
Most onboarding workflow problems come down to an incomplete field or a user setting.
- Test Workflow fails or the workflow will not save
- Open every trigger and action and look for a required field left blank. The builder will not save until all required fields in triggers and actions are completed.
- The workflow shows the internal notification as executed but the user never got it
- Open the user's profile in Contacts, find DND in the left panel, toggle it off and back on, then retest the workflow.
- The SMS or WhatsApp notification fails
- Verify the recipient has a valid phone number for SMS or a connected WhatsApp integration. Change the notification type or the recipient if they do not.
- The If/Else condition sends every contact to the None branch
- Check that the field you are evaluating is actually filled in on the contact. Blank values are expected when the source data is missing, and a Select or Dropdown compared with a Dynamic Value needs the option ID, not the display name.
- Sender Details will not save
- Make sure the From Email is a complete, valid address and matches the selected dedicated domain, and check that no Send Email action is overriding the workflow setting.
- You changed a Wait step but contacts already waiting did not move
- Changing a Wait action does not affect contacts already waiting. Only new entries pick up the change.
Questions
What do people ask about onboarding workflows in GoHighLevel?
- Can one onboarding workflow start from both a tag and a form?
- Yes. Add both triggers to the same workflow. The Form Submitted trigger can also fire for multiple forms by adding more filters. You can build and test this during a 30 day GoHighLevel trial through Michael's link.
- What happens if the same client submits the onboarding form twice?
- The trigger activates each time the form is submitted. Turn off Allow Reentry in workflow settings, or add conditions in the workflow, so the client does not go through onboarding twice.
- Does the Time Window delay the Assign To User step?
- No. The Time Window affects communication actions like email, SMS and calls. Internal actions such as assigning a user, adding a tag or updating a field run regardless.
- What is the difference between round robin and Equally split traffic in Assign To User?
- Round robin rotates assignments one at a time among users. Equally split traffic makes sure each user receives an equal number of assignments over time.
- Is there a limit on internal notifications?
- Each user can receive up to 500 notifications per 5 minutes. Beyond that, extra messages are queued and delivered after the limit resets, or dropped if the conditions of the workflow expire.
- Why did onboarding restart when a tag was removed?
- Without a filter the Contact Tag trigger fires on both tag additions and removals. Filter it to the added event so a removed tag never restarts onboarding.
From the field
Michael’s take.

The first thing I would get right is the trigger filter. If you start from a tag, filter it to the tag added event. If you start from a form, point the Form Is filter at the exact form. Almost every onboarding workflow I have seen misfire was firing on the wrong event, not failing on an action.
Where people go wrong is skipping the Settings tab. They publish, a client fills in the form twice, and the client gets two welcome emails and two owners. Turn Allow Reentry off before you publish. Then test every notification channel once. A team member with no phone number on their profile will quietly miss every SMS alert, and the workflow will still report success.
This build pays off the day you stop being the person who welcomes every client by hand. A coaching business, an agency, a local service company, it does not matter. Once the welcome, the routing, the owner and the team alert happen on their own, you get the first hour back and the client gets a consistent experience every time.
Go deeper
The features behind this build.
Every feature this guide touches has its own page in the library, with the settings, limits and Michael’s notes.
- WorkflowsWorkflow Builder Walkthrough in HighLevel
- WorkflowsWorkflow Settings: Overview
- WorkflowsWorkflow Trigger: Contact Tag
- WorkflowsWorkflow Trigger: Form Submitted: Automates workflow actions
- WorkflowsUsing the If/Else workflow action in HighLevel
- WorkflowsUsing the Assign to User workflow action in HighLevel
- WorkflowsWorkflow Action: Internal Notification
- WorkflowsUsing the email template builder in HighLevel workflow send email action
Get the guide
Take it with you. The PDF is yours.
The whole build, cover to cover, as a PDF you can keep open on a second screen or print for the team. HighLevel's Founder page opens alongside it.
Next step
Ready to build it with the team behind you?
Start your HighLevel trial through Michael and the CRM Pros team comes with it. You get the account, the training and real people to answer questions while you build.
The how to library has step by step HighLevel builds for Conversation AI, Voice AI, funnels, calendars, workflows and AI Studio. Go back to the full list.
Back to the GuidesAll the step by step builds