
01Who this is for
- Founders who need precise timing for onboarding sequences, so new users receive messages at appropriate intervals.
- Small business owners running appointment based services, to send reminders before bookings or invoices.
- Marketers who rely on engagement triggers, such as waiting for a link click before moving contacts forward.
02Wait actions, explained
The Wait action is a workflow step that temporarily holds a contact. Instead of advancing right away, the system checks the selected wait condition and only resumes when it is satisfied. You can pause for a fixed length, until a specific date, on a recurring cadence, around an appointment, for a reply, for an action, for custom segment criteria, or for a team member’s reply.
All wait configurations live inside the workflow editor. After adding a Wait step, you choose the wait type and fill its fields. Optional advanced settings let you limit resumption to certain days, hours, or additional date filters. Time values can be entered directly or pulled from a custom variable, allowing each contact to have a unique delay.
The action also supports timeout branches. If the condition is not met within the timeout period, the workflow can follow a separate path, enabling escalations or alternative messaging.
03How businesses use the Wait action
- Service based business. Add a Wait step set to an upcoming appointment, then send a reminder 1 hour before the booked time. The workflow holds the contact until the defined period before the appointment, then triggers the reminder message.
- Ecommerce store. Insert a Wait for a set period of time of 10 minutes after an abandoned cart trigger, then send a follow up email. The delay gives shoppers time before the reminder is delivered.
- Membership site. Configure a recurring schedule Wait for the first day of each month at 9 AM, and attach a monthly summary email. The workflow automatically releases each member on the same calendar day each month.
04The numbers and rules that matter
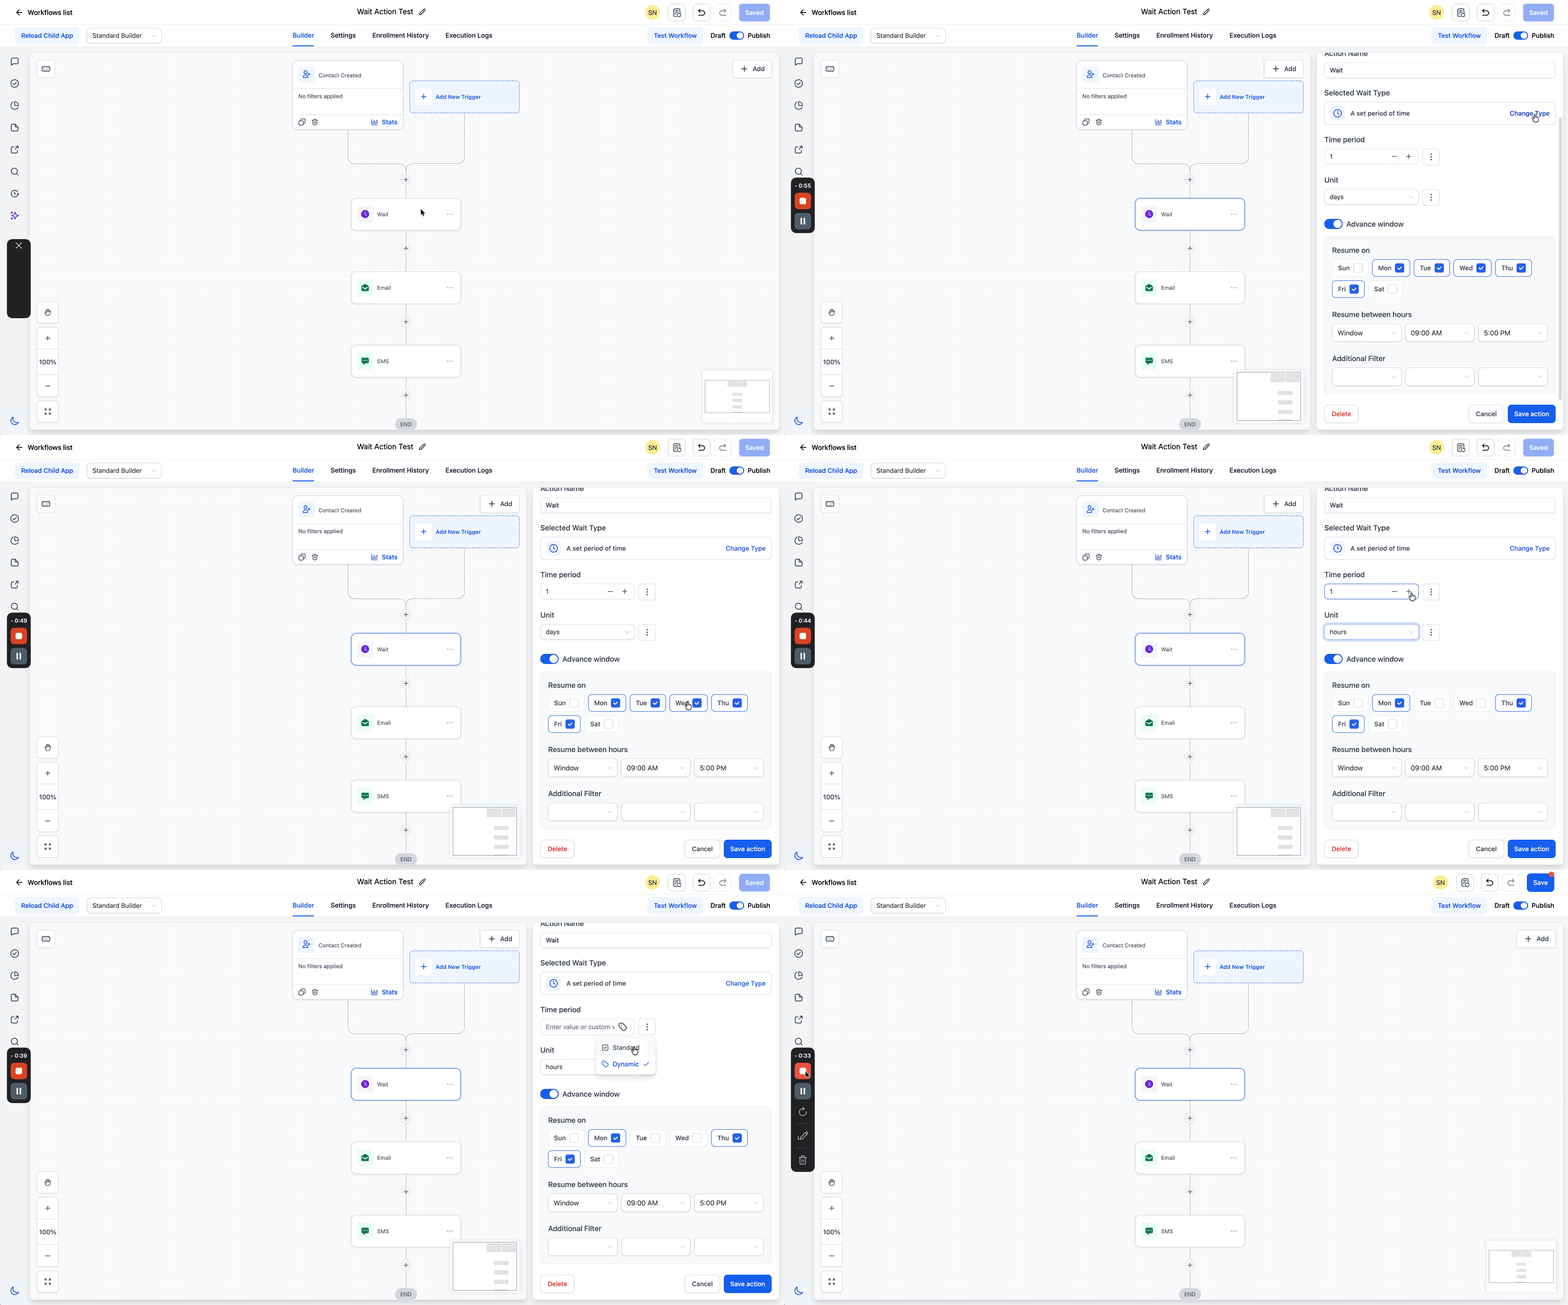
- Advance Window can limit resume days, hours and add granular date filters.
05Before you start
- If you plan to wait for a contact reply, ensure a Send Email or SMS action precedes the Wait step.
06How to set up and use the Wait action in HighLevel
Set up a Wait action
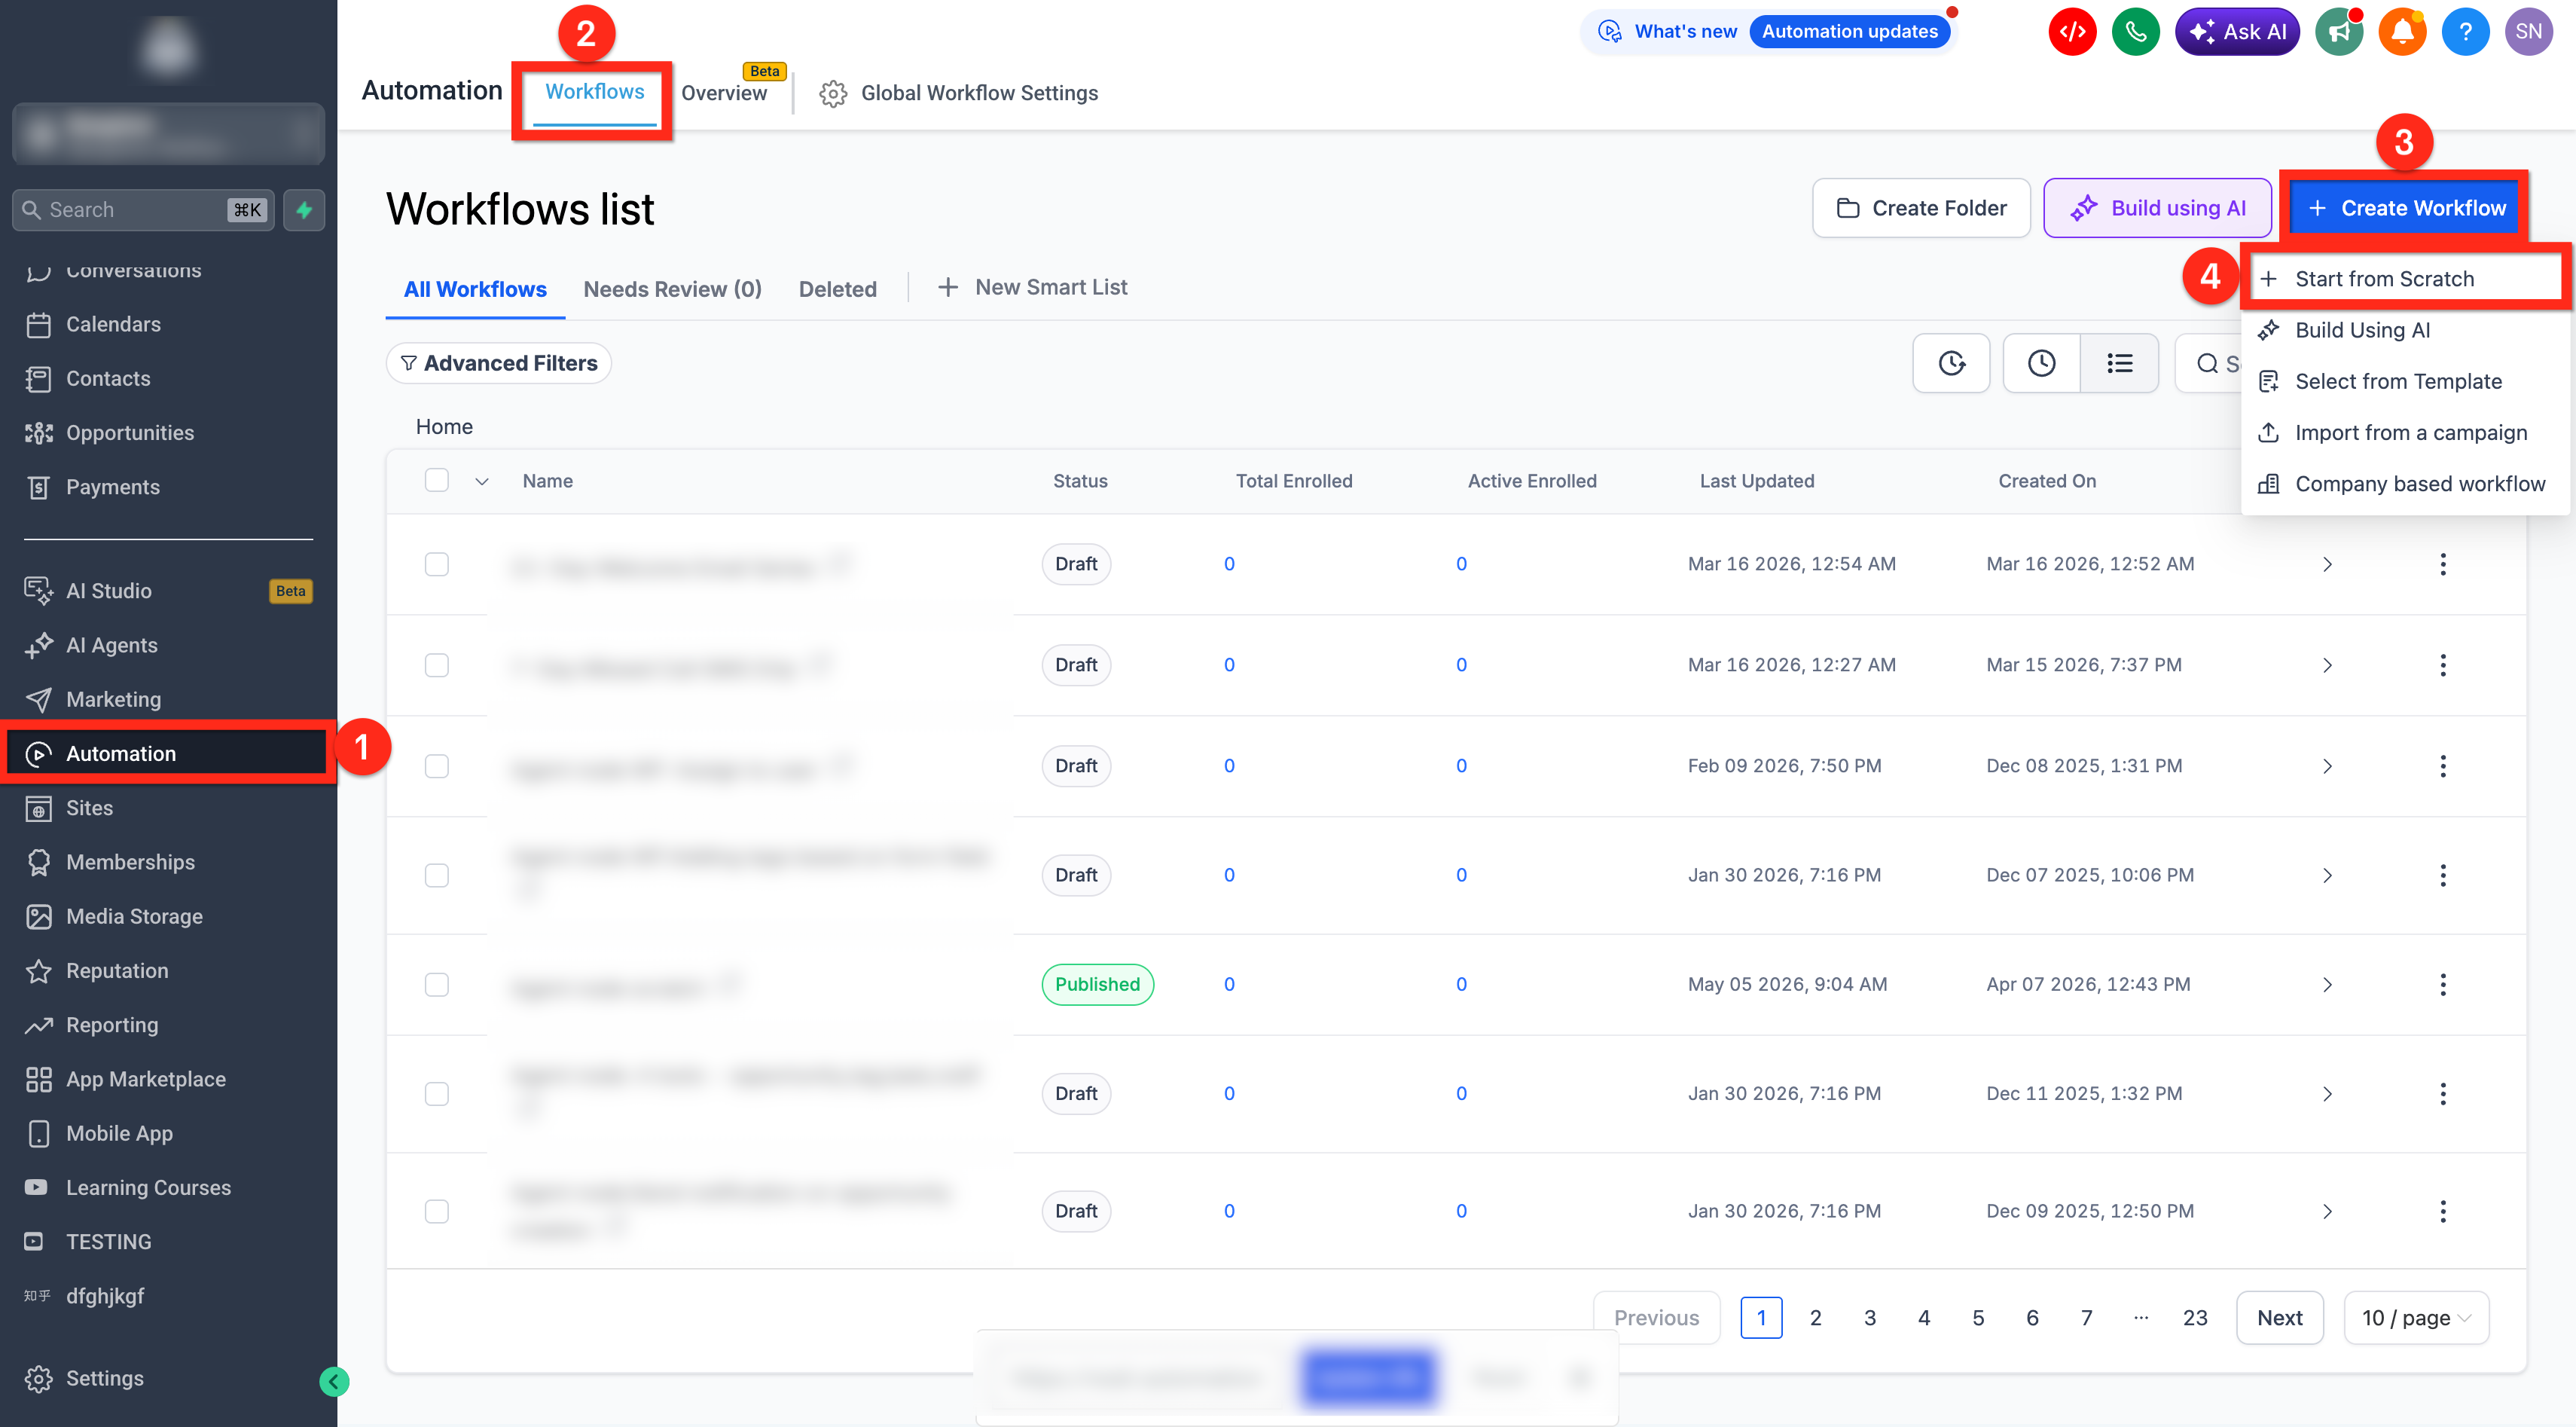
- Open Automation from the left navigation.
- Select Workflows.
- Click the + Create Workflow button in the top right corner.
- Choose + Start from scratch.
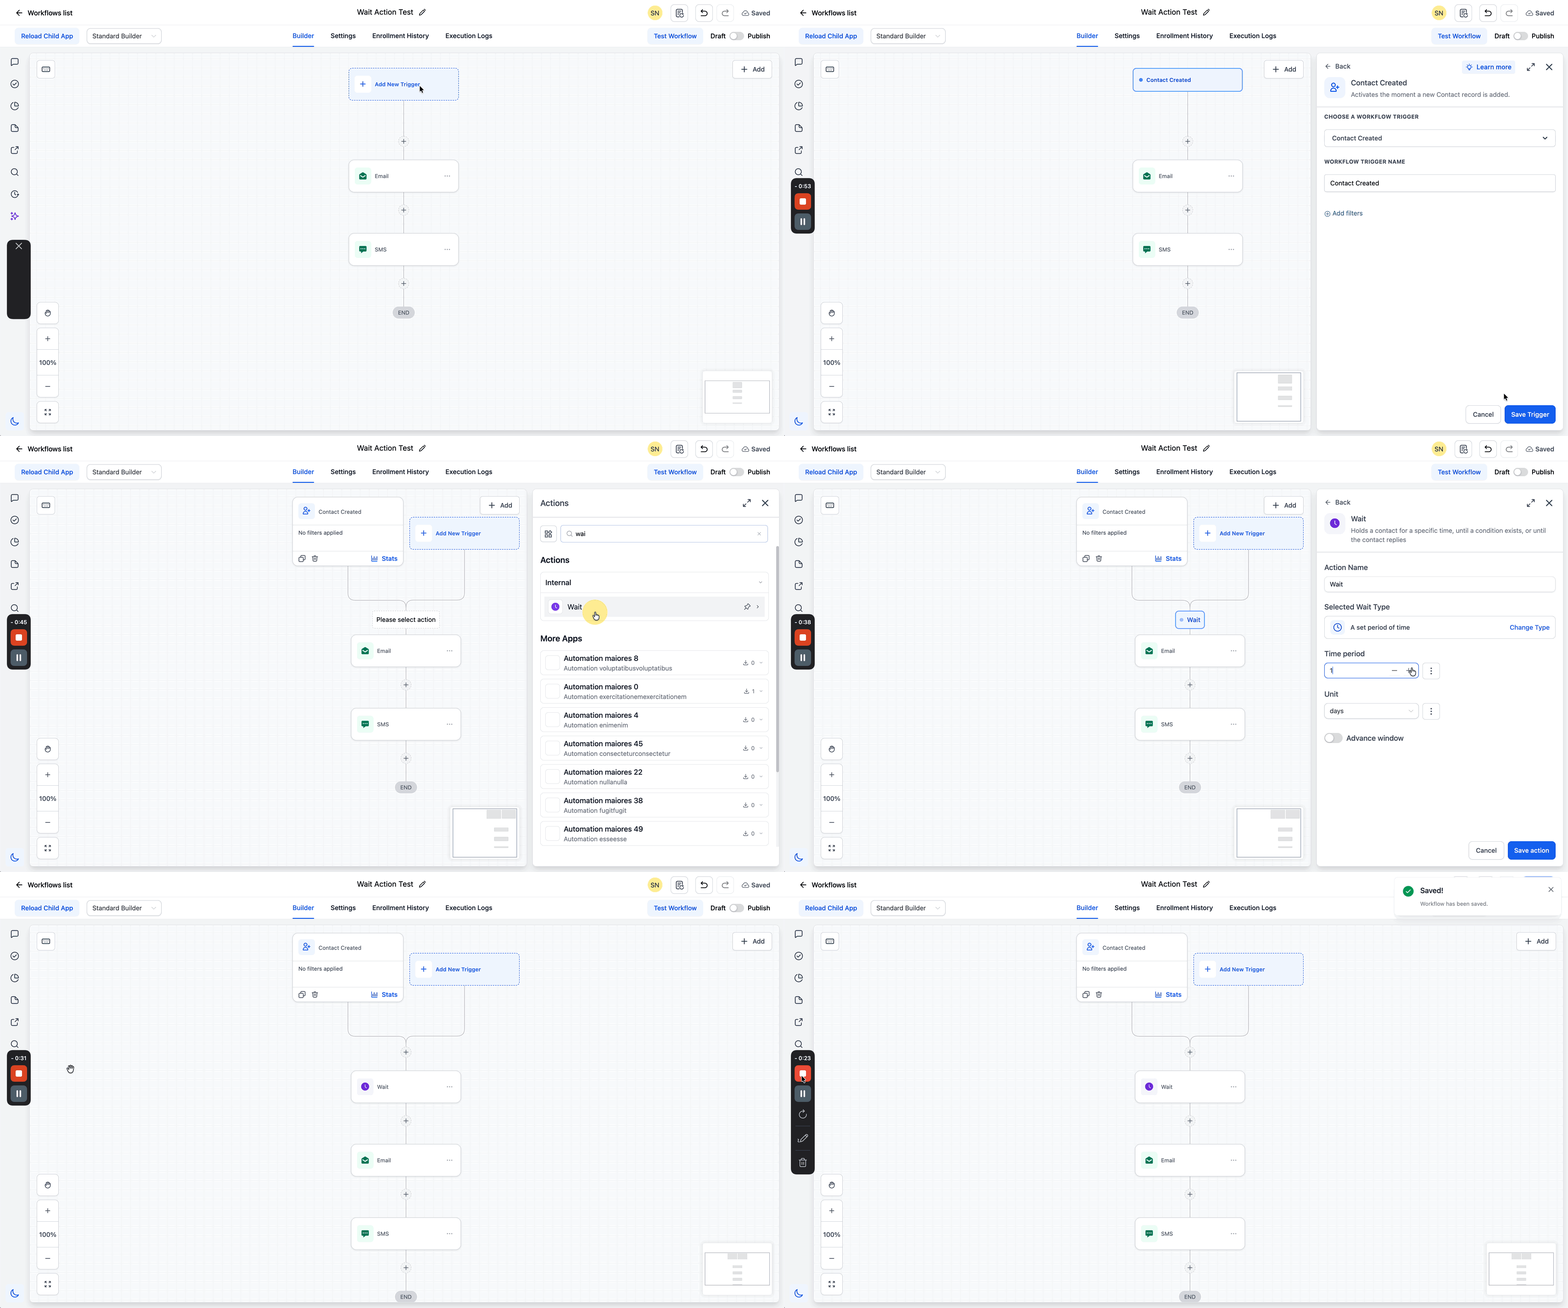
- Add a trigger, such as Contact created.
- Press the + icon to add a new workflow step.
- From the actions menu, scroll down or search for Wait.
- Enter a descriptive label for the step, for example Wait, 1 Day After Sign Up.
- Select the wait type that matches the intended pause.
- Provide the required values for the chosen wait configuration.
- If the Wait follows a Send action, note that the contact to reply option moves to the top of the list.
- If the workflow trigger is appointment based, an info banner will appear for the upcoming appointment or booking option.
- Save the step and publish the workflow.
07What it looks like in HighLevel
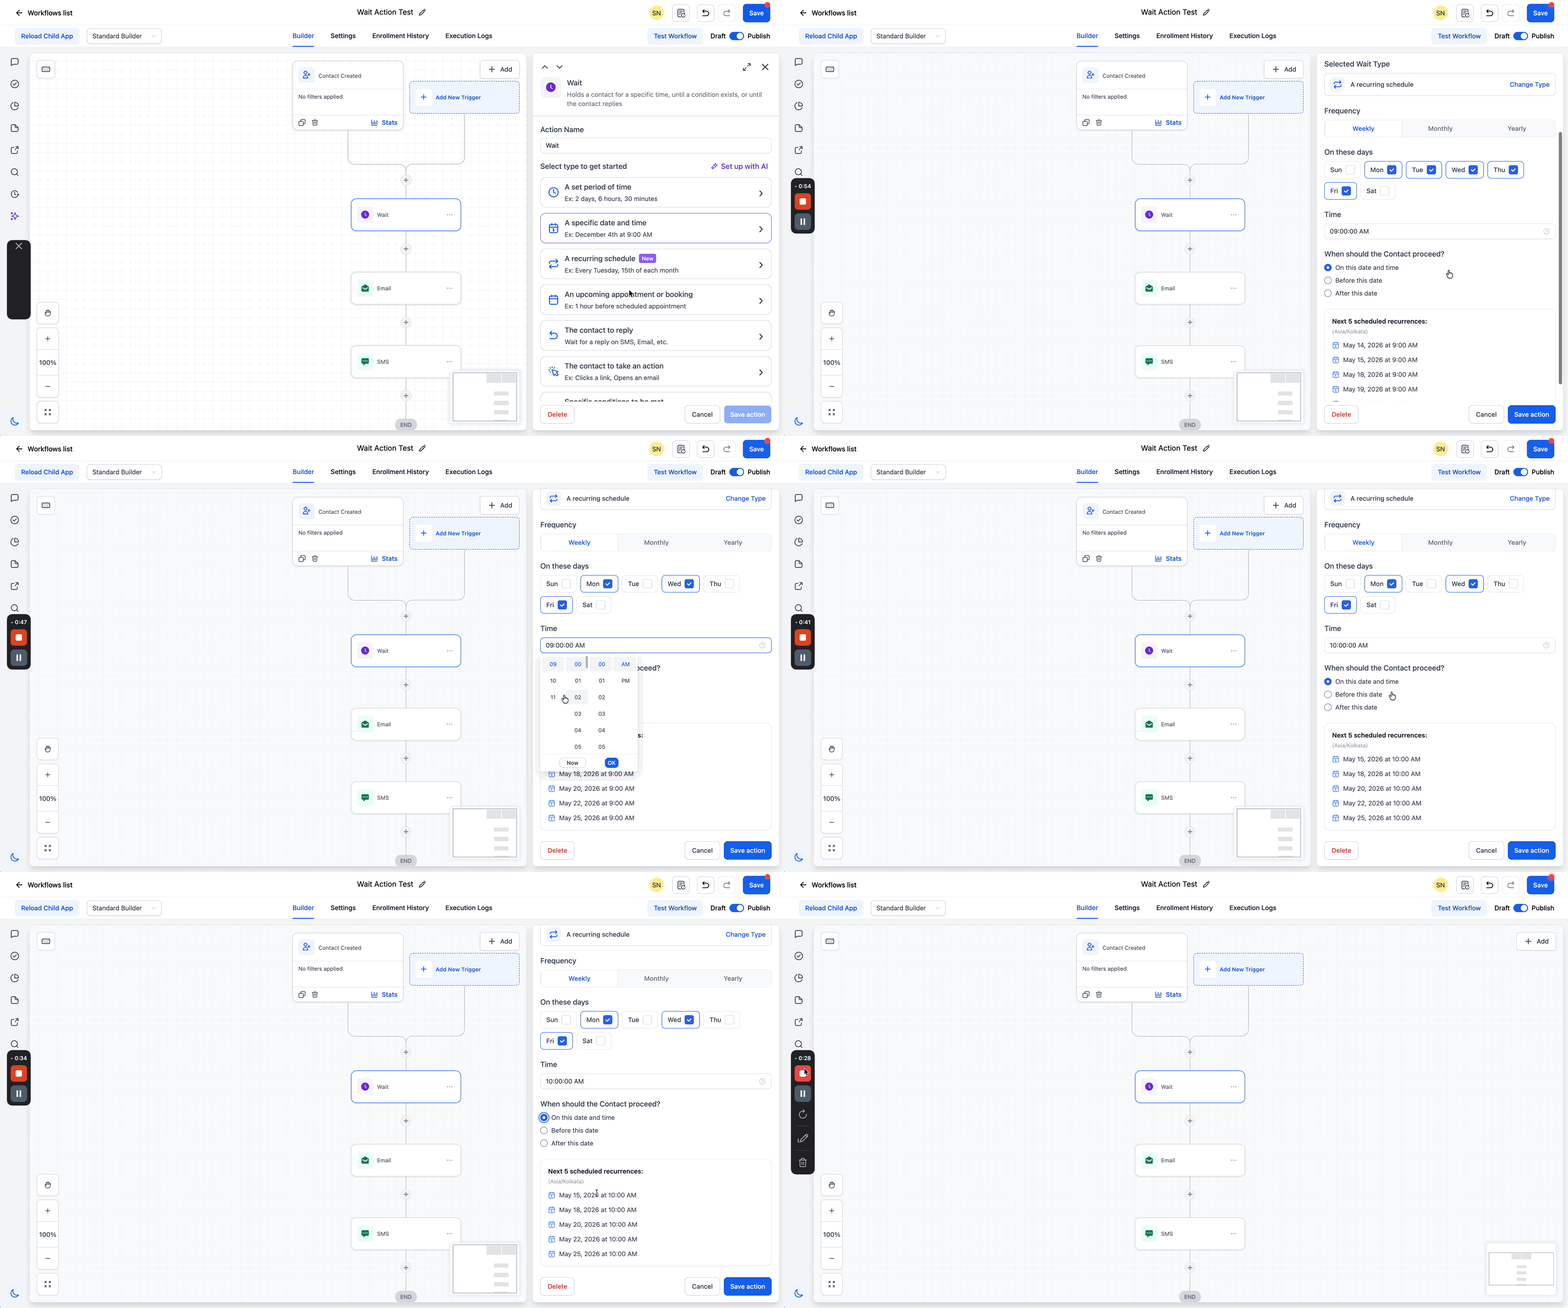
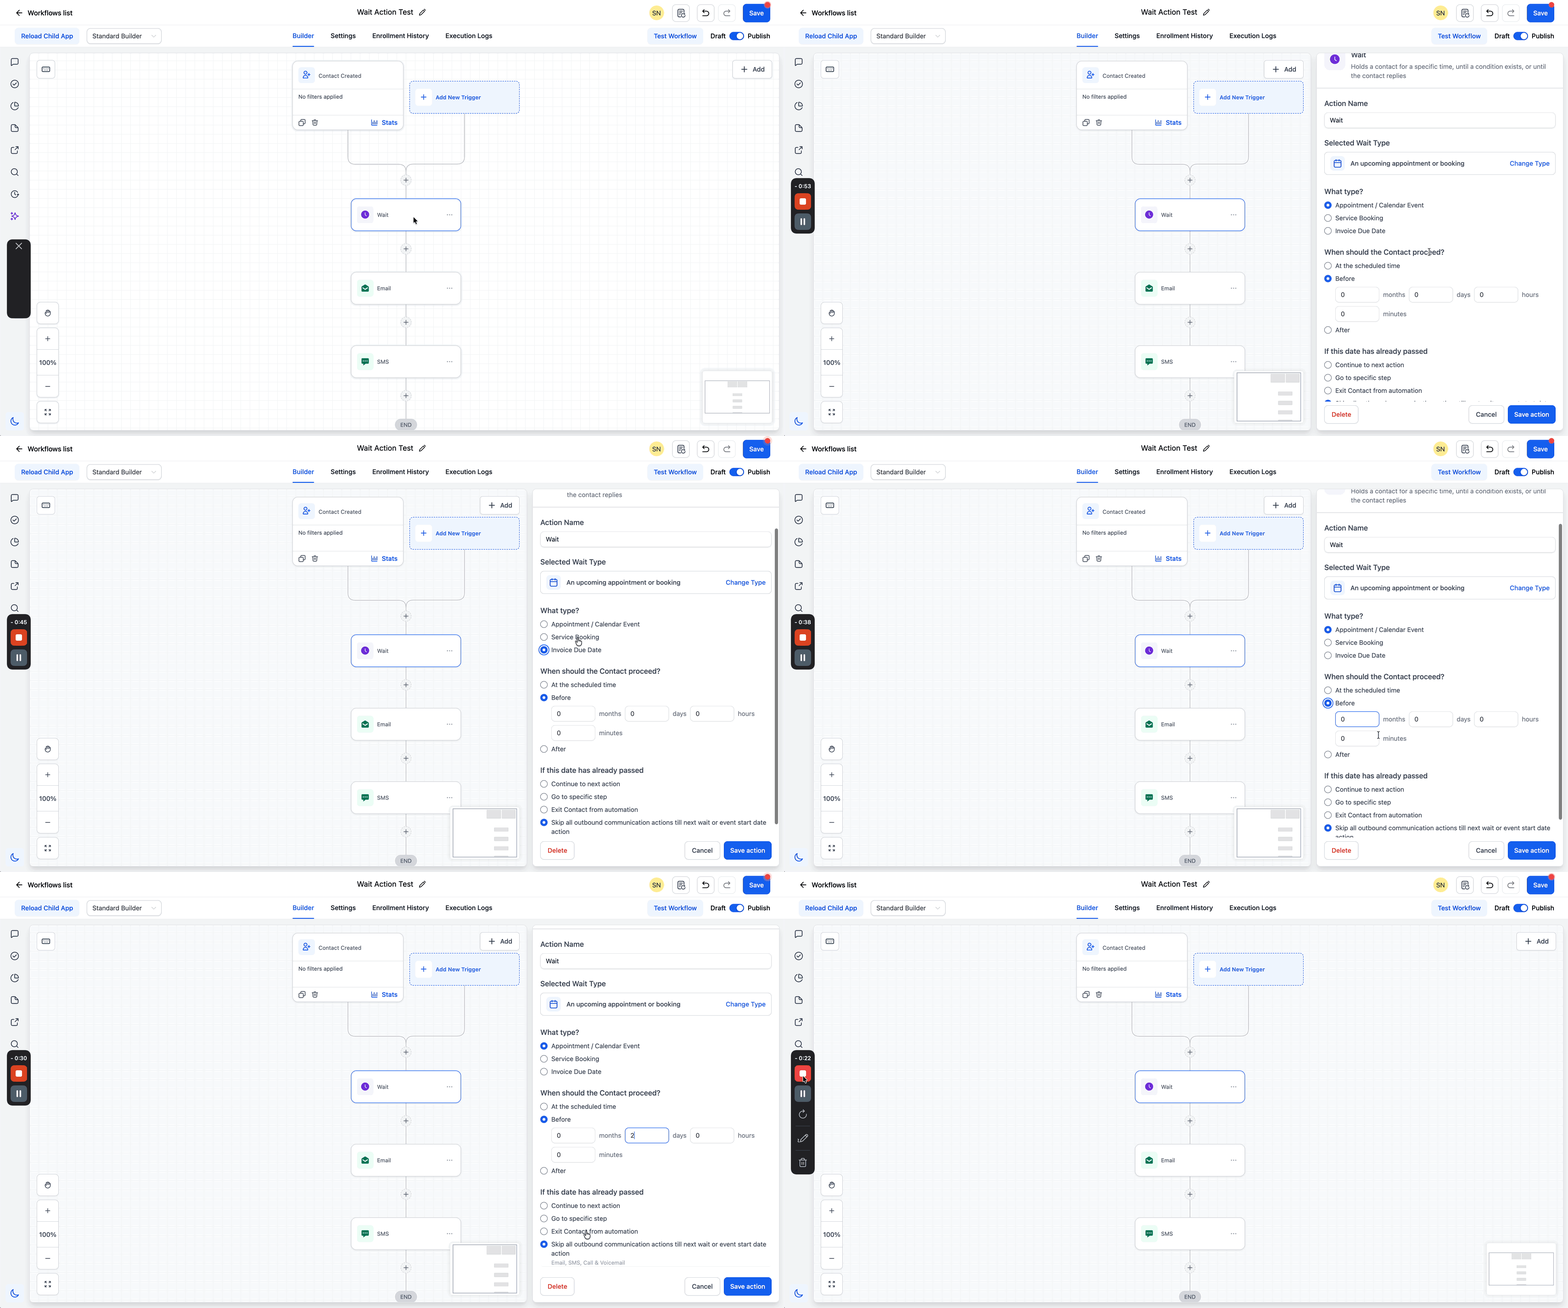
08Settings that matter
- A set period of time. Defines a fixed delay using seconds, minutes, hours or days; can use a static number or a dynamic variable, optionally limited by an advance window.
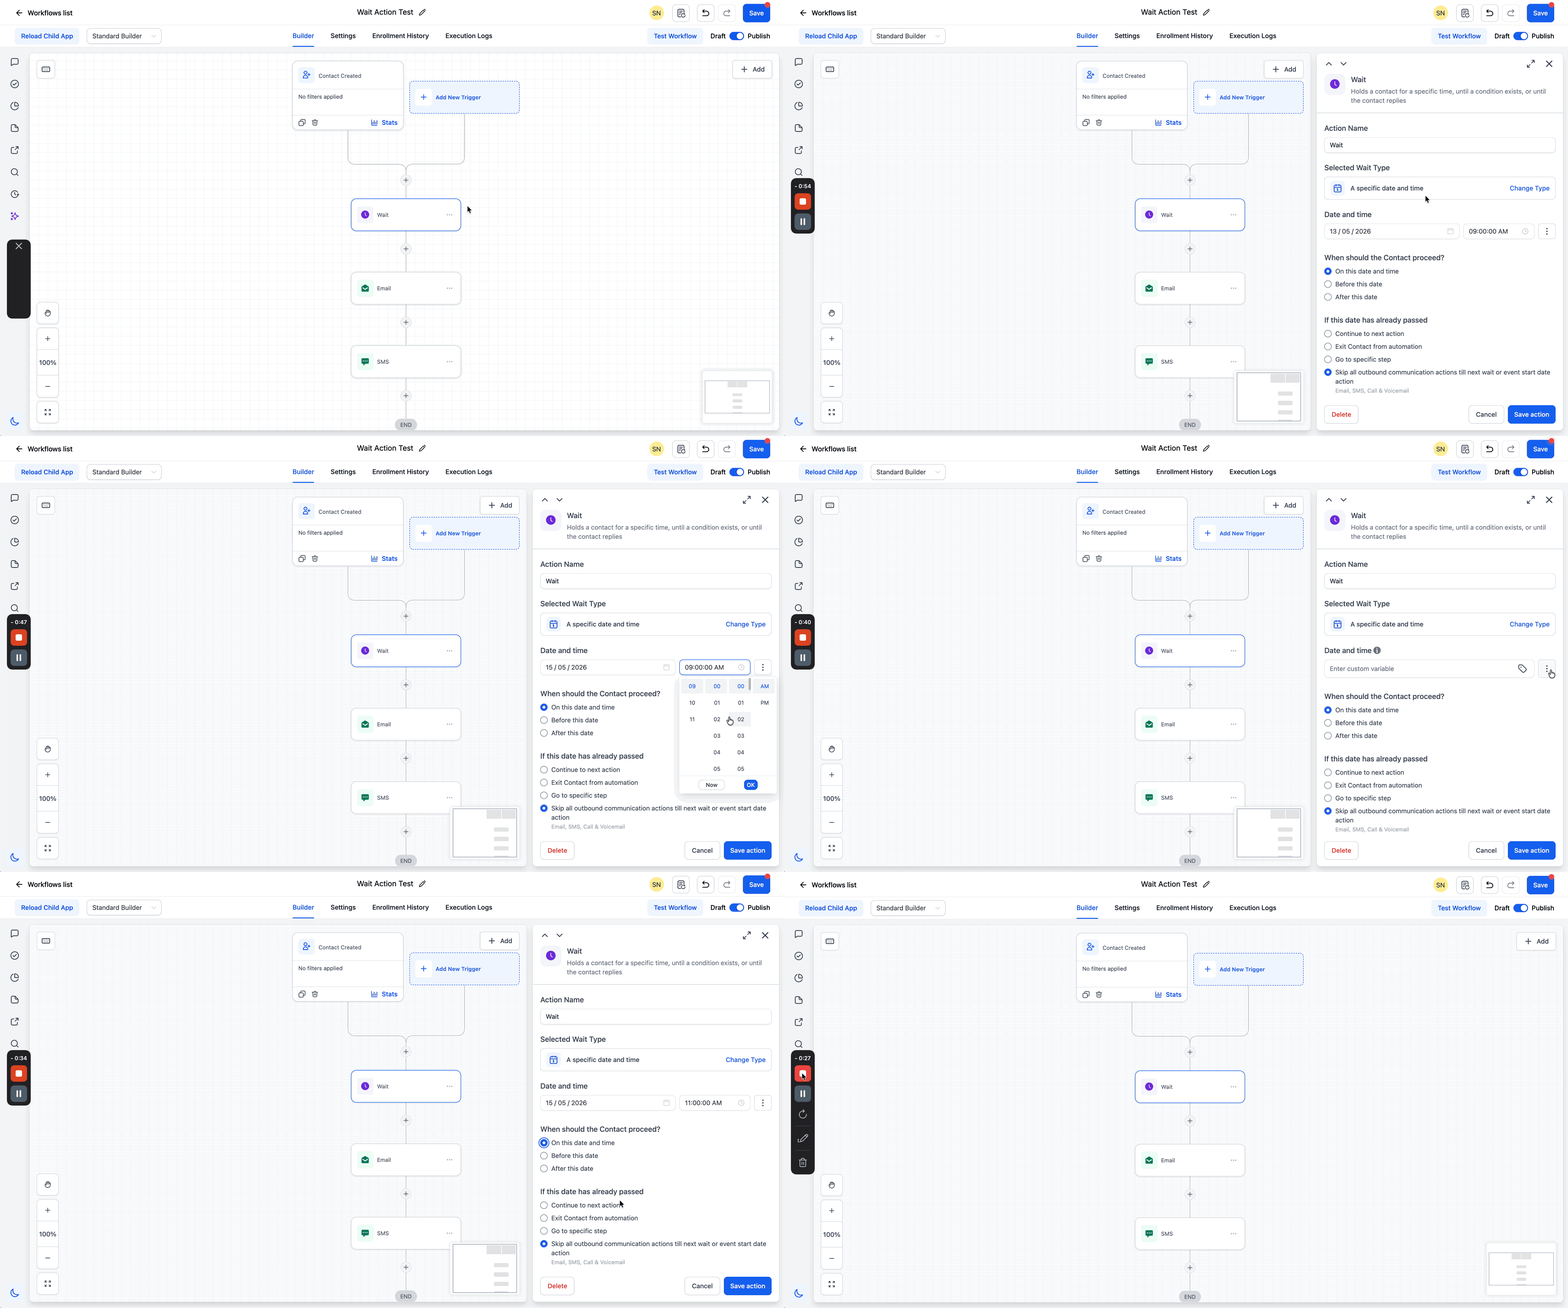
- A specific date and time. Pauses until an exact date and time, with options to trigger before, after, or exactly on that moment; the date may be static or supplied by a variable.
- A recurring schedule. Holds the contact until the next occurrence of a weekly, monthly or yearly pattern, with selectable days, months and times, and a preview of upcoming recurrences.
- An upcoming appointment or booking. Waits relative to an appointment, service booking or invoice due date, allowing selection of before, at or after the event and handling of past dates.
- The contact to reply. Keeps the contact in the workflow until they respond on a chosen channel; a timeout can be enabled to move forward after a set period.
- The contact to take an action. Waits for a specific engagement such as a trigger link click or an email event (open, click, bounce); a timeout may be added.
- Specific conditions to be met. Uses custom segments built from fields and logic; the contact proceeds when any segment evaluates true, with optional timeout handling.
- A user to reply. Pauses until a team member replies on a selected channel, optionally filtered by assigned user or specific users, and can include a timeout.
09Things to know before you rely on it
- Timeout options are optional; if disabled the workflow waits indefinitely for the condition.
- Dynamic values accept a custom variable that resolves at runtime; standard values are fixed.
- The Service Booking option is hidden when Service Booking is disabled for the location.
- Advance Window settings are optional and only restrict when contacts can resume based on days, hours or additional filters.
- The wait resolves when a user’s reply is delivered, not when it is sent.
10How it connects to the rest of HighLevel
- Learn the basics of building a workflow, including triggers and actions. Workflow basics
- Step by step guide to creating triggers, filters and actions in HighLevel. Workflow creation guide
- View all workflow features and see how the Wait action fits with other automation tools. All Workflows features
Michael's take

The Wait action is a small convenience that can feel like a real shift in how your automation behaves. By pausing contacts until the right moment, you avoid sending messages at odd hours or before a prospect is ready, which makes the whole flow feel more human.
A coaching business that runs weekly webinars benefits from the recurring schedule option. You can set a wait that releases contacts every Monday morning with the link to the next session, keeping the audience engaged without building a new workflow each week.