
01Who this is for
- Agency owners who host client sites and need to shift domain ownership to a client controlled Cloudflare account.
- Founders managing multiple brands who want to consolidate domains under a single Cloudflare organisation.
- Marketing teams that delegate DNS control to a separate Cloudflare account for specialized routing.
02Domain transfer out to Cloudflare, explained
This function moves an eligible domain from a HighLevel subaccount to another Cloudflare account. The registrar stays with Cloudflare, so no EPP code is needed. The transfer is initiated from the domain’s settings in HighLevel and completed by accepting the move in the destination Cloudflare account.
The workflow lives under Settings > Domains & URL Redirects for each subaccount. Advanced Settings > Configuration contains the Transfer to Another Registrar option, which actually triggers the Cloudflare to Cloudflare account move. After acceptance, the domain disappears from HighLevel and renewal shifts to Cloudflare.
03How businesses use domain transfer out to Cloudflare
- Digital agency. The agency adds a client’s domain to the client’s Cloudflare account, prepares the DNS records, then starts the transfer from HighLevel. The client accepts the move in Cloudflare, giving them full ownership and billing control.
- Ecommerce brand manager. The manager consolidates several brand domains into a central Cloudflare account. After setting up the destination account’s DNS, they initiate the transfer for each domain in HighLevel and accept the pending moves in Cloudflare.
- SaaS Founder. The Founder delegates DNS management to a technical partner by moving the product’s domain to the partner’s Cloudflare account. The Founder starts the transfer in HighLevel and the partner confirms it within Cloudflare.
04The numbers and rules that matter
- Domain is not restricted by the 60 day ICANN transfer lock.
05Before you start
- The domain must have been purchased through HighLevel.
- The destination Cloudflare account must already have the domain added and a plan selected (Free is supported).
- Required DNS records must exist in the destination zone.
- Proxying must be turned off for all DNS records in the destination account.
- DNSSEC must be disabled in the destination account.
- The domain must not be under the 60 day ICANN transfer lock.
- No other pending Cloudflare account move may exist for the domain.
06How to set up and use domain transfer out to Cloudflare in HighLevel
Prepare the destination Cloudflare account
- Sign in to the destination Cloudflare account.
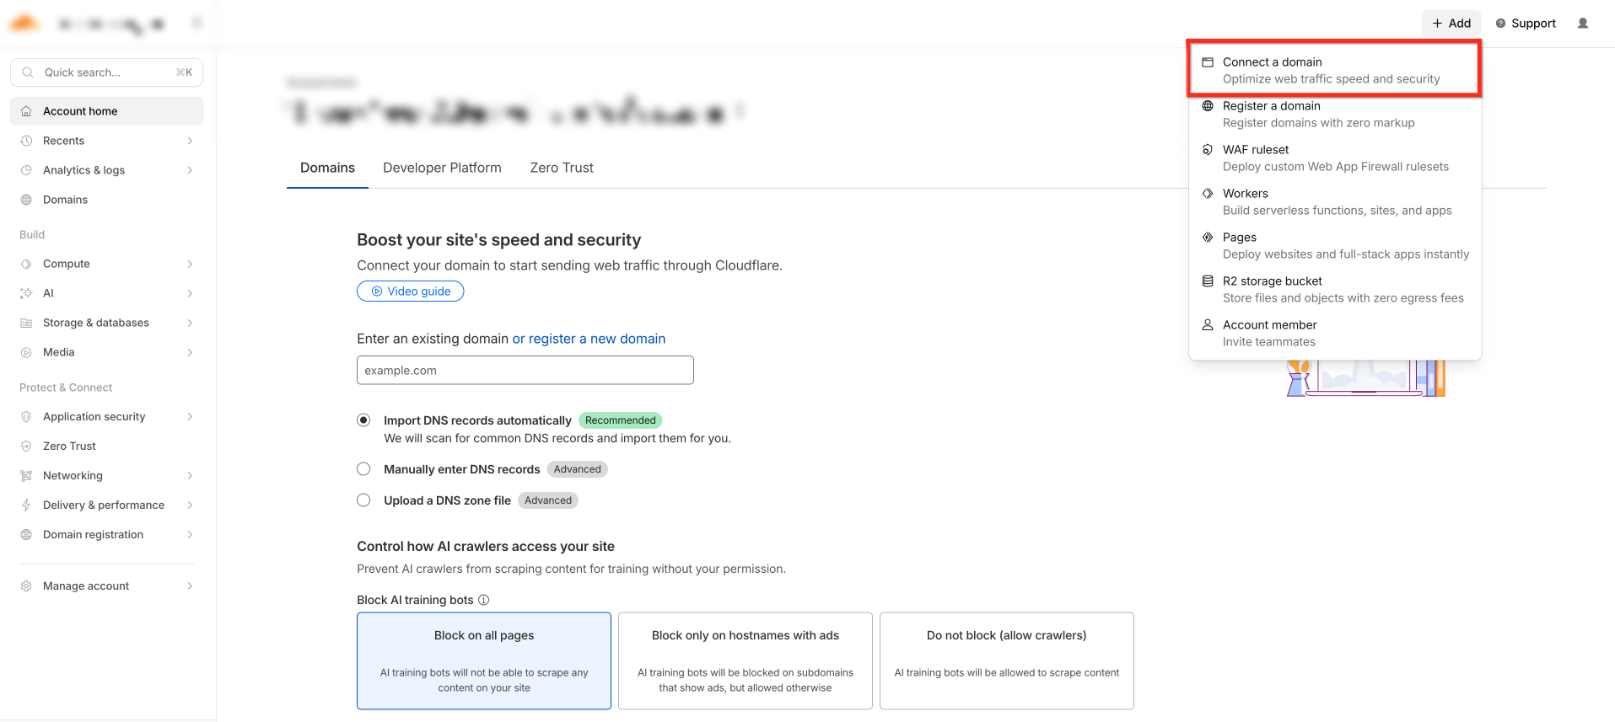
- Select + Add > Connect a domain and add the domain.
- Choose a Cloudflare plan; the Free plan is supported.
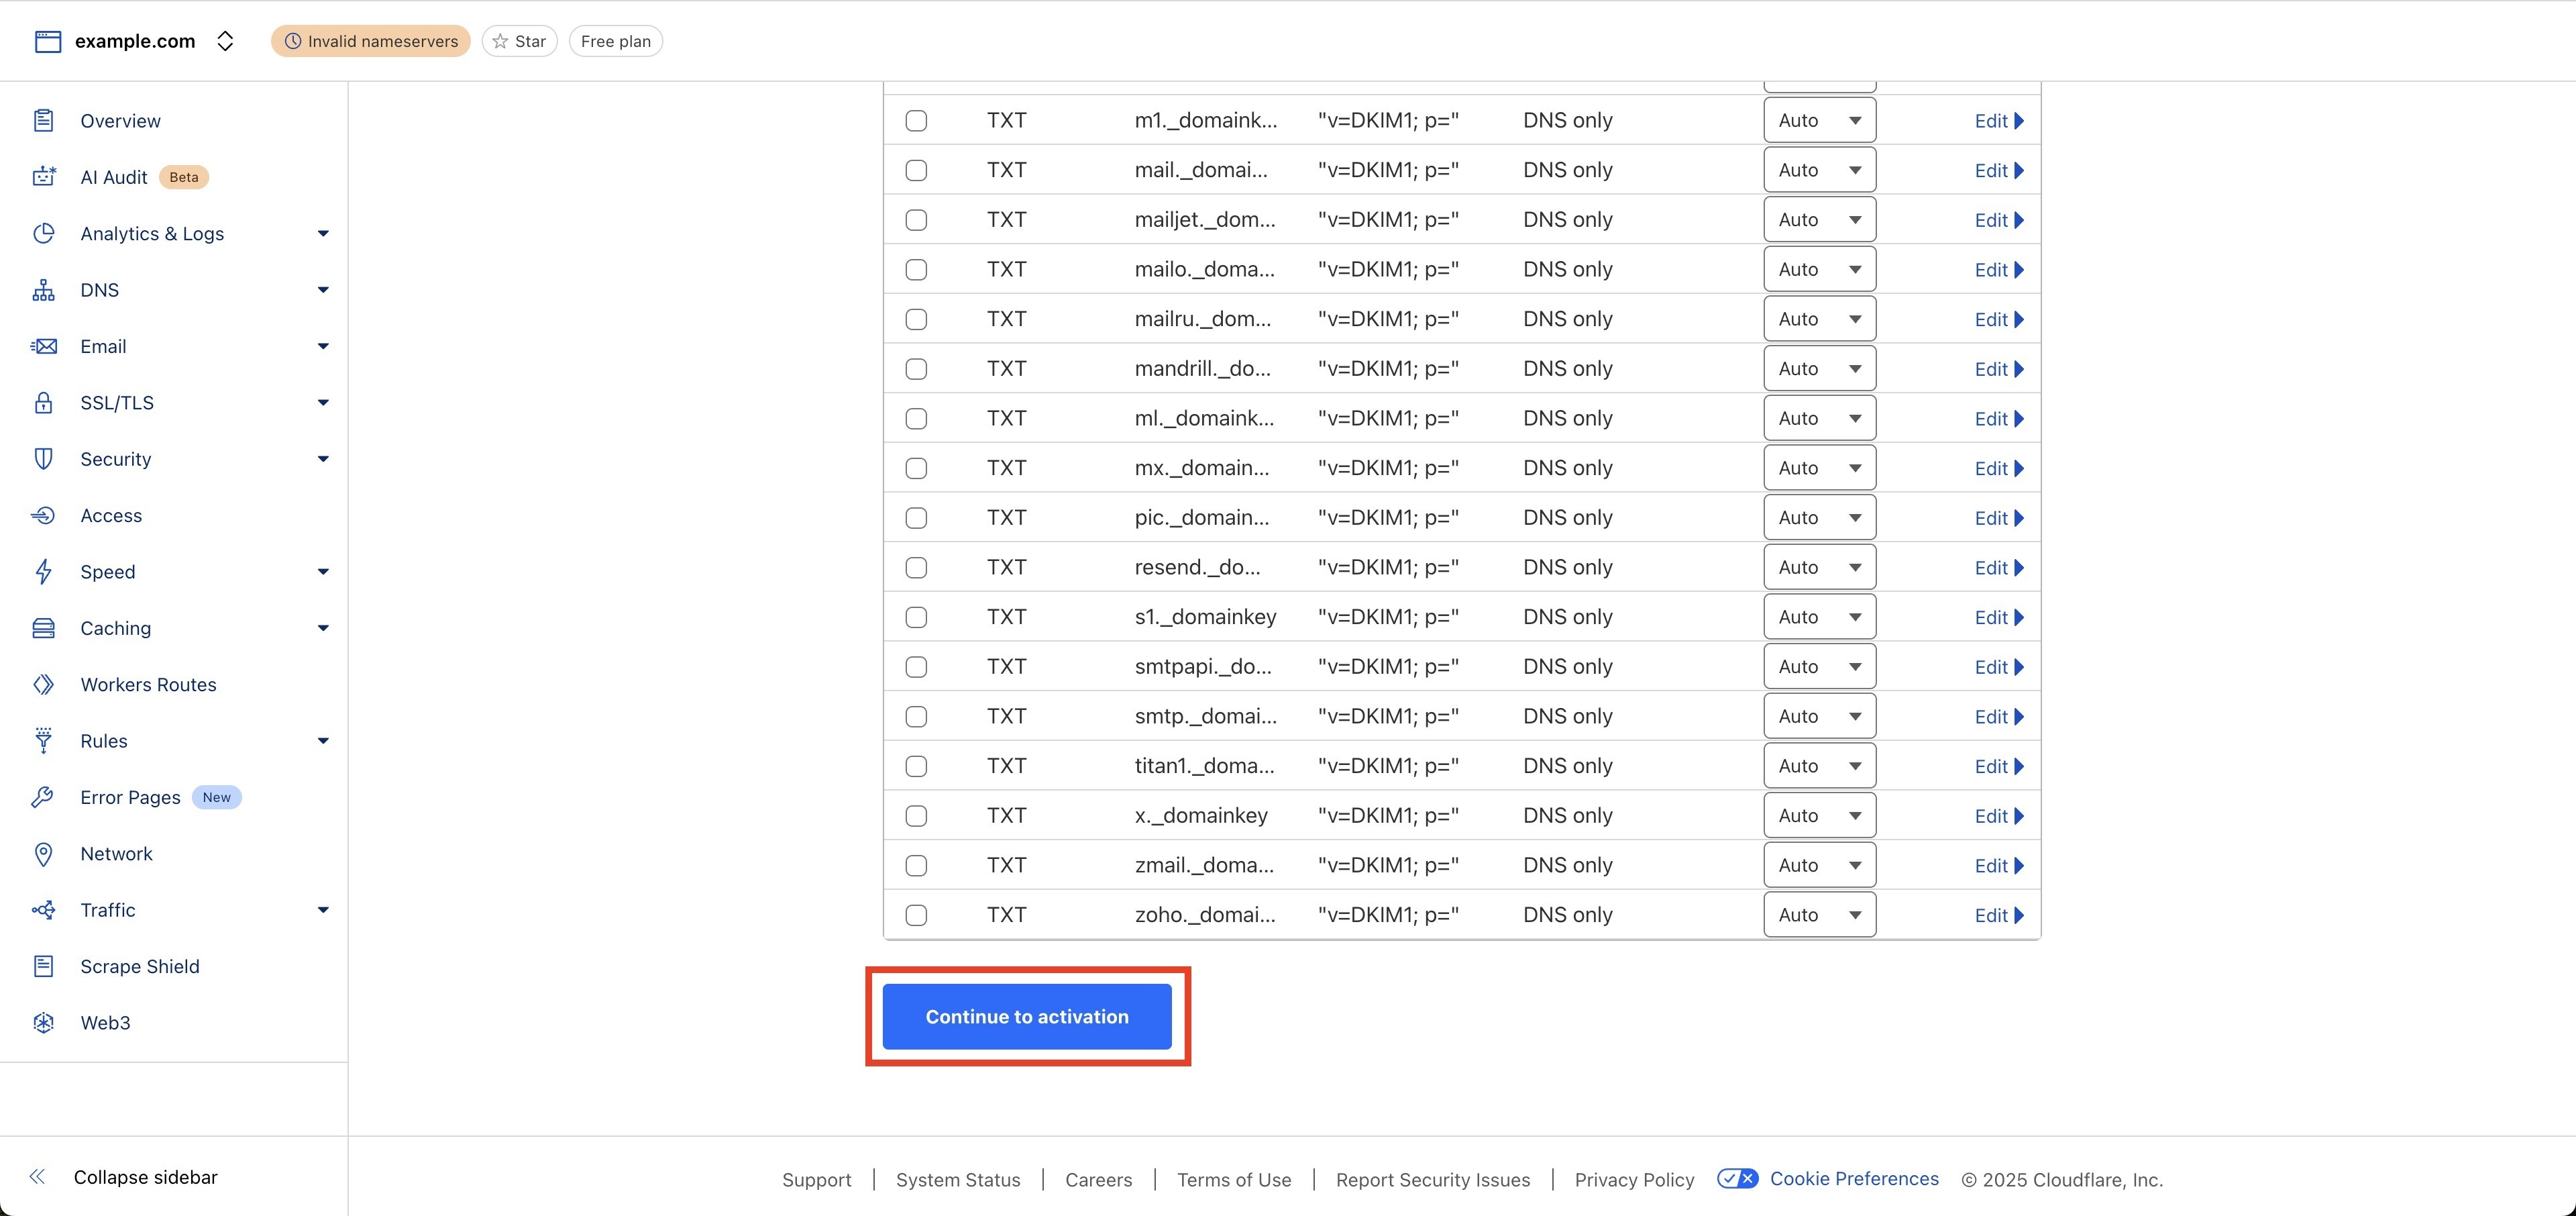
- Verify that the necessary DNS records exist in the destination zone.
- Turn proxying off for all DNS records.
- Confirm that DNSSEC is disabled.
Start the transfer in HighLevel
- In the appropriate Subaccount, open Settings > Domains & URL Redirects.
- Locate the domain and click Manage.
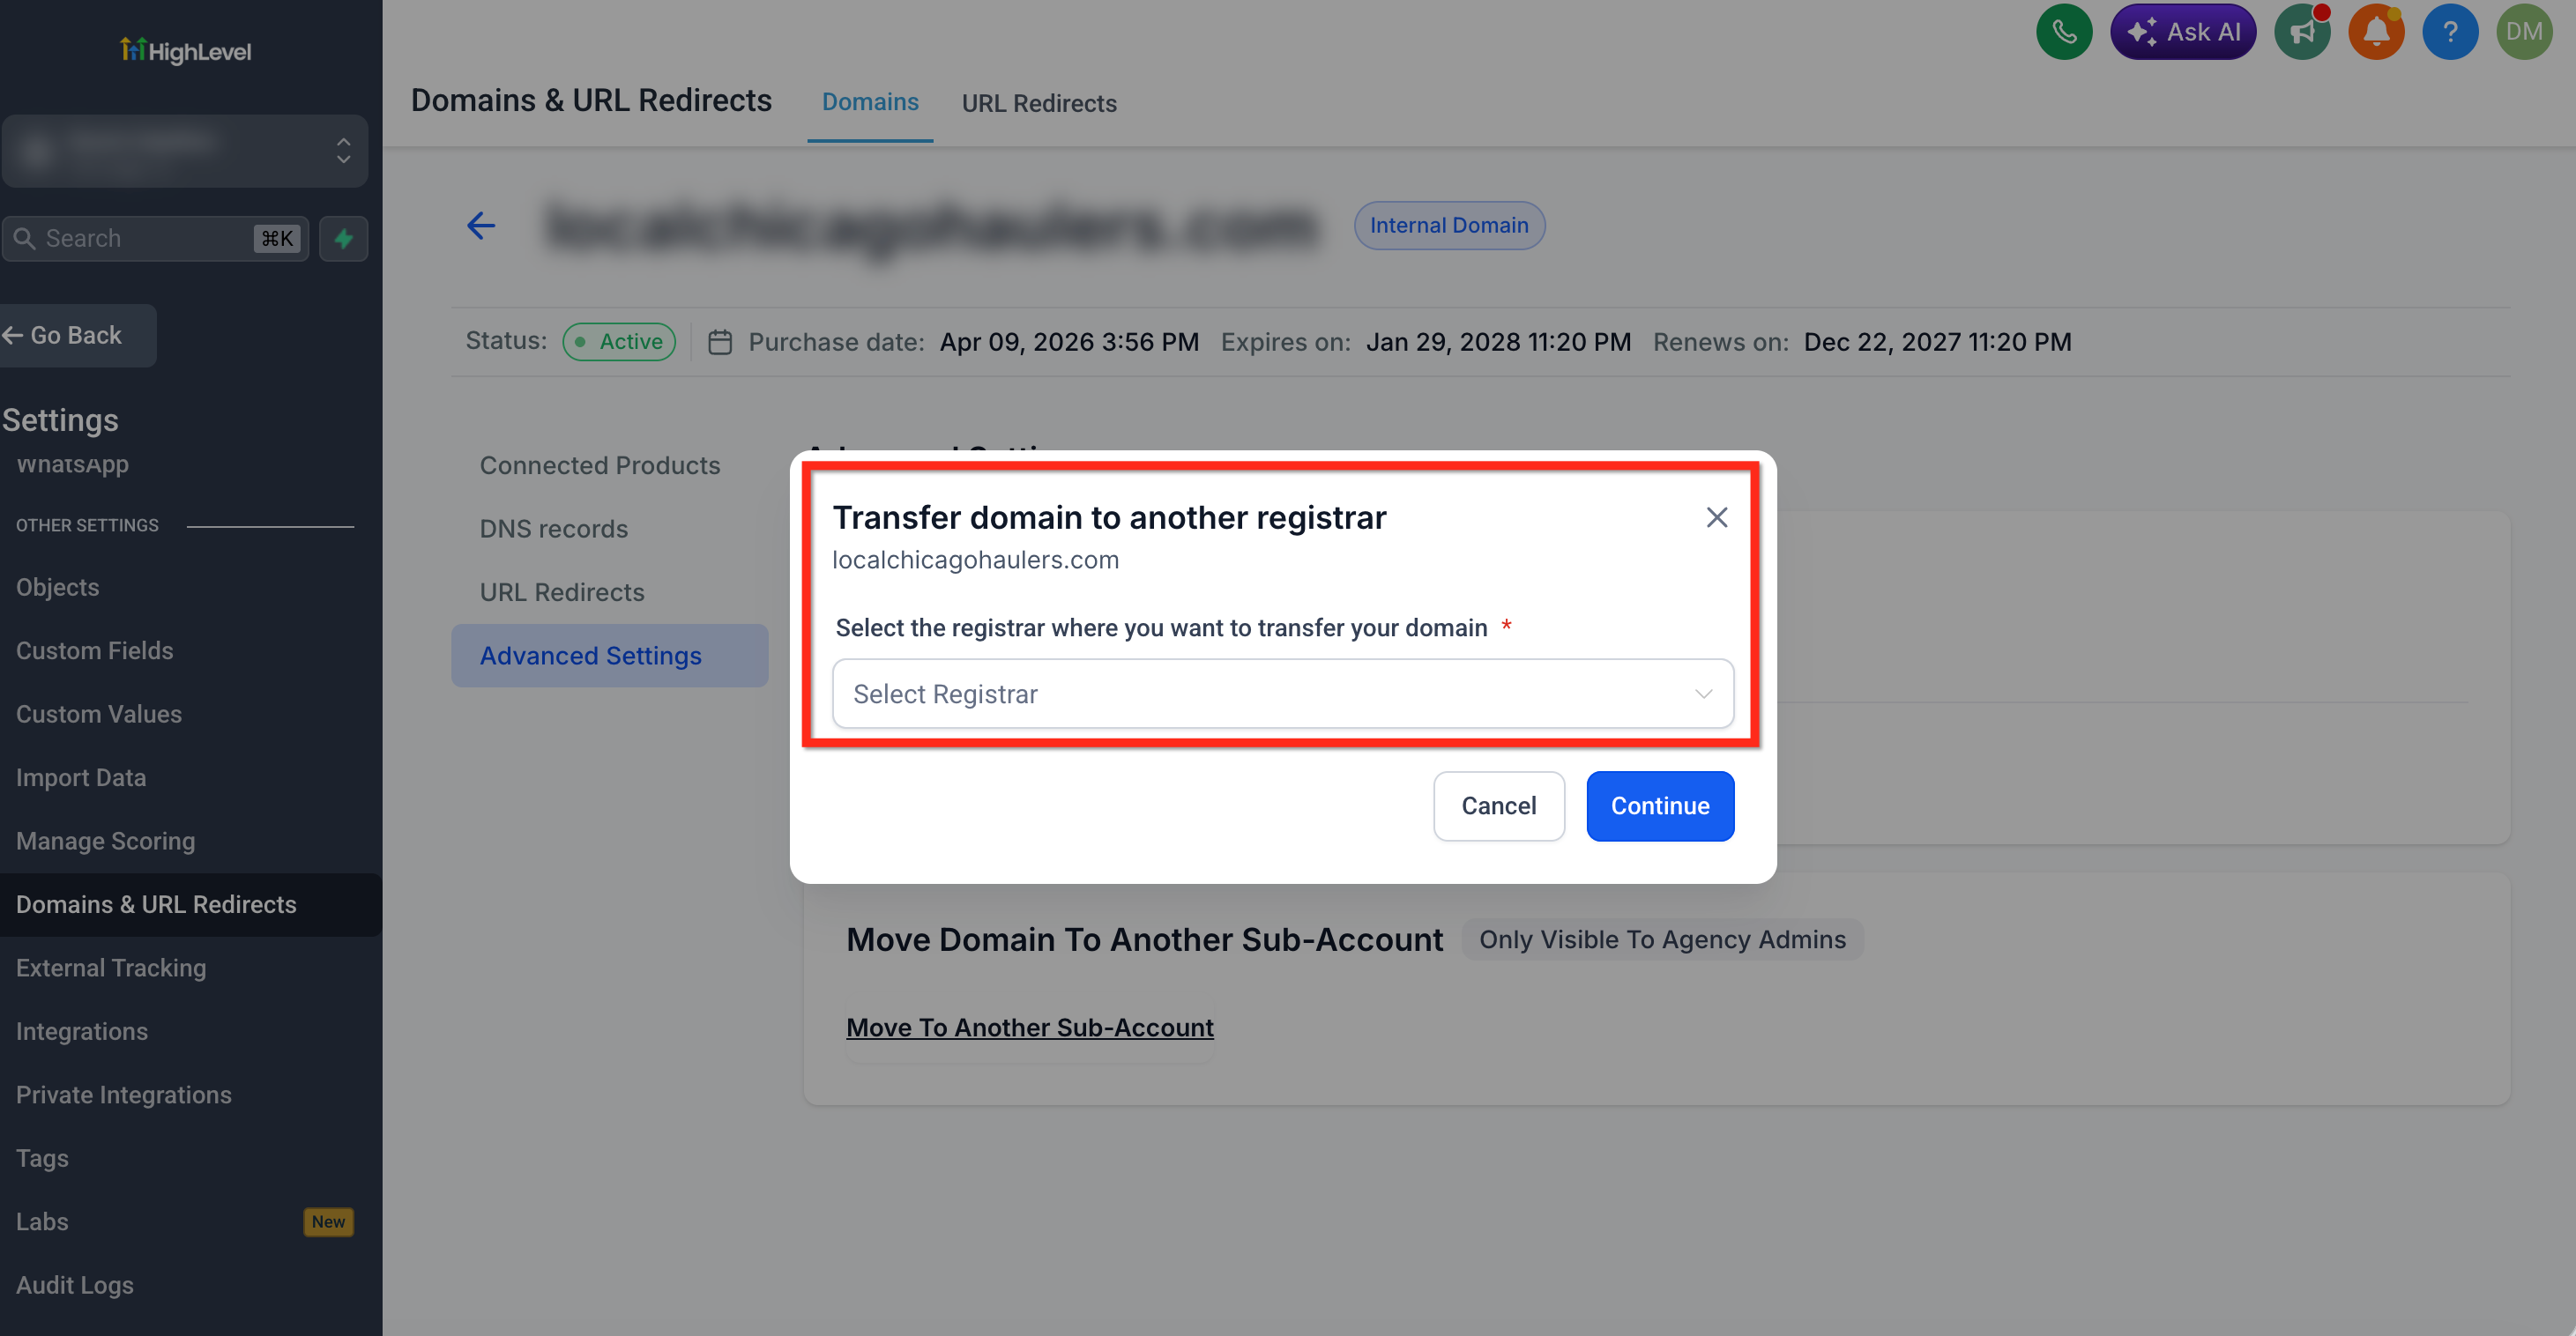
- Open Advanced Settings > Configuration.
- Select Transfer to Another Registrar.
- Run the eligibility check; if the 60 day lock applies, note the date shown.
- Choose the option to move the domain to another Cloudflare account.
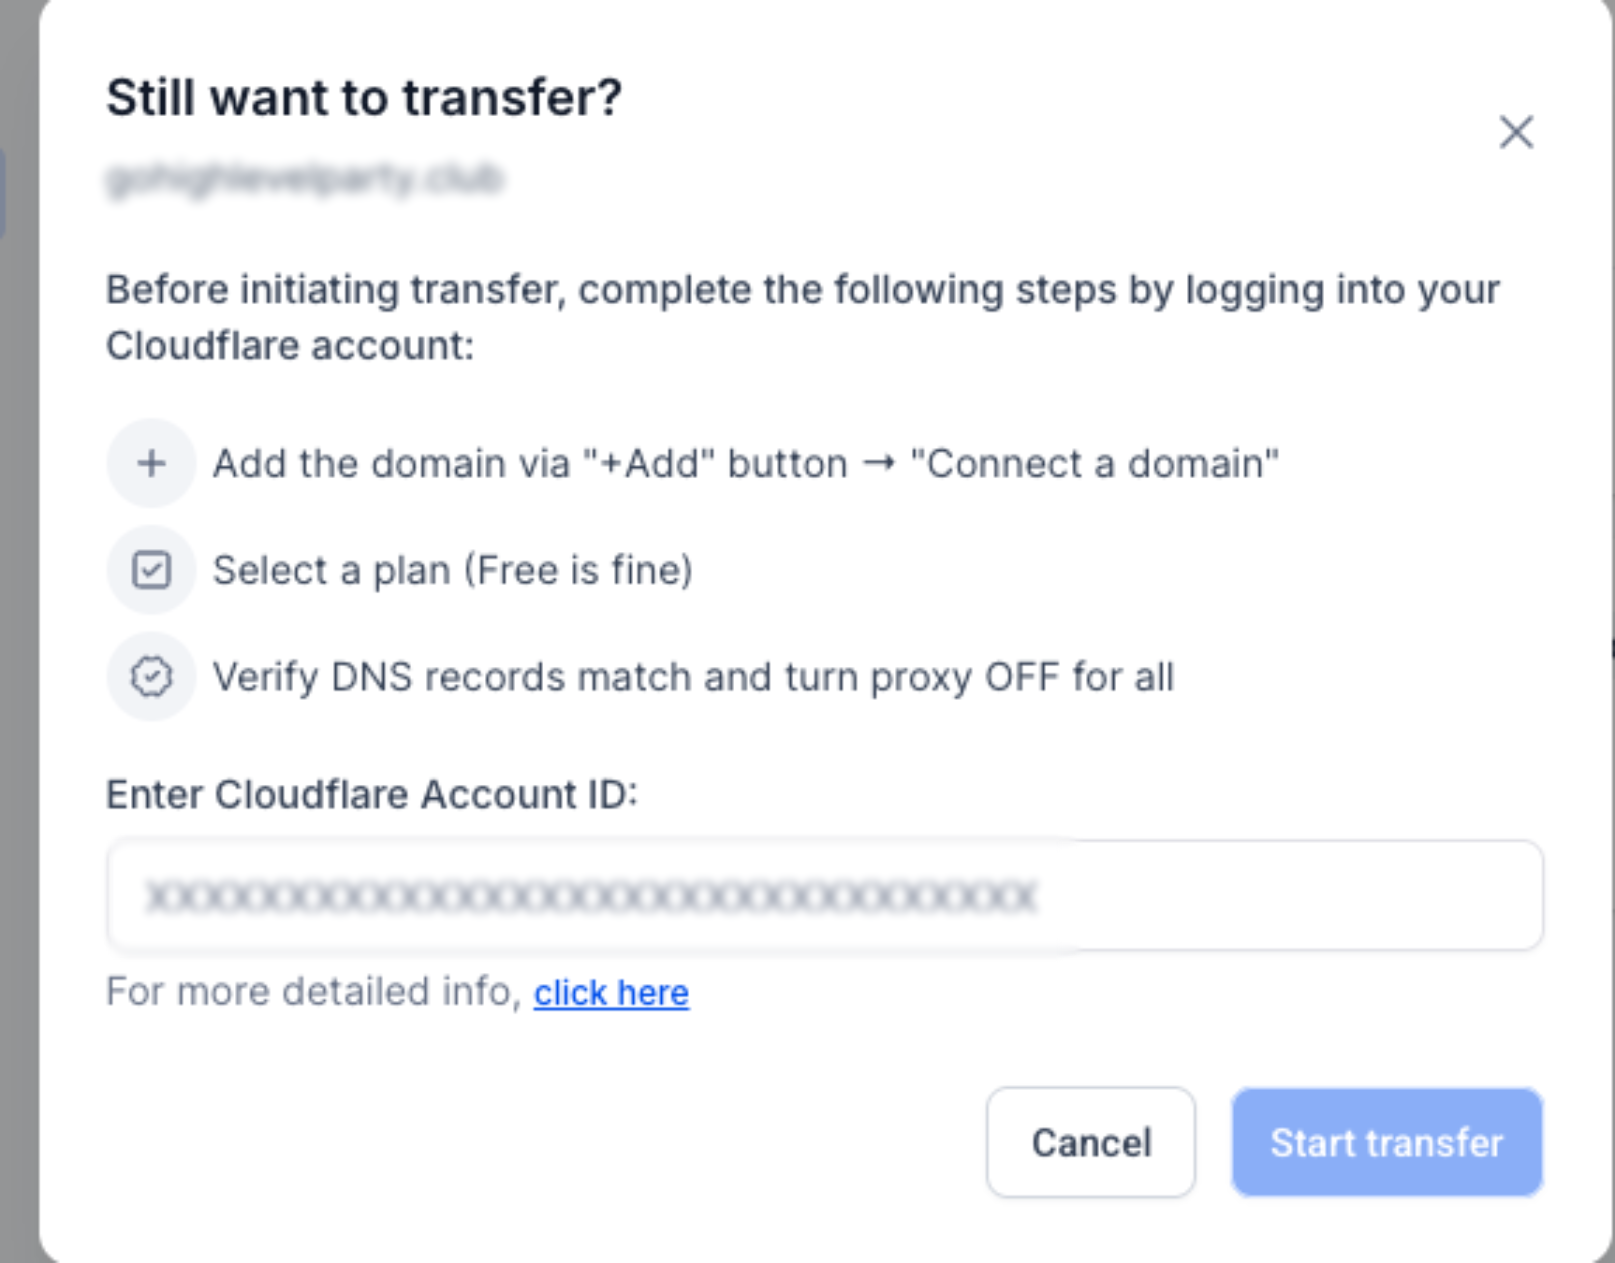
- Enter the destination Cloudflare Account ID and click Start transfer.
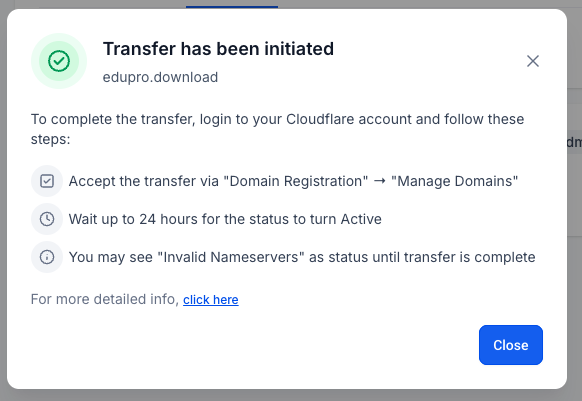
- Confirm the message that Transfer has been initiated.
Accept the move in Cloudflare
- Sign in to the destination Cloudflare account.
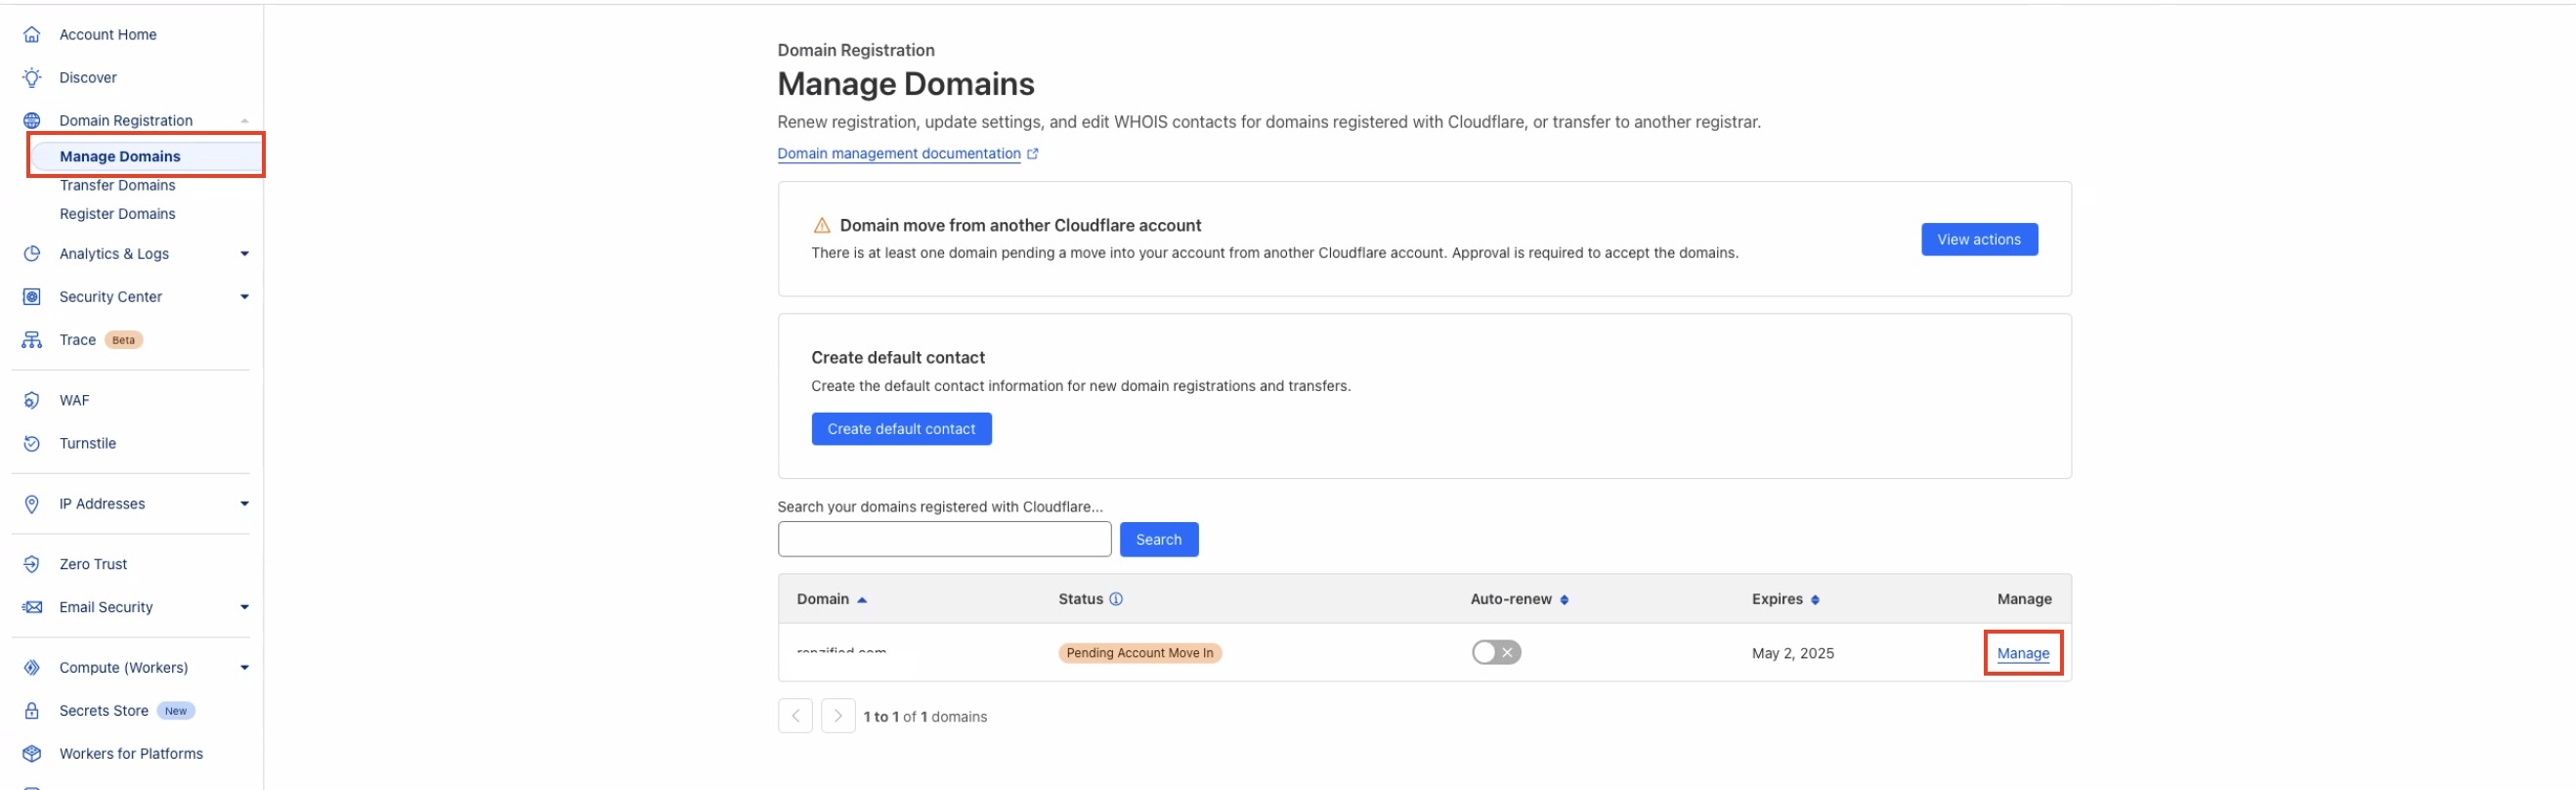
- Go to Domain Registration > Manage Domains.
- Locate the domain and open its management options.
- Accept the pending move.
- Wait up to 24 hours for the move to complete.
07What it looks like in HighLevel
08Settings that matter
- Transfer to Another Registrar. Selects the Cloudflare to Cloudflare account move option; it starts a domain transfer request without changing the registrar.
09Things to know before you rely on it
- Only domains purchased through HighLevel are eligible for this transfer.
- A domain under the 60 day ICANN transfer lock cannot be moved until the lock expires.
- Only one pending Cloudflare account move is allowed per domain at any time.
- DNSSEC must be disabled in the destination Cloudflare account.
- Proxying must be turned off for all DNS records in the destination account.
- Cloudflare does not copy DNS records during the move; records must be prepared in the destination account.
- The destination account must already have the domain added and a Cloudflare plan selected.
10If something goes wrong
- Transfer already in progress. Accept the existing pending move in Cloudflare or wait for it to expire before starting a new transfer.
- Invalid Cloudflare Account ID. Verify that the Account ID was copied from the correct destination Cloudflare account and re enter it.
- Domain not added to the destination account. Add the domain in the destination Cloudflare account via + Add > Connect a domain, select a plan, prepare DNS records, then retry the transfer.
- Invalid Nameservers after accepting the move. Allow up to 24 hours for the transfer to finish; the status should change to Active once complete.
11How it connects to the rest of HighLevel
- How to transfer a domain out of HighLevel Transfer out guide
- Configure & Connect Purchased Domains Domain setup
- HighLevel pricing and plans Pricing
Michael's take

Moving a HighLevel purchased domain to another Cloudflare account is worth the little effort for any small business that wants to consolidate billing or hand off ownership without dealing with EPP codes or registrar changes.
Don’t start the transfer until the destination account already has the domain added and all DNS records and proxy settings are correct.