
01Who this is for
- Agency owners who manage multiple client subaccounts and need separate sending identities for each client.
- Businesses that already use Google Workspace for their main domain and want to avoid MX record conflicts.
- Ecommerce sites that want brand consistent email addresses and better inbox placement.
02Dedicated sending domains, explained
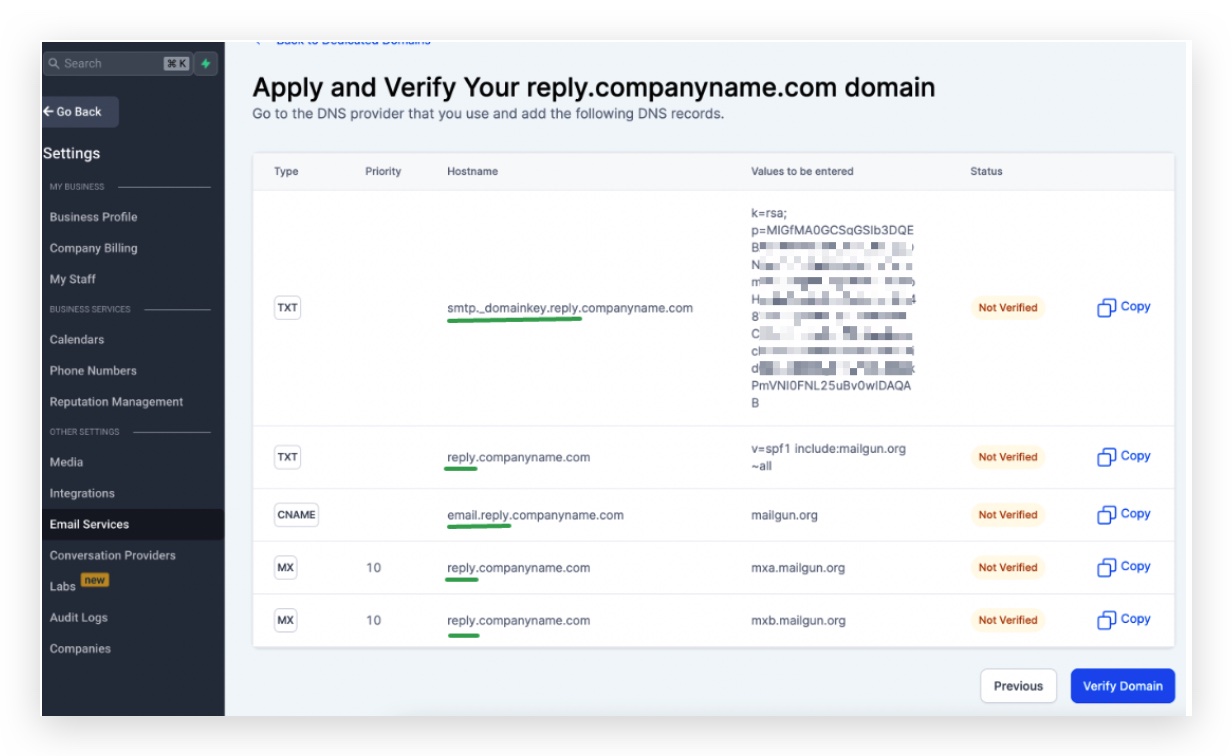
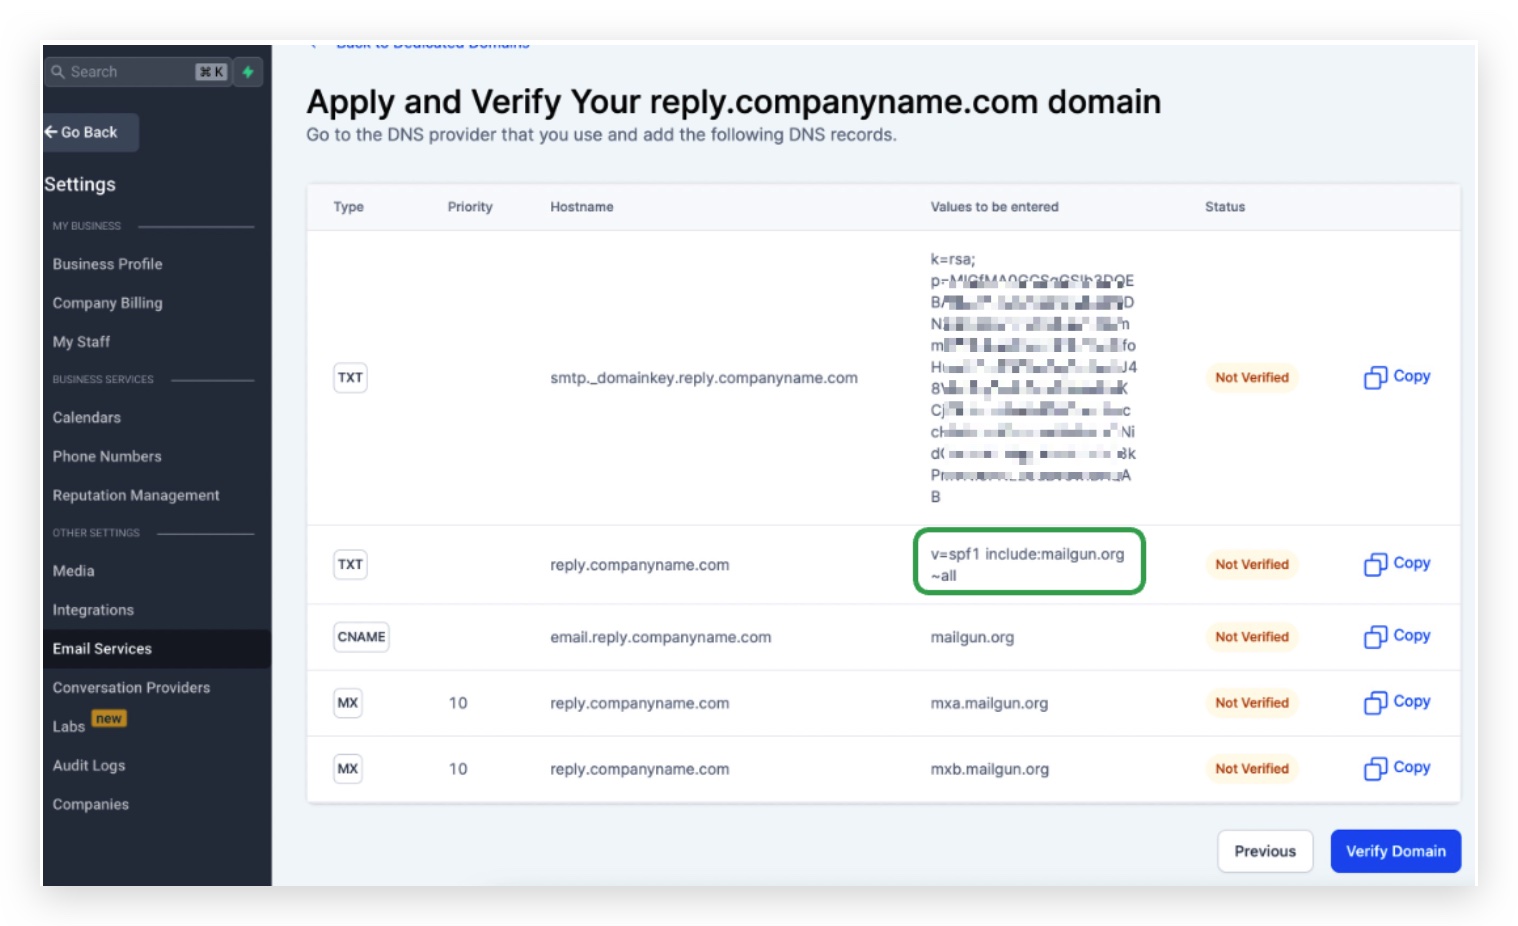
The feature lets you register a domain or subdomain as a dedicated sending address for LeadConnector Email. After you add the domain in HighLevel, the platform shows five DNS records that must exist in your hosting DNS. You create those records in Siteground’s DNS Zone Editor, then return to HighLevel and click Verify DNS Settings. A green checkmark confirms the domain is ready for sending and receiving mail through Mailgun.
03How businesses use dedicated sending domains
- Digital marketing agency. The agency adds a subdomain like client1.replies.com for each client. Within HighLevel they copy the required TXT, MX and CNAME values from the dedicated domain screen and paste them into Siteground. After verification, the agency sends campaign emails from the client’s own subdomain.
- Software as a service (SaaS) firm. The SaaS team creates a subdomain such as mail.appcompany.com. They follow the guide to add the SPF, DKIM, MX and CNAME records in Siteground. Once HighLevel verifies the domain, system notifications and password reset emails originate from mail.appcompany.com.
- Online retailer. The retailer decides to use a subdomain like orders.storebrand.com for order confirmations. They input the DNS values provided by HighLevel into Siteground, verify the domain, and then all order emails are sent from orders.storebrand.com, matching the brand’s web address.
04The numbers and rules that matter
- Two TXT records: SPF value v=spf1 include: Mailgun.org ~all; DKIM hostname and value are unique per account.
- Two MX records: Mxa.mailgun.org and mxb.mailgun.org, both priority 10.
- DNS propagation can take up to 24, 48 hours.
05Before you start
- Decide whether to use the root domain or a subdomain. If the root domain already receives mail through Google Workspace, you must use a subdomain.
06How to set up and use dedicated sending domains in HighLevel
Add and verify your domain
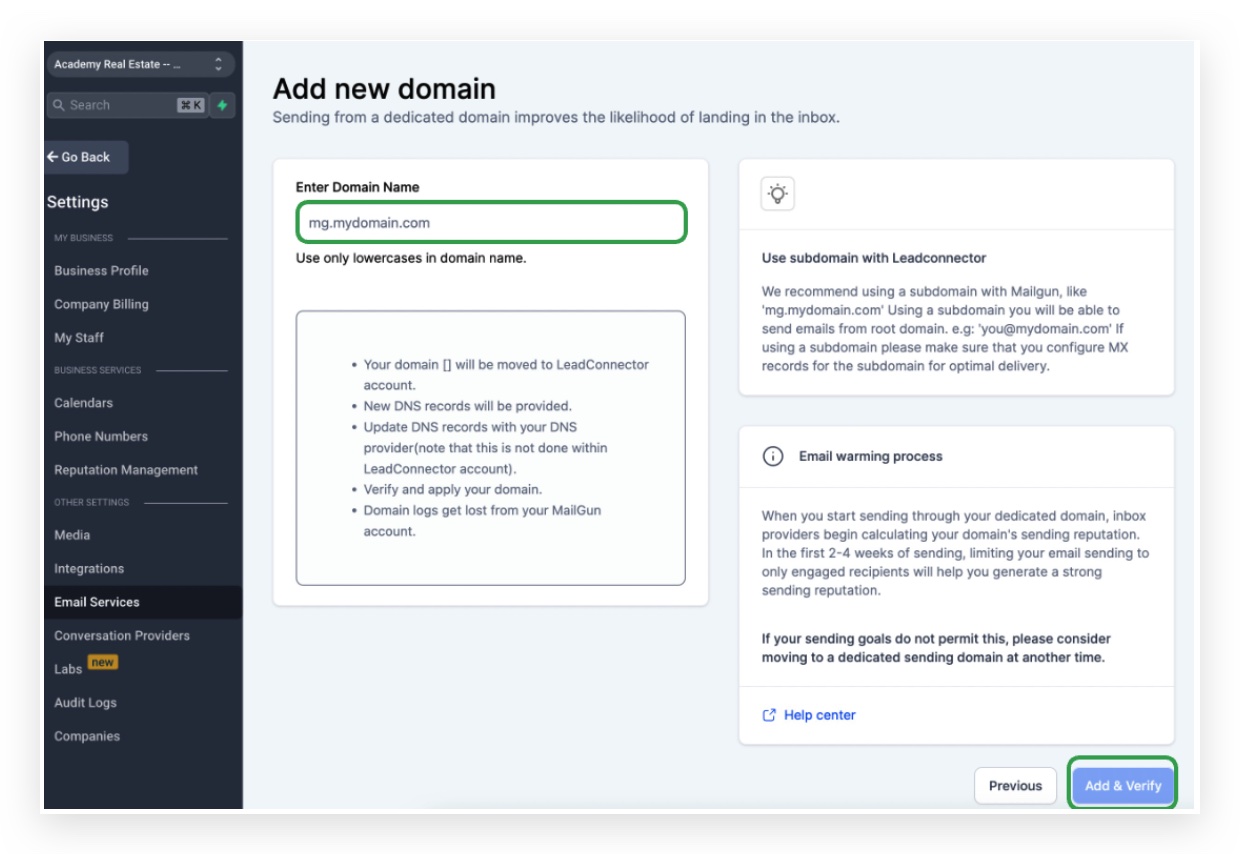
- Open Settings > Email Services > Dedicated Domain and click the + Add Domain button.
- Select either the main domain or type a subdomain prefix.
- Enter the chosen domain or subdomain and click Add & Verify.
- Keep the DNS records screen open for reference while you add records in Siteground.
Create first TXT record (SPF)
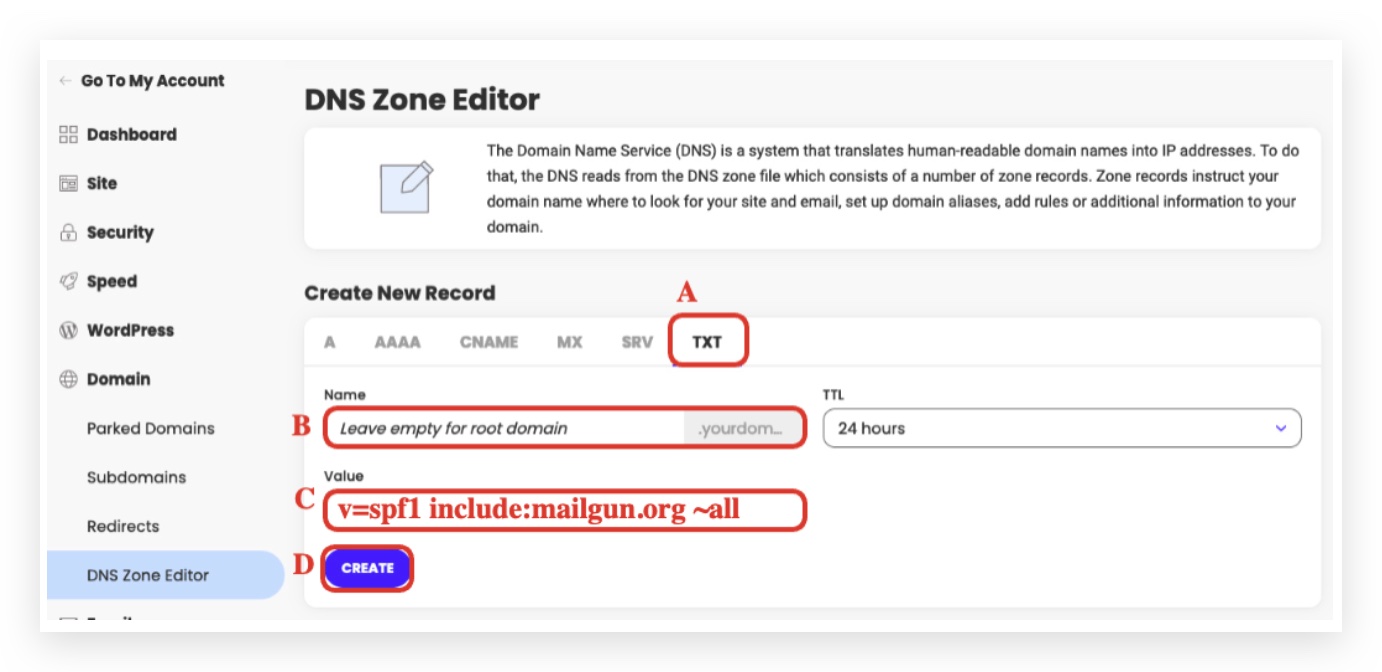
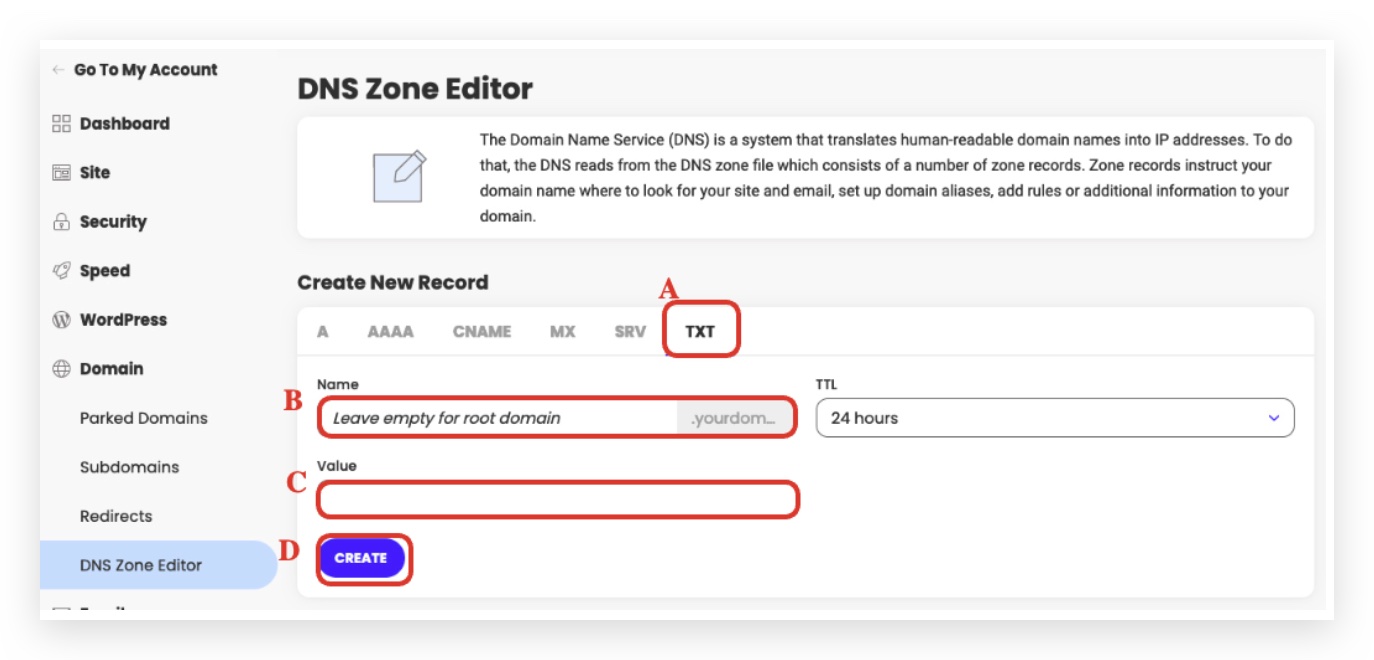
- Log in to Siteground and open Site Tools > Domain > DNS Zone Editor.
- In the Create New Record area, click the TXT tab.
- Enter the Name using only the subdomain portion (for example lc or replies) or @ for the root domain.
- Paste the SPF value v=spf1 include:mailgun.org ~all into the Value field.
- Click Create to save the record.
Create second TXT record (DKIM)
- Click + Add Record to open a new Create New Record form.
- Select the TXT tab.
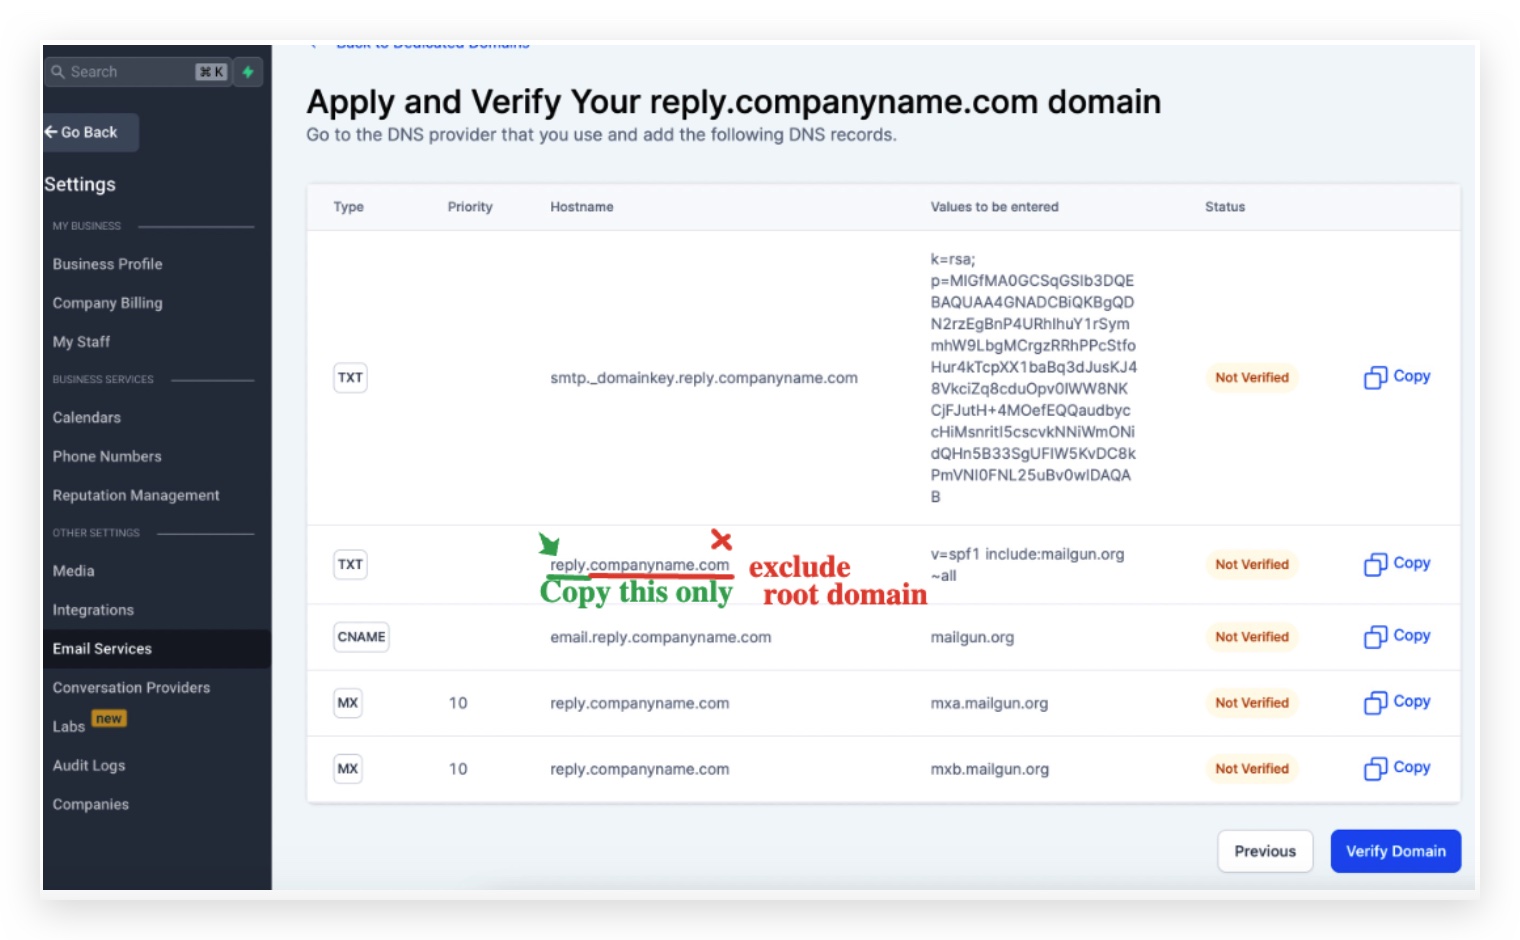
- Copy the hostname for the second TXT record from the HighLevel screen, excluding the root domain, and paste it into the Name field.
- Copy the unique DKIM value shown in HighLevel and paste it into the Value field.
- Click Create to finish the DKIM record.
Create first MX record (mxa.mailgun.org)
- In DNS Zone Editor click + Add Record.
- Choose the MX tab and select Add your own MX records.
- Enter the Name using the same logic as the TXT records (lc, replies or @).
- Set the Priority to 10.
- Enter mxa.mailgun.org as the Destination and click Create.
Create second MX record (mxb.mailgun.org)
- Click + Add Record again.
- Select the MX tab and choose Add your own MX records.
- Enter the same Name used for the first MX record.
- Set the Priority to 10.
- Enter mxb.mailgun.org as the Destination and click Create.
Create CNAME record
- Click + Add Record one final time.
- Select the CNAME tab.
- Enter the CNAME Name by copying the hostname from HighLevel and removing the root domain (for example email.lc).
- Set the Resolves To field to mailgun.org.
- Click Create to add the CNAME record.
Verify DNS settings
- Return to the HighLevel dedicated domain screen.
- Click Verify DNS Settings.
- If any record shows a red ✗, click Verify Domain again after waiting.
07What it looks like in HighLevel
08Settings that matter
- Name. Specifies the subdomain portion of the record without the root domain.
- Value. Holds the SPF string or the unique DKIM key provided by HighLevel.
- Priority. Defines the mail server preference for MX records; always set to 10.
- Destination. Points MX records to the Mailgun server address.
- Resolves To. Defines the target address for the CNAME record; always mailgun.org.
09Things to know before you rely on it
- If the main domain already has Google Workspace MX records, you must use a subdomain for the dedicated sending domain.
- Do not include the root domain in any Name or Hostname fields; only the subdomain portion is allowed.
- DNS propagation can take up to 24 to 48 hours, though changes often appear within minutes on Siteground.
- Dedicated sending domains are configured per subaccount; each subaccount requires its own setup.
10If something goes wrong
- Verification shows a red X after adding records.. Make sure the root domain was not included in any Name fields and that the DKIM value was copied exactly. Then click Verify Domain again.
- Records still fail verification after waiting.. Wait 15 to 30 minutes for propagation, then retry verification. Full global propagation may require up to 24 to 48 hours.
11How it connects to the rest of HighLevel
- Overview of dedicated sending domains in HighLevel Dedicated domain overview
- Assign dedicated sending domains to specific email types Assign domains
- Email warm up and DMARC guide for reliable delivery Warm up guide
Michael's take

Michael ReimerFounder of CRM Pros, HighLevel Commander and Certified Admin
A dedicated sending domain can be worth the effort for any small business that wants its emails to have a professional address from its own domain and may improve inbox placement.
Avoid the mistake of putting the full domain (e.g., replies.companyname.com) in the Name field; use only the subdomain part.
Get More InformationOpens on HighLevelPublished November 2, 2026 · Updated November 16, 2026