
01Who this is for
- Email marketers who need control over sender reputation can use a dedicated domain to keep their deliverability separate from shared pools.
- Agencies managing multiple client subaccounts benefit from assigning unique domains to each, avoiding conflicts with Google Workspace.
- Small businesses using LC Email for newsletters gain full authority over SPF, DKIM and MX settings by owning the domain.
02Dedicated sending domains, explained
The dedicated sending domain feature lives under Settings > Email Services > Dedicated Domain in each subaccount. It creates a set of DNS records that point the domain to Mailgun for outbound mail while preserving any existing Google Workspace configuration.
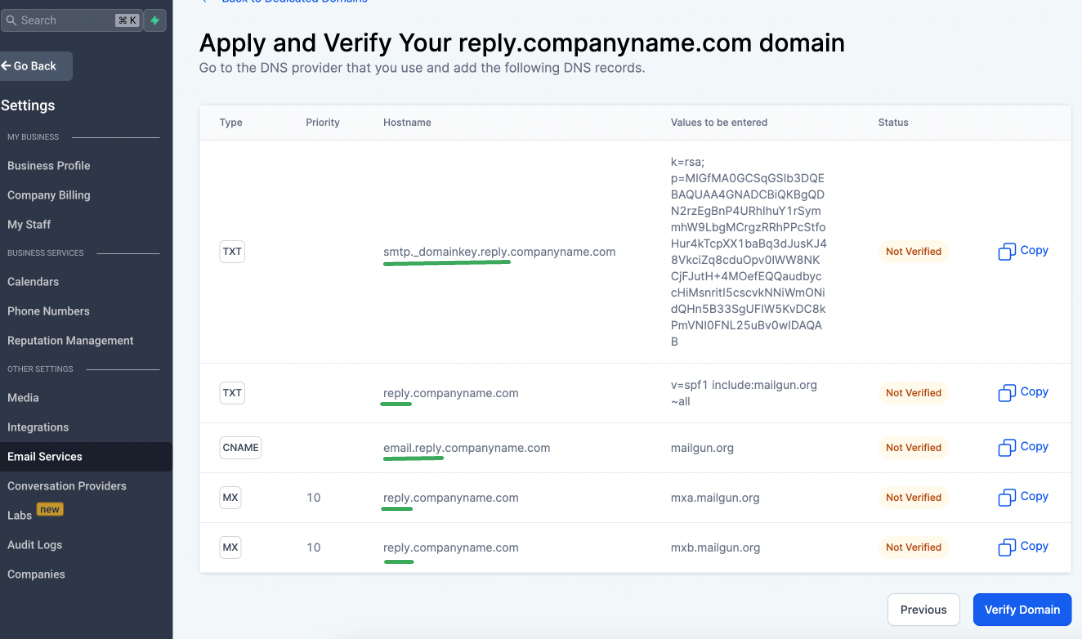
When you add a domain, HighLevel generates the exact values for SPF, DKIM, MX and CNAME records. You then copy those values into Google Domains. After the records propagate, you verify the domain inside the platform and the domain becomes active for sending.
The domain can be the root of your website or any subdomain. If the root domain already runs Google Workspace, a subdomain is required to avoid MX conflicts. No additional subscription fee is charged beyond your existing plan.
03How businesses use dedicated sending domains
- Digital marketing agency. The agency creates a subdomain like mail.client.com in HighLevel, copies the generated SPF, DKIM, MX and CNAME values into Google Domains, saves the records and then verifies the domain. This gives the agency exclusive sending reputation for that client.
- Ecommerce store. The store adds a subdomain such as sales.store.com, follows the same DNS entry steps in Google Domains, and verifies it in HighLevel. All order confirmation emails are then sent from the store’s own domain.
- Consulting firm. The firm registers a dedicated domain like updates.consultant.com, inputs the five required records in Google Domains, saves and verifies within HighLevel. Future consulting newsletters use this domain for improved inbox placement.
04The numbers and rules that matter
- 5 DNS records are required: 2 TXT, 2 MX, 1 CNAME.
- SPF record value: V=spf1 include: Mailgun.org ~all.
- MX values: 10 mxa.mailgun.org and 10 mxb.mailgun.org.
- DNS propagation typically takes a few minutes, up to 24, 48 hours.
05Before you start
- Own a domain registered with Google Domains.
- Have access to Settings > Email Services > Dedicated Domain in the relevant subaccount.
06How to set up and use dedicated sending domains in HighLevel
Add your domain in Email Services
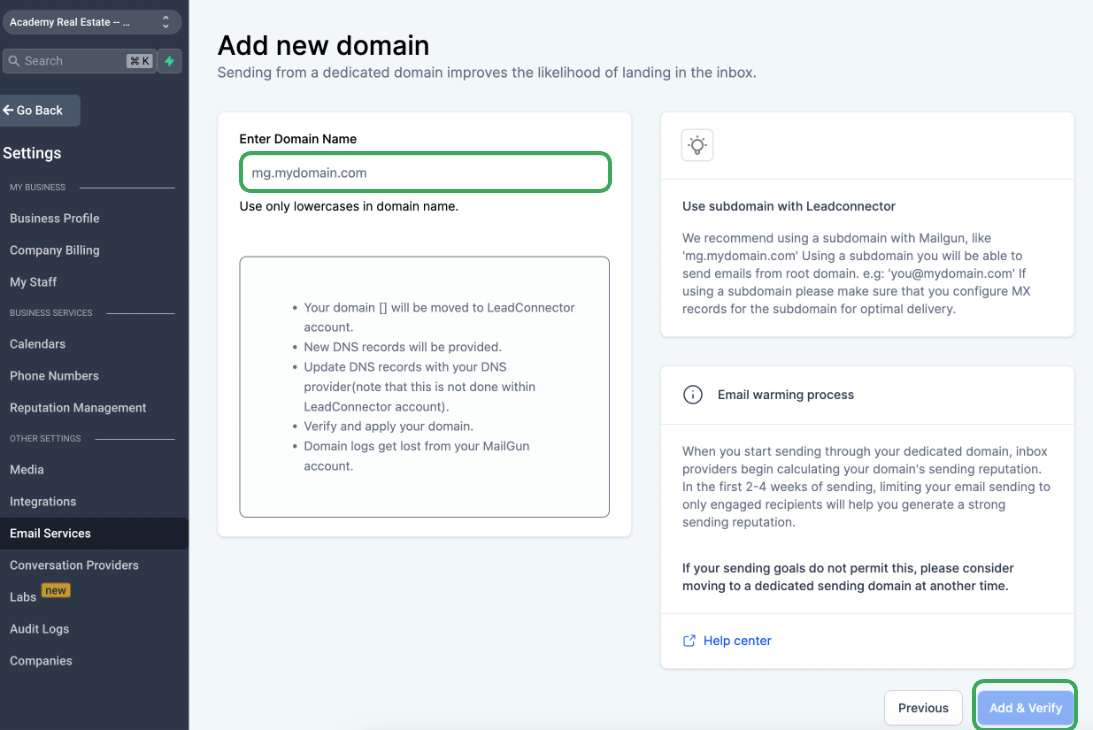
- Open Settings, go to Email Services, select Dedicated Domain and press the + Add Domain button.
- Enter either the root domain or a subdomain prefix, noting that a root domain cannot be used if Google Workspace is active.
- Press Add & Verify to generate the list of DNS records.
Open Google Domains DNS
- Open a new browser tab and sign in to domains.google.com.
- Click on the domain you are configuring.
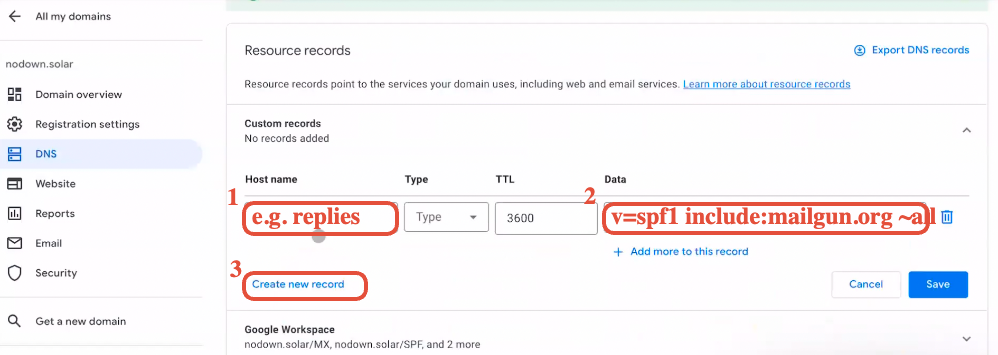
- Choose DNS from the left hand navigation menu.
Add the 1st TXT record (SPF)
- Click Create new record in the Google Domains DNS view.
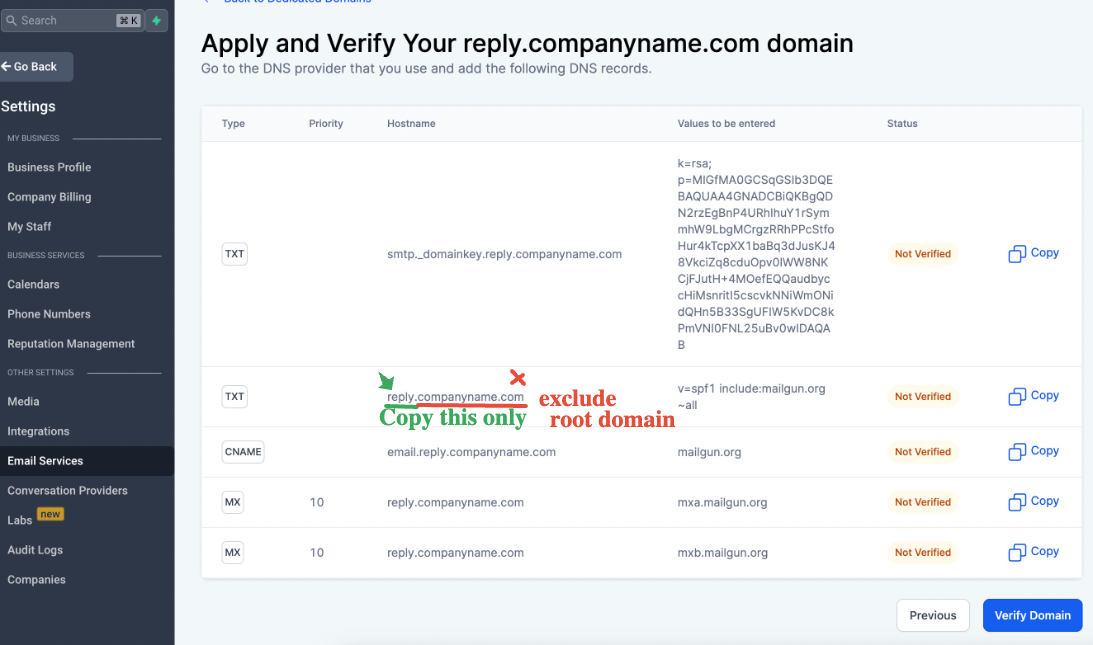
- Enter the subdomain prefix (or @ for the root) as the Host Name.
- Select TXT from the Type dropdown.
- Paste the SPF value v=spf1 include:mailgun.org ~all into the Data field.
- Click Create new record to move on to the next TXT entry without saving yet.
Add the 2nd TXT record (DKIM)
- Click Create new record again.
- Choose TXT as the record type.
- Copy the DKIM hostname from the HighLevel DNS screen and paste it as the Host Name.
- Copy the full DKIM value from HighLevel and paste it into the Data field.
- Click Create new record to proceed to the MX records.
Add MX records
- Click Create new record.
- Enter the appropriate subdomain prefix (or @) as the Host Name.
- Select MX from the Type list.
- Paste the first MX entry 10 mxa.mailgun.org into Data.
- Click + Add more and paste the second entry 10 mxb.mailgun.org.
- Click Create new record to continue with the CNAME record.
Add the CNAME record
- Click Create new record.
- Enter email.<prefix> (or just email for the root) as the Host Name.
- Select CNAME from the Type dropdown.
- Paste mailgun.org into the Data field.
- Leave the record pending until all five records are entered.
Save and verify your domain
- Click Save in Google Domains after all five records are listed.
- Return to the HighLevel Email Services screen and press Verify Domain.
- If verification is not immediate, wait a few minutes and press Verify Domain again.
07What it looks like in HighLevel
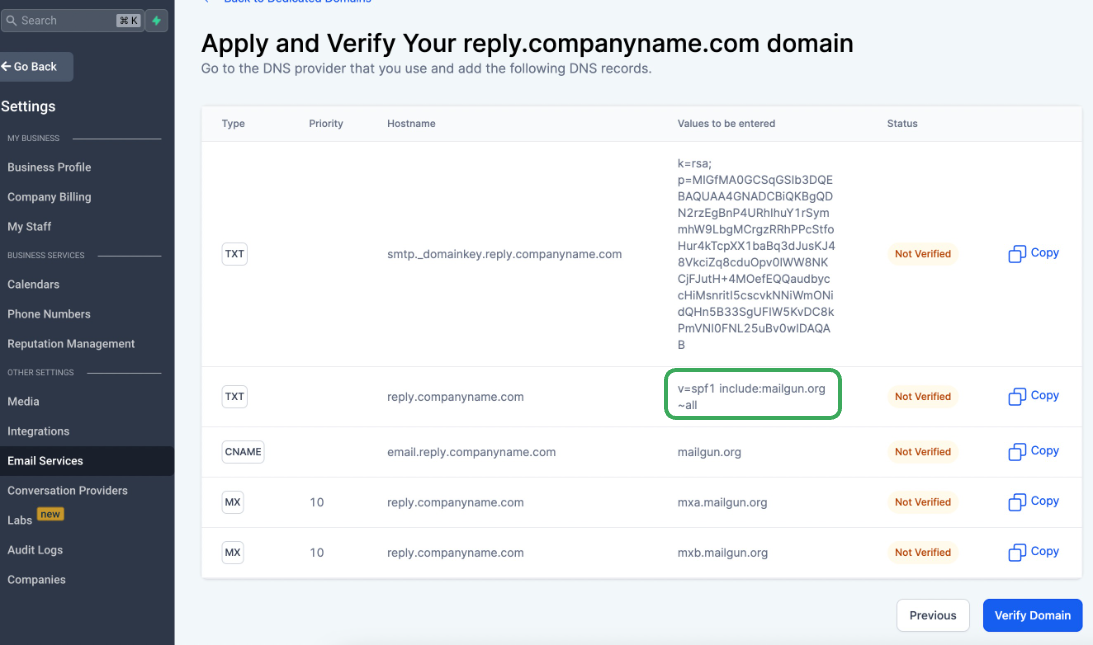

08Settings that matter
- Host Name. Defines the subdomain portion used for each DNS entry; it tells the DNS system which name the record applies to.
- Type. Specifies the record format such as TXT, MX or CNAME, determining how the DNS data is interpreted.
- Data. Contains the actual value for the record, such as the SPF string, DKIM key, MX host and priority, or the CNAME target.
09Things to know before you rely on it
- Root domains cannot be used if Google Workspace is active; a subdomain must be chosen to avoid MX conflicts.
- Do not click Save after each individual record; add all five records first and then save once.
- DNS propagation may take minutes and occasionally up to 24 to 48 hours; records might not verify immediately.
- Using this feature does not add a separate charge; it works with your existing HighLevel subscription.
10If something goes wrong
- Domain records remain unverified after waiting.. Wait a few minutes, then click Verify Domain again. If verification still fails, compare the values in Google Domains with those shown in HighLevel and correct any mismatches.
11How it connects to the rest of HighLevel
- Overview of dedicated sending domains and management in HighLevel Dedicated domains overview
- Guide to buying and assigning a dedicated IP for LC Email Dedicated IP guide
- Using default headers with dedicated sending domains Default headers
Michael's take

People often try to register their root domain when Google Workspace already handles email there, only to break their existing mail flow. The conflict comes from adding MX records that overwrite the ones Google Workspace needs.
I would start with a subdomain like replies.companyname.com, add the five DNS records exactly as shown, wait for propagation, then verify in HighLevel. After verification I’d double check the SSL certificate and send a test email before rolling it out to any campaign.