

Home/HighLevel/Guides/Set up the Founder Plan
HighLevel Guides · Volume 11 · Founder Plan
GoHighLevel Founder Plan setup. Set it up and start billing clients.
The $497 Founder Plan (formerly Agency Pro) turns GoHighLevel into a product you resell. This guide takes you from a fresh upgrade to a working billing hub: your agency subaccount, a reusable snapshot, your first client account built from it, rebilling with markup, wallets that reload on their own, and a dashboard that shows your profit. At the end you have one client live and a repeatable process for every client after that. HighLevel is the same platform many people still search for as GoHighLevel.

What you are building
What you are building in this guide.
A billing hub for your agency. One Agency SubAccount holds your Stripe connection and billing configuration. One snapshot holds your best workflows, funnels, calendars and forms. Every new client subaccount gets loaded from that snapshot, then rebilling charges the client for their SMS, email, phone and AI usage at your markup. Wallets reload from the card on file so services never stop, and the Rebilling tab on the Agency Dashboard shows revenue, cost and profit across every client. Plan prices are on the GoHighLevel pricing page, and is HighLevel worth it helps you decide whether the plan fits. Not on the platform yet? Start with a 30 day GoHighLevel trial through Michael's link.
- A Stripe account connected to your agency and a designated Agency SubAccount
- A snapshot of your master build, ready to load into any client
- Your first client subaccount running on that snapshot
- Rebilling with markup active on that client, with wallet reloads set
- A rebilling dashboard and export that show real profit per product
- A usage alert on the wallet so a heavy user never surprises you
Before you start
What to have ready before you start.
Gather these first so you never have to stop in the middle of a part.
- An active $497 Founder Plan account with Agency View access
- A Stripe account for your agency, with login details on hand
- The Agency SubAccount management permission on your user
- Snapshot access enabled under User, then Roles and Permissions
- A master subaccount that already contains the workflows, funnels, calendars and forms you want to reuse
- Your first client's business details and a valid card they can add in Company Billing
- A markup number in mind for usage based services like Phone, Email and AI
Part 01 of 06
Connect Stripe and mark your own account.
Rebilling and wallets run through your agency's Stripe account. HighLevel also needs to know which subaccount is yours, not a client's. That designated Agency SubAccount holds your payment provider connection and billing configuration.
- Go to Agency View, then Settings, then Stripe, and connect your Agency Stripe account.
- Go to Agency View, then SubAccounts, and start creating a new subaccount.
- When asked what type of account you are setting up, choose This is my own account.
- Complete the subaccount creation process.
- Back in the subaccount list, confirm the blue Agency subaccount badge shows on the new account.
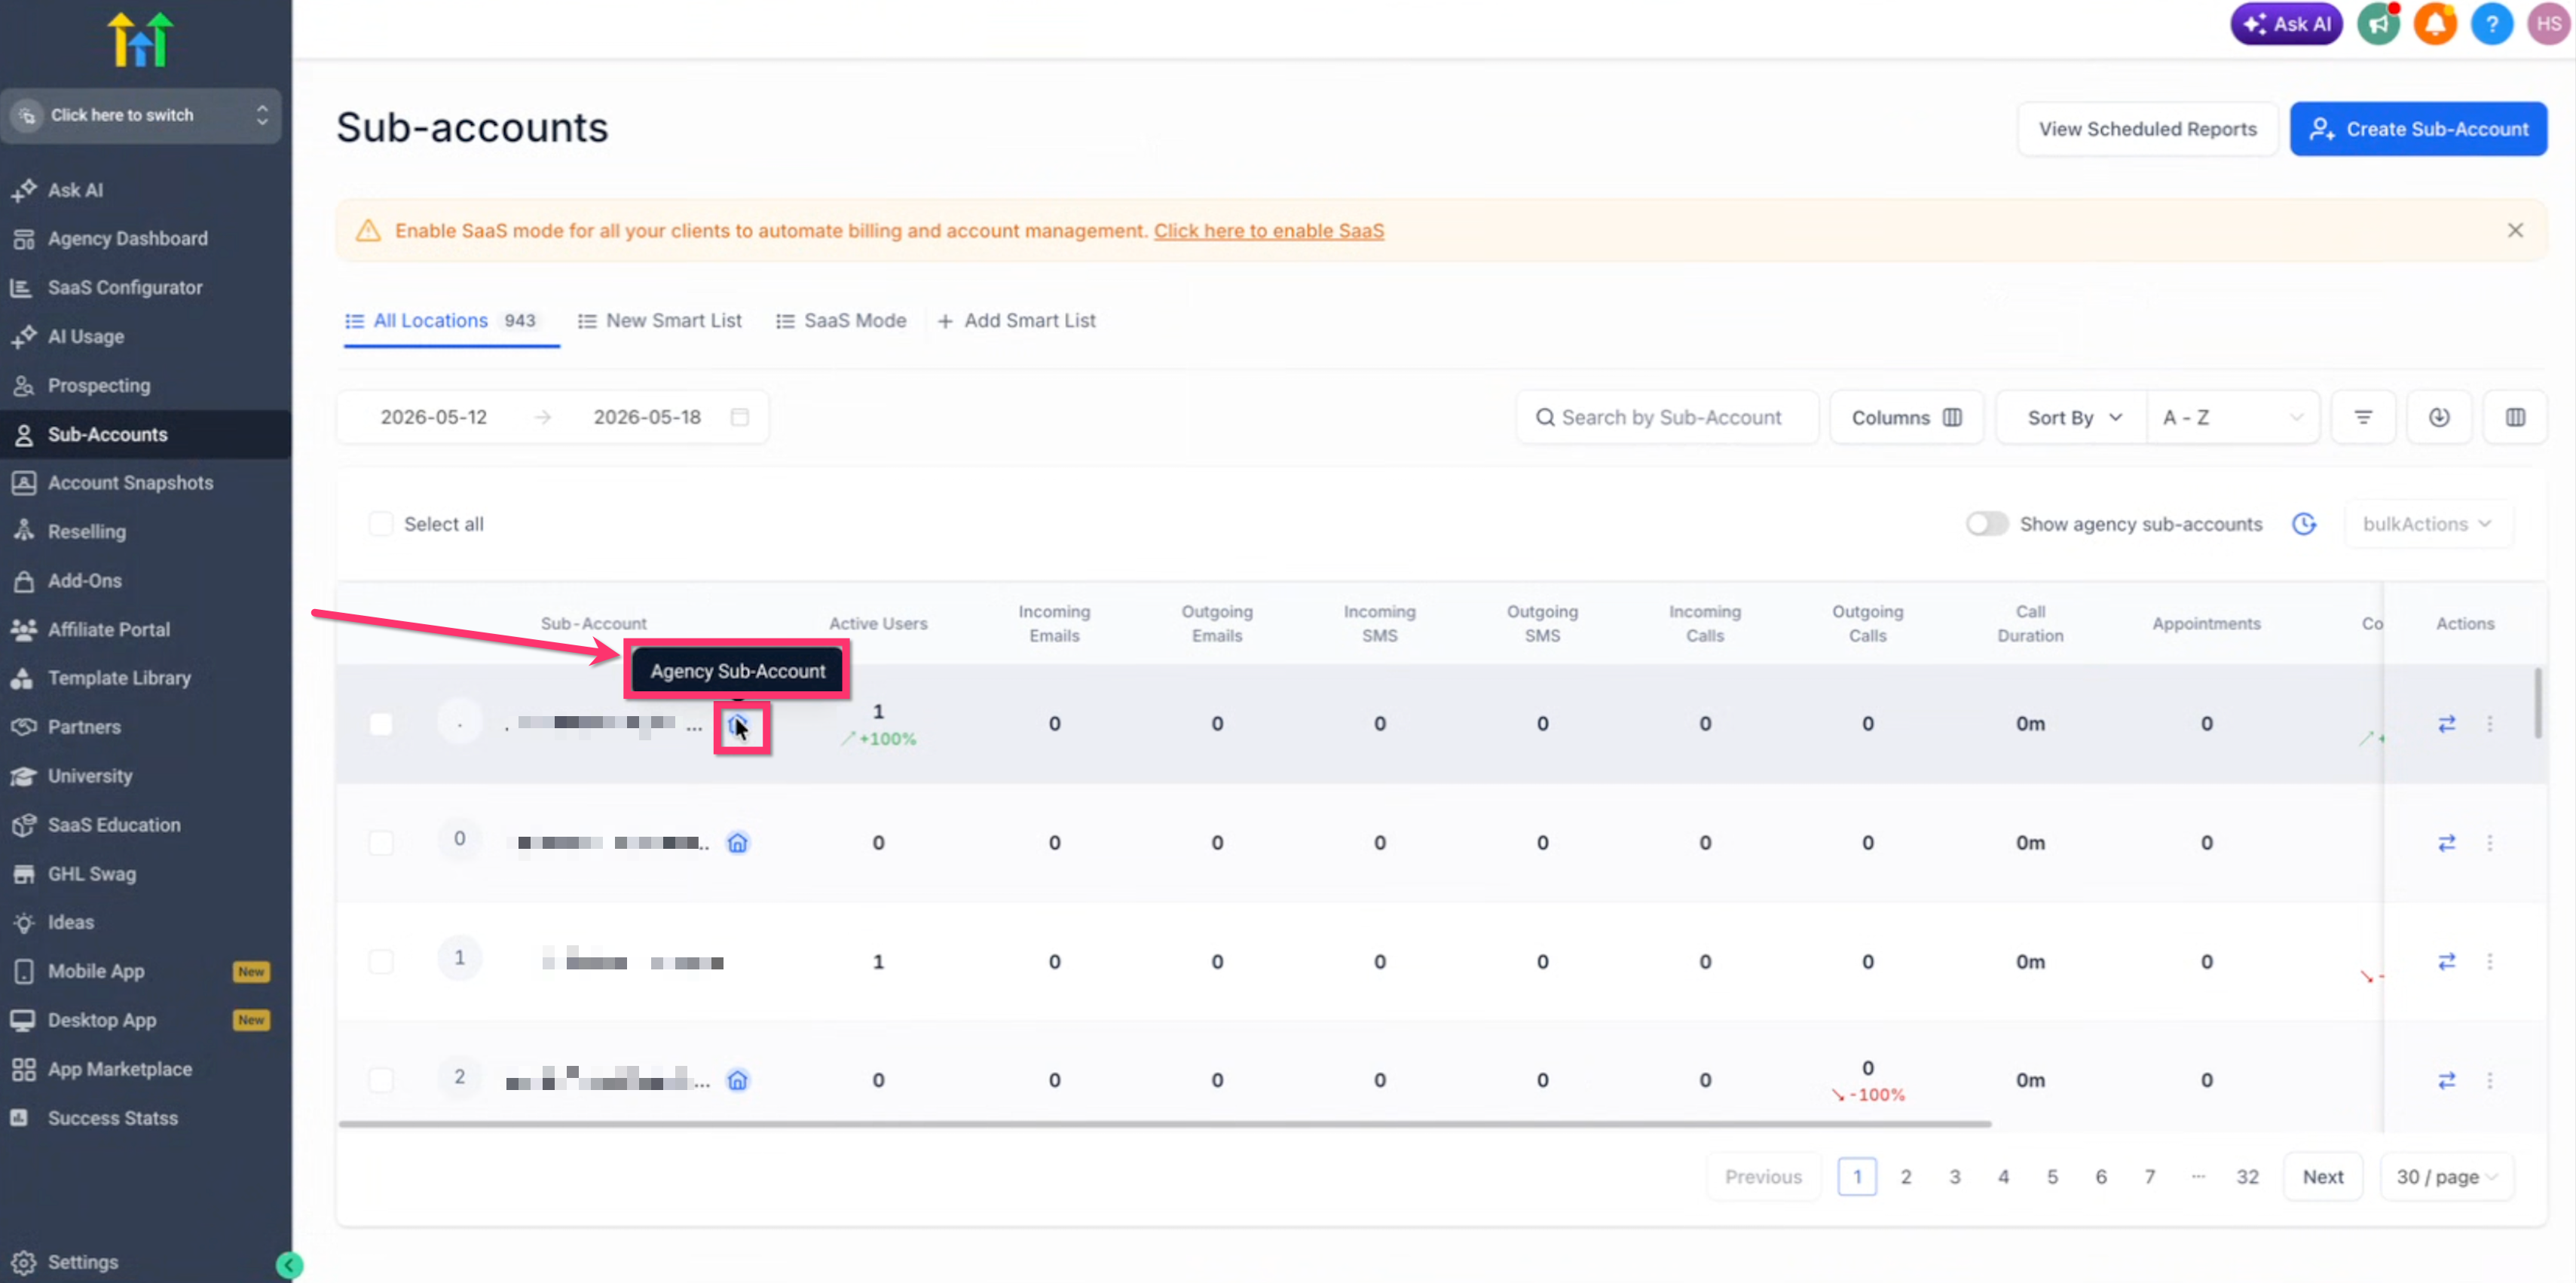
The blue badge marks the account that belongs to your agency. - Use the Show agency subaccounts only filter any time you need to find it fast.
- Inside this Agency SubAccount, confirm the supported payment provider is connected before you touch rebilling.
Part 02 of 06
Capture your master build as a snapshot.
A snapshot is a reusable template of one subaccount's configuration. Build it once from your cleanest subaccount and every client after that starts with the same workflows, funnels, calendars and forms. Contacts, conversations and appointments never copy over, and that is by design.
- Open the master subaccount and check that every workflow, funnel, calendar and form you want to reuse is finished.
- Go to Agency View, then Account Snapshots.
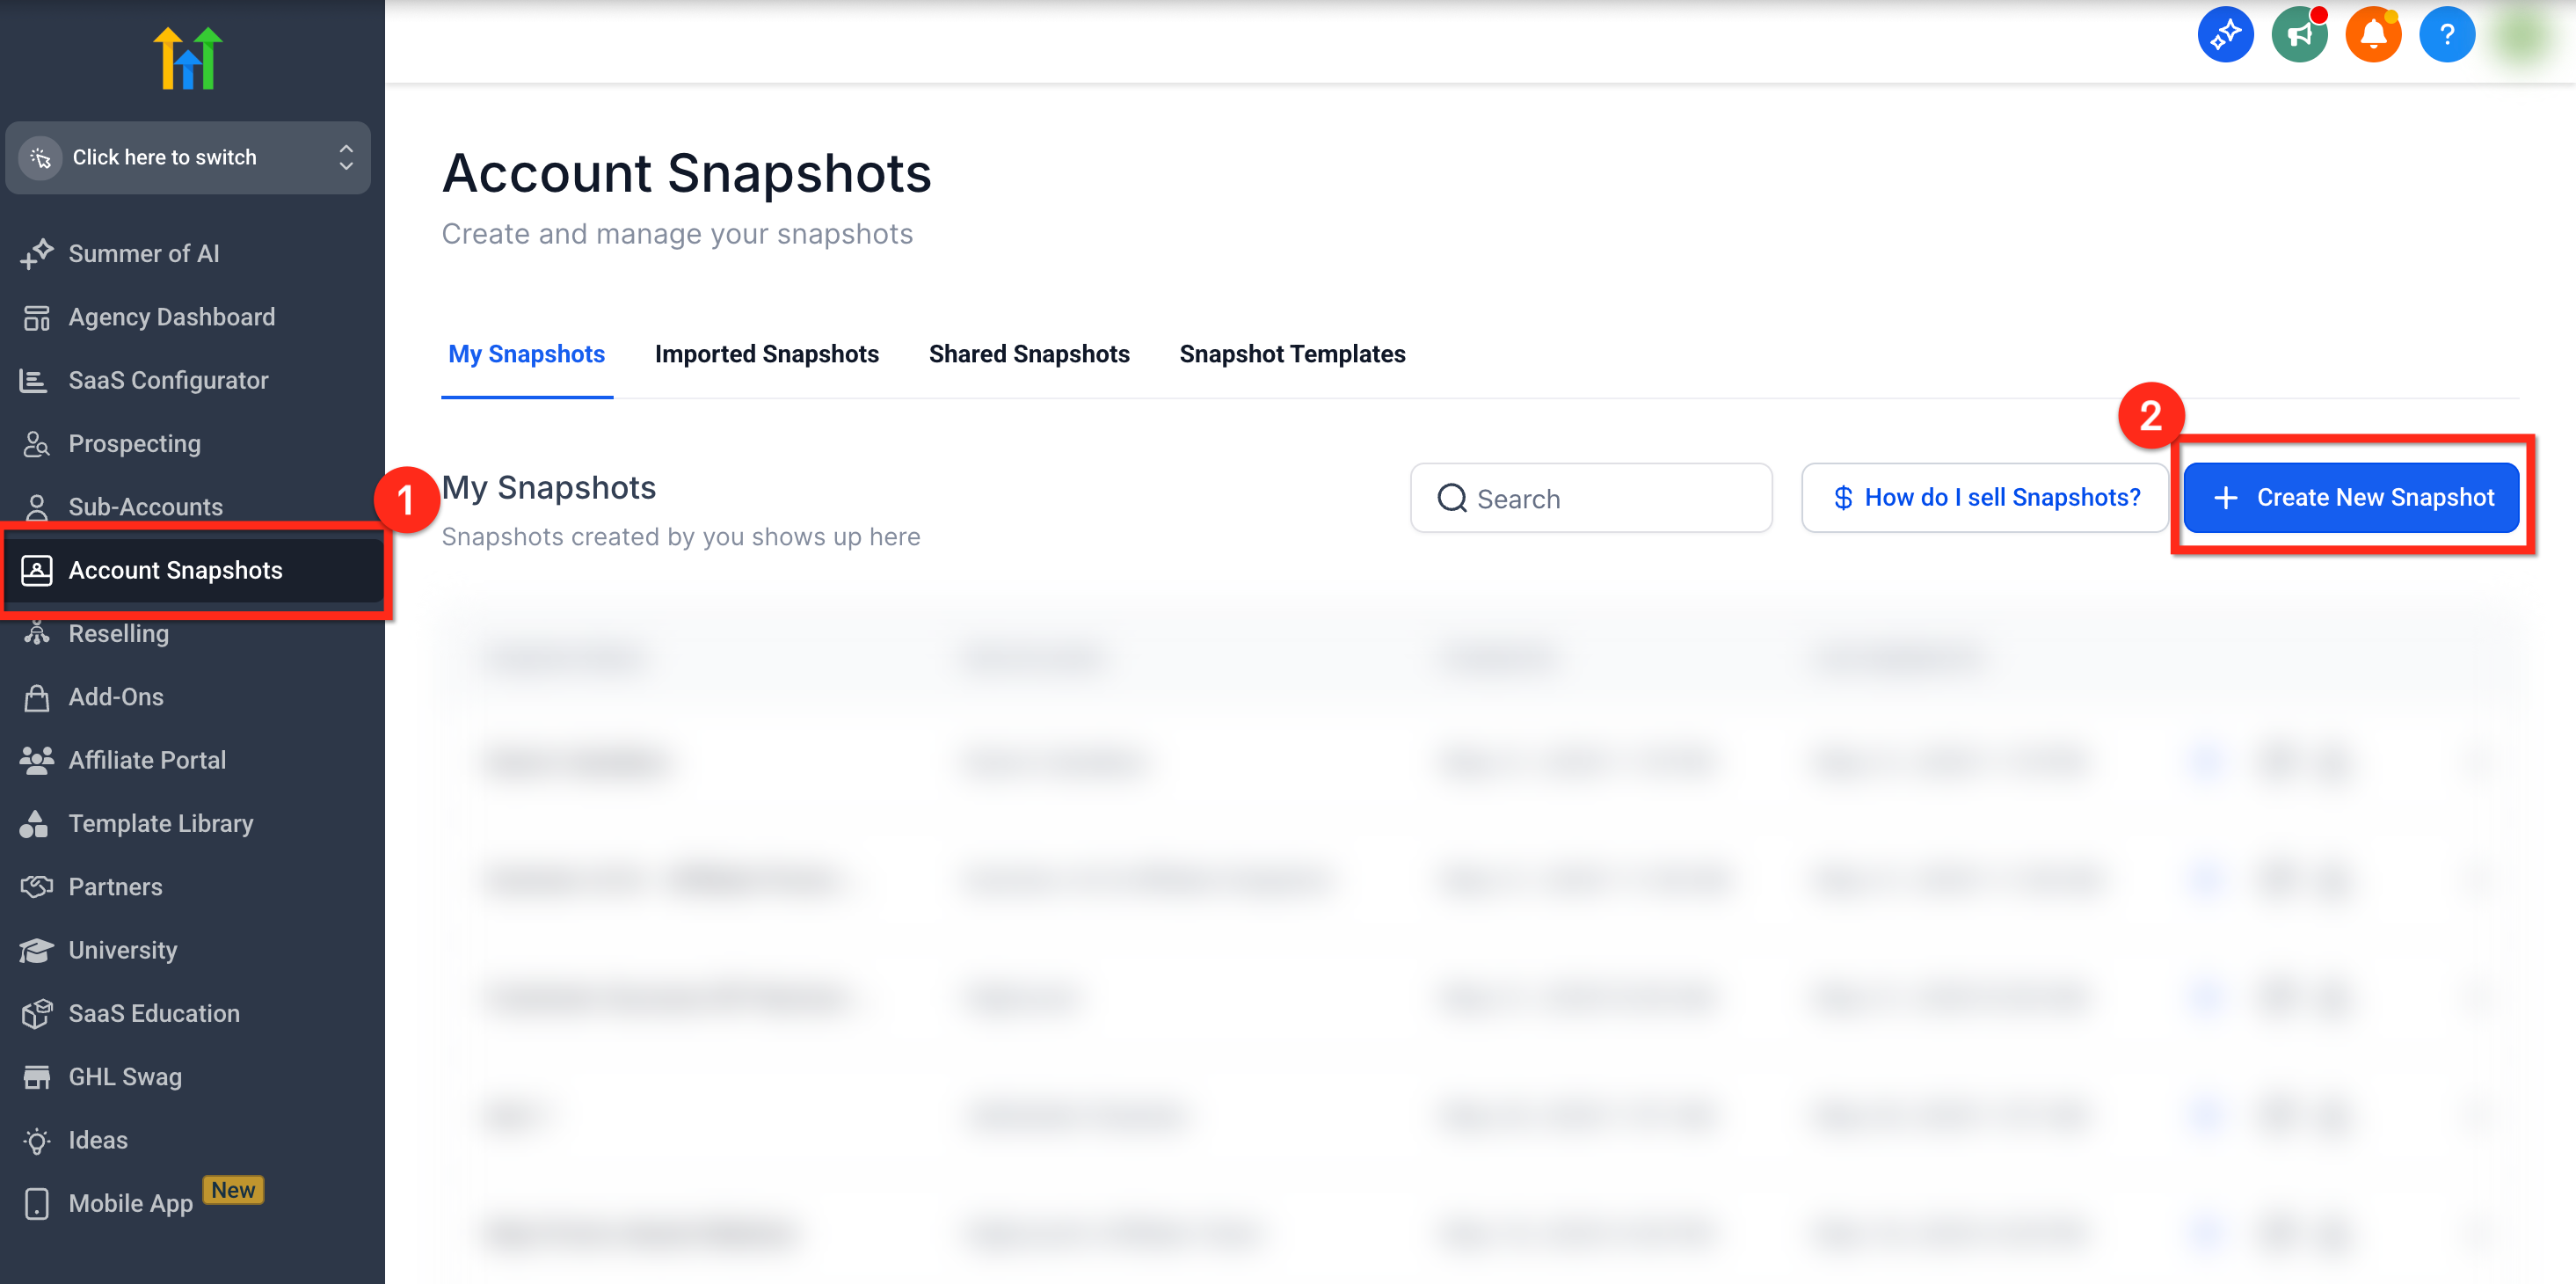
Account Snapshots lives in Agency View. - Click the blue + Create New Snapshot button in the top right.
- Enter a clear snapshot name and select the master subaccount as the source.
- Click Select All, or expand each category and pick the specific items you want.
- Include the Company Custom Fields you want carried over.
- Click Create to save the snapshot.
- If any category fails to load during creation, click Retry to fetch it again without starting over.
Part 03 of 06
Create the client subaccount and load the snapshot.
Now you build the first client account from your template. Load the snapshot from inside the client's Manage Client screen so the assets land in the right place. Review the asset list and any conflicts before you confirm.
- Go to Agency View, then SubAccounts, and create the client's subaccount as a client account, not your own.
- In the subaccount list, click the three dot menu on the client account and choose Manage Client.
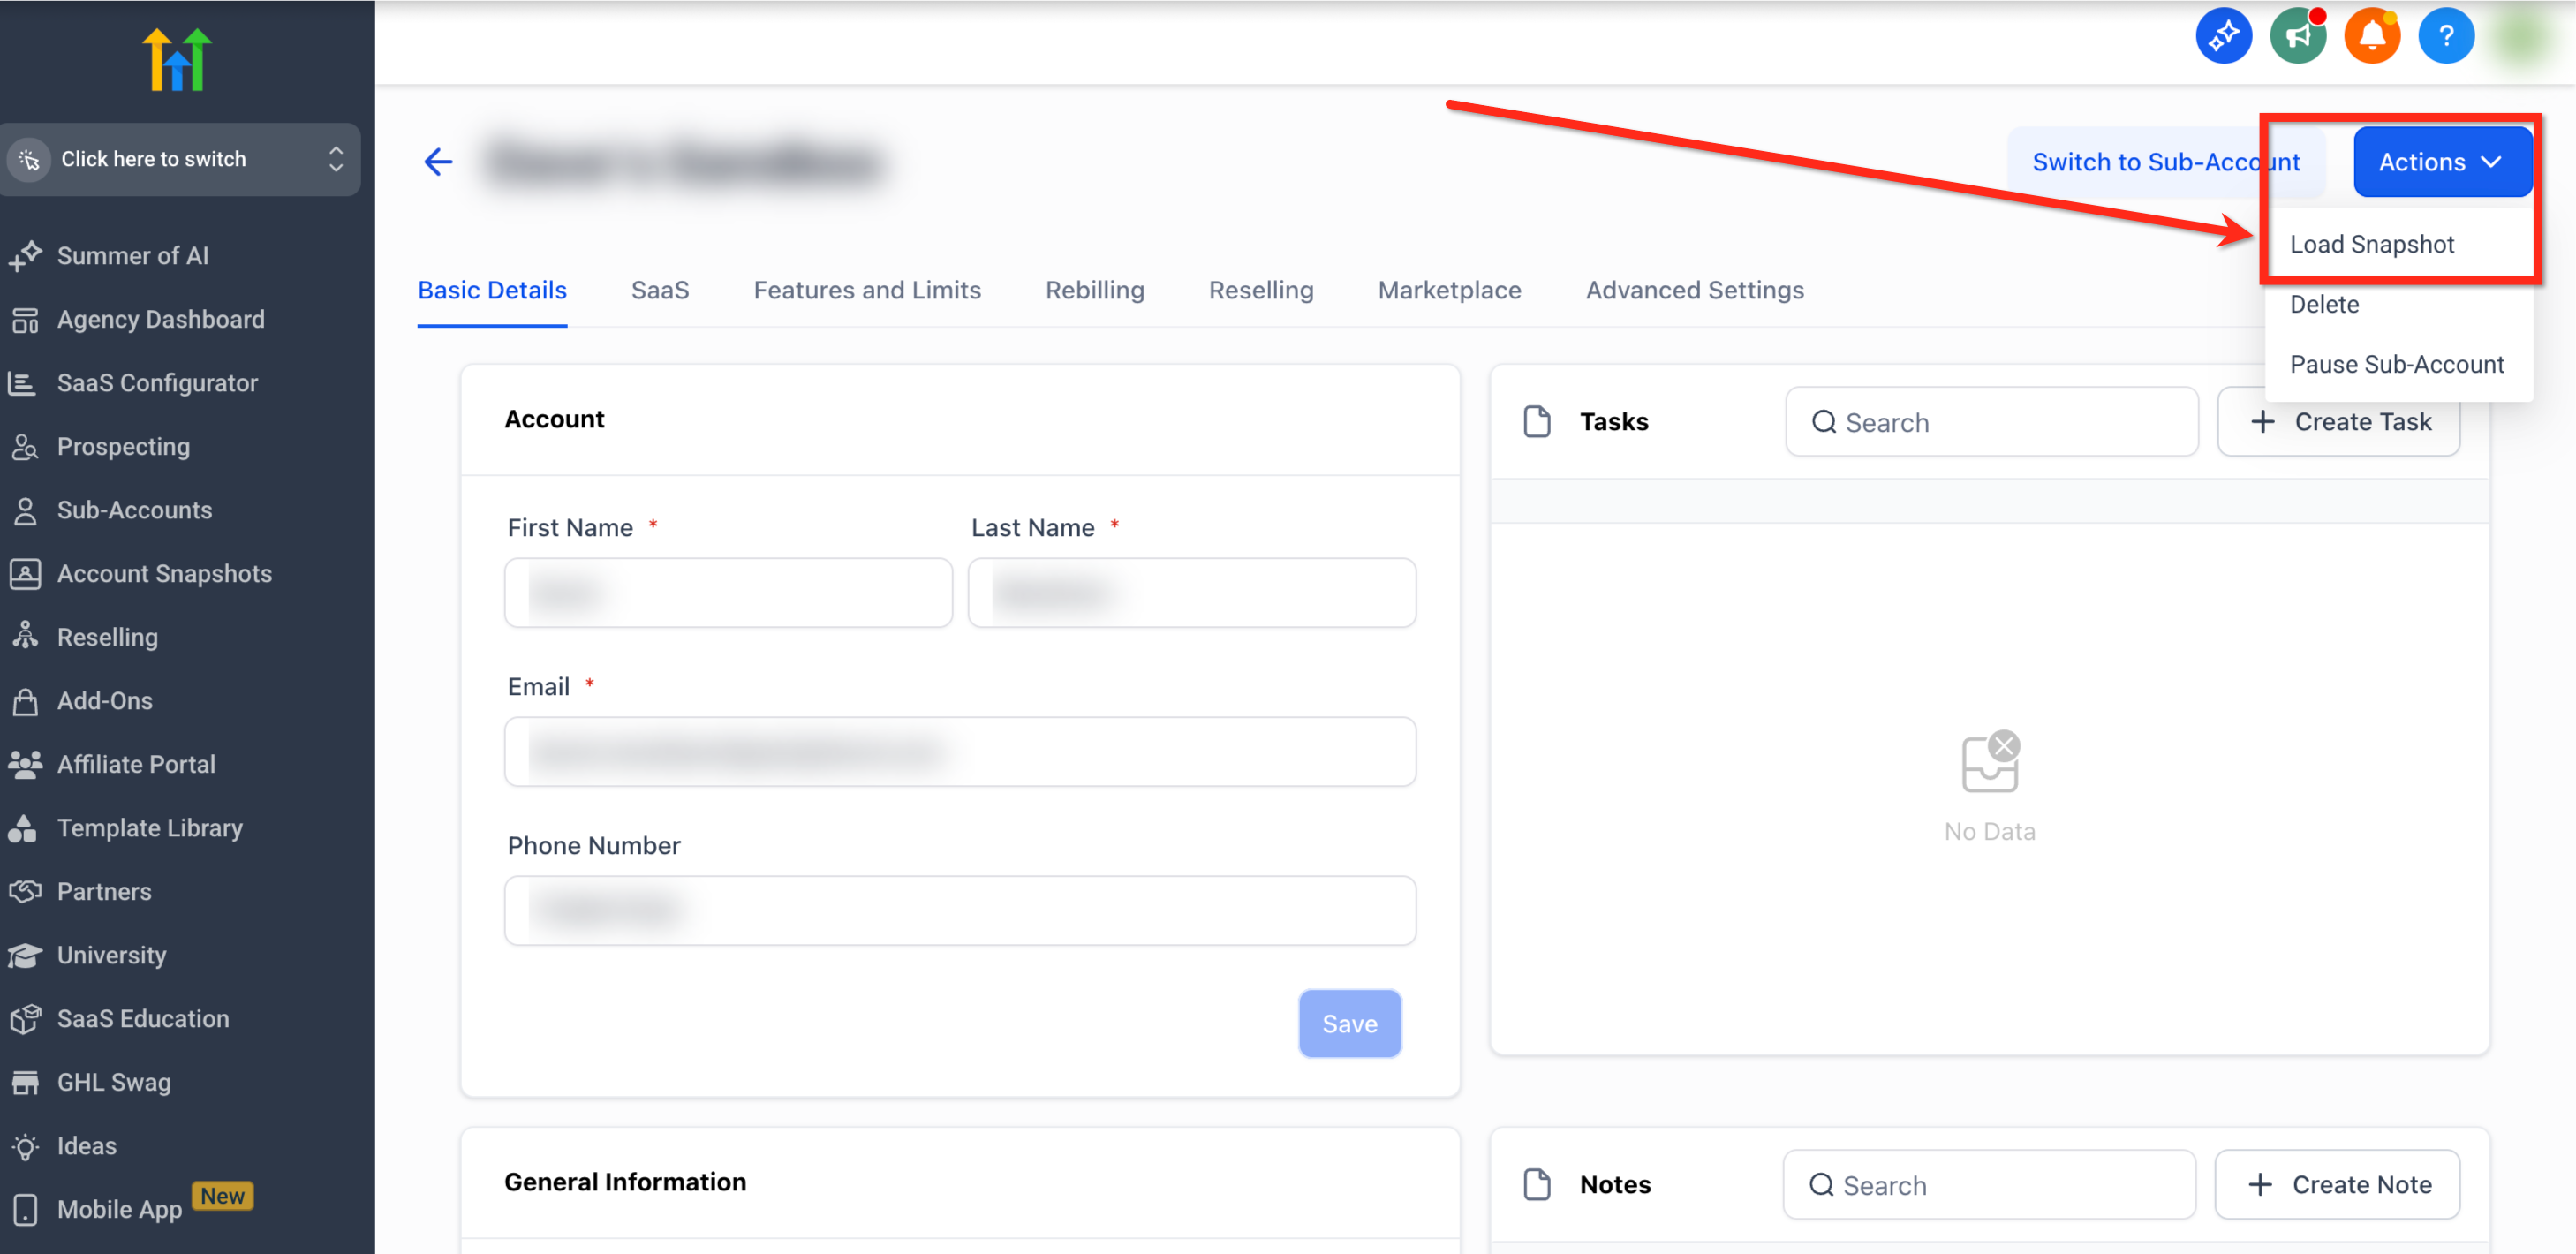
Load Snapshot sits under Actions in Manage Client. - Click Actions in the upper right corner and choose Load Snapshot.
- In the Load Snapshot popup, open Pick a Snapshot, select your master snapshot, and click Proceed.
- Pick the assets to import with the checkboxes, or click Select All, then click Proceed.
- If dashboards are included, click Set as default on the one dashboard the client should see first.
- On the conflict screen, choose Override or Skip for each item, then click Proceed.
- Type confirm when prompted, click Proceed, and wait for the success notification and the confirmation email.
Part 04 of 06
Turn on rebilling and set your markup.
Rebilling charges the client for their own usage. You always pay HighLevel first, then bill the client the same amount or a marked up amount. The client needs a card in Company Billing or the configuration waits On Hold.
- Have the client add a valid card in SubAccount View, then Settings, then Company Billing.
- Go to Agency View, then SubAccounts, click the three dots on the client account, and choose Manage Client.
- Open the Rebilling tab.
- Configure the markup for each usage based service and save.
- If the configuration shows On Hold, wait for the client's card to be added; it activates on its own after the first payment succeeds.
- For many clients at once, go to SubAccounts, check each account, click Bulk Actions, and choose Enable Rebilling.
- In the popup select your payment provider, click Continue, drag the Enable rebilling on all services and apply same markup slider, adjust individual sliders, and click Enable Rebilling.
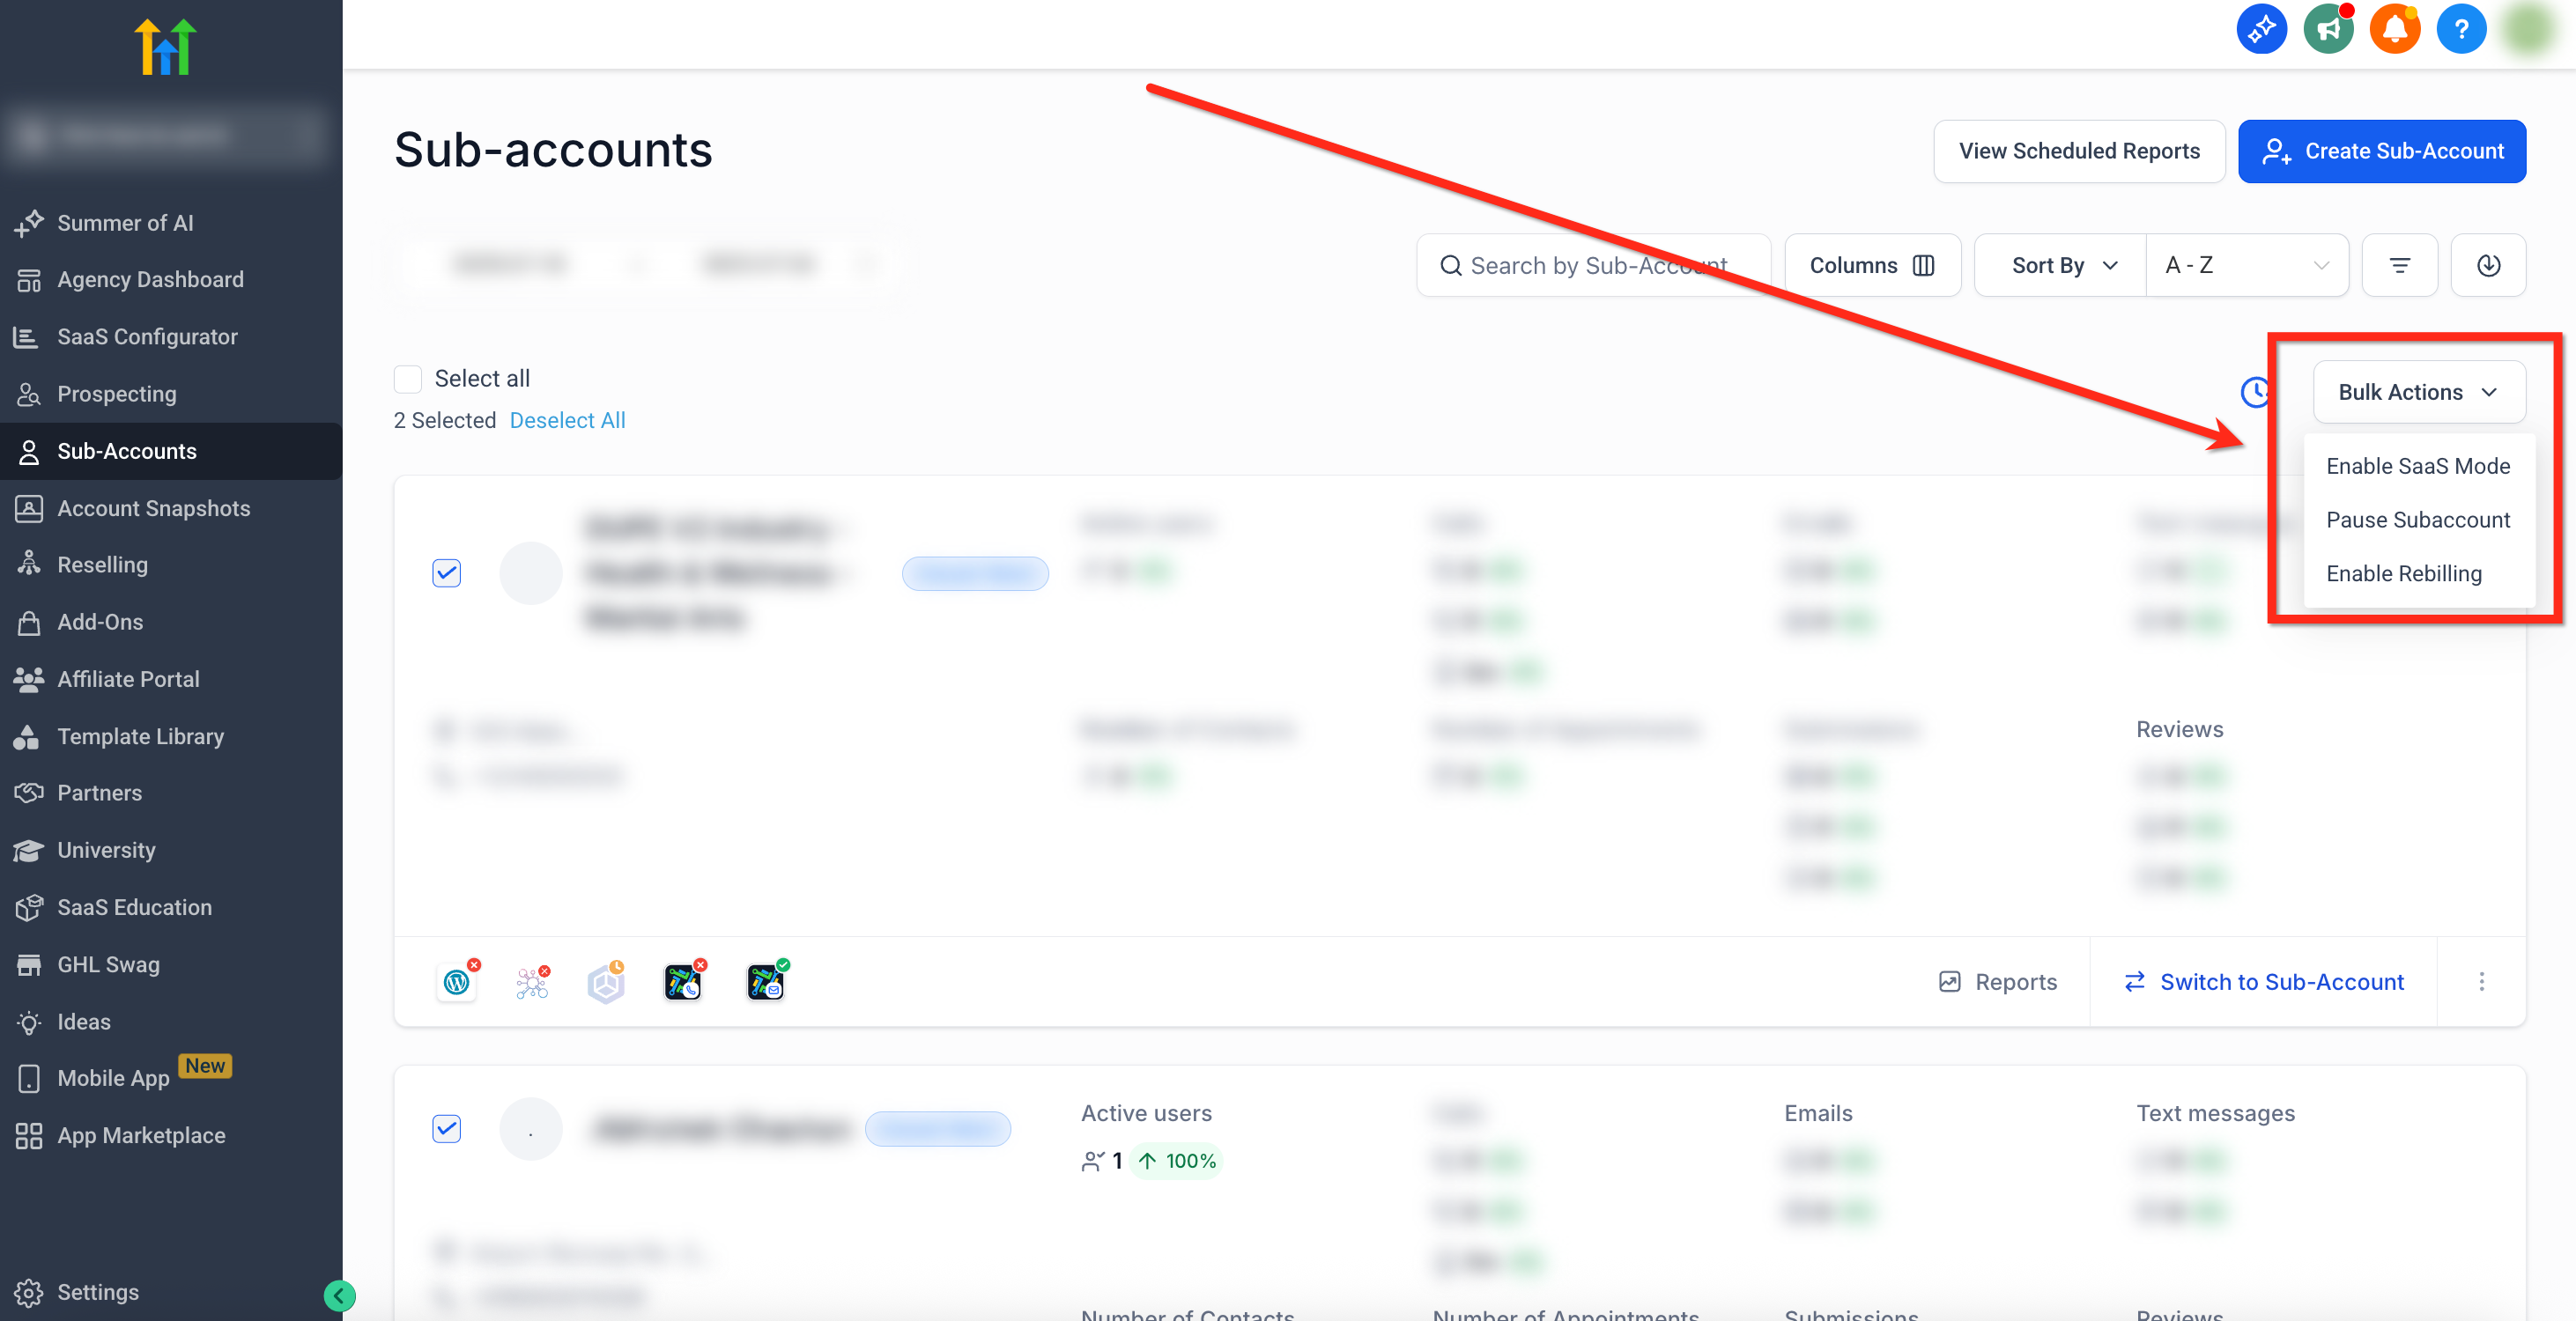
One global slider sets the same markup across every service. - Click the Clock Icon next to Bulk Actions to confirm the bulk job finished.
Part 05 of 06
Set the wallets so services never stop.
Usage based services draw from a wallet. When the balance drops below a threshold, the card on file reloads it. Set this on your agency wallet and on the client wallet, then add a usage alert so a heavy user never surprises you.
- Go to Agency View, then Settings, then Billing, and set your agency wallet's reload amount and minimum balance.
- In the client subaccount, go to Settings, then Company Billing, then Credits.
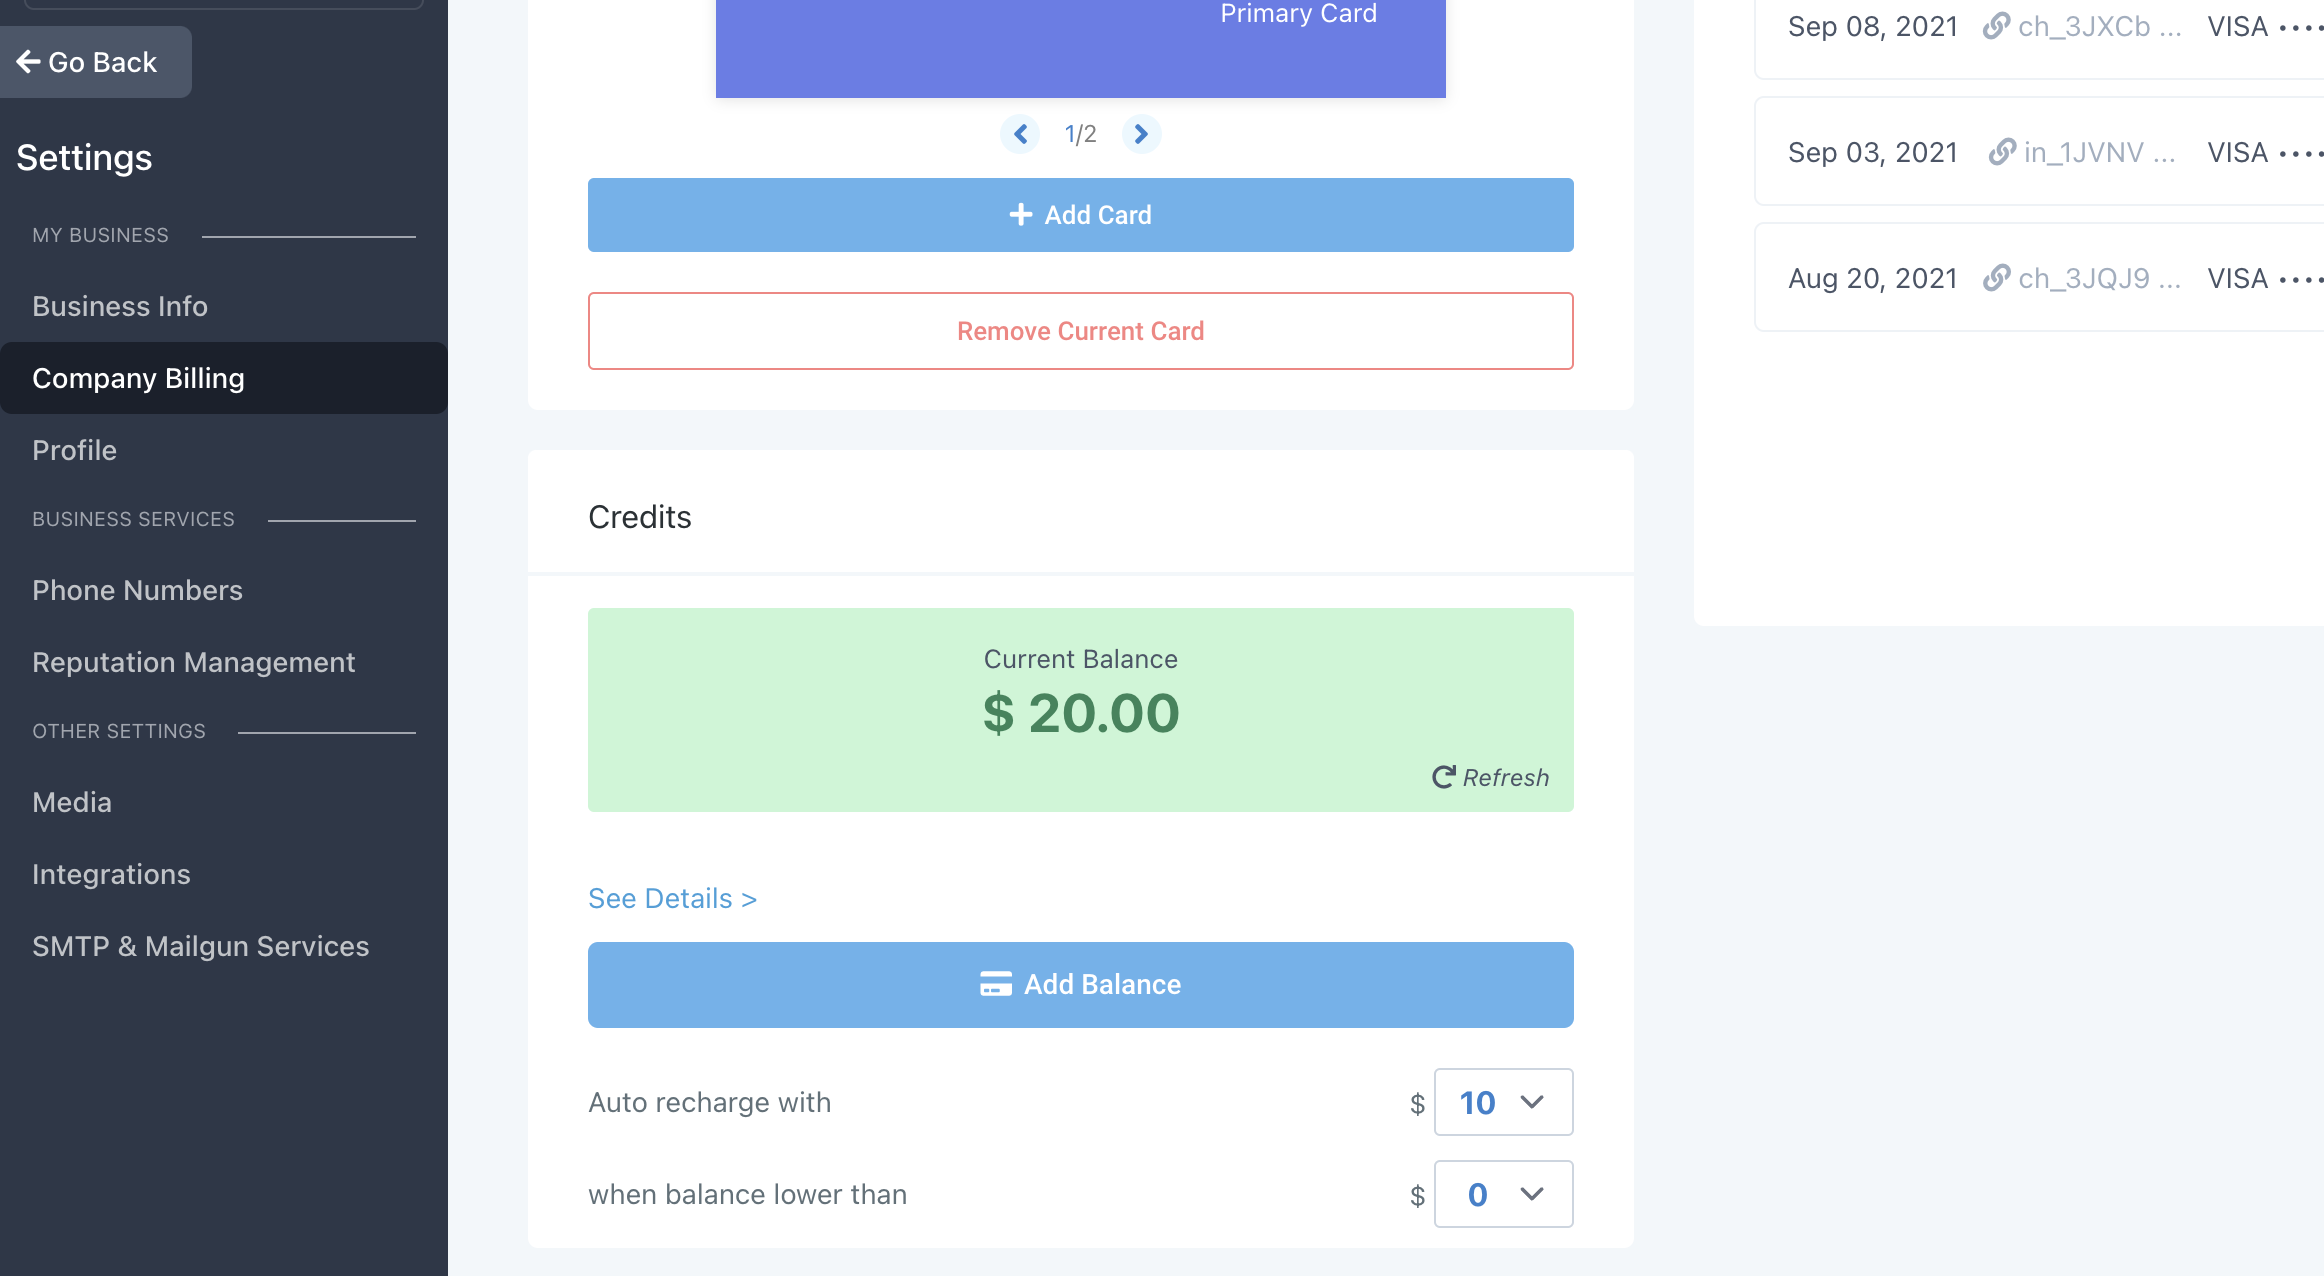
Auto recharge settings live under Company Billing, then Credits. - Enter the amount in the Auto Recharge with field.
- Enter the threshold in the when balance lower than field.
- Click See Details under Credits to confirm the wallet history is logging transactions.
- Go to Agency View, then Billing, then Notifications, then Wallet, and click Add a condition to set a usage threshold.
- Select the notification frequency, add any admin or user emails, and save.
Part 06 of 06
Open the dashboard and check your profit.
The Rebilling tab on the Agency Dashboard pulls revenue, cost and profit from every rebilled subaccount. Set the filters once, keep the rebilled only toggle on, and export when you need transaction level detail.
- Log in to Agency View and click Agency Dashboard in the left navigation.
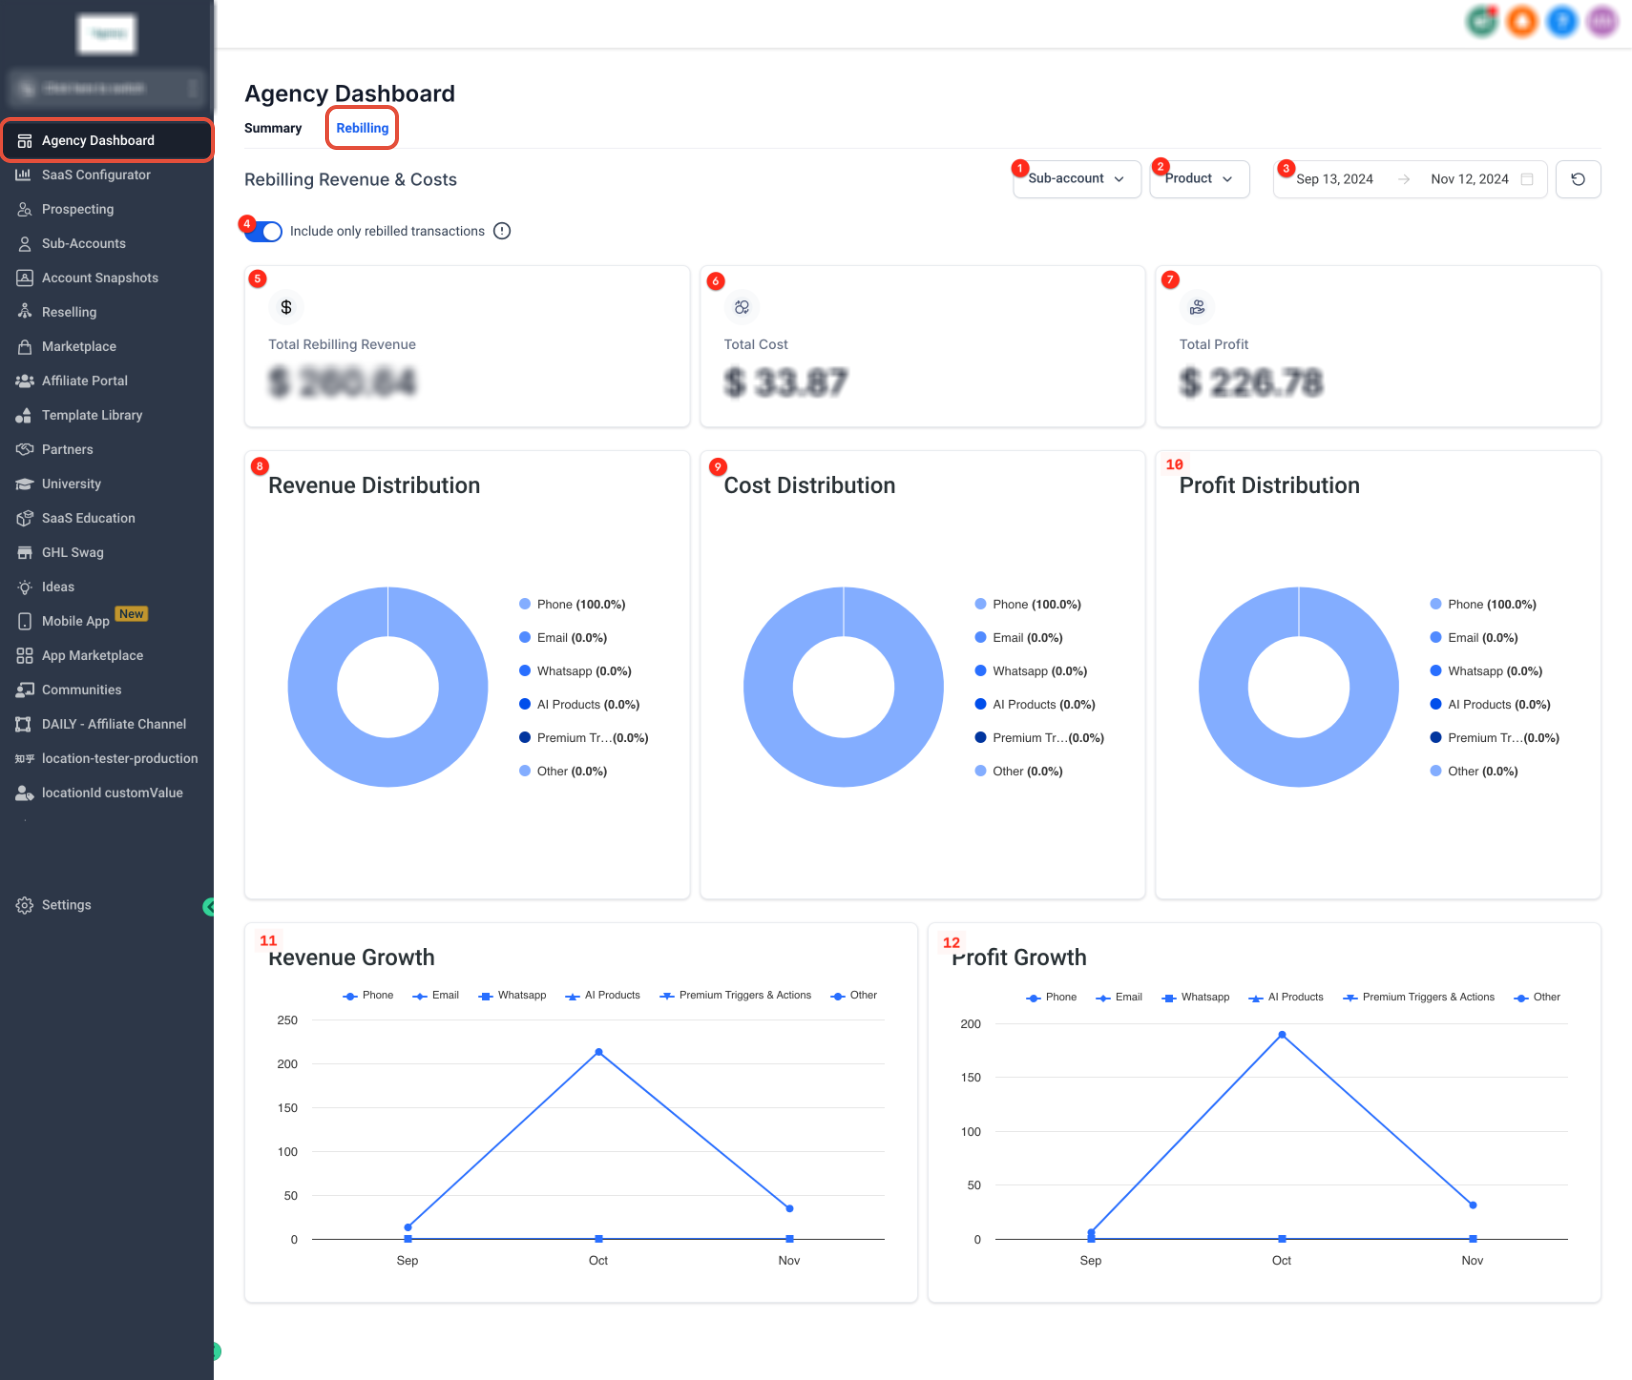
Revenue, cost and profit cards sit under the filters. - Select the Rebilling tab.
- Use the Subaccount filter to select your first client.
- Choose a Product filter such as Phone, Email, WhatsApp, LC Premium Triggers & Actions or AI Products.
- Set a custom Date range and click Confirm.
- Turn on Include only rebilled transactions.
- Click Refresh, then read the total revenue, total cost and total profit cards.
- Click Export to download the CSV and add a Profit column by subtracting Usage Cost from Charge.
Test it
Test the build before you bill anyone.
Run these checks on the first client account before you add the next one.
- Open Agency View, then SubAccounts, and confirm the blue Agency subaccount badge shows only on your own account.
- Open the client subaccount and confirm the workflows, funnels and calendars from the snapshot are there and the default dashboard loads first.
- Open Manage Client, then Rebilling, and confirm the status is active, not On Hold.
- Send one test SMS or email from the client account, then open Company Billing, then Credits, then See Details and confirm the credit deduction appears.
- Open Agency View, then Billing, then Notifications, then Wallet, and confirm your usage condition is saved.
- Open the Rebilling tab on the Agency Dashboard, filter to the client, and confirm the test usage shows as cost and revenue.
- Export the CSV and confirm the Charge minus Usage Cost matches the profit card for the same date range.
When a step fails
When something breaks, fix it here.
These are the problems that come up most, with the fix the sources give.
- Rebilling sits On Hold and never activates
- The client has no payment method. Add a valid card in SubAccount View, then Settings, then Company Billing. Rebilling activates once the first payment succeeds.
- Load Snapshot is missing from the Actions menu
- Enable Snapshot access under User, then Roles and Permissions from the Agency Dashboard, then reopen Manage Client.
- Wallet will not reload
- Check the card on file for address or detail errors, or contact the bank. If one card fails, HighLevel tries other saved cards. Manage cards in the Agency Stripe dashboard. If automatic retries are exhausted, recharge manually to reset the counter.
- Dashboard totals do not match the exported report
- Apply the same date range, product and subaccount filters in both places, and check the Include only rebilled transactions toggle matches.
- Dashboard numbers do not match Stripe payouts
- The dashboard excludes Stripe processing fees, direct refunds and timing differences. Negative revenue comes from refunds, cancellations or prorated adjustments.
- Bulk rebilling wiped a client's custom markup
- Bulk configuration overwrites existing markups. Open that client's Manage Client, then Rebilling tab and set the markup again individually.
Questions
What do people ask about GoHighLevel Founder Plan setup?
- Is an Agency SubAccount different from a normal subaccount?
- It is still a regular subaccount. The designation marks it as the account of your own agency instead of a client account, and it holds your payment provider connections and rebilling configuration.
- Do snapshots copy contacts, conversations or appointments?
- No. Snapshots carry configuration and reusable assets like workflows, funnels, calendars and forms. Live account data stays in the source account.
- What is deducted from the wallet and what is charged to the card?
- Usage based rebilling services come out of the wallet, and the card is charged when the balance drops below the minimum. Monthly fees and reselling items like WhatsApp subscriptions, Yext and WordPress hosting go straight to the card on file.
- Can I bulk disable rebilling?
- No. Bulk actions enable and configure markups only. Disabling rebilling is done one subaccount at a time.
- Why does the rebilling dashboard only show six months?
- The dashboard limits reporting to the most recent six months. Export the CSV each month if you need a longer record.
- What happens when a wallet runs out of money?
- If a wallet hits $0.00 or goes negative, LC services stop until a payment reloads it. Software wallets retry a recharge 7 times, one per day. Agency wallets retry 12 times over 3 days. A manual recharge resets the counter.
From the field
Michael’s take.

The first thing I do after an upgrade is the boring part: connect Stripe and mark my own Agency SubAccount. Everything else hangs off that. People skip it, start loading snapshots into random accounts, and then wonder why the billing hub is tangled with client data. One account holds the money side. Keep it that way.
Where people go wrong is the snapshot. They assume contacts and appointments move. They do not. They also assume the load is safe, then hit Override on a conflict and lose a client's custom workflow for good. Pick only the assets you mean to use, read the conflict list, and test the whole thing in a dummy subaccount before a real client sees it. On rebilling, get the global markup slider right first so every client starts from the same margin, then adjust single services later if you need to.
This build pays off once you have more than a handful of clients sending SMS or running AI. With a few low usage accounts, the thresholds and markups can feel like overhead. With dozens, the wallet reloads and the Rebilling tab are the difference between guessing at margin and knowing it. Add the Profit column to your export every month and compare it to the dashboard. That ten minute habit catches more billing mistakes than anything else.
Go deeper
The features behind this build.
Every feature this guide touches has its own page in the library, with the settings, limits and Michael’s notes.
- SaaS ConfiguratorRebilling, reselling, and wallets explained for HighLevel agencies
- SaaS ConfiguratorSaaS Wallet Credit Management: Subaccount Level in HighLevel
- Agency ViewAgency dashboard for rebilling in HighLevel: Track revenue, costs and profit
- SaaS ConfiguratorSaaS Bulk Rebilling Setup for Multiple SubAccounts
- Agency ViewAgency SubAccounts in HighLevel for SaaS and Rebilling
- Account SnapshotsSnapshots overview: Reusable account templates in HighLevel
- Account SnapshotsCreating New Snapshots in HighLevel
- Account SnapshotsLoad Snapshots into Existing SubAccount
Get the guide
Take it with you. The PDF is yours.
The whole build, cover to cover, as a PDF you can keep open on a second screen or print for the team. HighLevel's Founder page opens alongside it.
Next step
Not on HighLevel yet? Start here.
Start your HighLevel trial through Michael and the CRM Pros team comes with it. You get the setup help, the community and the training that make a build like this stick.
The how to library has step by step HighLevel builds for Conversation AI, Voice AI, funnels, calendars, workflows and AI Studio. Go back to the full list.
Back to the GuidesAll the step by step builds