
Home/HighLevel/Guides/Set up the booking calendar
HighLevel Guides · Volume 05 · Calendars
Set up a GoHighLevel calendar for bookings and let the team share the load.
A GoHighLevel calendar can share bookings across a whole team. A round robin calendar hands each new booking to an available team member without anyone checking who is free. This guide takes you from an empty Calendars screen to a live calendar with working hours, distribution rules, a synced Google or Outlook calendar and a link or embed code you can share. At the end, a prospect picks a time and the right person gets the appointment. HighLevel is the same platform many people still search for as GoHighLevel.
What you are building
What you are building and what it does.
One round robin calendar for a team of two or more people. A prospect opens the booking page, sees only times when someone on the team is free, and books. HighLevel assigns the appointment by availability or by equal distribution, keeps repeat clients with the person they already know, and writes the appointment to each team member's own Google or Outlook calendar so nobody gets double booked.
- One booking link that spreads appointments across the whole team
- Working hours, buffers and date overrides that keep each day realistic
- Distribution and assignment rules that decide who gets each booking and each reschedule
- Each team member's Google or Outlook calendar synced so outside events block the slot
- A calendar embedded on your site or shared as a link
- Open times that show only when someone on the team is free
Before you start
Before you start, have these ready.
Gather these once and the build goes straight through.
- Admin or user level access to Calendar Settings in the subaccount
- Every team member who will take bookings added as a user in the subaccount
- Each team member's own Google account or Outlook account login, since calendar connections are tied to the individual user, not the company
- The meeting length, buffer and working hours you want for the team
- A decision on the distribution method: Optimize for Availability or Optimize for Equal Distribution
- A page on your site, or a HighLevel funnel page, where the calendar will live
Part 01 of 06
Create the calendar and add the team.
This part creates the round robin calendar itself and puts the team on it. Everything else in the guide lives inside this one calendar.
- Go to Settings, then Calendars, and click Create Calendar.
- Select Round Robin as the calendar type.
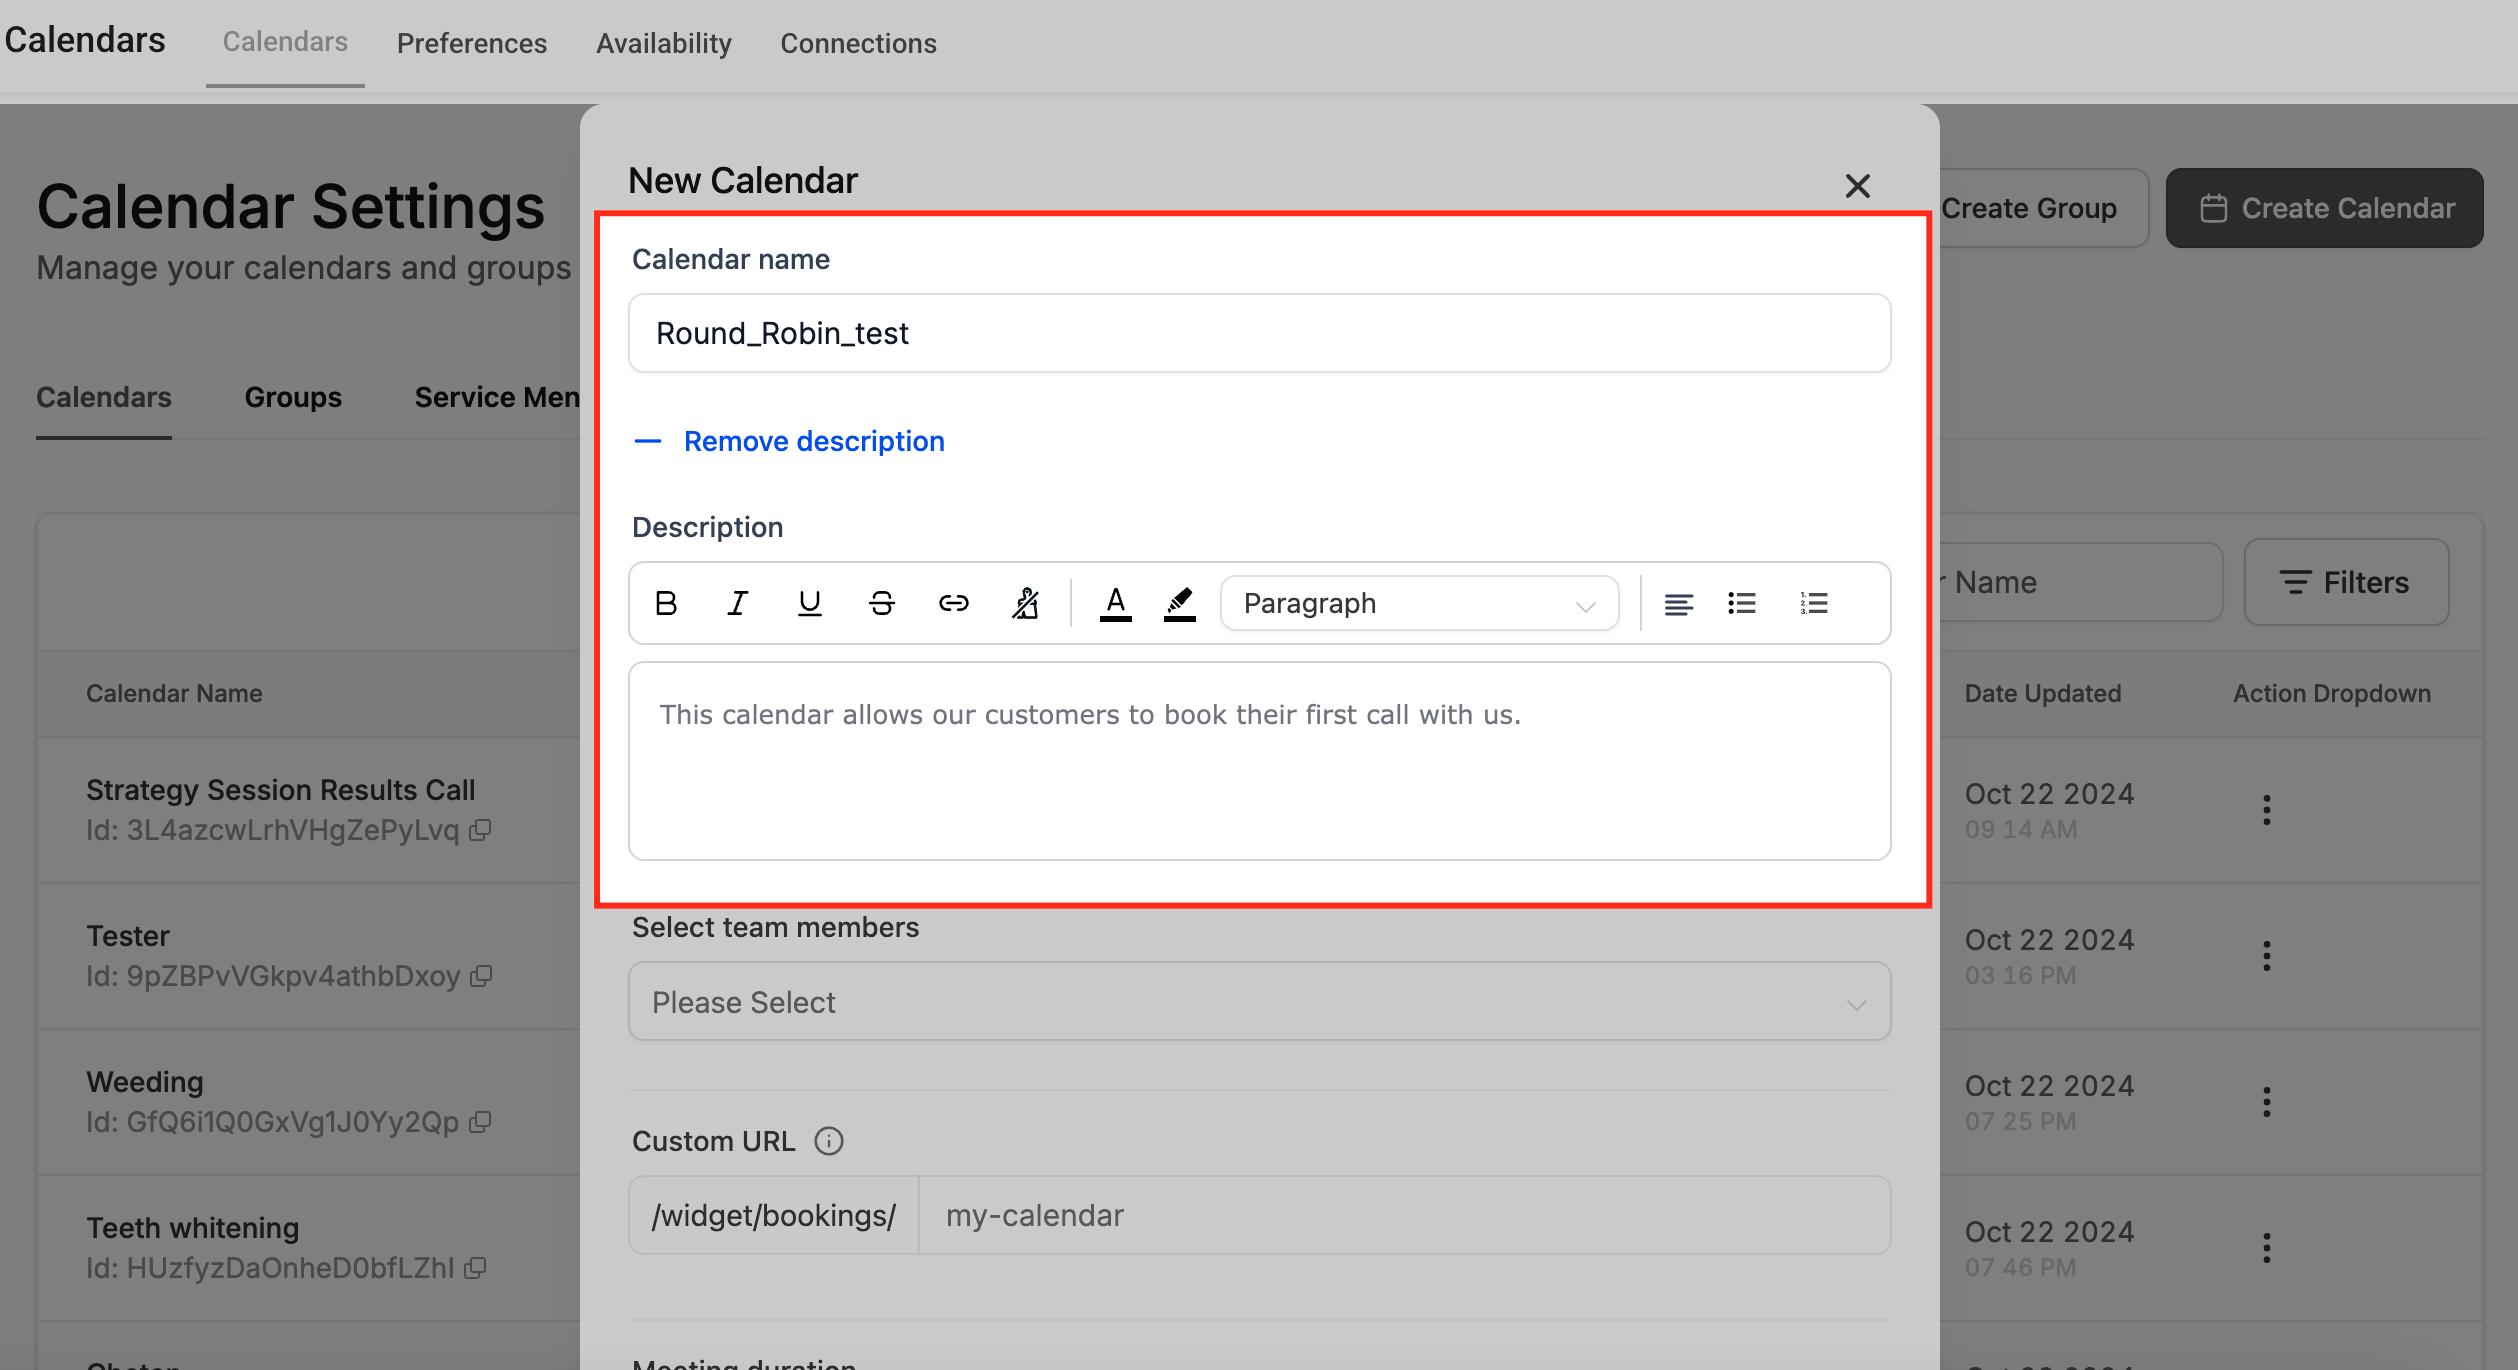
The calendar name, description and team members are set on the first screen. - Enter a Calendar Name and a Description that says what the meeting is for.
- Select the Team Members who will receive appointments through this calendar.
- Edit the Custom URL slug if you want a cleaner link. HighLevel checks whether the slug is taken and prompts you if it is.
- Set the Meeting Duration.
- Turn on Accept Payments only if you charge for the meeting, then pick the currency and add a description under Payment Information.
- Click Save.
Part 02 of 06
Set the hours and the spacing between meetings.
Working hours decide when the calendar can accept a booking. Slot and buffer settings decide how those hours get carved up. Get the buffer right here and the rest of the day stays realistic.
- Go to Calendars, then Calendar Settings, and click Edit Calendar on your round robin calendar.
- Select Availability in the left menu.
- Under Booking Availability, click a team member's name to open the side panel.
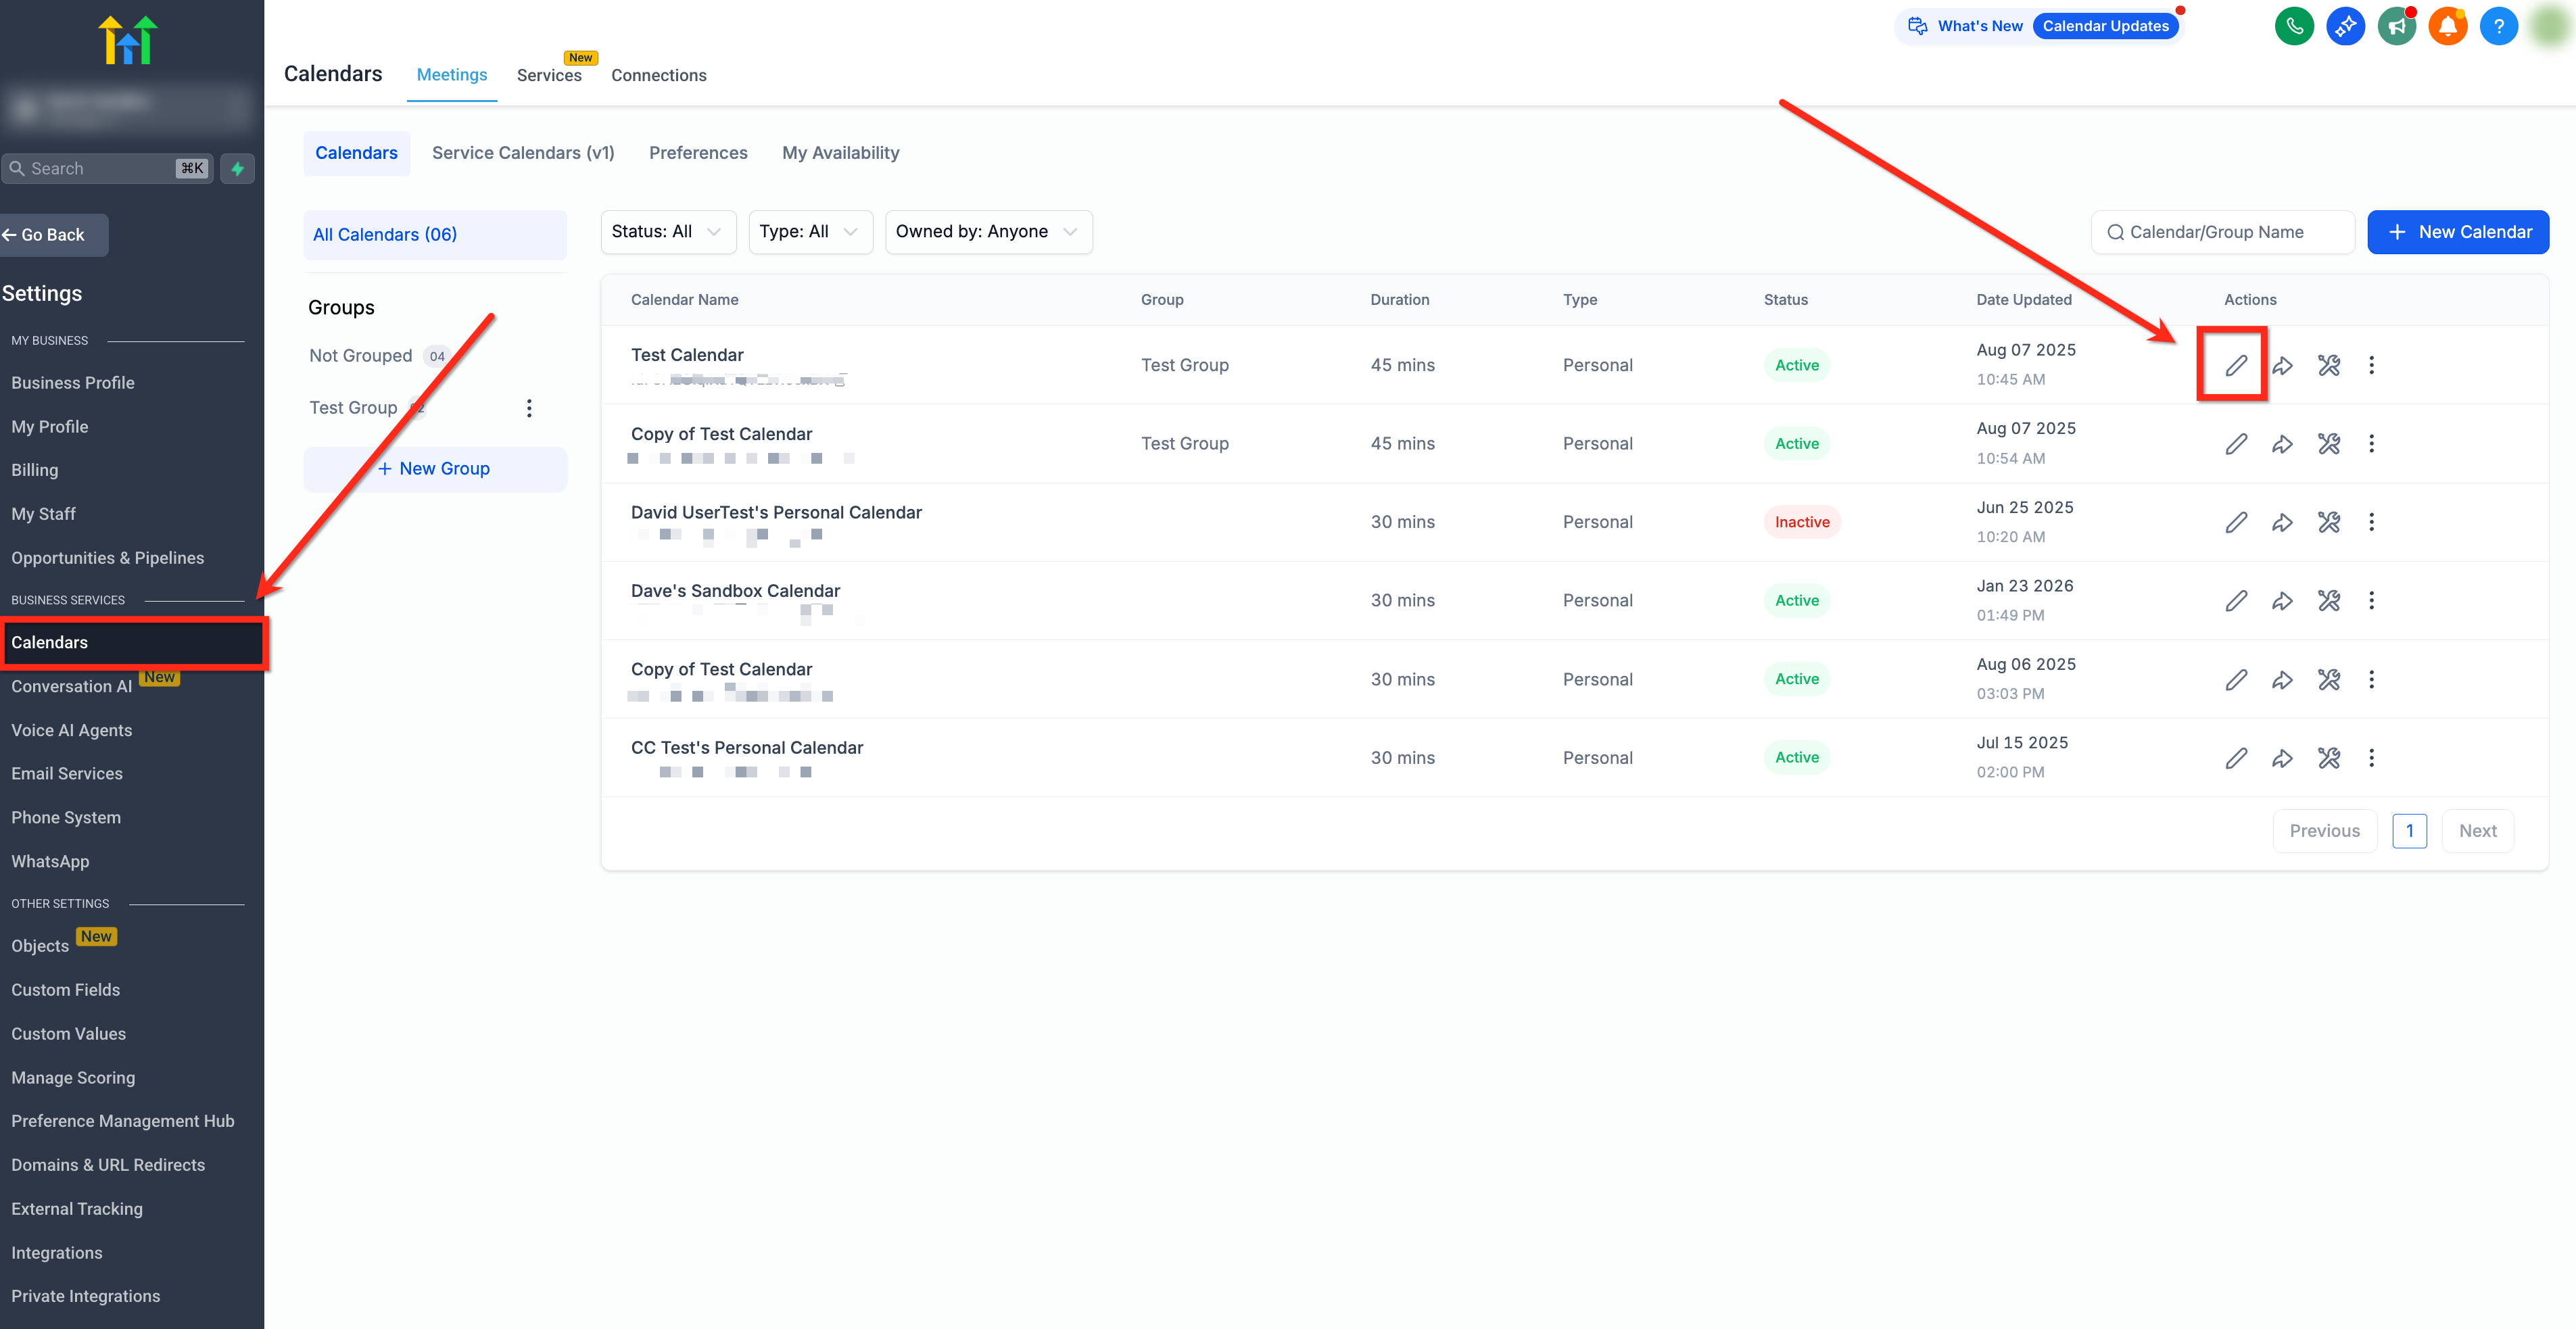
Weekly working hours repeat every week. Date specific hours override single dates. - In Weekly Working Hours, click Edit and set the hours for each day. Click Copy to apply one day's hours to other days.
- Click the blue Save button.
- To override a holiday or special day, click + Add Date Specific Hours, select the dates, set the Start time and End time, and save.
- Set the Slot Interval, the Buffer before or after each appointment, Appointments per slot and Appointments per day.
- Set the Minimum scheduling notice and the Date range so last minute bookings and far future bookings stay within reason.
Part 03 of 06
Pick the distribution method and set priority.
This is where you tell HighLevel how to choose between team members when more than one is free. The two methods behave differently, so pick the one that matches how the team works.
- Open the calendar settings and find the distribution options for the round robin calendar.
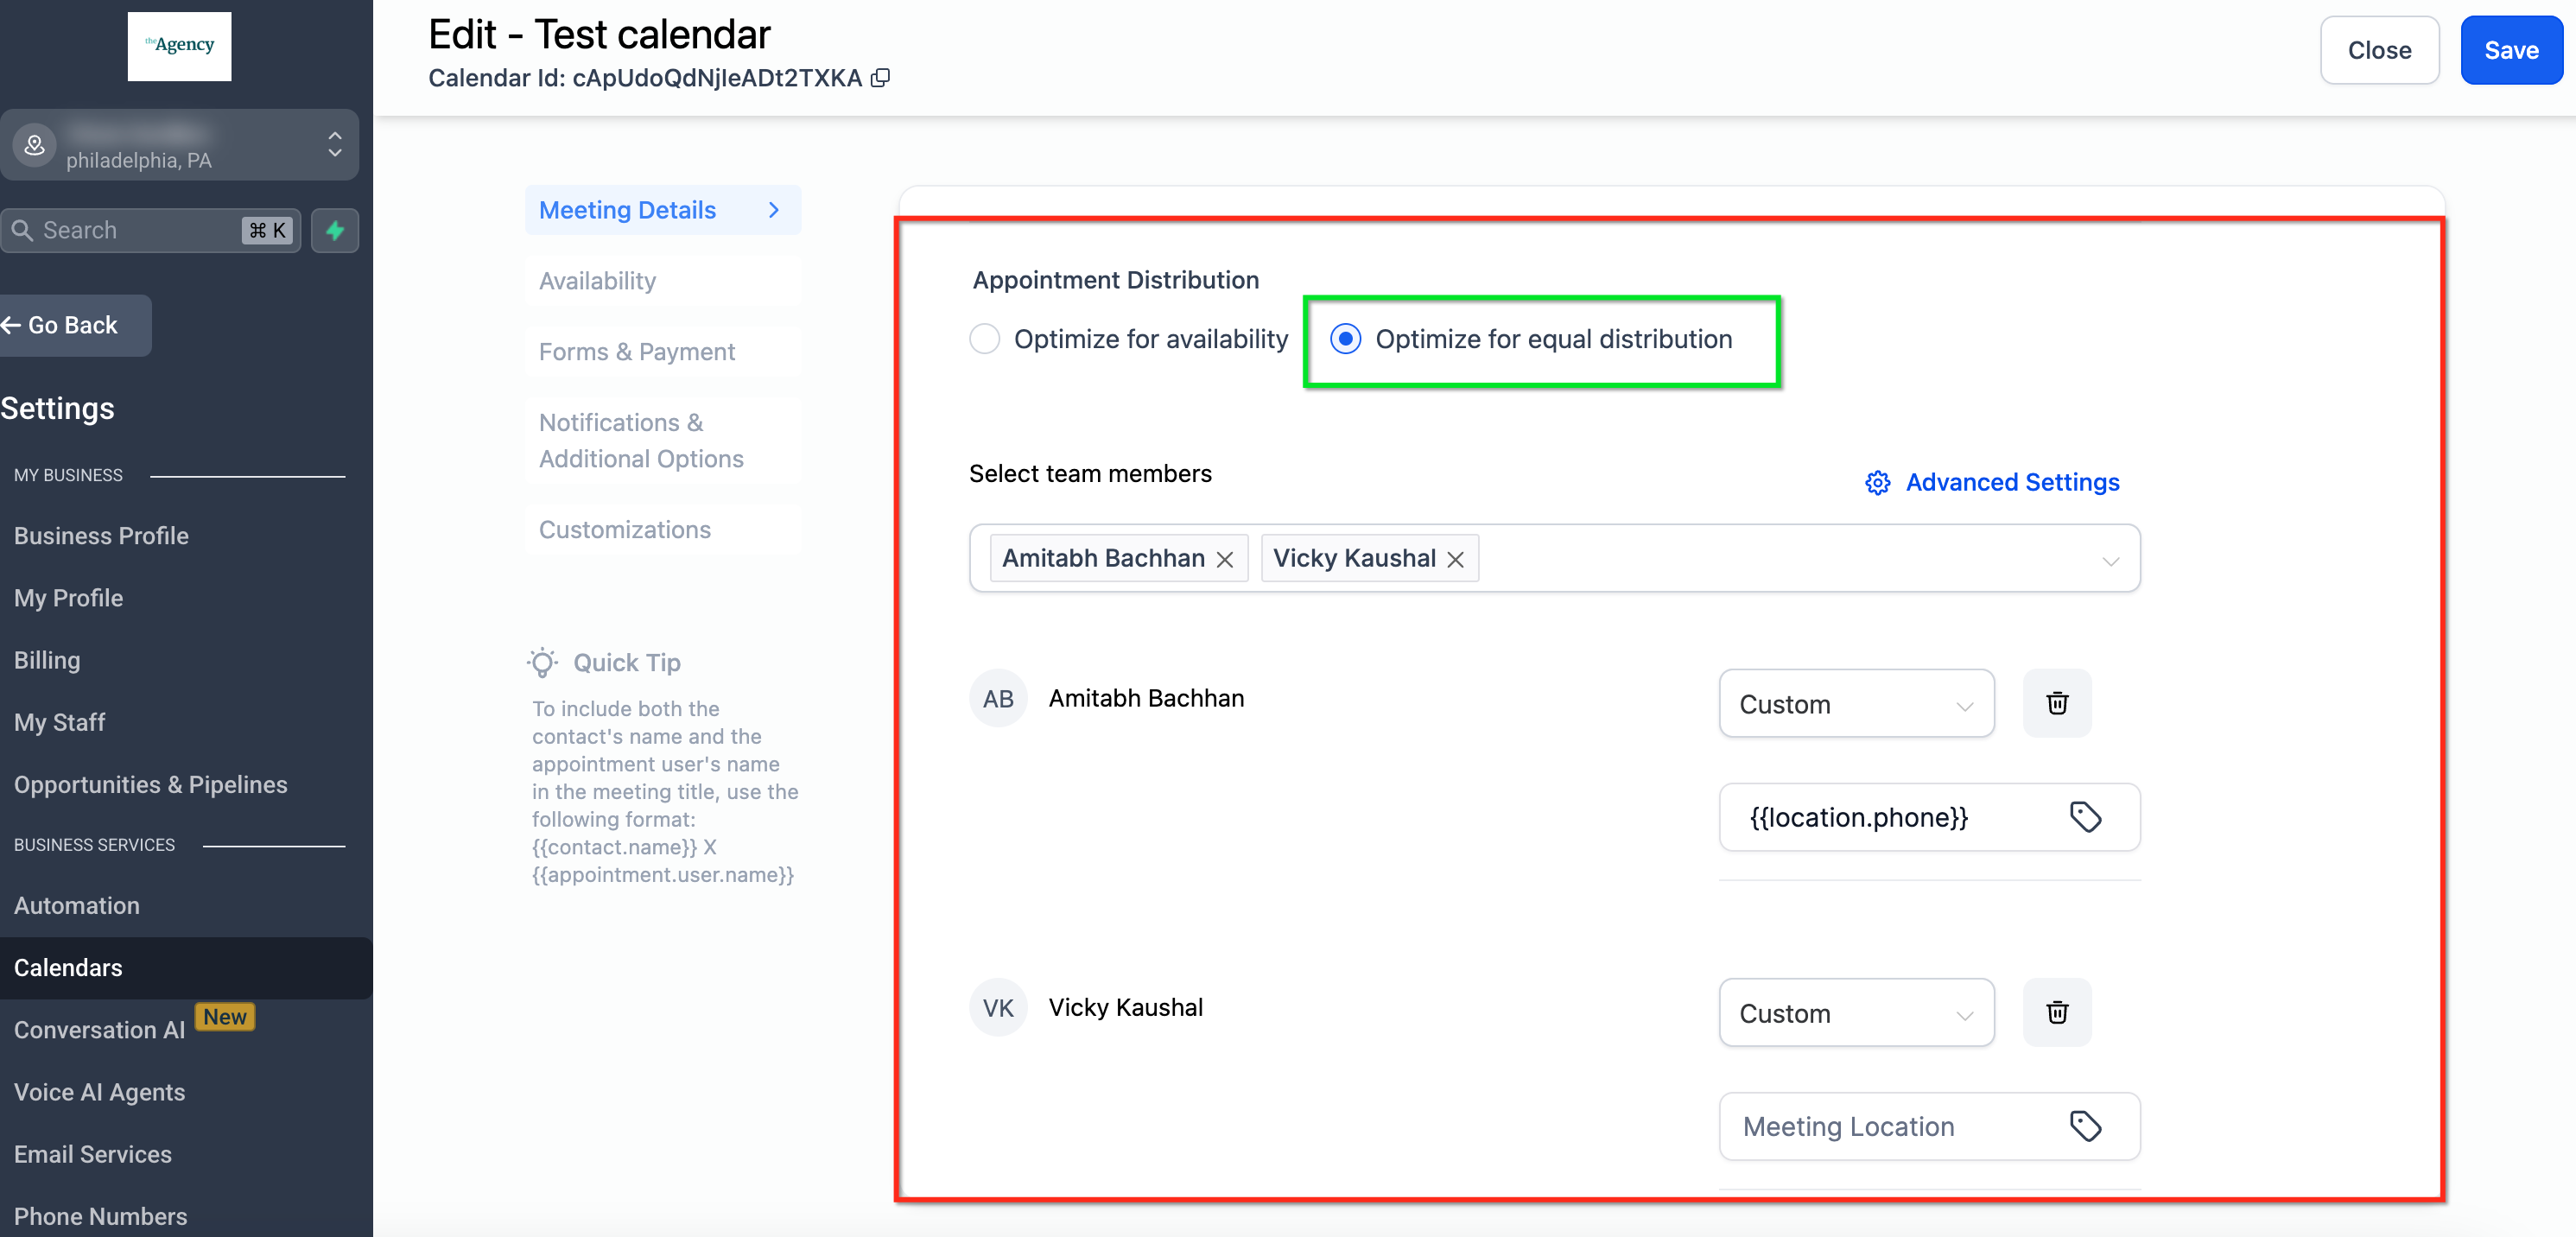
Optimize for Availability or Optimize for Equal Distribution. Only one applies at a time. - Choose Optimize for Availability to send each booking to whoever is free at that time, with higher priority members considered first.
- Or choose Optimize for Equal Distribution to spread bookings evenly over the month, so nobody gets more than three appointments ahead of anyone else.
- Set each team member's priority to High, Medium or Low.
- Pick a default Meeting location for each team member, such as Zoom or a physical address.
- Turn off Allow Staff Selection if you want true automatic assignment. When it is on, the booker can pick a person and the distribution logic is skipped.
- Save the calendar.
Part 04 of 06
Decide who keeps the client on repeat bookings.
Distribution handles brand new leads. Assignment rules handle the contact who already has a person on your team. These settings keep that relationship intact and decide what happens when someone reschedules.
- In the calendar settings, open Advanced Settings.
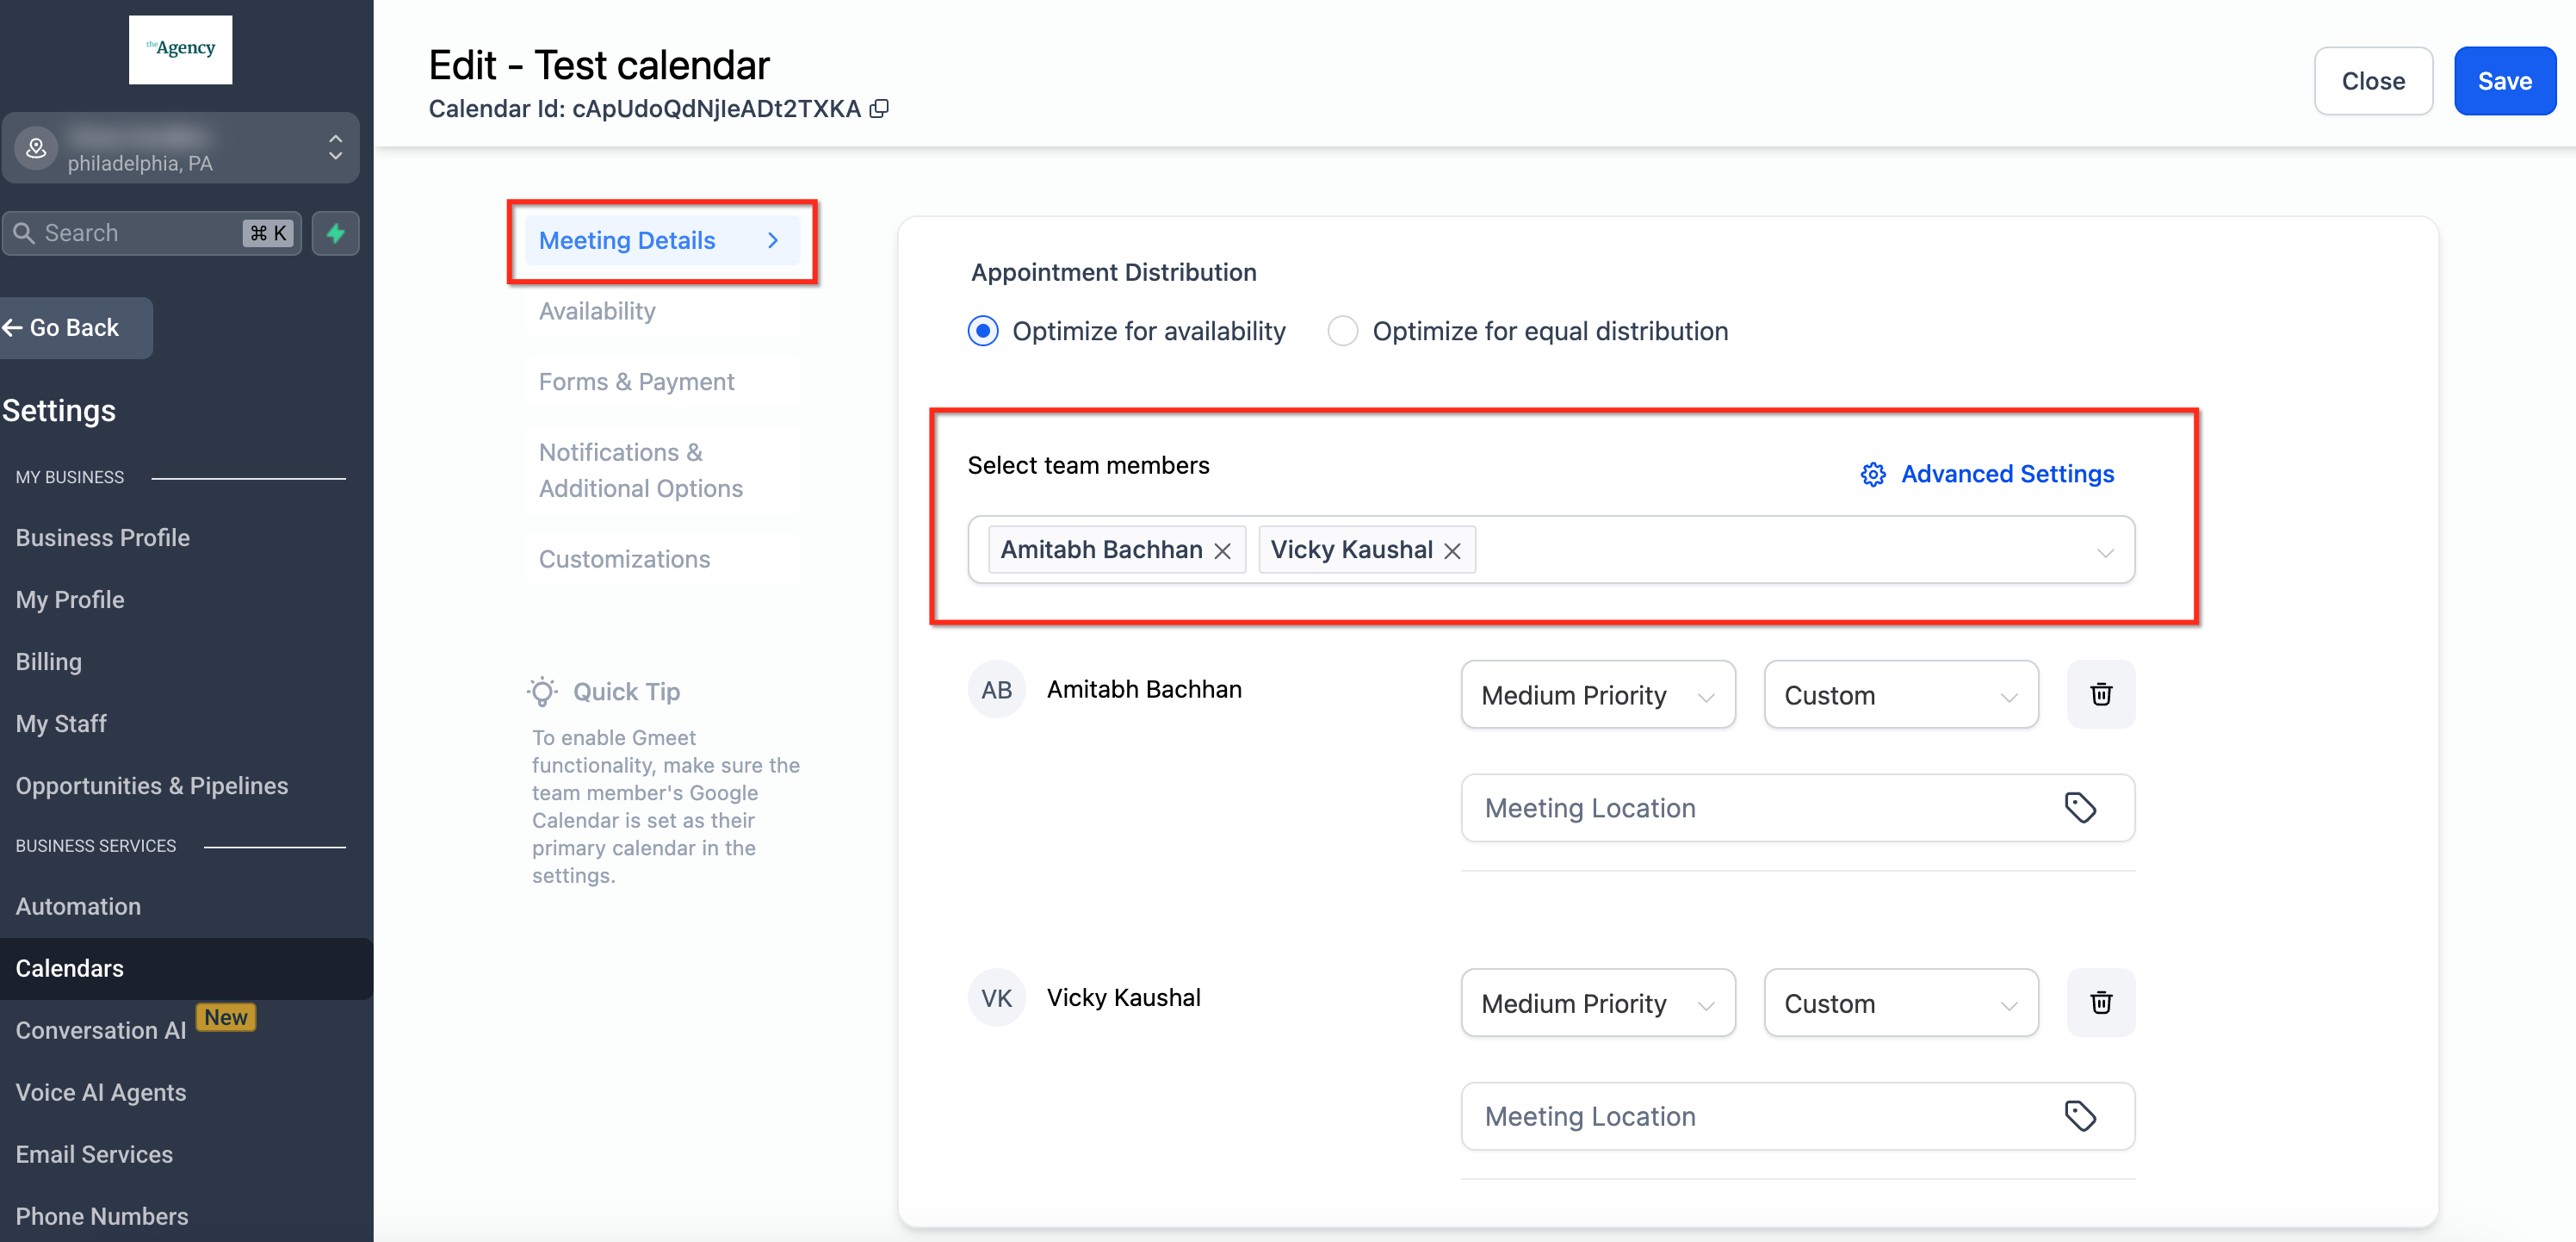
Assignment rules sit under Advanced Settings in the round robin calendar. - Turn on Always Book with Assigned User so a contact who already has an assigned user gets that person's slots first.
- Turn on Assign Contacts to Their Respective Calendar Team Members so a new booking assigns the contact to the person they booked with.
- Turn on Automatically Assign a Contact's Future Appointments to the Same Team Member so later bookings stay with that person.
- Under the reschedule options, choose Keep Same Appointment Owner to show only the original owner's slots, or Reassign Through Round Robin to let anyone take it.
- Confirm Allow Staff Selection is off so bookers cannot change the staff member on the widget.
- Save the calendar.
Part 05 of 06
Connect each person's calendar so nothing double books.
Calendar connections belong to the individual user, not the company. Each team member logs in as themselves and connects their own Google or Outlook account. Do this for every person on the calendar.
- For Google, go to Calendars, click Calendar Settings in the upper right, then click the Connections tab and press + Add New.
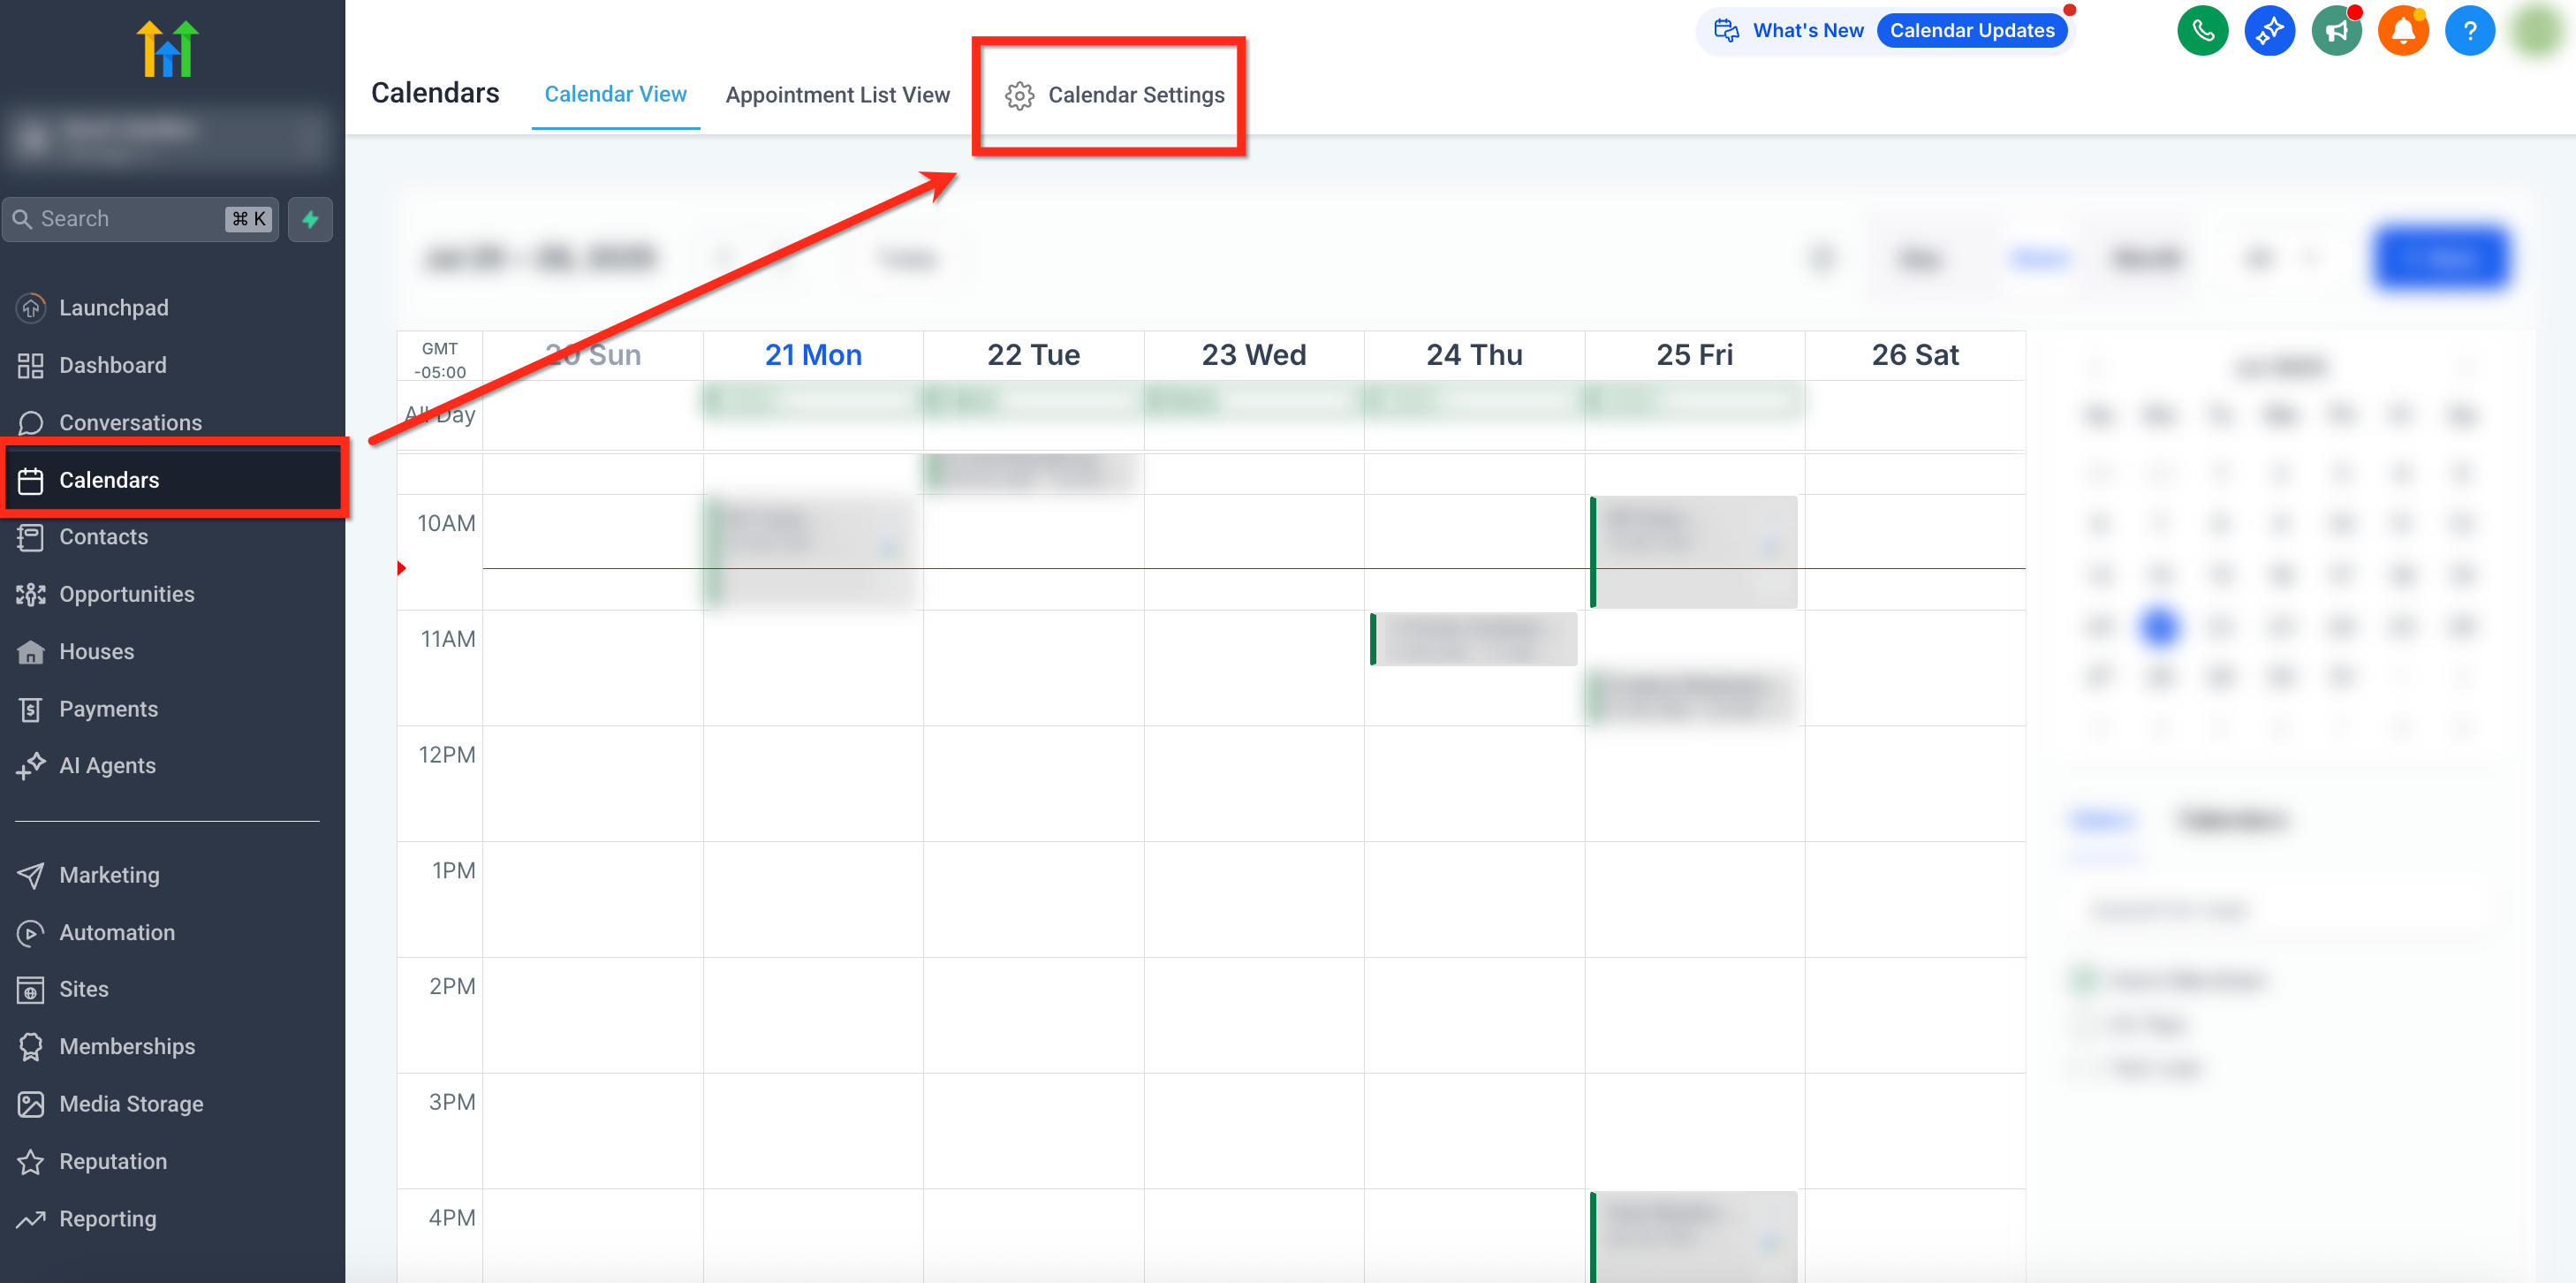
Google connects under Calendar Settings, then Connections. Outlook connects under Settings, then Profile. - Click Connect beside Google Calendar, select the Google account and accept all requested permissions.
- If a permissions warning appears, go to Settings, then Integrations, then Google, and click Reconnect.
- For Outlook, go to Settings, then Profile, and in the Integrations section connect the Outlook account. Log in and allow LeadConnector to access the calendar.
- Scroll to Calendar Configuration, click the edit button under Primary Calendar, select the calendar that should receive bookings, and save.
- Click the edit button under Check for Conflicts, select the calendar HighLevel should read for busy times, and save.
- Repeat for every team member on the round robin calendar.
Part 06 of 06
Put the calendar where prospects can book.
The calendar is built. Now give it a home. You can share the link directly, paste the embed code on any site, or drop it into a HighLevel page with the Calendar element.
- Go to Calendars, then Calendar Settings.
- Click the three dots next to your round robin calendar and select Share.
- Copy the booking link if you want to send it by email or text.
- To embed on an outside site, select the Embed Code tab in the share window and click Copy.
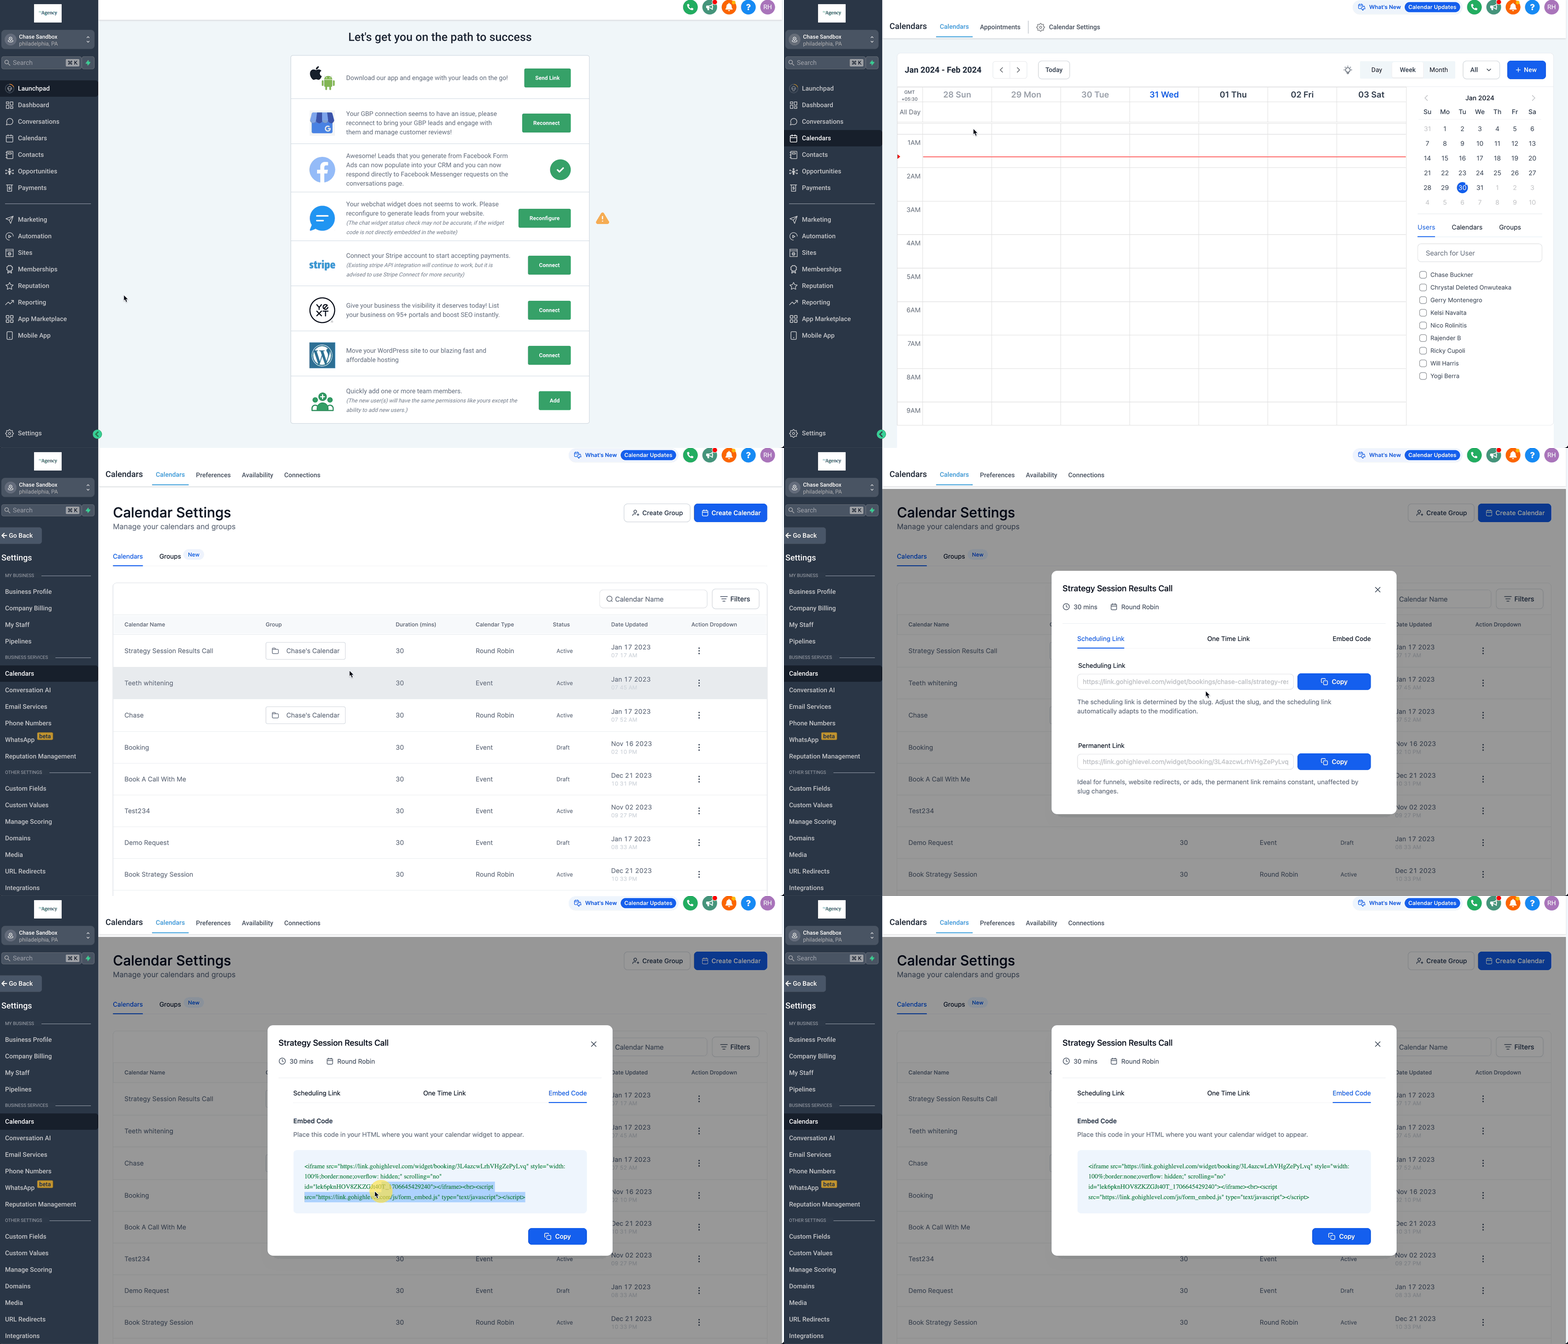
The embed code comes from Share, then Embed Code, on the calendar's three dots menu. - Paste the code into a custom code element on the page where the calendar should appear.
- For a HighLevel funnel or website page, use the Calendar element in the page builder and pick this calendar instead of pasting code.
Test it
Test it before you send the link.
Book a few test appointments and watch where each one lands.
- Open the booking link in a private browser window. You should see only times inside the working hours you set.
- Book a test appointment. The booking should appear in HighLevel under Calendars assigned to one team member.
- Open that team member's Google or Outlook calendar. The same appointment should show there within a short wait.
- Book a second and third test appointment at different times. With Optimize for Equal Distribution, bookings should rotate across the team. With Optimize for Availability, each should go to whoever is free.
- Add a busy event to one team member's connected calendar, then reload the booking page. That person's time should no longer show as open.
- Reschedule a test appointment from the confirmation. With Keep Same Appointment Owner on, only the original owner's slots should appear.
- Check the slot spacing. Two appointments should never sit back to back if you set a buffer.
For the short version of what the calendar can do, see whether HighLevel has a calendar booking tool, and to put this calendar on a page built to convert, build a booking funnel. Plan prices are on the GoHighLevel pricing hub, the page on whether HighLevel is worth it weighs the cost, and you can build this calendar during a 30 day trial through Michael's link.
When a step fails
When it does not work, check these first.
Most calendar problems trace back to a connection or a hidden setting.
- Google calendar is not syncing
- Go to Settings, then Integrations, then Google, and look for a missing permissions warning. Click Reconnect and accept every permission, including writer access.
- The Google calendar is not listed when connecting
- Log out of every Google account in the browser, then reconnect using the correct account.
- A deleted calendar banner appears
- Click Fix This on the banner, remove the deleted calendars, then reconnect or select an active calendar.
- Appointments are not syncing to or from Outlook
- Edit the Primary calendar, choose Do not sync events to the primary calendar, save, then reselect the same calendar.
- Weekly hours vanished on a date
- Date Specific Hours replace weekly hours for that date. Enter the full range you want open on that date, not only the added hours.
- Not every team member shows in the booking dropdown
- The dropdown lists only users on that calendar. Go to Calendars, select the calendar, open the Team Members tab and add the user.
Questions
Common questions.
These questions come up most when a team sets up a shared booking calendar.
- How does calendar booking work in GoHighLevel?
- A prospect opens the booking page, sees only times when someone on the team is free, and books. HighLevel assigns the appointment by availability or by equal distribution, keeps repeat clients with the person they already know, and writes the appointment to that team member's own Google or Outlook calendar.
- What happens if no team member is available at the time a prospect wants?
- HighLevel will not book an empty slot. If no team member is free at a time, HighLevel hides that slot, and the prospect is asked to pick another date or time. That is why every team member needs working hours and a connected calendar before the link goes out.
- Can I give certain team members priority for certain clients?
- Not by client. Round robin supports availability based or equal distribution, plus High, Medium and Low priority per team member, with higher priority members considered first. To keep a client with one person, turn on Always Book with Assigned User, so a contact who already has an assigned user gets that person's slots first.
- Can one Google calendar be shared across several users?
- No. Each user connects their own Google calendar. You can link more than one calendar per user, with one as the Linked Calendar for bookings and the rest as Conflict Calendars that block busy times. Calendar connections are tied to the individual user, not the company.
- Can a user write appointments to both Google and Outlook?
- No. A user can use both, for example Outlook as the primary calendar and Google for conflict checks, but appointments write to only one calendar at a time. Decide which calendar each person treats as primary before you connect, then book a test appointment and confirm where it lands.
- Can I set different buffers or date ranges for different meeting types?
- No. Buffer, slot interval and date range apply to the whole calendar. Create a separate calendar for each meeting type that needs its own settings, for example one calendar for short intro calls and another for longer consultations, each with its own buffer, slot interval and date range.
From the field
Michael’s take.

The first thing I lock in is the buffer. A team calendar without breathing room between meetings looks fine on paper and falls apart by Tuesday. Give people time to travel, write notes or reset, then test a few bookings and confirm the slots line up before anyone outside the company sees the link.
Where people go wrong is staff selection. They want equal distribution, they leave Allow Staff Selection on, and the distribution logic never runs because every booker picks a name. Turn it off. Then turn on Always Book with Assigned User so a client who already has a relationship with someone on the team stays with that person. Automatic distribution and continuity are not in conflict when both settings are right.
This build pays off the day you add a second person who takes meetings. One link, one calendar, no checking who is free, and nobody gets overloaded while someone else sits idle. Connect each person's own Google or Outlook calendar before launch, and the double booking problem goes away with it.
Go deeper
The features behind this build.
Every feature this guide touches has its own page in the library, with the settings, limits and Michael’s notes.
- Calendars & AppointmentsRound robin calendars in HighLevel: Setup, distribution and availability
- Calendars & AppointmentsAppointment Distribution Logic for Round Robin Calendars
- Calendars & AppointmentsCalendar Availability: Weekly Working Hours & Date Specific Hours
- Calendars & AppointmentsAdjusting Availability Settings for Individual Calendars
- Calendars & AppointmentsIntegrating Google with HighLevel calendars
- Calendars & AppointmentsHow to sync HighLevel Calendars with Outlook
- Calendars & AppointmentsHow to embed HighLevel calendars using HTML code
- Calendars & AppointmentsManaging team member assignments in round robin calendars
Get the guide
Take it with you. The PDF is yours.
The whole build, cover to cover, as a PDF you can keep open on a second screen or print for the team. HighLevel's Founder page opens alongside it.
Next step
Want this built with a team behind you?
Start your HighLevel trial through Michael and the CRM Pros team comes with it. You get the account, the training and people who have built this calendar many times.
The how to library has step by step HighLevel builds for Conversation AI, Voice AI, funnels, calendars, workflows and AI Studio. Go back to the full list.
Back to the GuidesAll the step by step builds