
01Who this is for
- Founders running inbound call centers: they can capture client messages without needing separate voicemail services.
- Small businesses with limited staff: the feature allows callers to leave details when agents are unavailable.
- Service based companies that need documentation of client requests: recordings are stored in the conversation section for later reference.
02Record voicemail, explained
The Record Voicemail (IVR) action is a workflow step that prompts callers to speak and saves the audio as a voicemail. It can automatically stop when a defined period of silence occurs, when a caller presses a chosen keypad key, or when the maximum recording length is reached.
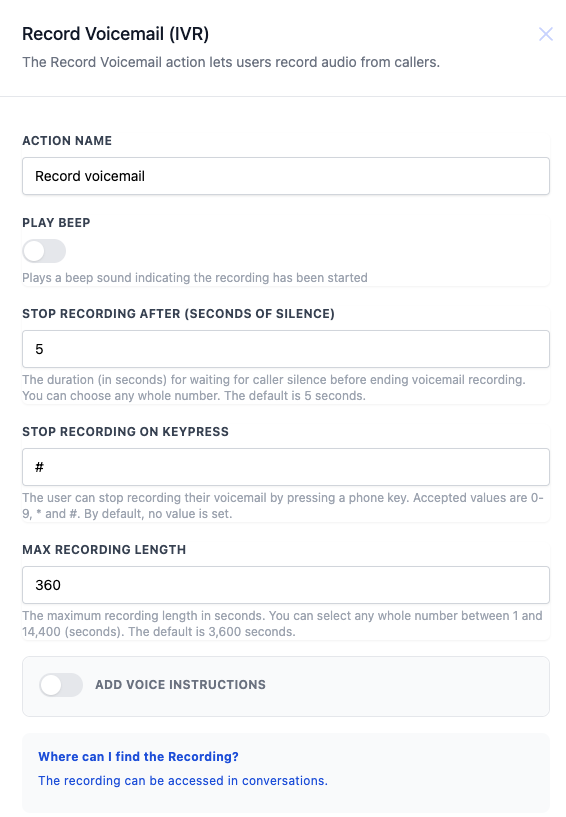
The action lives inside the workflow builder. After adding the action, you configure its fields, name, optional beep, silence timeout, keypress stop, maximum length, and optional voice instructions. Once a call reaches this step, the caller hears any provided instructions, records their message, and the file appears in the conversation record.
03How businesses use record voicemail
- Dental practice. A dental office adds the action to its appointment reminder workflow. Callers who miss the reminder can record a message describing the reason for rescheduling, which the staff reviews in the conversation tab.
- Real estate agency. Agents set up a property inquiry workflow that ends with a voicemail step. Prospects leave their questions after a beep, and the recordings are stored with the lead’s conversation for easy follow up.
- Home service contractor. When a customer calls after hours, the IVR routes them to a voicemail action. The customer records the service issue, and the contractor accesses the audio later to prepare for the visit.
04How to set up and use record voicemail in HighLevel
Configure record voicemail action
- Enter a unique Action Name for the voicemail step.
- Toggle the Play Beep option if a beep should signal recording start.
- Set the number of seconds of silence after which recording stops.
- Choose a keypad key (e.g., #) that callers can press to end recording.
- Enter the maximum allowed recording length in seconds.
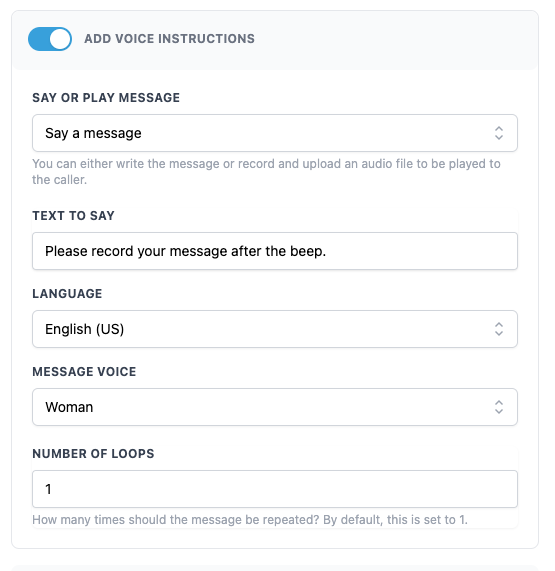
- Enable the Add Voice Instructions feature.
- Provide the instruction audio by recording or uploading a file.
- Save the voicemail action to apply the settings.
- Locate the captured voicemail in the conversation view after a call.
05What it looks like in HighLevel
06Settings that matter
- Action Name. Defines the identifier for this voicemail step; it must be unique.
- Play Beep. When enabled, a beep sound plays to tell the caller that recording has begun.
- Stop Recording After. Specifies how many seconds of silence cause the recording to stop automatically.
- Stop Recording on Keypress. Designates a keypad key that the caller can press to end the recording early.
- Max Recording Length. Sets the upper limit for the voicemail duration in seconds.
- Add Voice Instructions. Enables an introductory message for callers, which can be recorded or uploaded.
07Things to know before you rely on it
- Play Beep is optional; the recording starts without it if disabled.
- Stop Recording after Silence requires a numeric value in seconds.
- Stop Recording on Keypress is optional; any single keypad key can be assigned.
- Max Recording Length must be set to avoid exceeding storage limits.
- Voice Instructions are optional; if enabled, a message must be provided.
08How it connects to the rest of HighLevel
- Explore all workflow capabilities to see how voicemail fits with other actions. Workflows overview
- Learn the basics of building workflows before adding the voicemail step. Workflow basics
- Review pricing options to ensure your plan includes workflow actions. Pricing
Michael's take

I prefer to enable the beep and add a short spoken instruction so the caller knows when to begin speaking.
If I were setting this up for a client, I’d start with a modest Max Recording Length and test the silence timeout.