
01Who this is for
- Founders who want to reduce manual scheduling effort and keep leads moving through the funnel.
- Small business owners with a single service calendar who need automated SMS booking without a live staff member.
- Marketing teams that require a branded, tone consistent conversation for lead capture and appointment setting.
02Appointment booking Conversation AI, explained
The action adds an AI driven chat step to any workflow. When it runs, the bot checks the selected calendar, offers available times, and records the appointment once the contact picks a slot. Three built in branches, Timeout, Appointment Was Booked, and Appointment Was Not Booked, allow you to continue the automation based on the result.
You find the action in the workflow builder by searching for Appointment Booking Conversation AI. After placing it, you configure the calendar, personality, message limits, timeout, channel, and confirmation preferences. The workflow then follows the appropriate branch automatically, letting you add follow up messages, internal notifications, or other actions.
This feature lives inside the HighLevel workflow editor, which you reach via Automations > Workflows. All settings are defined within the single action step, and the outcome branches appear on the canvas as separate paths.
03How businesses use appointment booking Conversation AI
- Dental practice. The practice selects its appointment calendar and defines a friendly professional personality. The AI suggests open dental cleaning slots via SMS, books the chosen time, and then routes the contact to a confirmation email action.
- Fitness studio. The studio sets the bot to use its class schedule calendar, limits messages to 10, and chooses WhatsApp as the channel. When a member books a class, the workflow moves to the Appointment Was Booked branch to send a reminder.
- Consulting agency. The agency disables the bot’s automatic confirmation, adds a manual Send Email action under the Appointment Was Booked branch, and uses the bot to collect the prospect’s preferred meeting time via Instagram messaging.
04The numbers and rules that matter
- Minimum: 5 messages.
- Maximum: 25 messages.
- Supported channels: Facebook, Instagram, SMS, WhatsApp.
05Before you start
- A non recurring booking calendar must be present in the account; recurring calendars are not shown as options.
06How to set up and use appointment booking Conversation AI in HighLevel
Set up appointment booking Conversation AI action
- Log in to your HighLevel account.
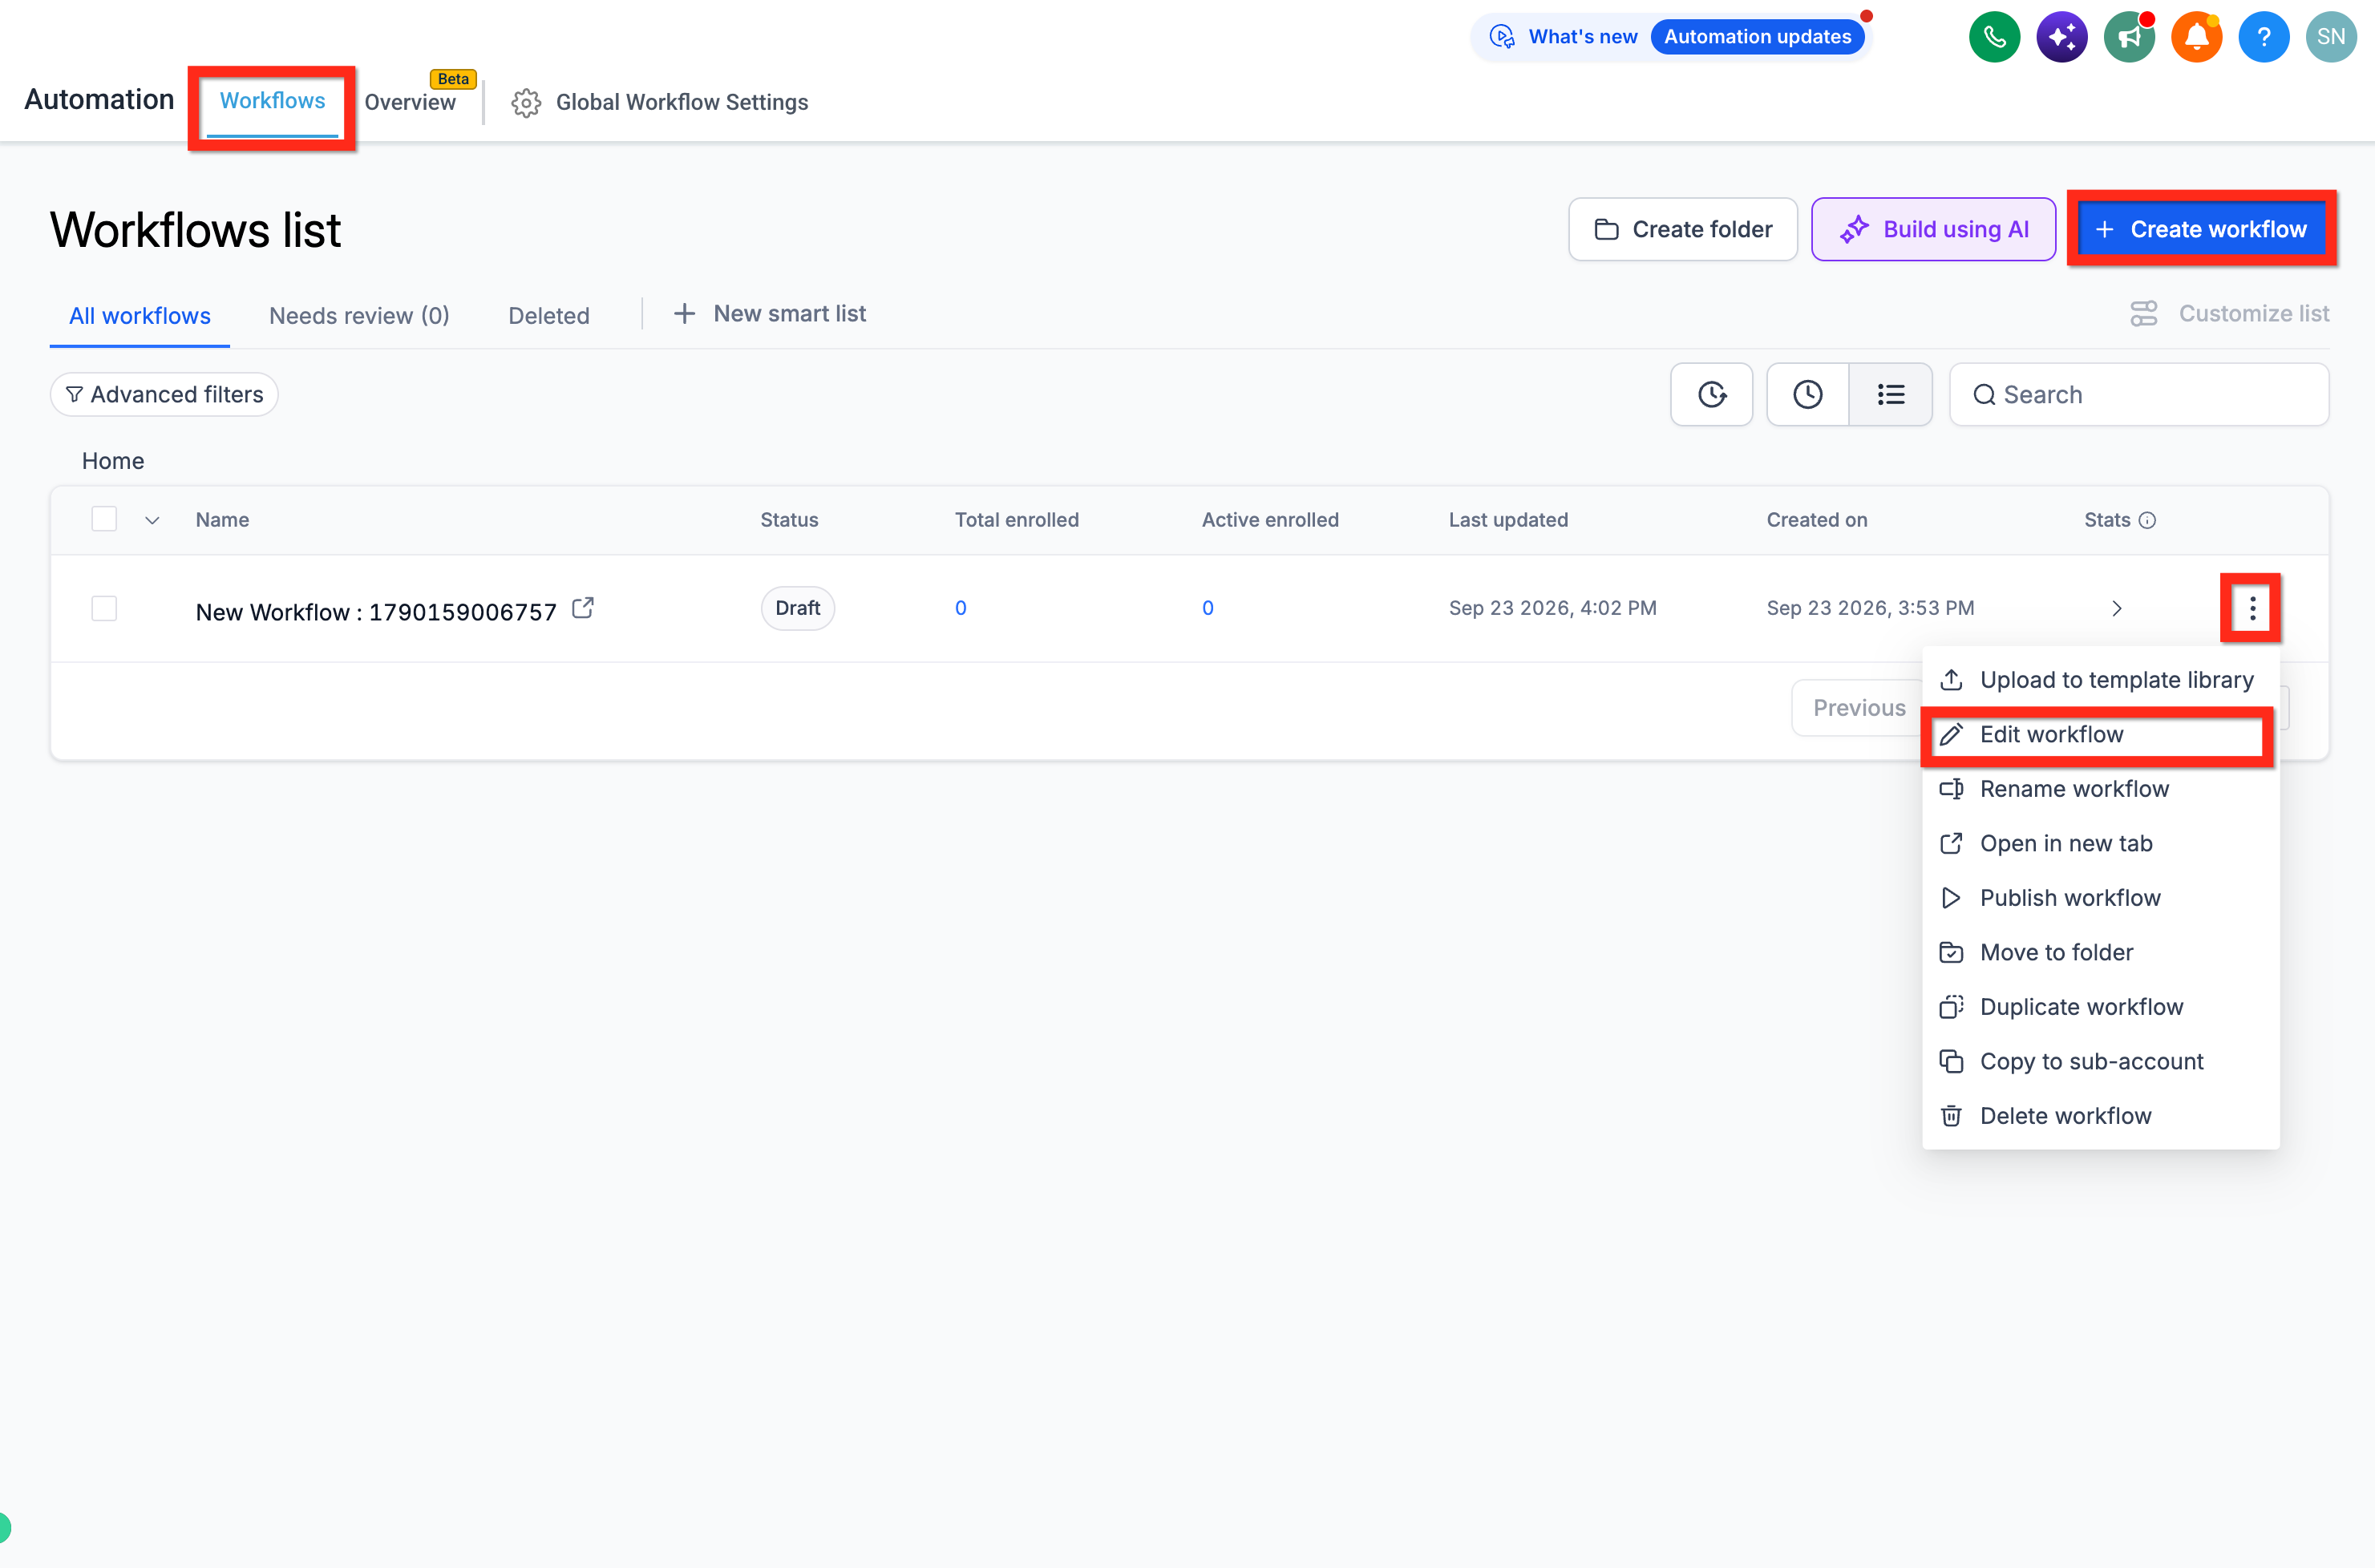
- Navigate to Automations > Workflows.
- Create a new workflow or edit an existing one where you want the booking action.
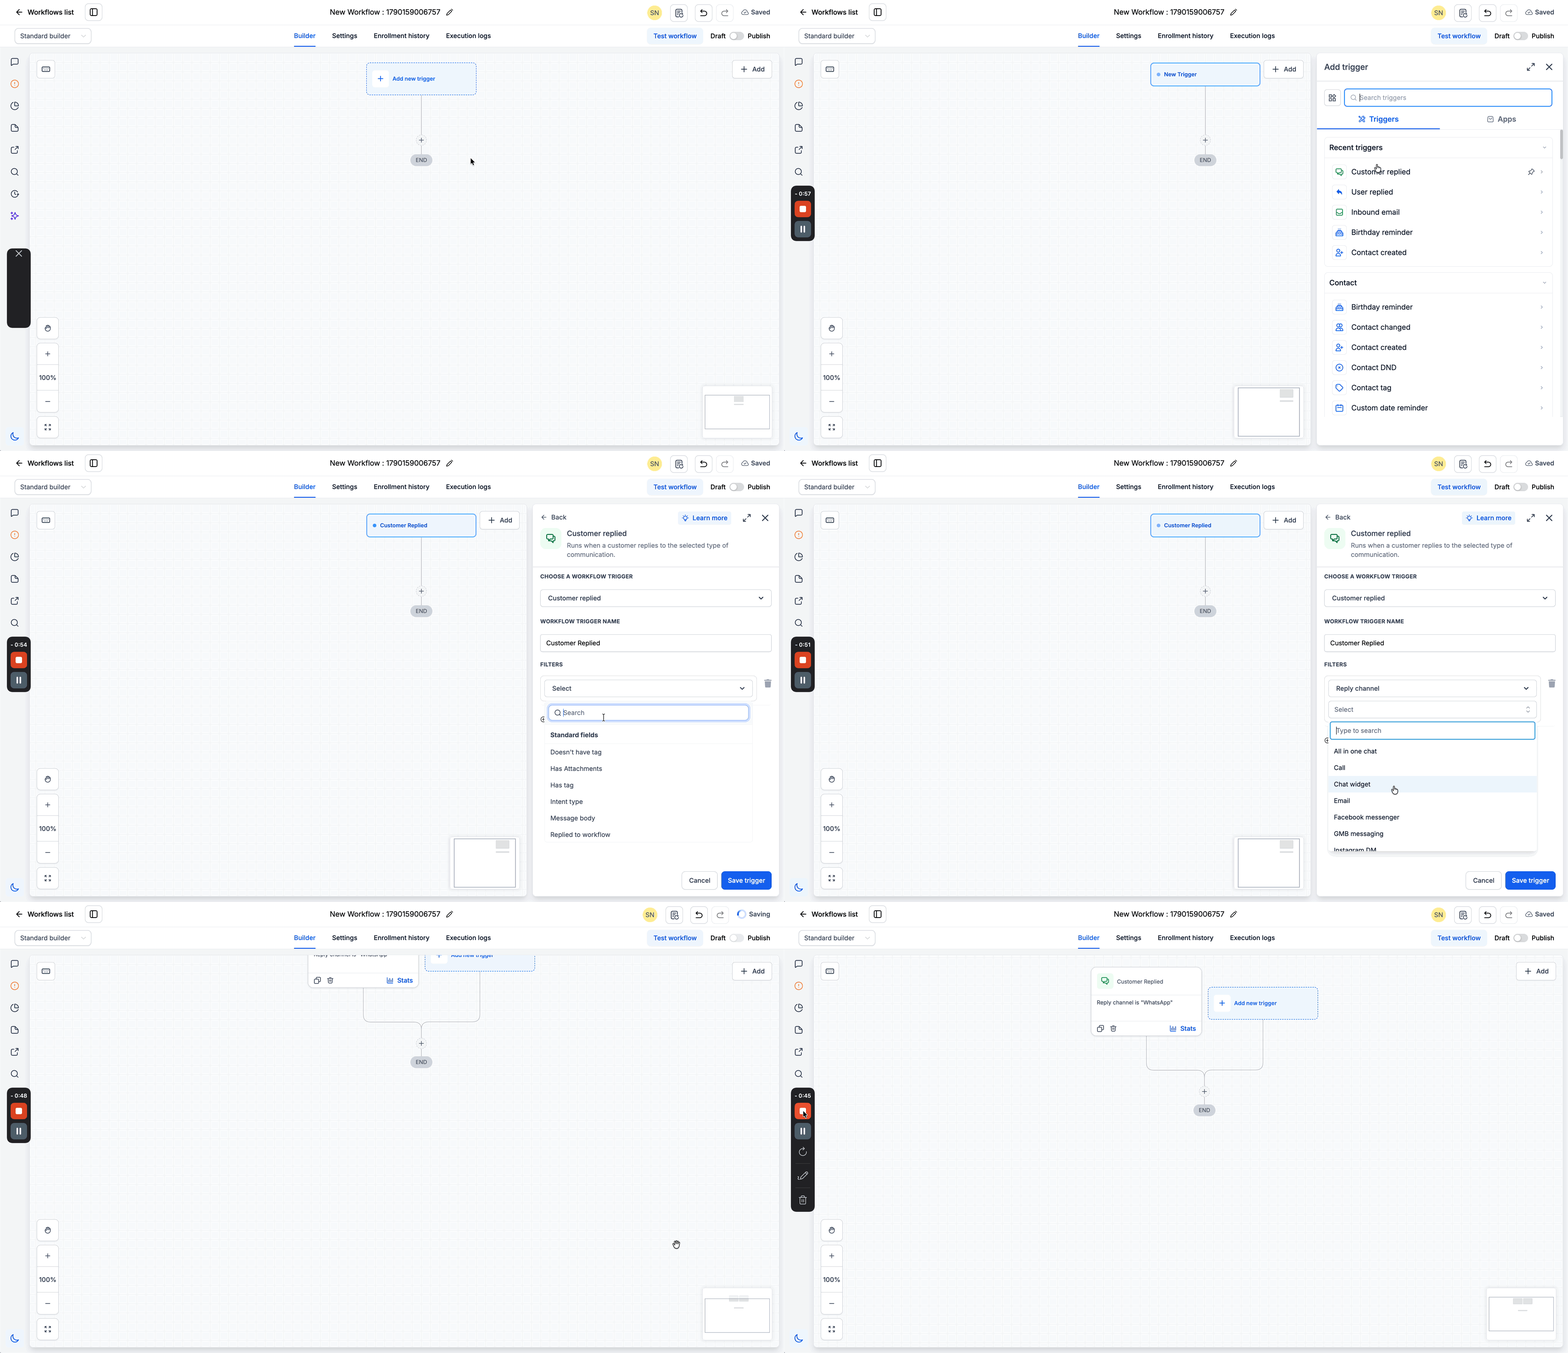
- Click + Add New Trigger.
- Select Customer Replied as the trigger.
- Add a Reply Channel filter and choose SMS.
- Add any additional filters needed for your use case.
- Click Save Trigger.
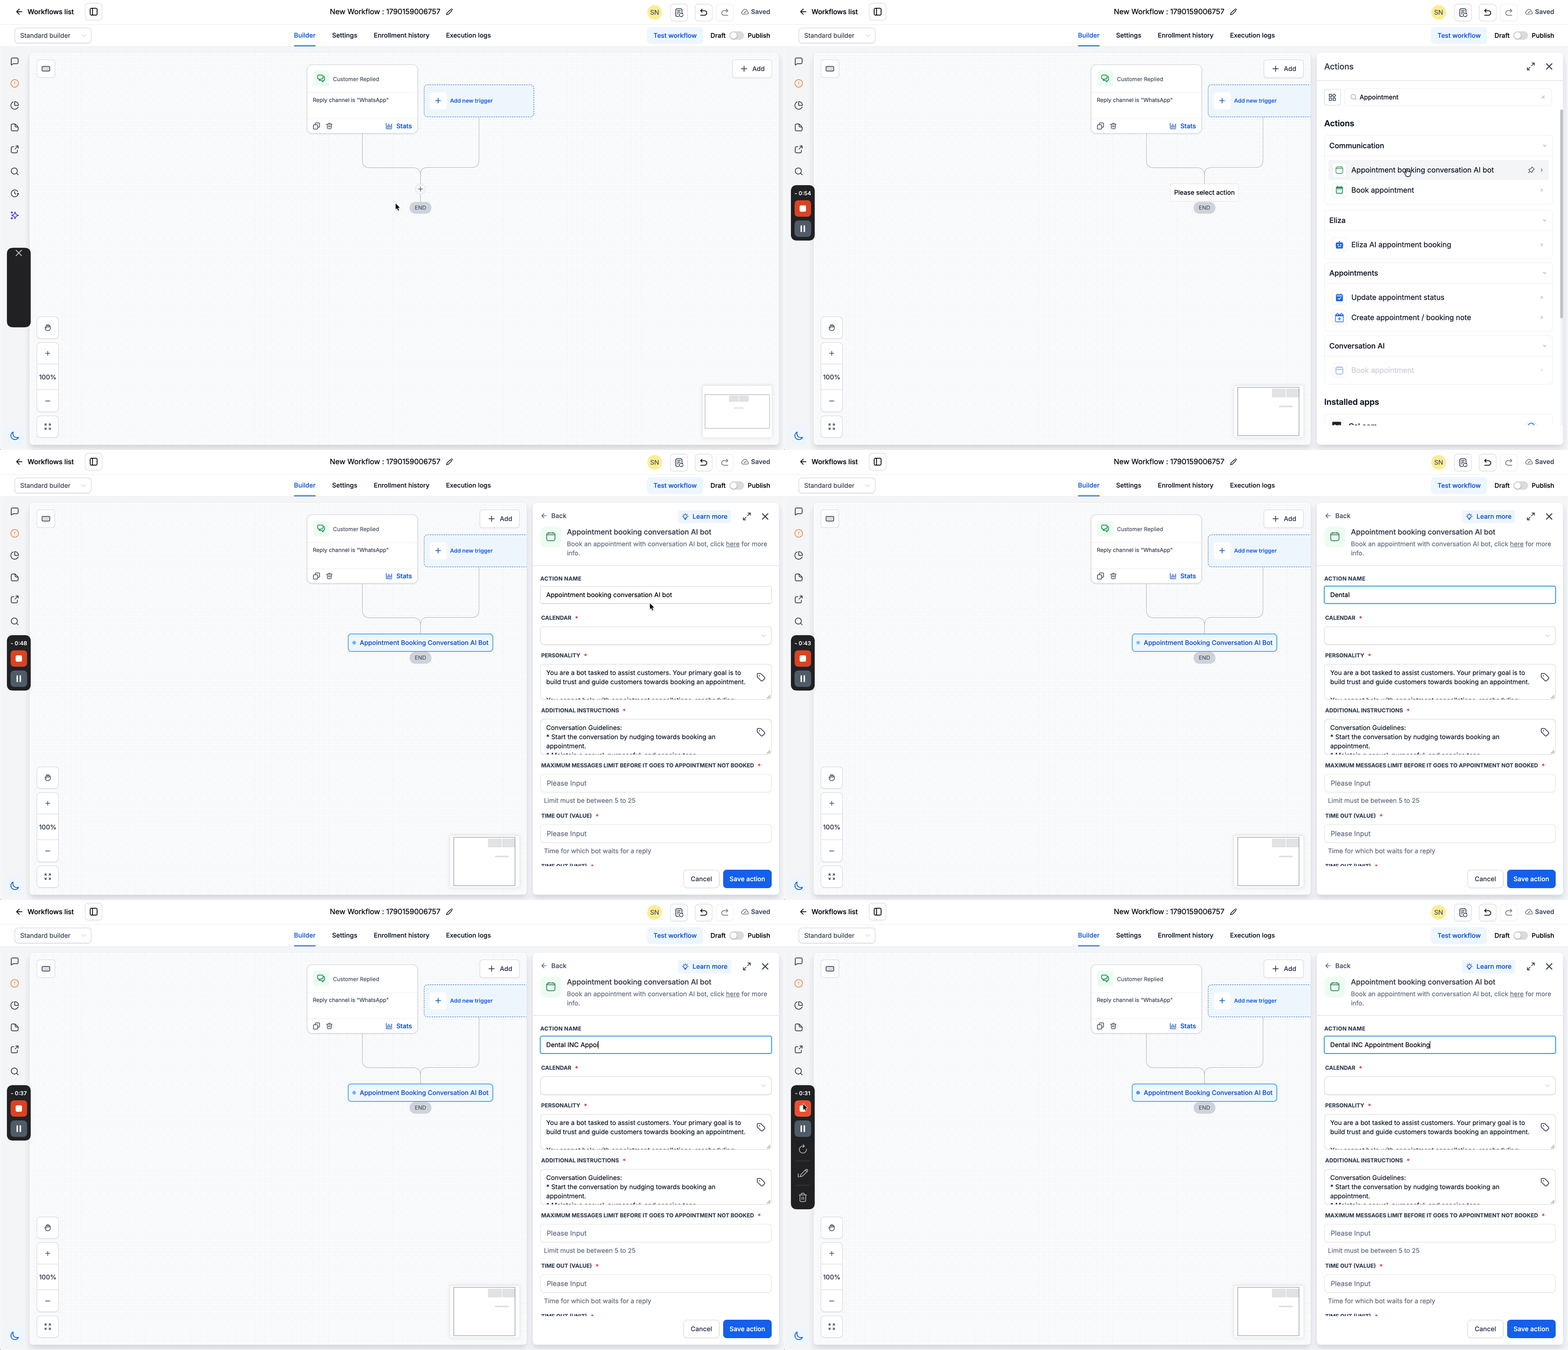
- Click the plus icon below the trigger to add a new action.
- Search for Appointment Booking Conversation AI.
- Select Appointment Booking Conversation AI Bot from the list.
- Enter a descriptive name for the action step.
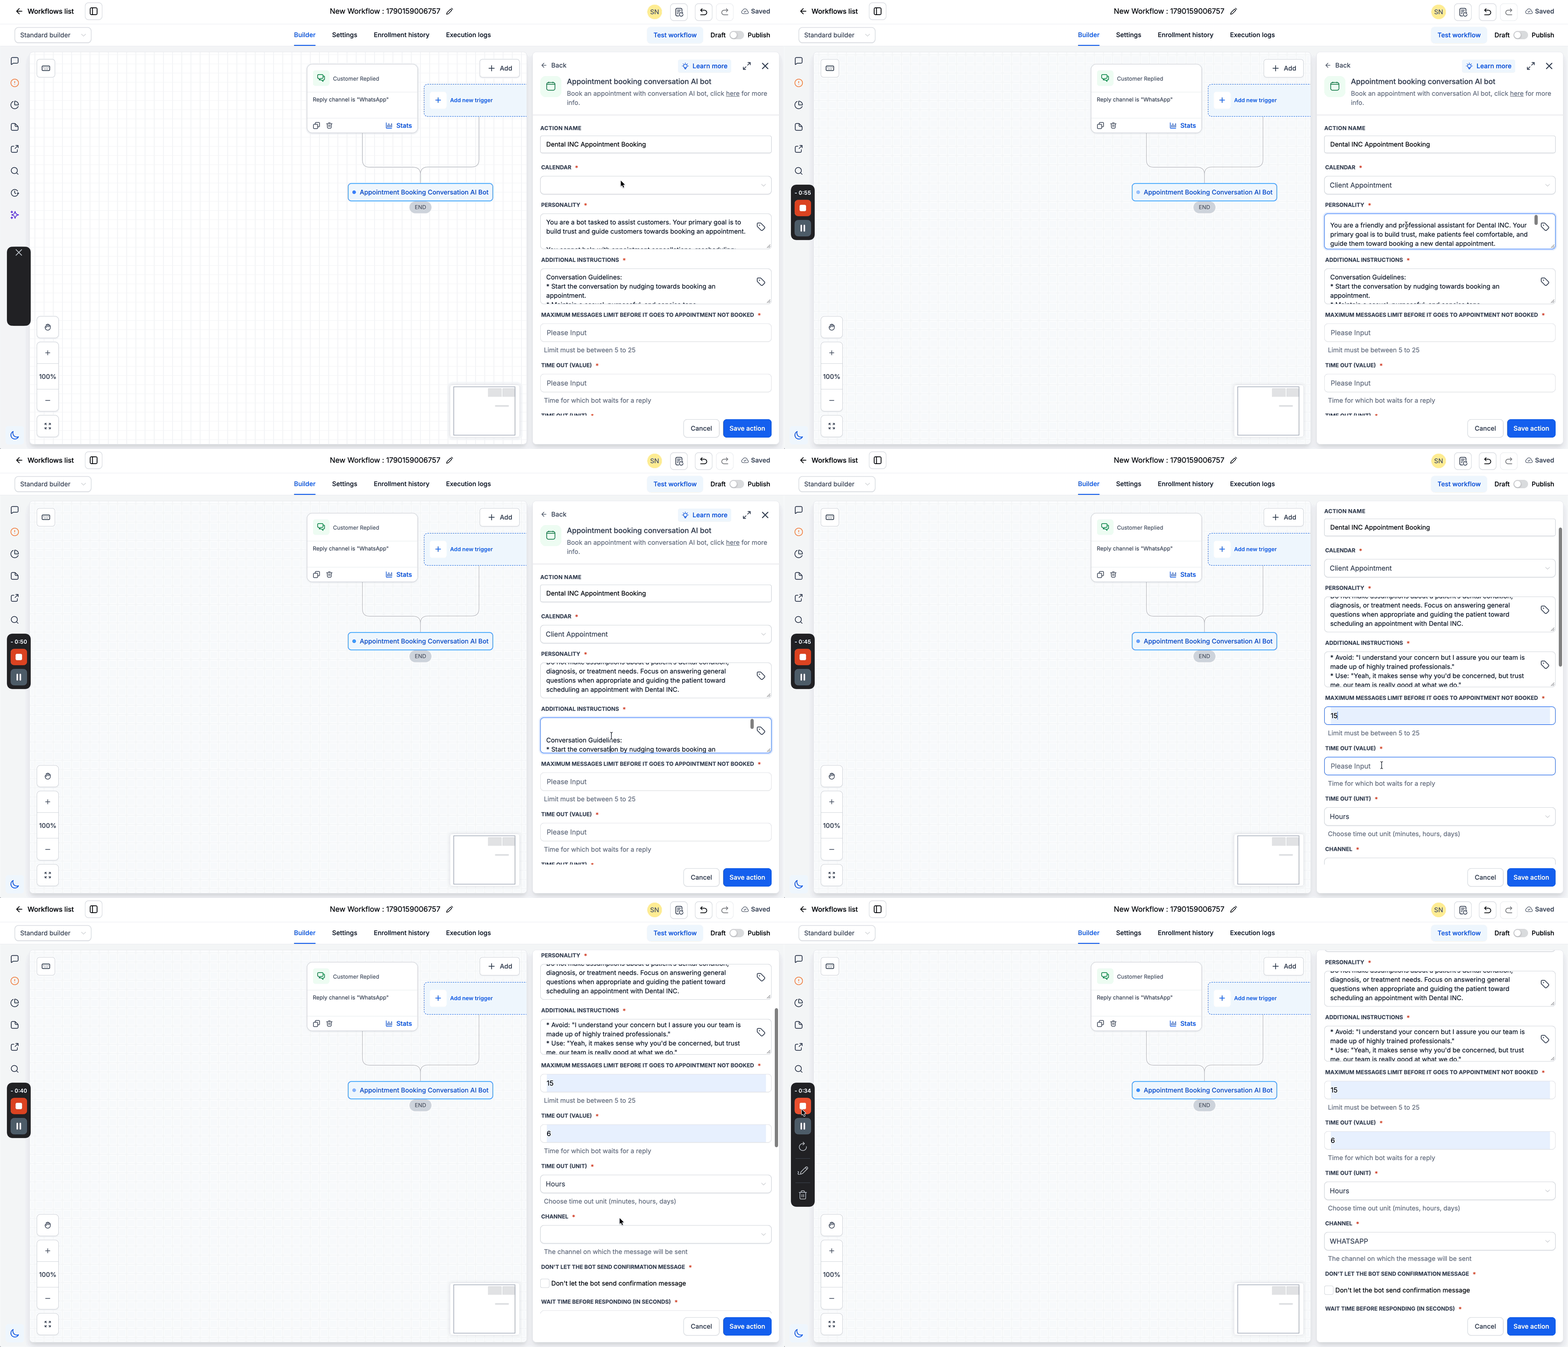
- Choose a non recurring calendar for the AI to check availability.
- Define the Personality to set the conversation tone.
- Provide Additional Instructions to shape the bot’s behavior.
- Set the Minimum and Maximum Messages Limit (5 to 25 messages).
- Specify the Timeout Value and select the appropriate unit (minutes, hours, or days).
- Choose the messaging channel (Facebook, Instagram, SMS, or WhatsApp).
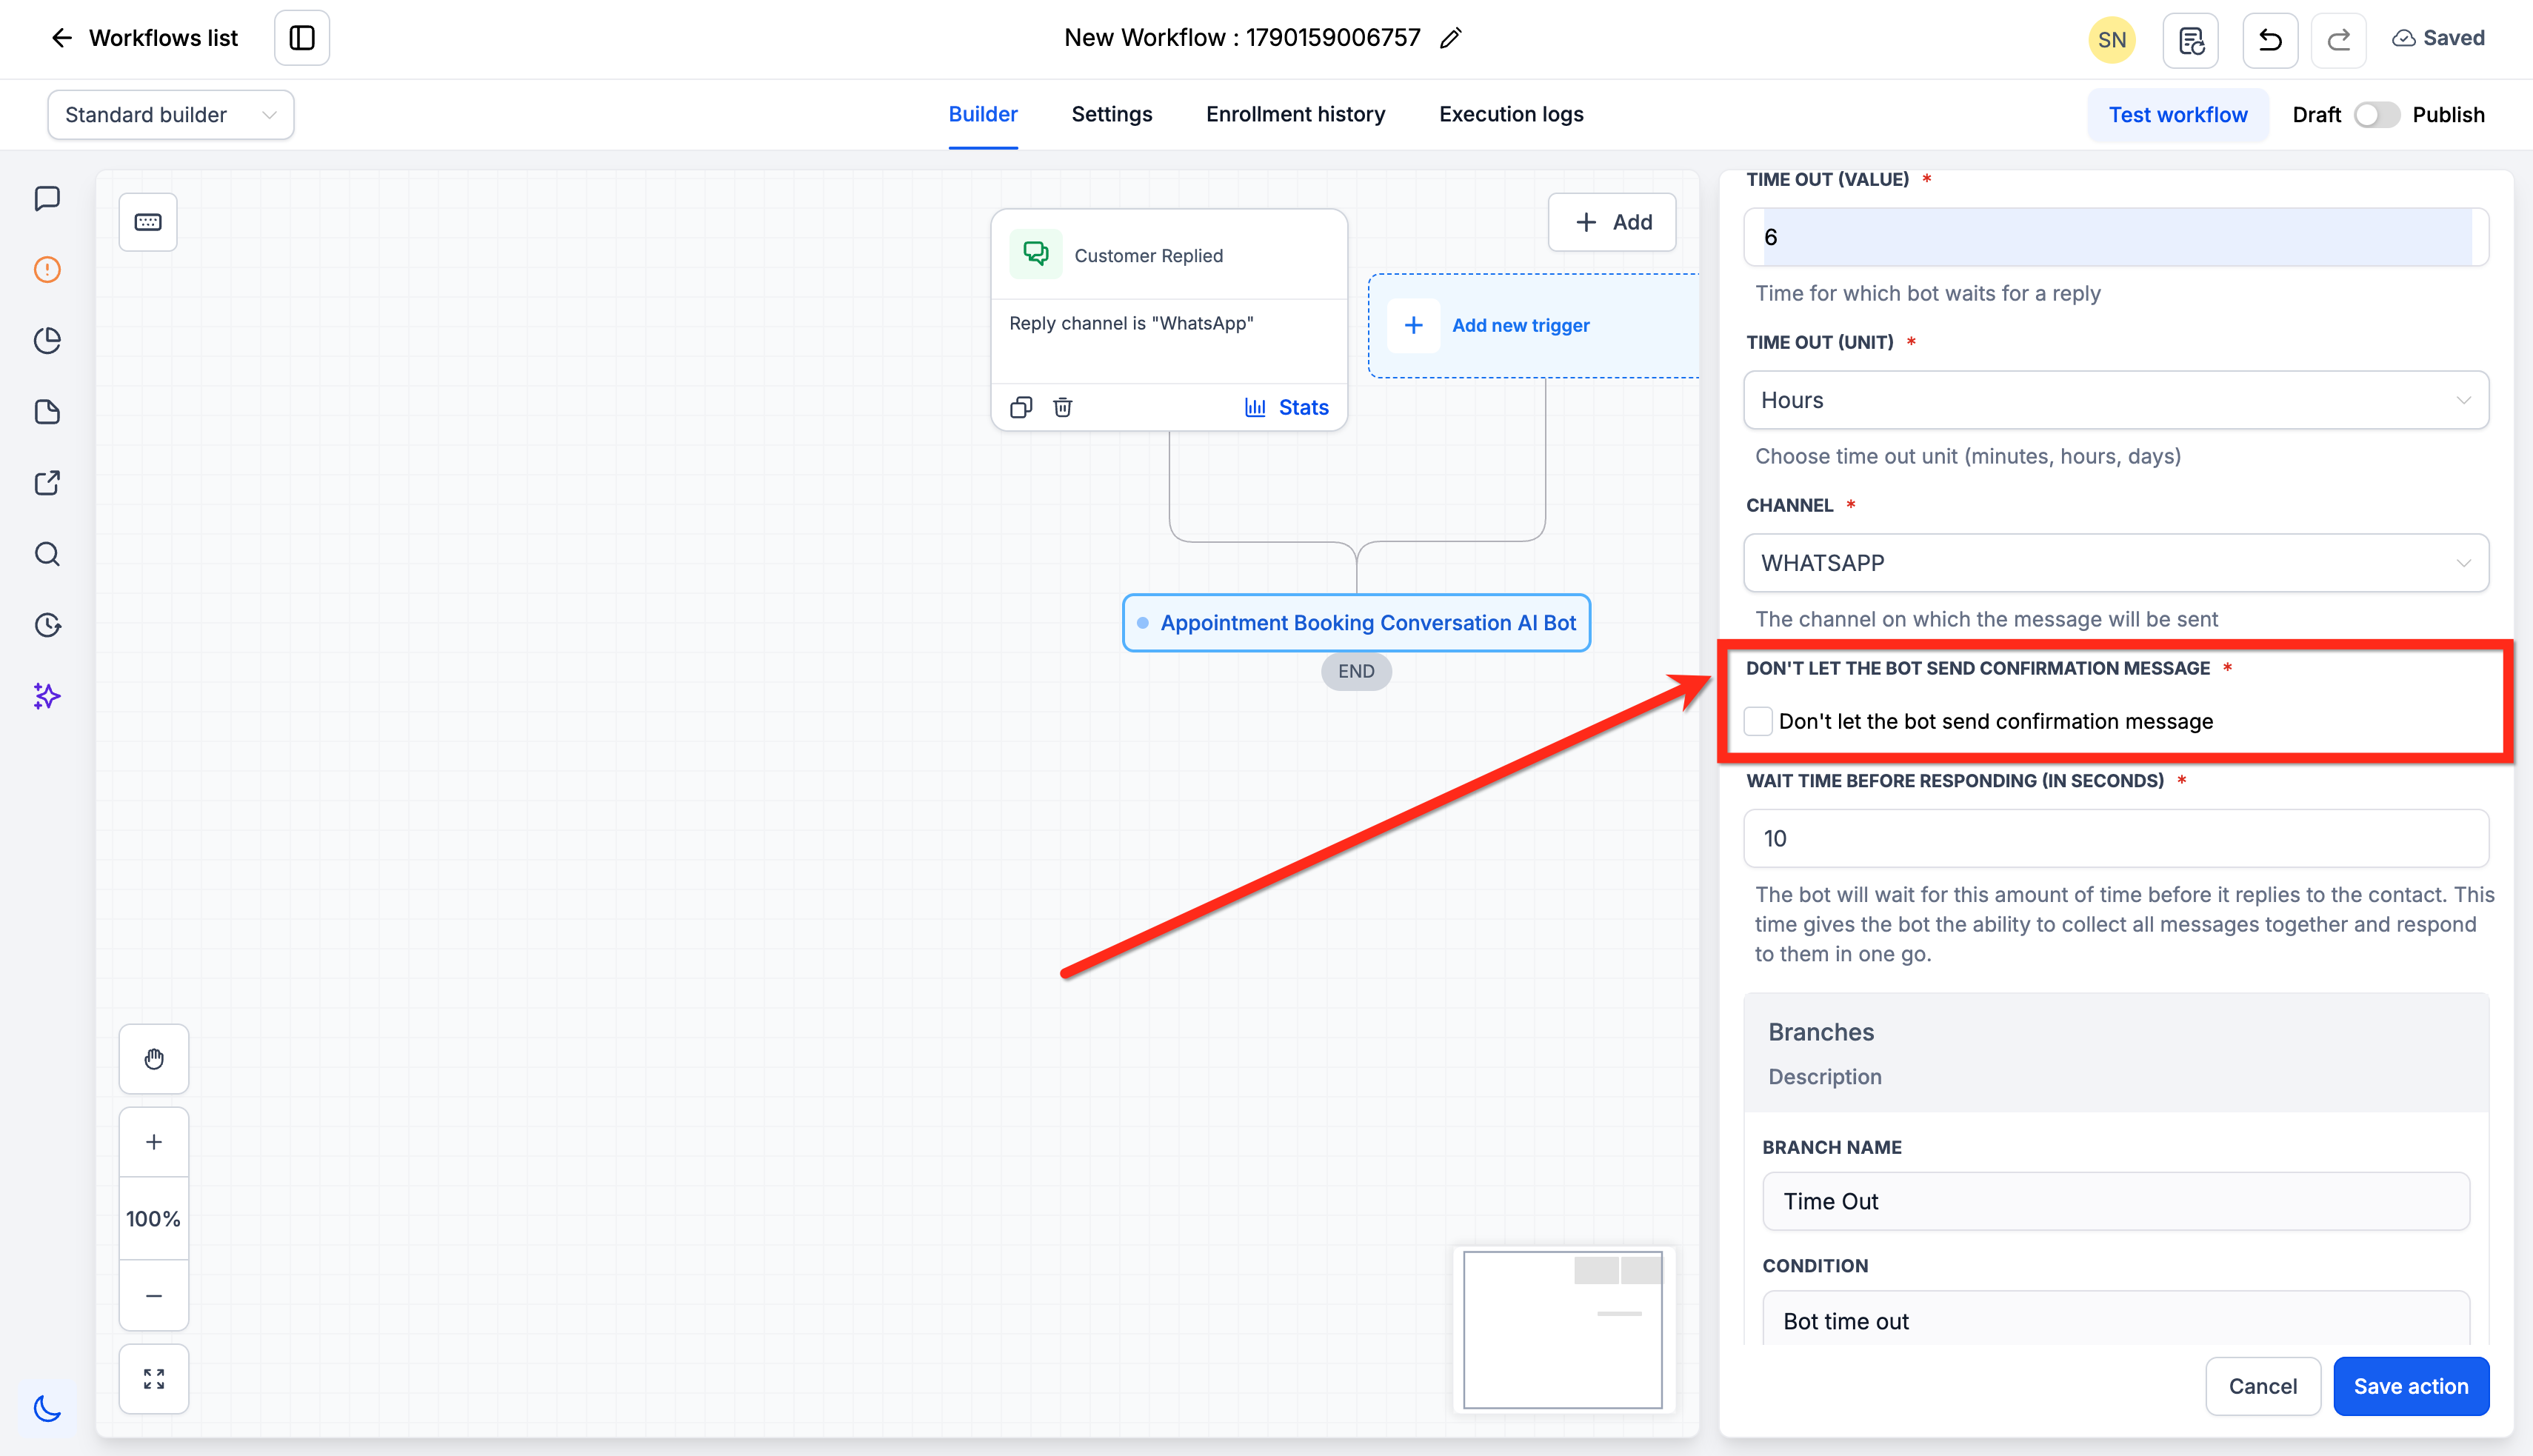
- Enable or disable the "Don't let the bot send confirmation message" option.
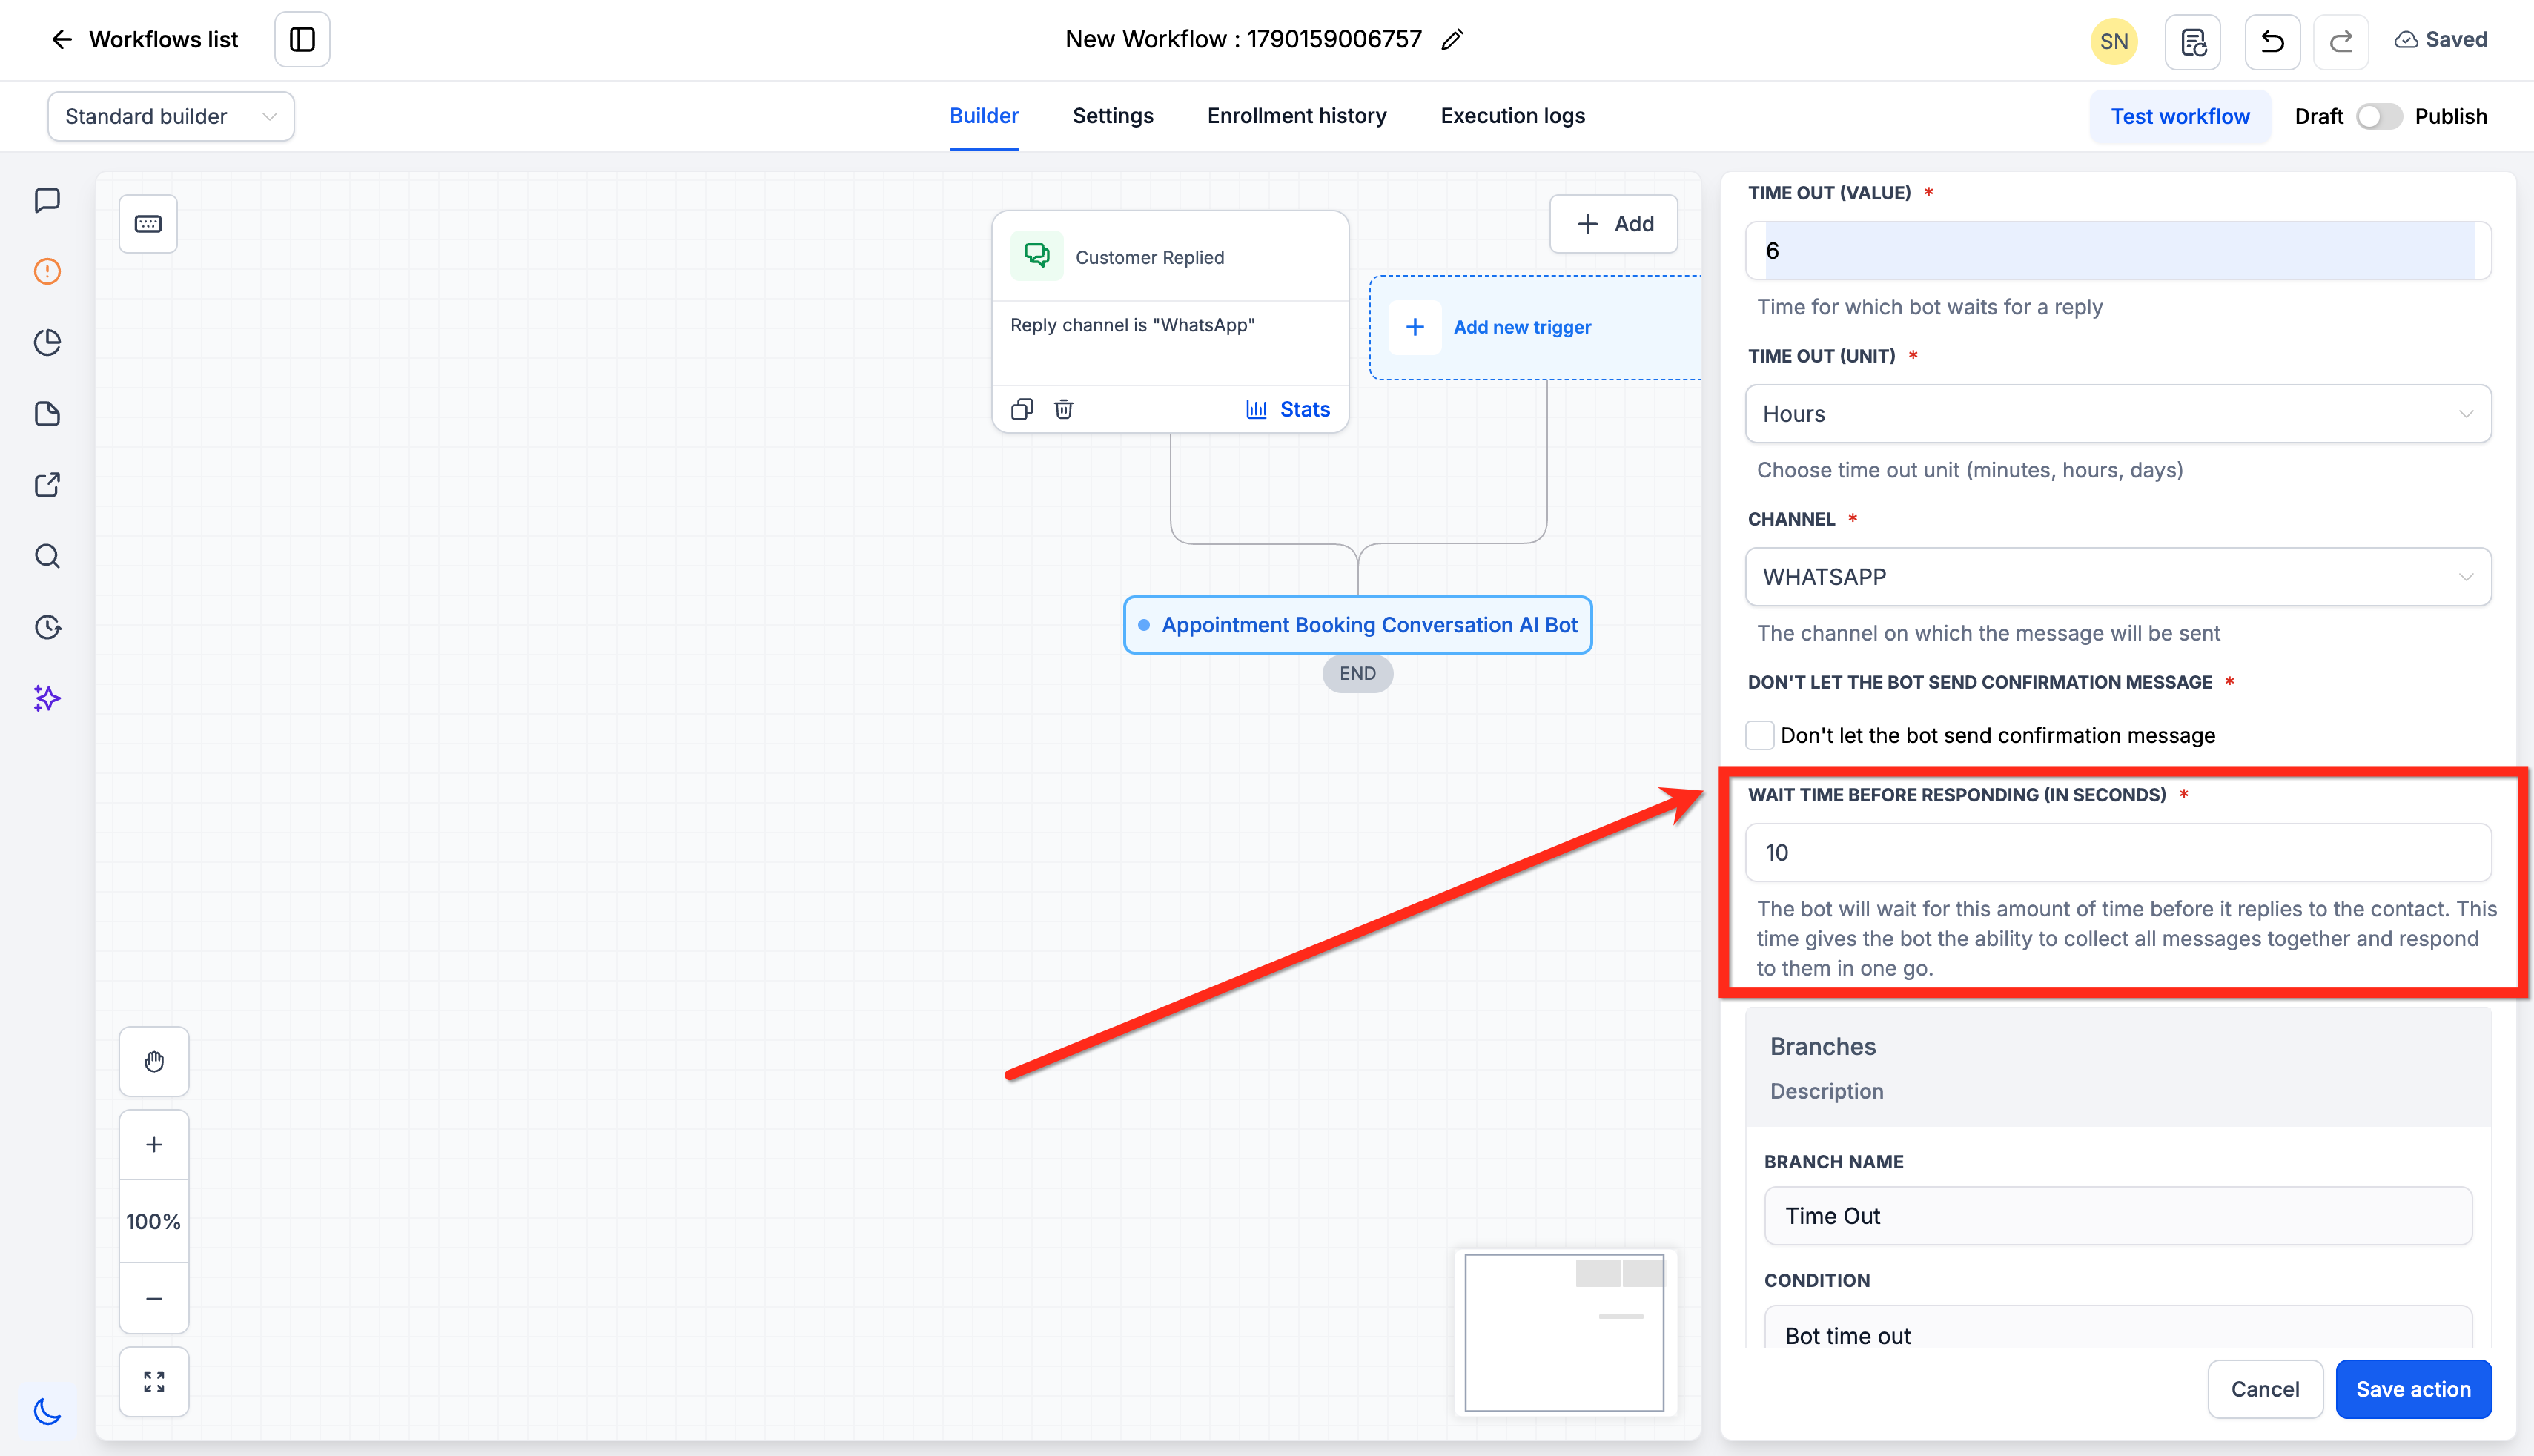
- Set the Wait time before responding in seconds.
- Click Save Action to add the built in outcome branches.
- Add follow up actions under each branch: Timeout, Appointment Was Booked, Appointment Was Not Booked.
- Test the workflow by simulating a contact conversation.
- Save the workflow.
- Publish the workflow to make it active.
07What it looks like in HighLevel
08Settings that matter
- Calendar. Selects which booking calendar the AI will query for available slots.
- Personality. Controls the tone and style of the AI’s messages during the conversation.
- Additional Instructions. Provides extra rules or guidance that shape how the AI conducts the booking chat.
- Maximum Messages Limit. Defines the highest number of messages the AI can send before triggering the Appointment Was Not Booked outcome.
- Timeout Value. Sets how long the AI waits for a reply before moving to the Timeout branch.
- Timeout Unit. Specifies the unit (minutes, hours, or days) for the Timeout Value.
- Channel. Chooses the communication platform (Facebook, Instagram, SMS, or WhatsApp) the AI uses.
- Don't let the bot send confirmation message. When enabled, prevents the AI from automatically sending a booking confirmation after creating the appointment.
- Wait time before responding. Adds a short delay, in seconds, before the AI replies so it can combine closely timed messages.
09Things to know before you rely on it
- Recurring calendars are not supported and will not appear in the Calendar dropdown.
- Maximum Messages Limit must be set between 5 and 25 messages.
- Timeout and Appointment Was Not Booked are distinct outcomes; the former triggers on no reply, the latter on reaching the message limit.
10If something goes wrong
- Recurring calendar does not appear in the Calendar field. Use a supported non recurring calendar for this action.
- Contact receives no booking confirmation. Either enable the bot’s confirmation message or add a manual confirmation action under the Appointment Was Booked branch.
11How it connects to the rest of HighLevel
- Configure how the AI sends SMS messages within the workflow. Send SMS action
- Add a follow up email after a successful booking. Send Email action
- Learn the basics of building workflows and adding triggers. Workflow basics guide
- Review pricing and plan options for workflow automation. HighLevel pricing
Michael's take

Relying on an AI bot to handle booking can feel risky if you haven’t vetted how it reacts when a contact drifts off or stops replying. The built in Timeout and Appointment Was Not Booked branches exist for a reason. Don’t assume the bot will always land a meeting.
If I were adding this, I’d let the AI send the confirmation first, then layer any custom follow up in the booked branch.