
01Who this is for
- Founders who control their brand’s email reputation and need a secure sending address.
- Marketing teams that run campaigns and want to reduce spam placement.
- Agencies managing multiple client domains and requiring separate authentication for each.
02Dedicated domains, explained
The feature lets you register a domain or subdomain that HighLevel will use to send emails. It creates a set of DNS records, SPF, DKIM, CNAME, MX and DMARC, that prove the messages originate from you. HighLevel stores the domain under Settings > Email Services > Dedicated Domain & IP.
When the records are correctly added, the platform verifies them, generates an SSL certificate for the domain and changes its status to Verified / Active. After verification you can test sending and monitor DMARC reports to keep delivery reliable.
03How businesses use adding and verifying a domain
- SaaS startup. The startup adds a subdomain like mail.startup.com, copies the SPF, DKIM and DMARC values HighLevel provides, and pastes them into the DNS console. After clicking Verify, the platform confirms the records, issues an SSL certificate and the startup can send onboarding emails that pass authentication checks.
- Real estate agency. The agency creates a dedicated sending domain such as email.realestate.co to separate its marketing mail from its main website. It follows the auto configure flow if the DNS host is supported, or manually adds the records, then verifies the domain so client newsletters are less likely to land in spam.
- Ecommerce store. The store registers mail.shopexample.com, adds the required TXT and CNAME entries supplied by HighLevel, and verifies the domain. Once active, order confirmations and promotional offers are sent from the authenticated address, helping inbox providers trust the messages.
04The numbers and rules that matter
- TTL recommendation: 5 minutes (300 seconds).
- SSL certificate is issued 1, 10 minutes after verification.
- DNS propagation can take up to 24, 48 hours.
- Supported autoconfigure providers: Cloudflare, GoDaddy, Namecheap, AWS Route 53, Google Domains.
05Before you start
- Login access to your DNS provider’s dashboard (Cloudflare, GoDaddy, Route 53, etc.).
- The domain or subdomain you intend to use for sending.
- Permission to add or edit DNS records.
- Basic knowledge of SPF, DKIM, DMARC, CNAME, TXT and MX record types.
06How to set up and use adding and verifying a domain in HighLevel
Add your domain
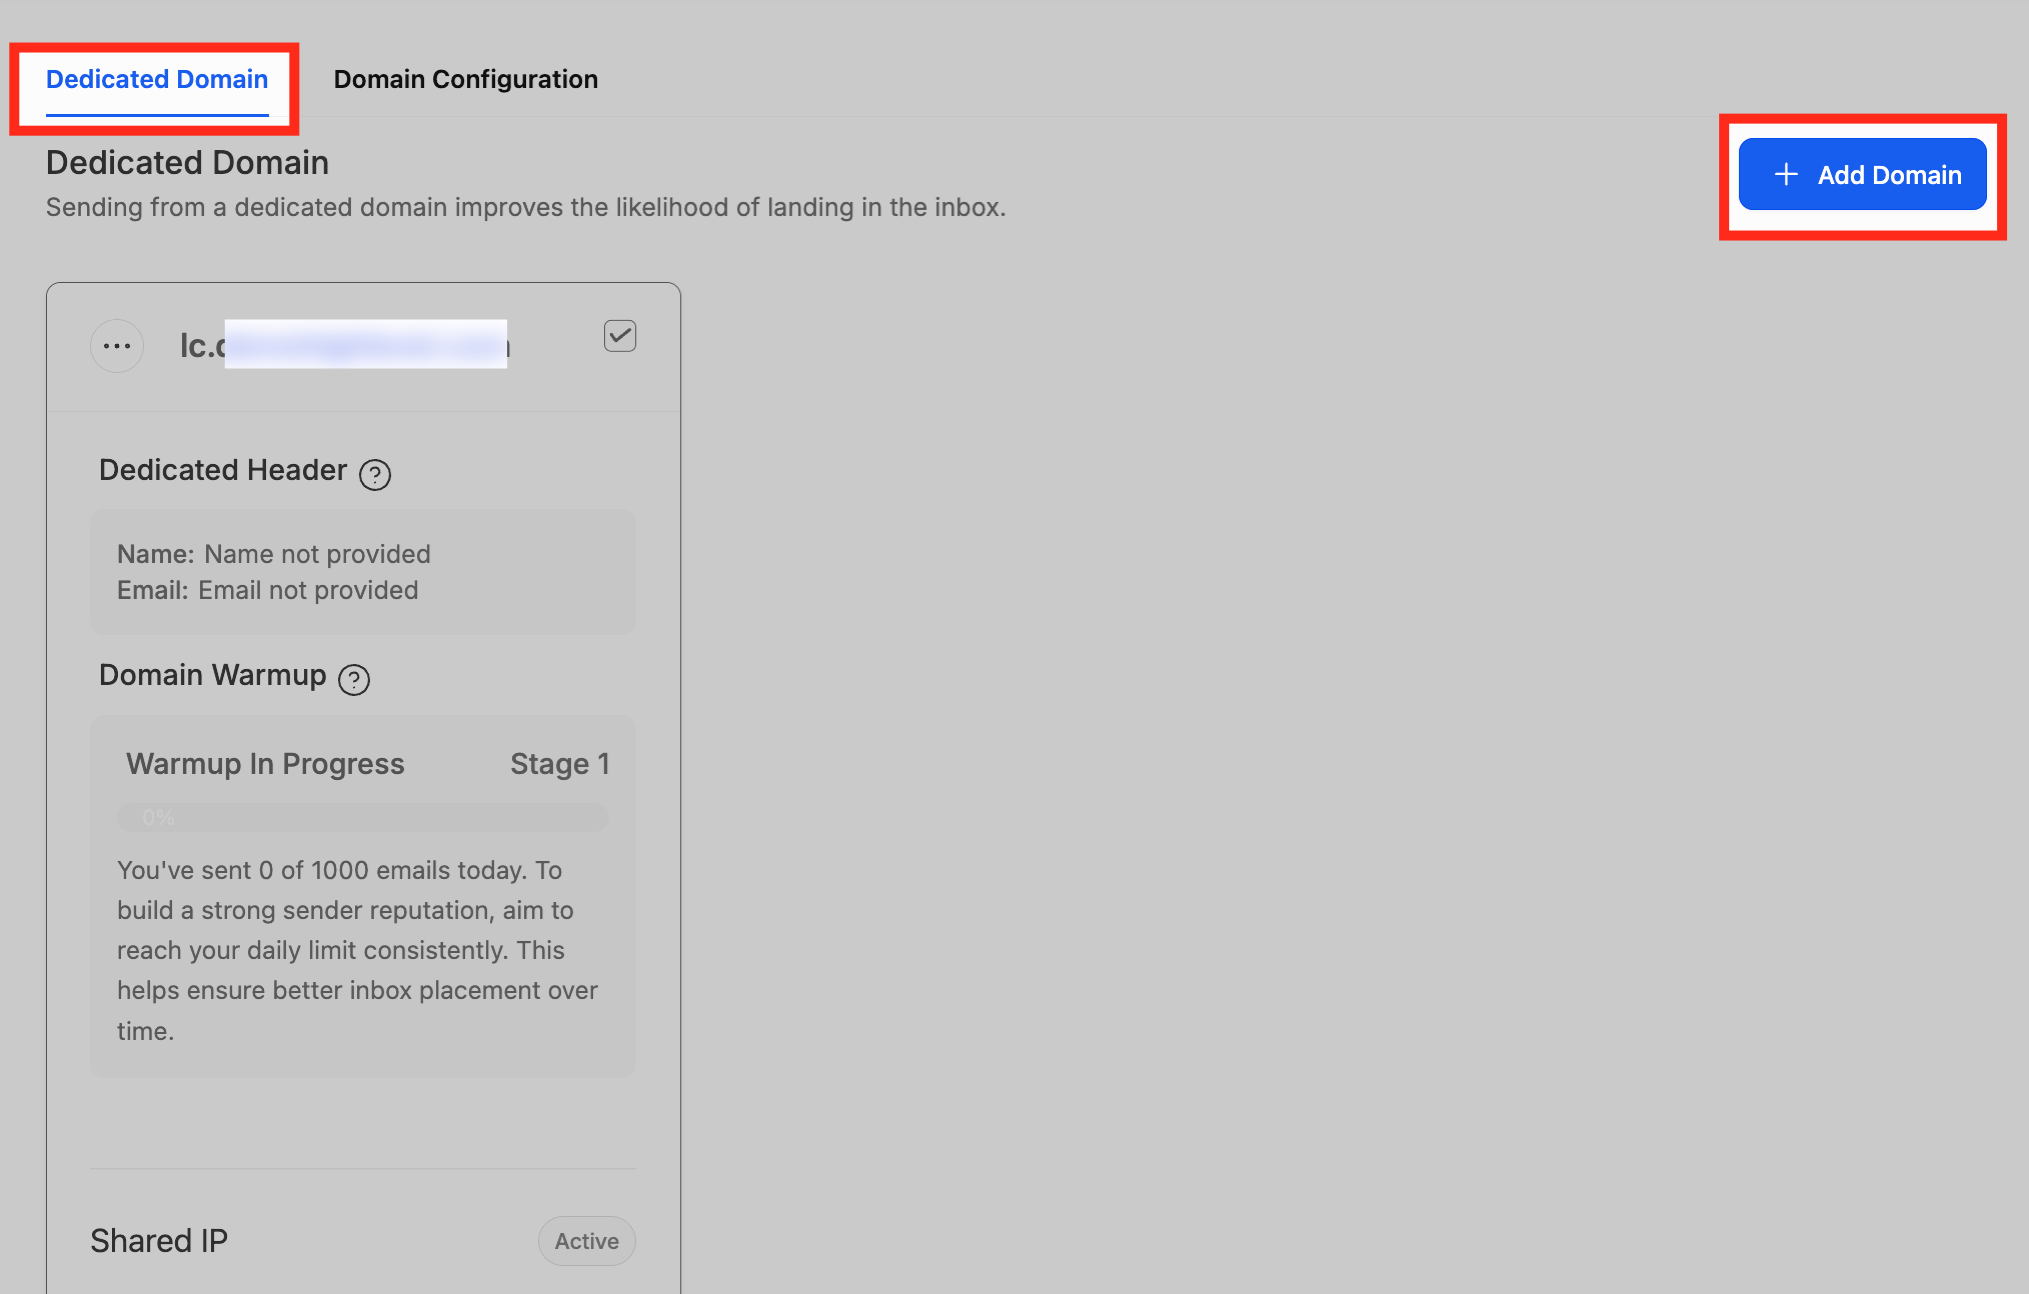
- Open Settings, then select Email Services, and go to Dedicated Domain & IP.
- Click the + Add Domain button at the top right of the Dedicated Domains screen.
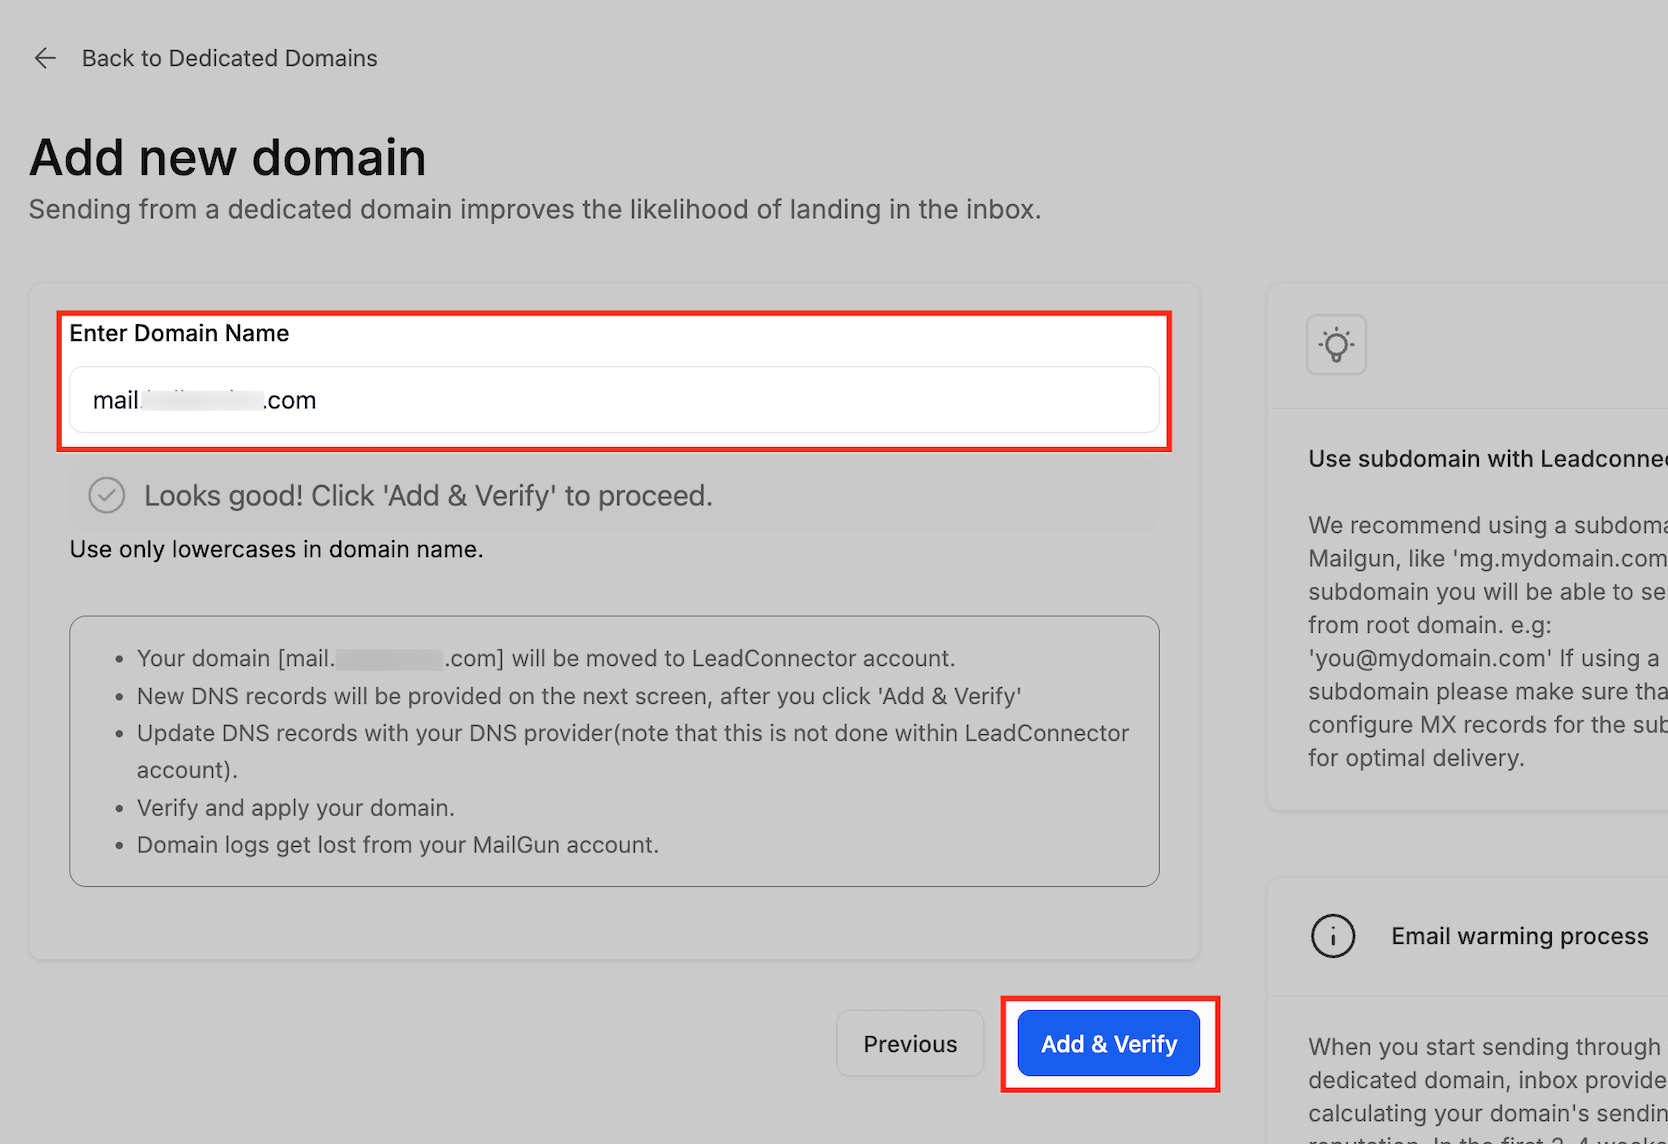
- Enter the chosen domain or subdomain, prefer a subdomain such as mail.example.com, and press Add & Verify.
Verify your domain
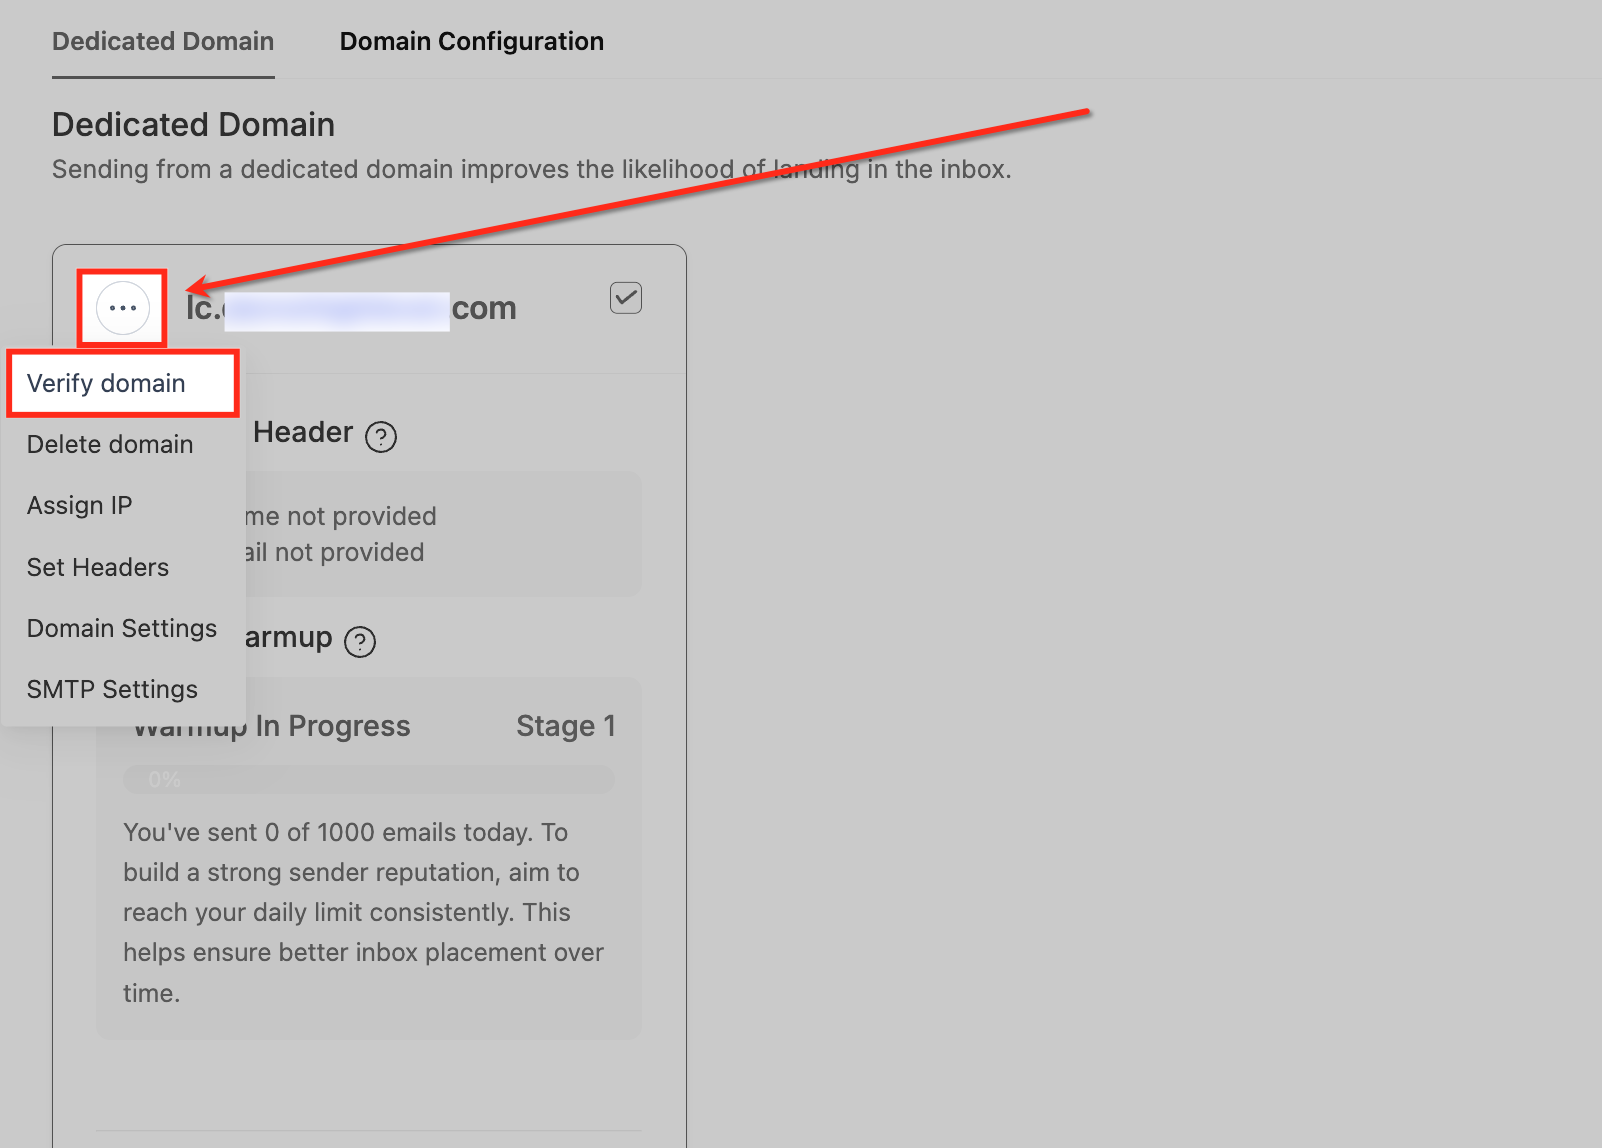
- Find the three dot menu beside the newly added domain and choose Verify domain.
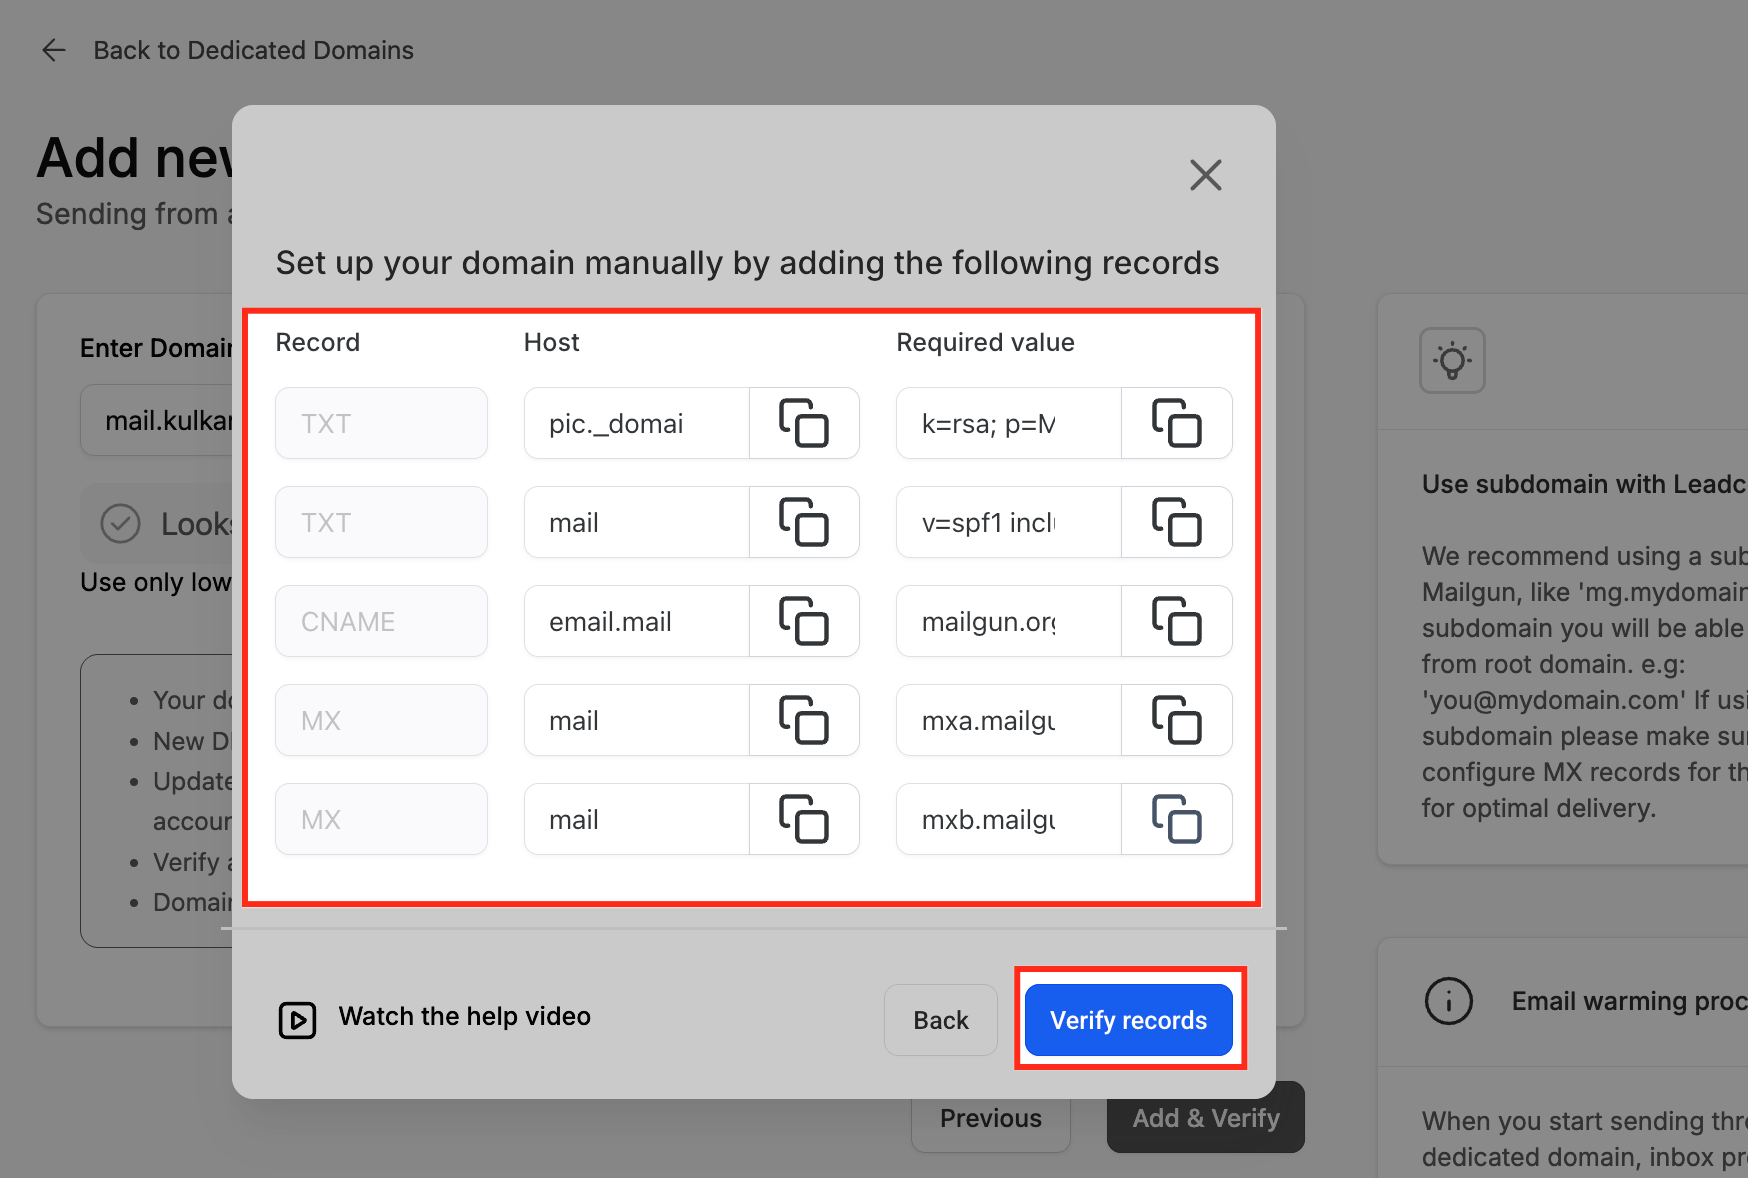
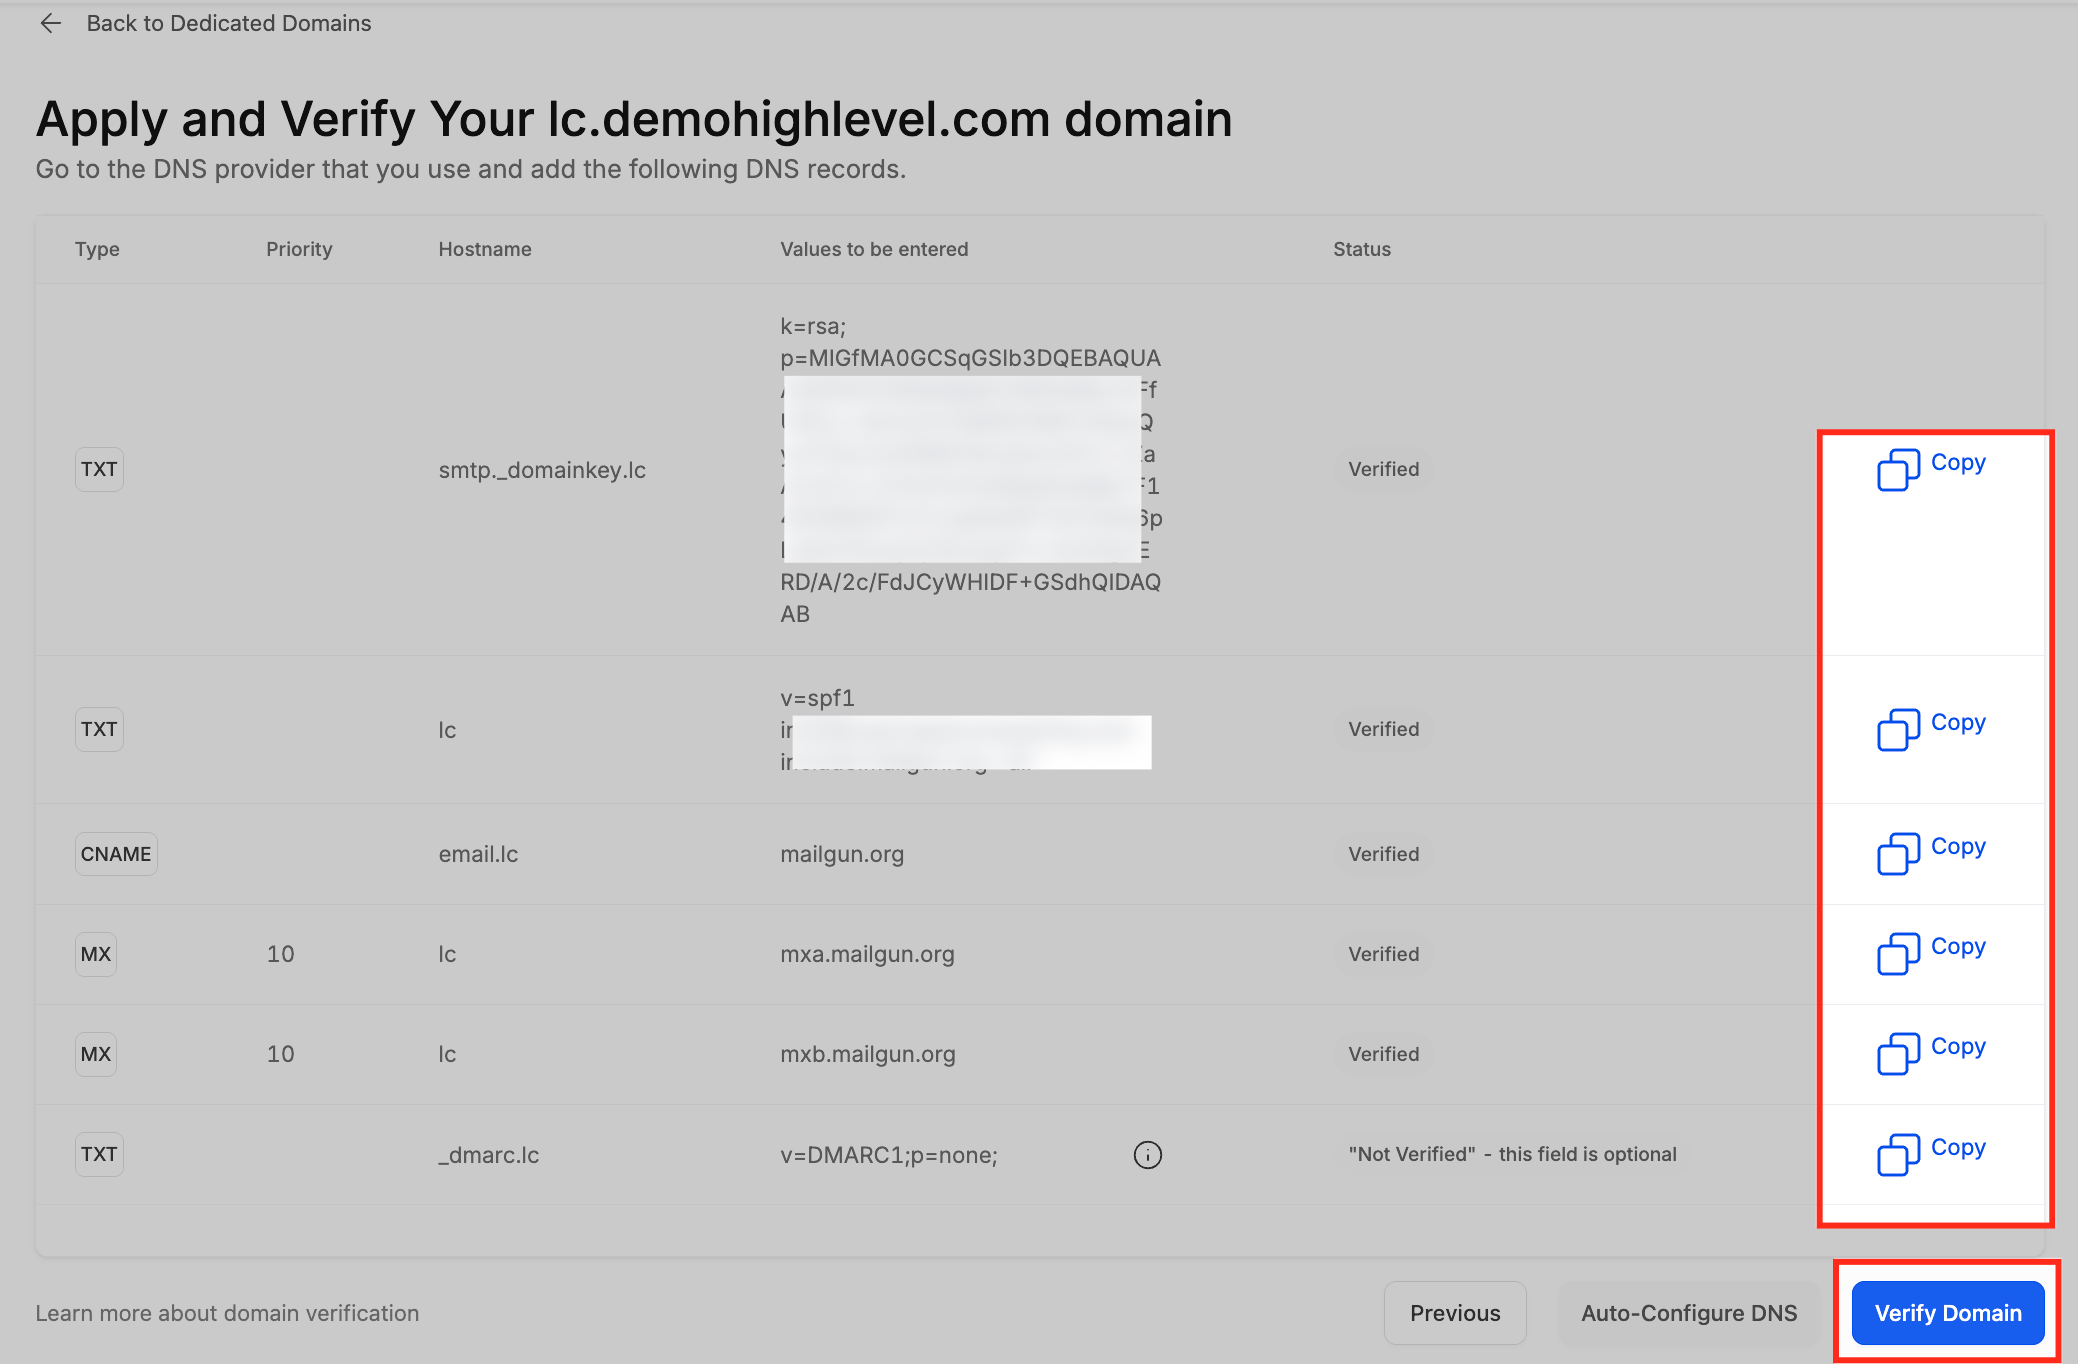
- Review the list of required DNS records (SPF, DKIM, CNAME, MX, DMARC) and copy each value using the provided buttons.
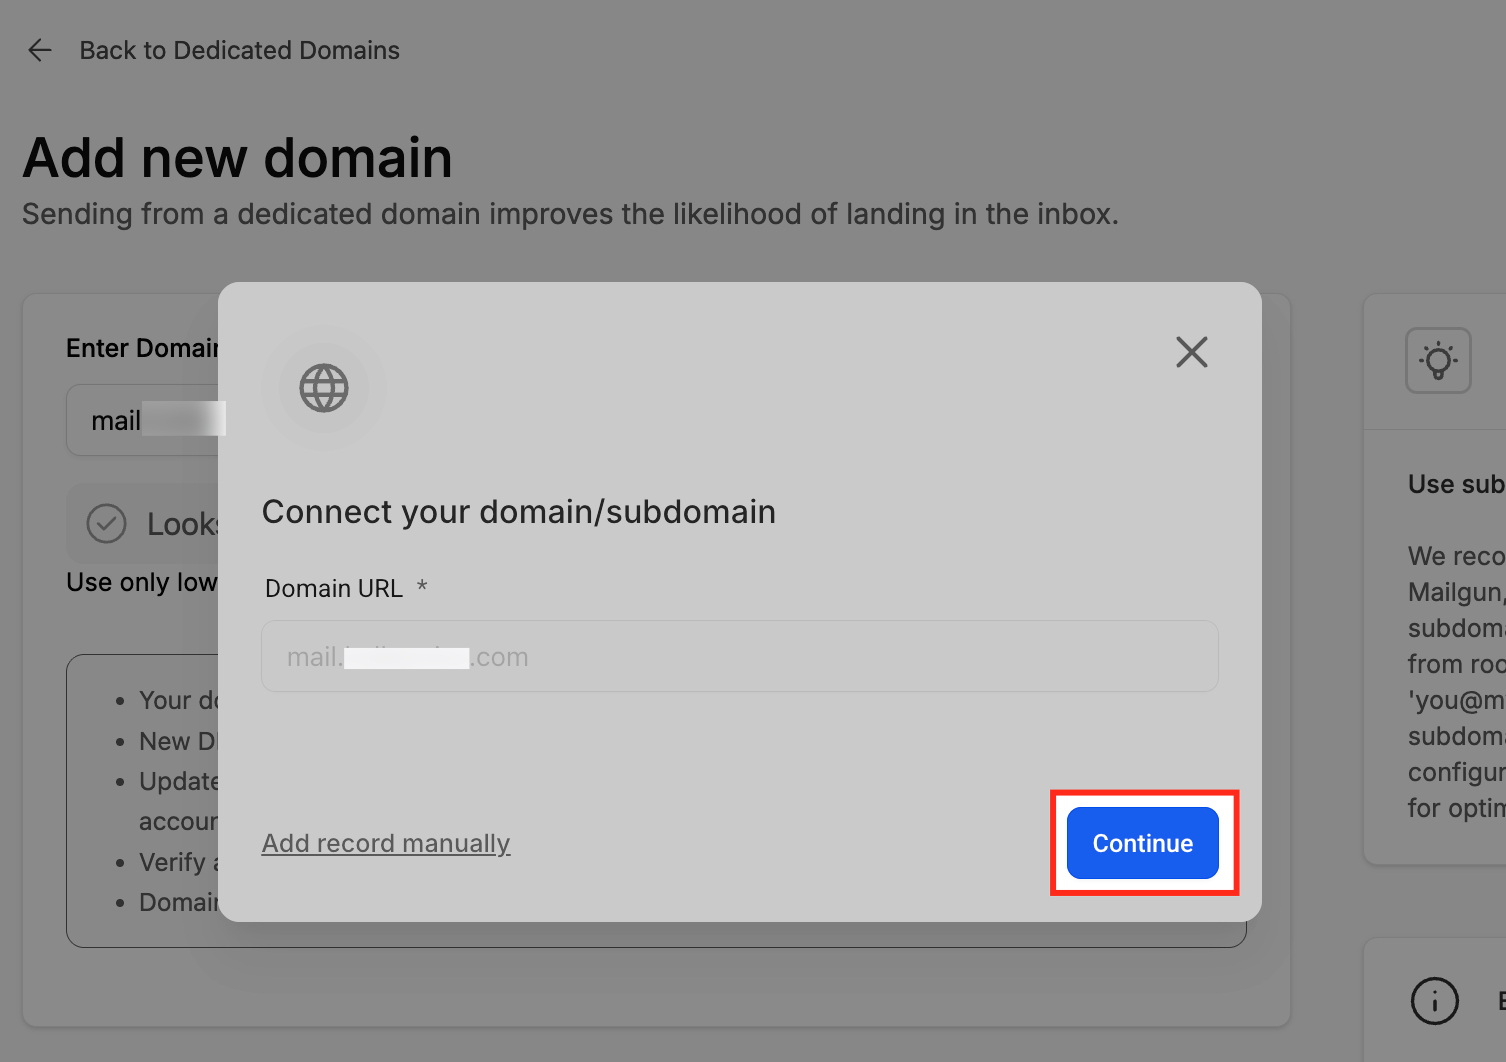
- If your DNS provider is supported, click Continue to start automatic setup.
- Log in to the DNS provider when prompted and grant Lead Connector permission to create the records.
- If automatic setup is not available, manually add each record exactly as shown, using the correct type, host name and value.
- After the records are in place, wait a few minutes then return to the three dot menu and click Verify domain again to trigger a re check.
After verification
- Wait for the SSL certificate to be issued; this usually completes within a few minutes.
- Confirm that the domain status changes to Verified / Active in the platform.
- Send a test email and examine the headers to ensure SPF and DKIM pass.
- Use DMARC reports and inbox testing tools to keep an eye on ongoing deliverability.
07What it looks like in HighLevel
08Settings that matter
- Dedicated Domain & IP. The section where you register domains that HighLevel will use for sending authenticated email.
- Verify domain. A command that tells HighLevel to check the DNS records you added and change the domain’s status when they are correct.
09Things to know before you rely on it
- Auto configure works only with DNS providers that are supported; unsupported providers require manual entry.
- TTL for each record should be set to 5 minutes (300 seconds) when possible to speed up verification.
- Only one SPF TXT record and one DMARC record may exist per domain; duplicates cause verification to fail.
- If using Cloudflare, DNS only (gray cloud) must be selected for email related records; proxying prevents successful verification.
- Domain verification typically finishes within 1 to 10 minutes, but DNS propagation can take up to 24 to 48 hours.
10If something goes wrong
- A DNS record does not match the provided value.. Edit the record in your DNS console so it exactly matches the value shown by HighLevel, then re run verification.
- Incorrect record type selected (e.g., CNAME instead of TXT).. Replace the record with the correct type as indicated in the verification list and verify again.
- Host or Name field contains extra symbols or missing subdomain.. Enter only the subdomain part for subdomains (for example "mail") or use "@" for root domains, then retry verification.
- TTL is set too high, delaying propagation.. Change the TTL to 300 seconds (5 minutes) where possible and wait a few minutes before verifying again.
- Multiple DMARC records exist for the same domain.. Delete the extra DMARC entries so that only one remains, then run verification.
- Cloudflare shows an orange cloud (proxied) for email records.. Switch the cloud icon to gray (DNS only) and re verify the domain.
11How it connects to the rest of HighLevel
- Learn about dedicated sending domains and how they integrate with HighLevel email. Dedicated email sending domains
- See how SSL certificates are automatically issued for verified domains. SSL certificates for domains
- Read the guide on enabling and billing for email verification. Email verification billing
- Start a 30 day trial of HighLevel to test domain authentication. 30 day trial
Michael's take

Verifying a domain in HighLevel protects your brand, prevents spoofing and improves inbox placement.
The biggest mistake is to copy a DNS value incorrectly or leave a stray extra character; even a tiny typo will stop verification.