
01Who this is for
- Yoga studio Founders benefit because they can automate client bookings and avoid scheduling conflicts.
- Instructors use the calendars to see their assigned classes and manage their availability.
- Studio managers gain a single view of room usage and equipment reservations.
02Service calendars, explained
Service Calendars are a scheduling tool inside HighLevel that lets you create distinct calendars for each yoga offering. Each calendar can be linked to specific instructors, studio rooms, and equipment, ensuring bookings respect availability and resources.
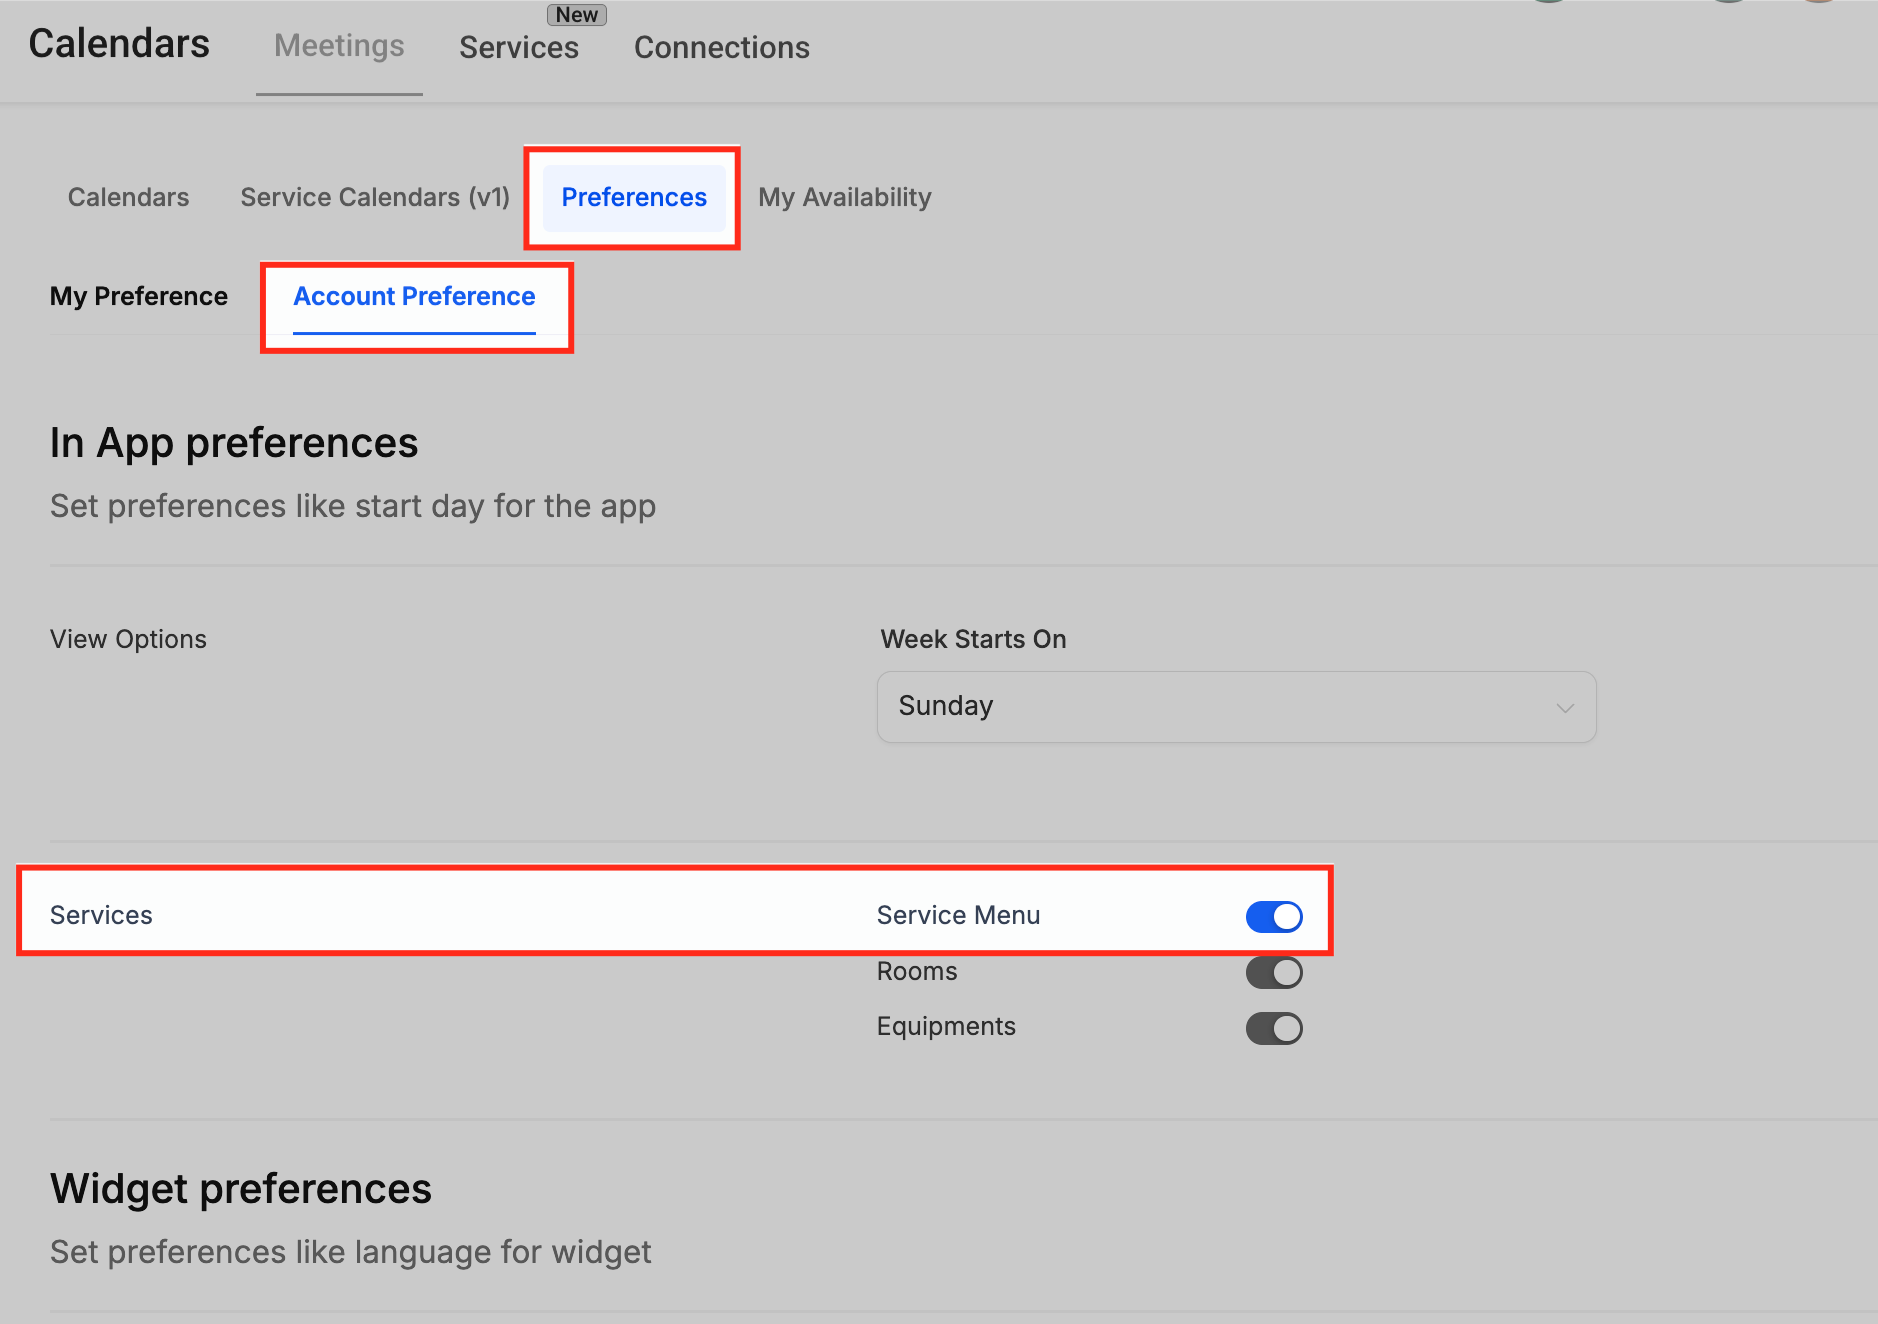
The feature is accessed from the Calendars menu. First enable the service based booking system via Preferences > Account Preference, then organize services into groups and build individual calendars. A Service Menu can combine several calendars on one public page.
When a client selects a class, the platform checks staff schedules, room assignments, and equipment counts to block conflicting times. All details appear on internal calendars with custom colors and titles for quick identification.
03How businesses use service calendars
- Yoga classes. Add instructors, set their weekly hours, create a group for classes, build a calendar for each class type, assign the appropriate studio room and equipment, then publish a Service Menu so clients can book classes online.
- Private yoga sessions. Create staff profiles for private instructors, define their availability, set up a group for private sessions, configure a calendar with room and equipment assignments, and enable the Service Menu to allow clients to schedule one on one sessions.
- Workshops. Organize workshop staff, establish a group for workshops, assign larger studio spaces and any special equipment, then add the workshops to a Service Menu so participants can register for multiple workshop offerings.
04Before you start
- Staff members must be added and their availability set.
- The Service Menu option must be enabled in Account Preference.
05How to set up and use service calendars in HighLevel
Add staff members and set availability
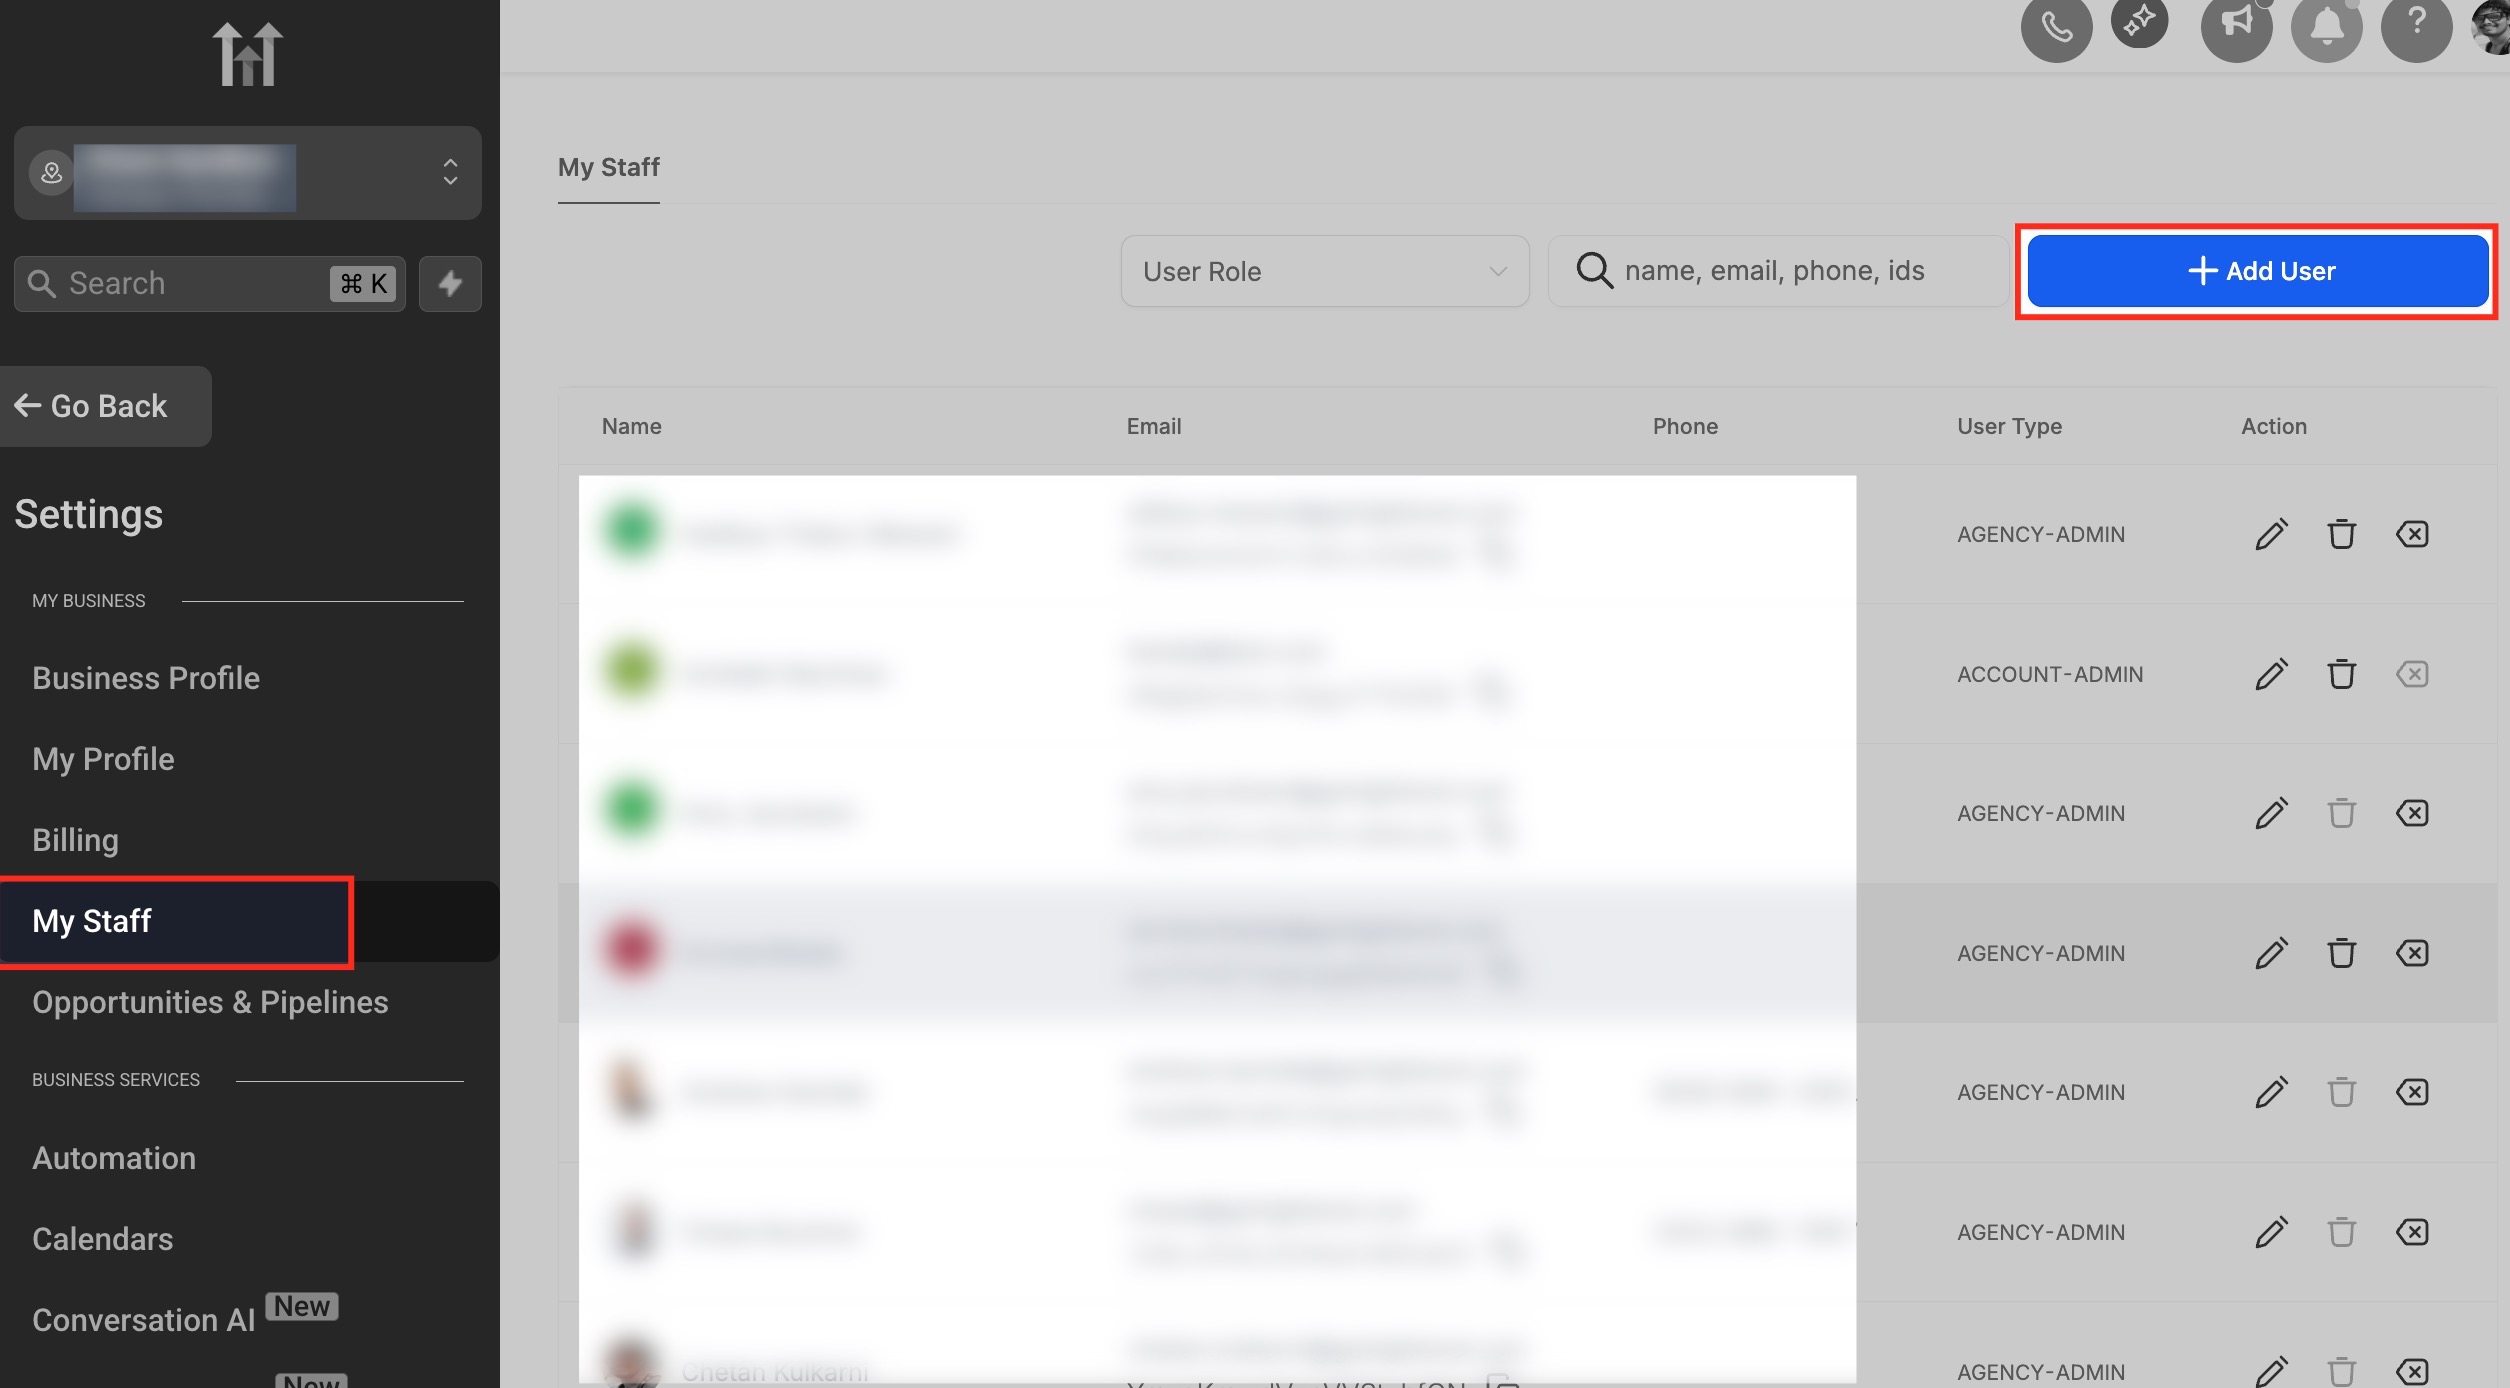
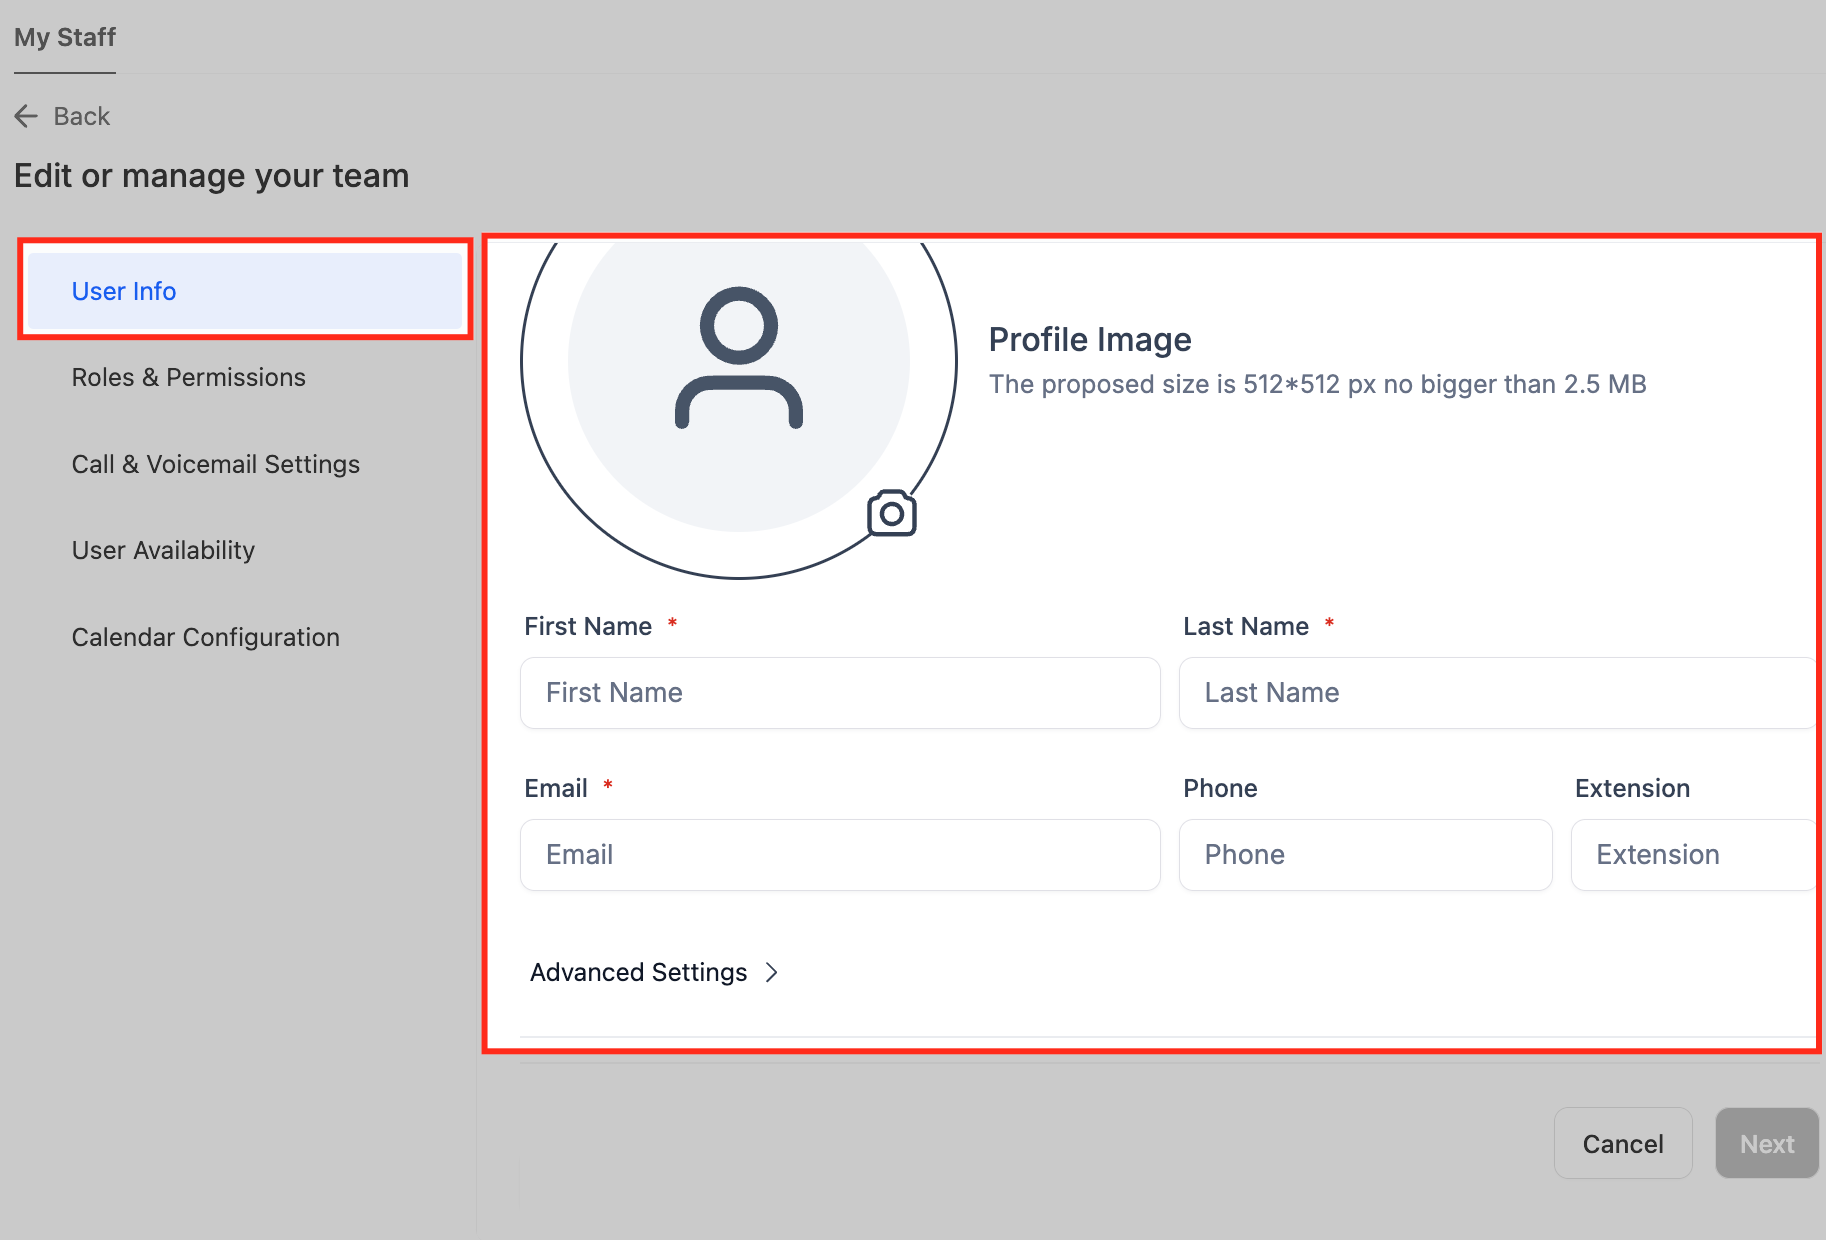
- From the subaccount dashboard, go to Settings > My Staff > Add User.
- Enter the instructor’s name, email address, extension, and set any needed permissions.
- Mark the days and times the instructor works, such as Mon, Wed 9 am, 5 pm.
- Click Save to store the new user and their schedule.
Create a group for services
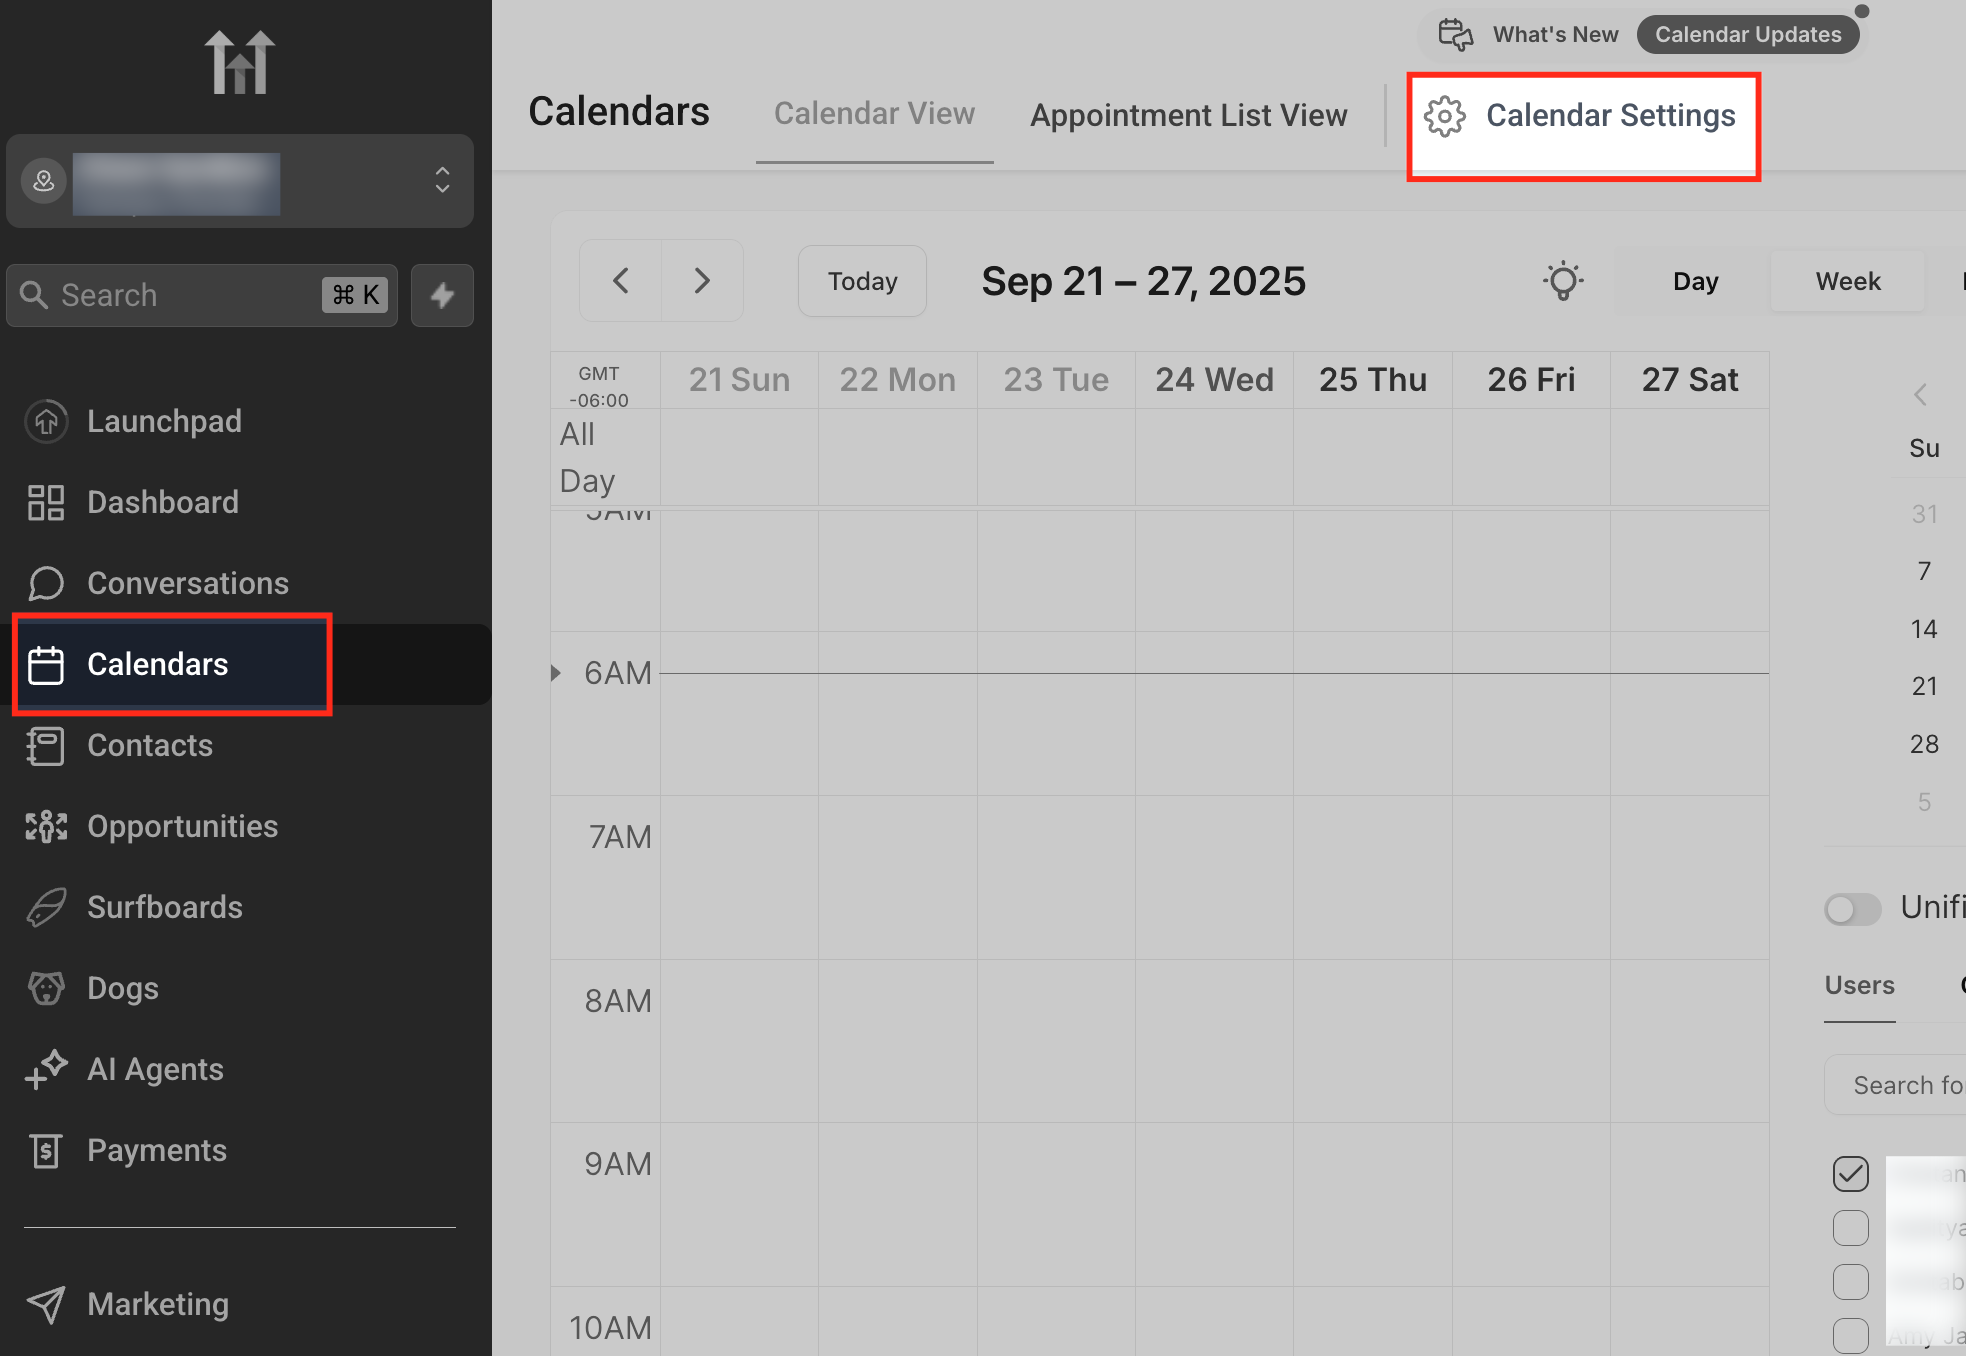
- Open Calendar Settings by selecting Calendars and clicking the Calendar Settings button at the top right.
- Navigate to Preferences > Account Preference and toggle the Service Menu option on.
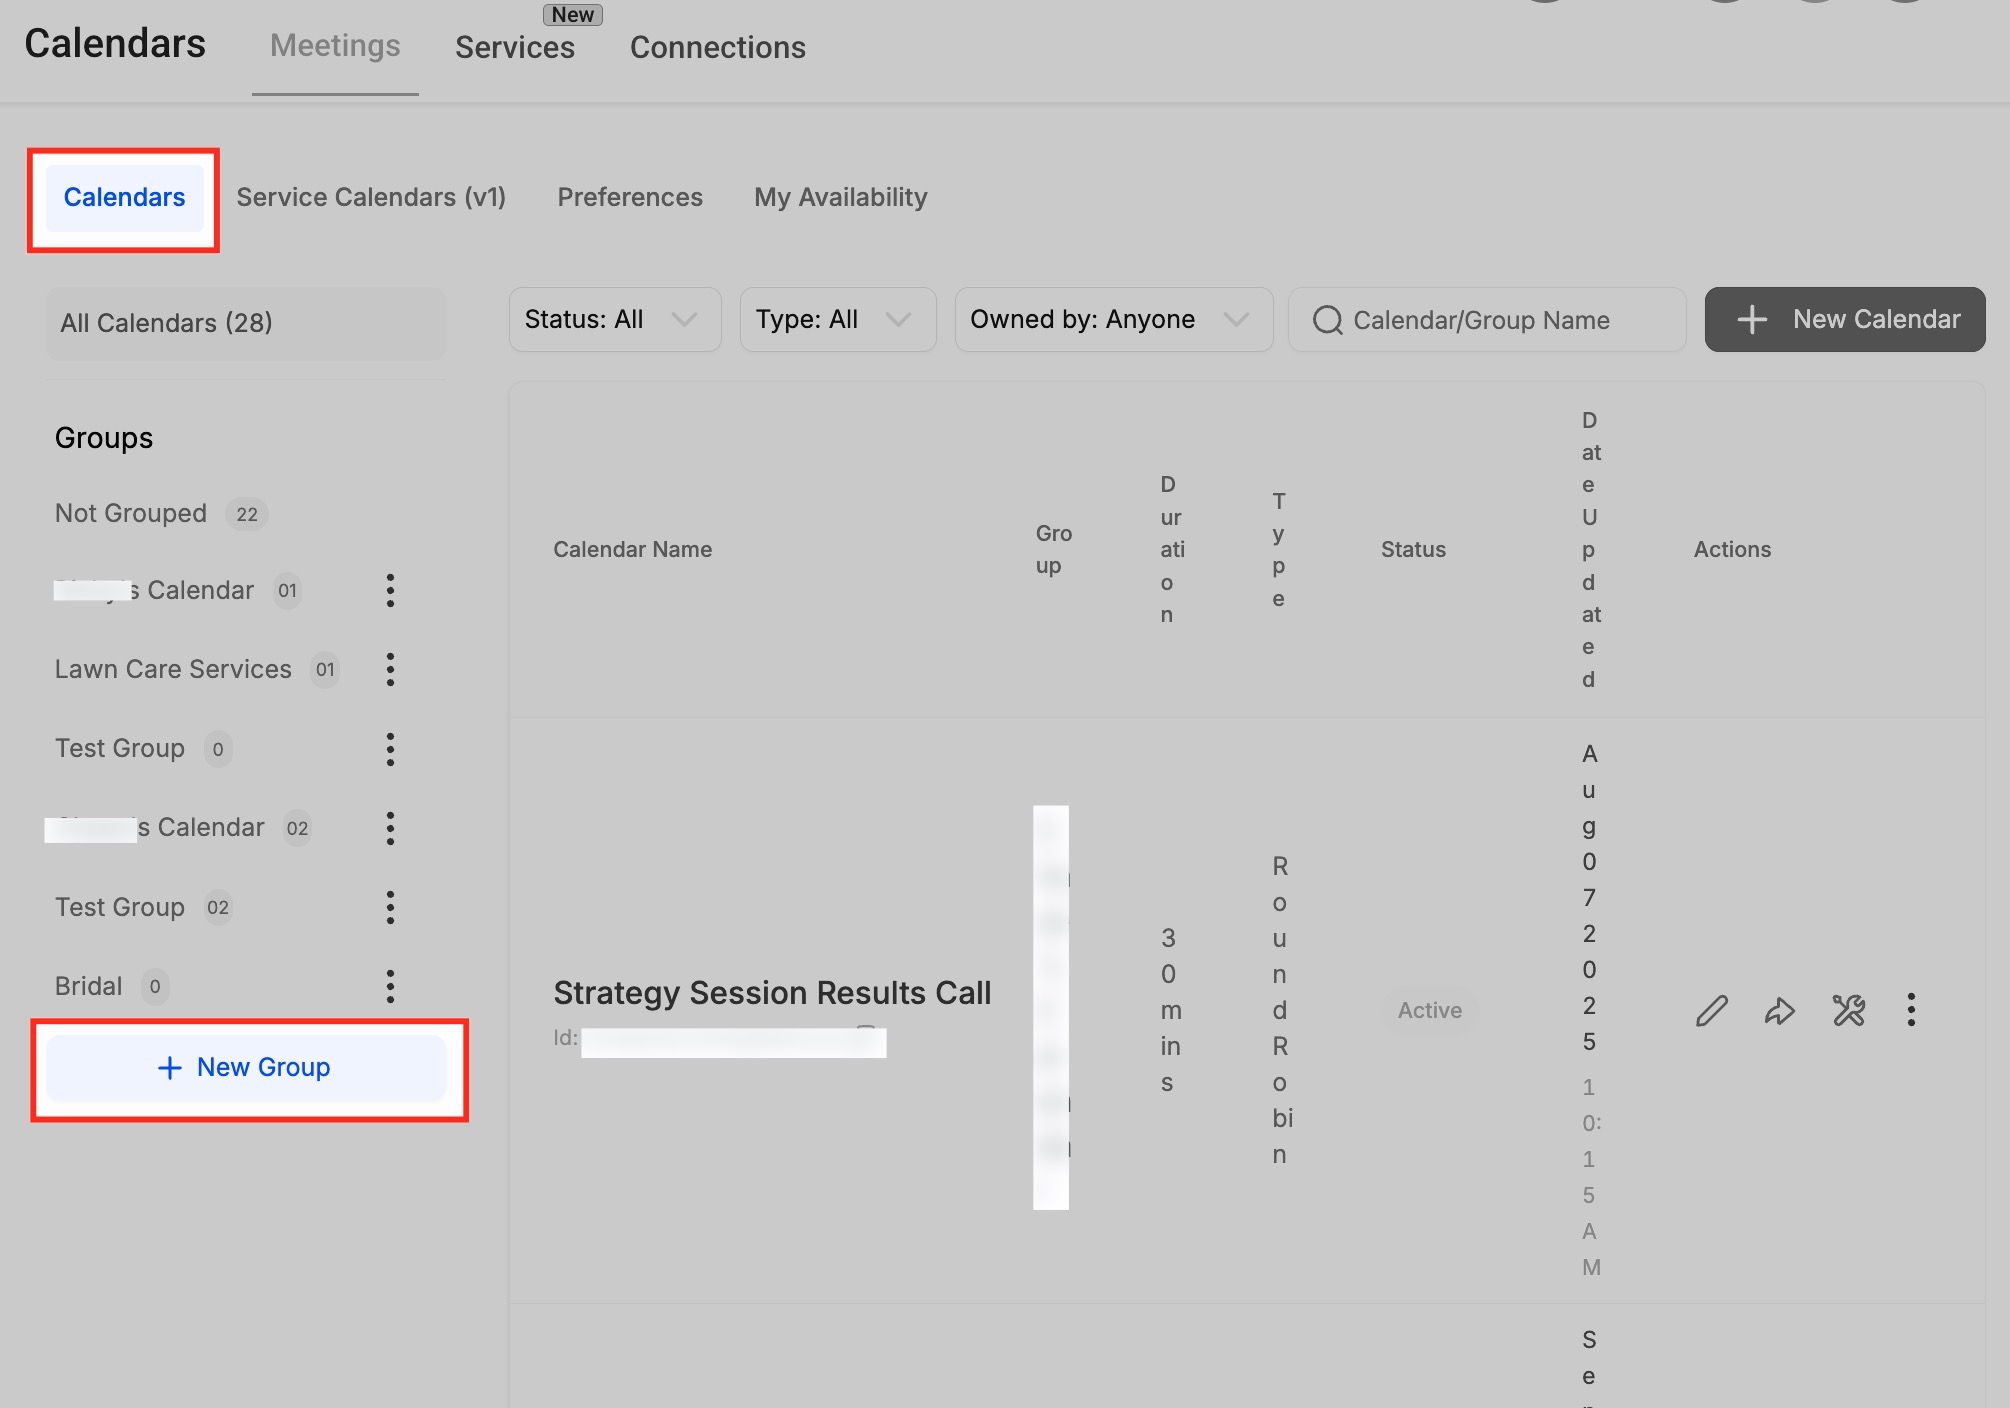
- In the Calendars tab, click + New Group on the left sidebar.
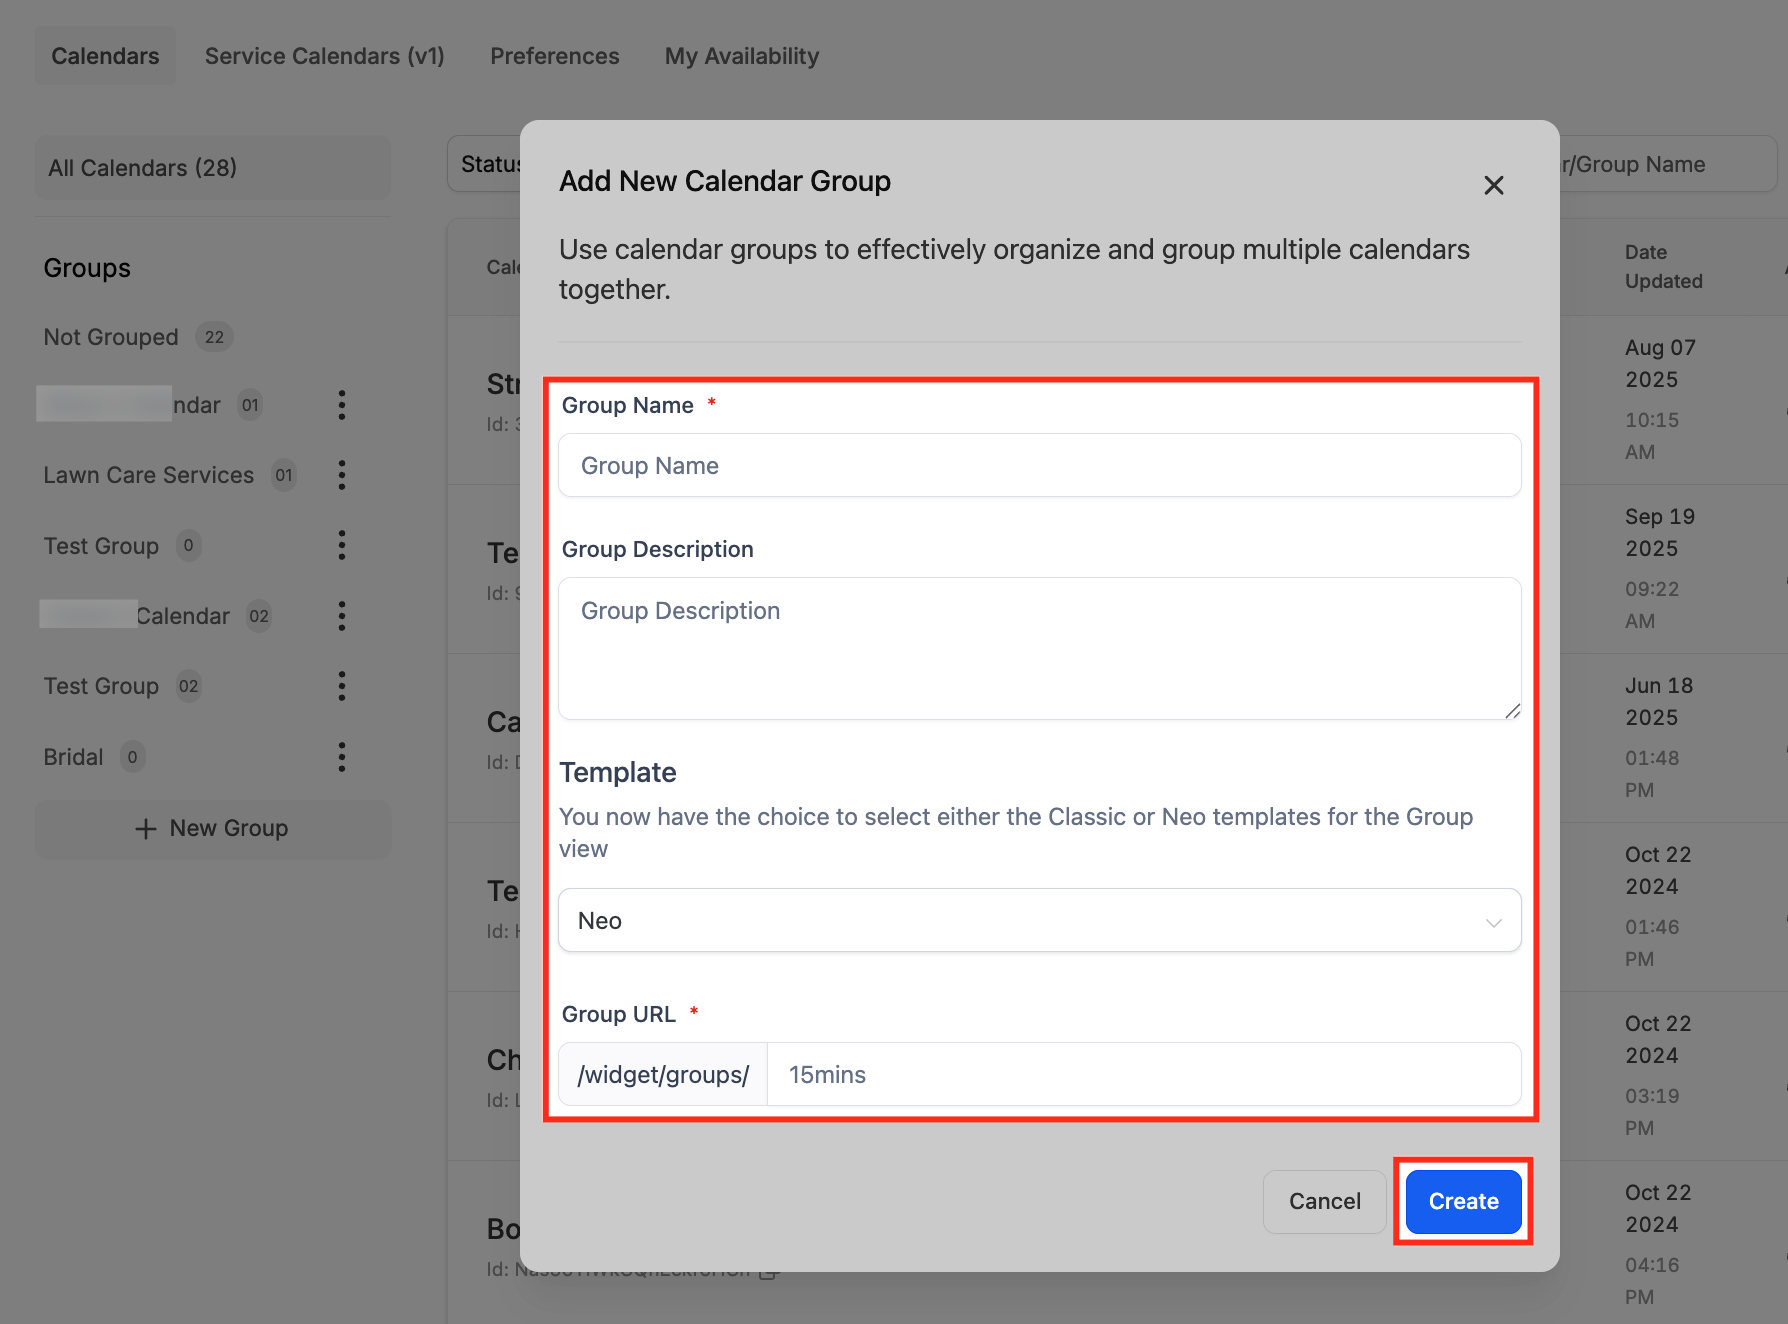
- Enter a Group Name, Description, and URL slug in the pop up form.
- Pick a template type (Classic or Neo) and click Create to save the group.
Create a service calendar
- Select the desired group from the left sidebar.
- Click Create Calendar to begin a new calendar for that group.
- Open Calendars > Service Menu > Create Service Menu and choose Service Booking.
- Enter the Service Name, assign staff, set a custom URL, define the service duration, and specify availability.
- Click Advanced Settings to view additional configuration panels.
Set up service details and resources
- Upload a Service Logo in the Service Details tab.
- Enter a clear Service Name and a descriptive text.
- Assign the service to the appropriate Group and create a custom URL for the booking link.
- Set the Appointment Invite Title and select the instructors who can deliver the service.
- Choose a Meeting Location, assign a Meeting Color, and link a Room that represents the studio space.
- Link required Equipment such as mats or blocks and specify the quantity available.
Create a service menu
- Open the Service Menu area via Meetings > Service Calendars (v1) > Service Menu.
- Click the + Create Service Menu button in the top right corner.
- Provide the Service Menu name, description, URL slug, select a form, and toggle the consent checkbox if needed.
- Enable the Add Guests option under Additional Options.
- Enable Multiple Service Selection under Additional Options.
- Enable Staff Selection under Additional Options.
- Select the groups or calendars to include and arrange their order on the page.
Edit an existing service calendar
- Navigate to Service Calendars (v1) under the Meetings tab.
- Locate the calendar you want to modify in the list.
- Click the pencil icon in the Actions column to open the calendar settings.
- Change the required fields such as service name, staff, availability, or resources and save the updates.
06What it looks like in HighLevel
07Settings that matter
- Service Menu. Activates the service based booking system so you can create service calendars and combine them on a single menu page.
- Enable Add Guests. Allows customers to add additional participants when they book an appointment.
- Enable Multiple Service Selection. Lets a client choose more than one service, such as a class together with a private session, in one booking.
- Enable Staff Selection. Provides a dropdown for clients to pick their preferred instructor during booking.
08Things to know before you rely on it
- A service calendar cannot be saved until at least one staff member is assigned.
- Rooms and equipment must be linked to a service to prevent double booking of those resources.
- The Service Menu toggle must be turned on before groups and calendars can be created.
09If something goes wrong
- Cannot save a service calendar. Assign at least one staff member to the service before attempting to save.
- No time slots appear for a service. Verify that the assigned staff have availability set and that rooms and equipment are linked to the service.
10How it connects to the rest of HighLevel
- View all calendar and appointment features Calendars & Appointments
- Check HighLevel pricing and plans Pricing
- Start a 30 day HighLevel trial Free trial
- Learn how to embed a HighLevel calendar with HTML Embed calendar
- Set up a group calendar overview Group calendar guide
Michael's take

The first setting I would lock in is the Service Menu toggle in Preferences > Account Preference. Turning that on opens the whole service based workflow and prevents you from getting stuck halfway through the setup.