
Home/HighLevel/Guides/Build the reputation workflow
HighLevel Guides · Volume 04 · Pillar 02
How to build a review request workflow in GoHighLevel and ask every time.
Most businesses only ask for a review when someone remembers to. This build asks after every job, follows up until the customer clicks, and replies to each review in the business voice. At the end you will have review requests running from a workflow and Reviews AI handling the replies. HighLevel is the same platform many people still search for as GoHighLevel.
What you are building
What you are building and what it does for the business.
When a job closes, the workflow fires a Send Review Request action. HighLevel texts the customer a short message with the review link, emails a branded version, and retries on a schedule until the link is clicked. Every request shows up under Reputation with a status of Queued, Sent, Delivered or Failed. When a review lands, Reviews AI drafts a reply in the business voice, and once you trust the tone it posts replies on its own. The Review Widget then shows the best reviews on the website. New to workflows? Read the GoHighLevel workflows guide and the workflow questions and answers first. Plan and usage costs are on the GoHighLevel pricing page.
- A review link that routes customers to Google or a custom URL
- SMS and email templates with a live message and retry messages
- A workflow action that sends the request after every job
- Reviews AI replying to reviews, first as suggestions and then on Autopilot
- A review widget on the website that updates as new reviews arrive
- A status for every request under Reputation: Queued, Sent, Delivered or Failed
Before you start
Before you start have these ready.
Gather these first and the build runs without a stop.
- Google Business Profile connected in the subaccount under Settings, then Integrations (Facebook too if you want those reviews)
- A phone number in the subaccount to use as the default SMS sender
- A verified sender email address whose SMTP login matches the address you will send from
- Reviews AI turned on for this subaccount at the agency level under AI Suite, then AI Setup
- The workflow where a job gets marked complete, or the trigger you will use to start the request
- Two or three sentences in the business voice for the SMS and the email
Part 01 of 06
Set the review link so every request lands somewhere.
Every SMS and email pulls the same review link. Set it once here and the {{reputation.review_link}} token fills it in everywhere. Review Balancing spreads customers across your connected platforms. A Custom Link sends everyone to one URL.
- In the subaccount, go to Settings, then Integrations, and confirm Google is connected.
- Go to Reputation, then Settings, then Review Link.
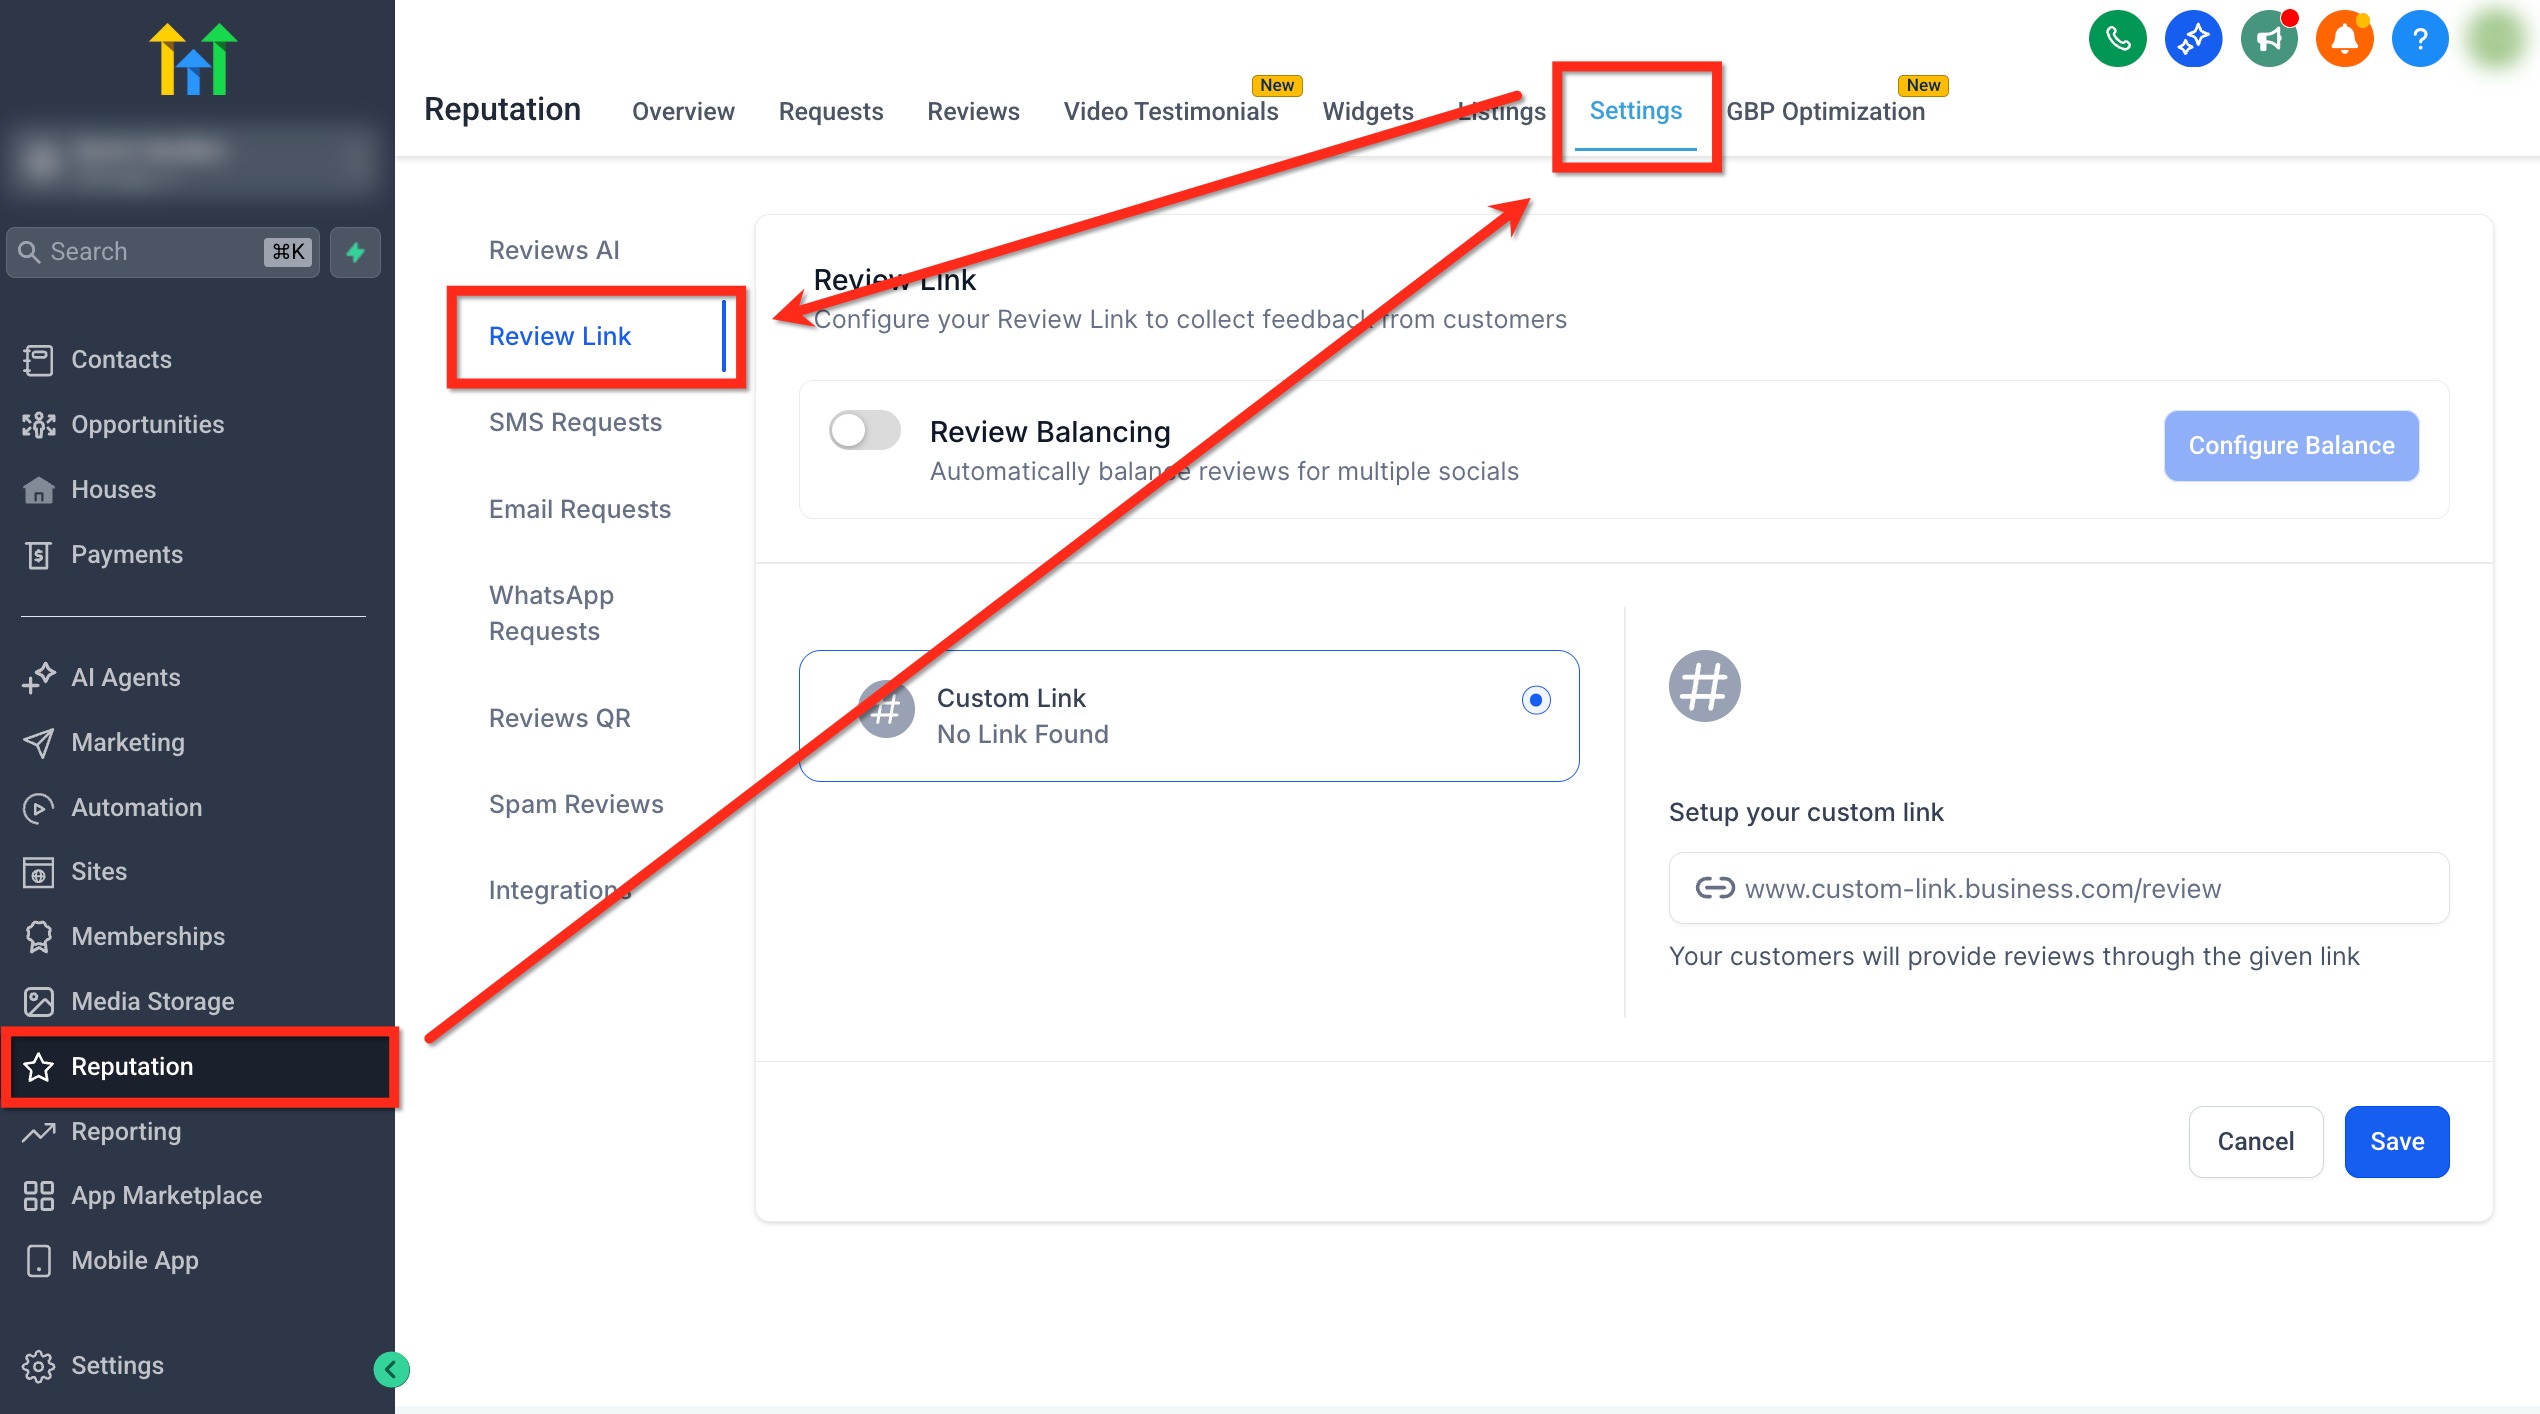
Review Link settings with Review Balancing and Custom Link. - Toggle on Review Balancing to spread reviews across connected platforms such as Google.
- If you want one destination instead, select Custom Link and paste the review URL.
- Save the setting.
Part 02 of 06
Turn on SMS requests and write the texts.
SMS gets read fast, so it carries the first ask. You set when the first text goes out, how often it repeats, and how many retries are allowed. Then you write the live message and a shorter message for each retry.
- Go to Reputation, then Settings, then SMS Requests, and toggle on Enable SMS Review Requests.
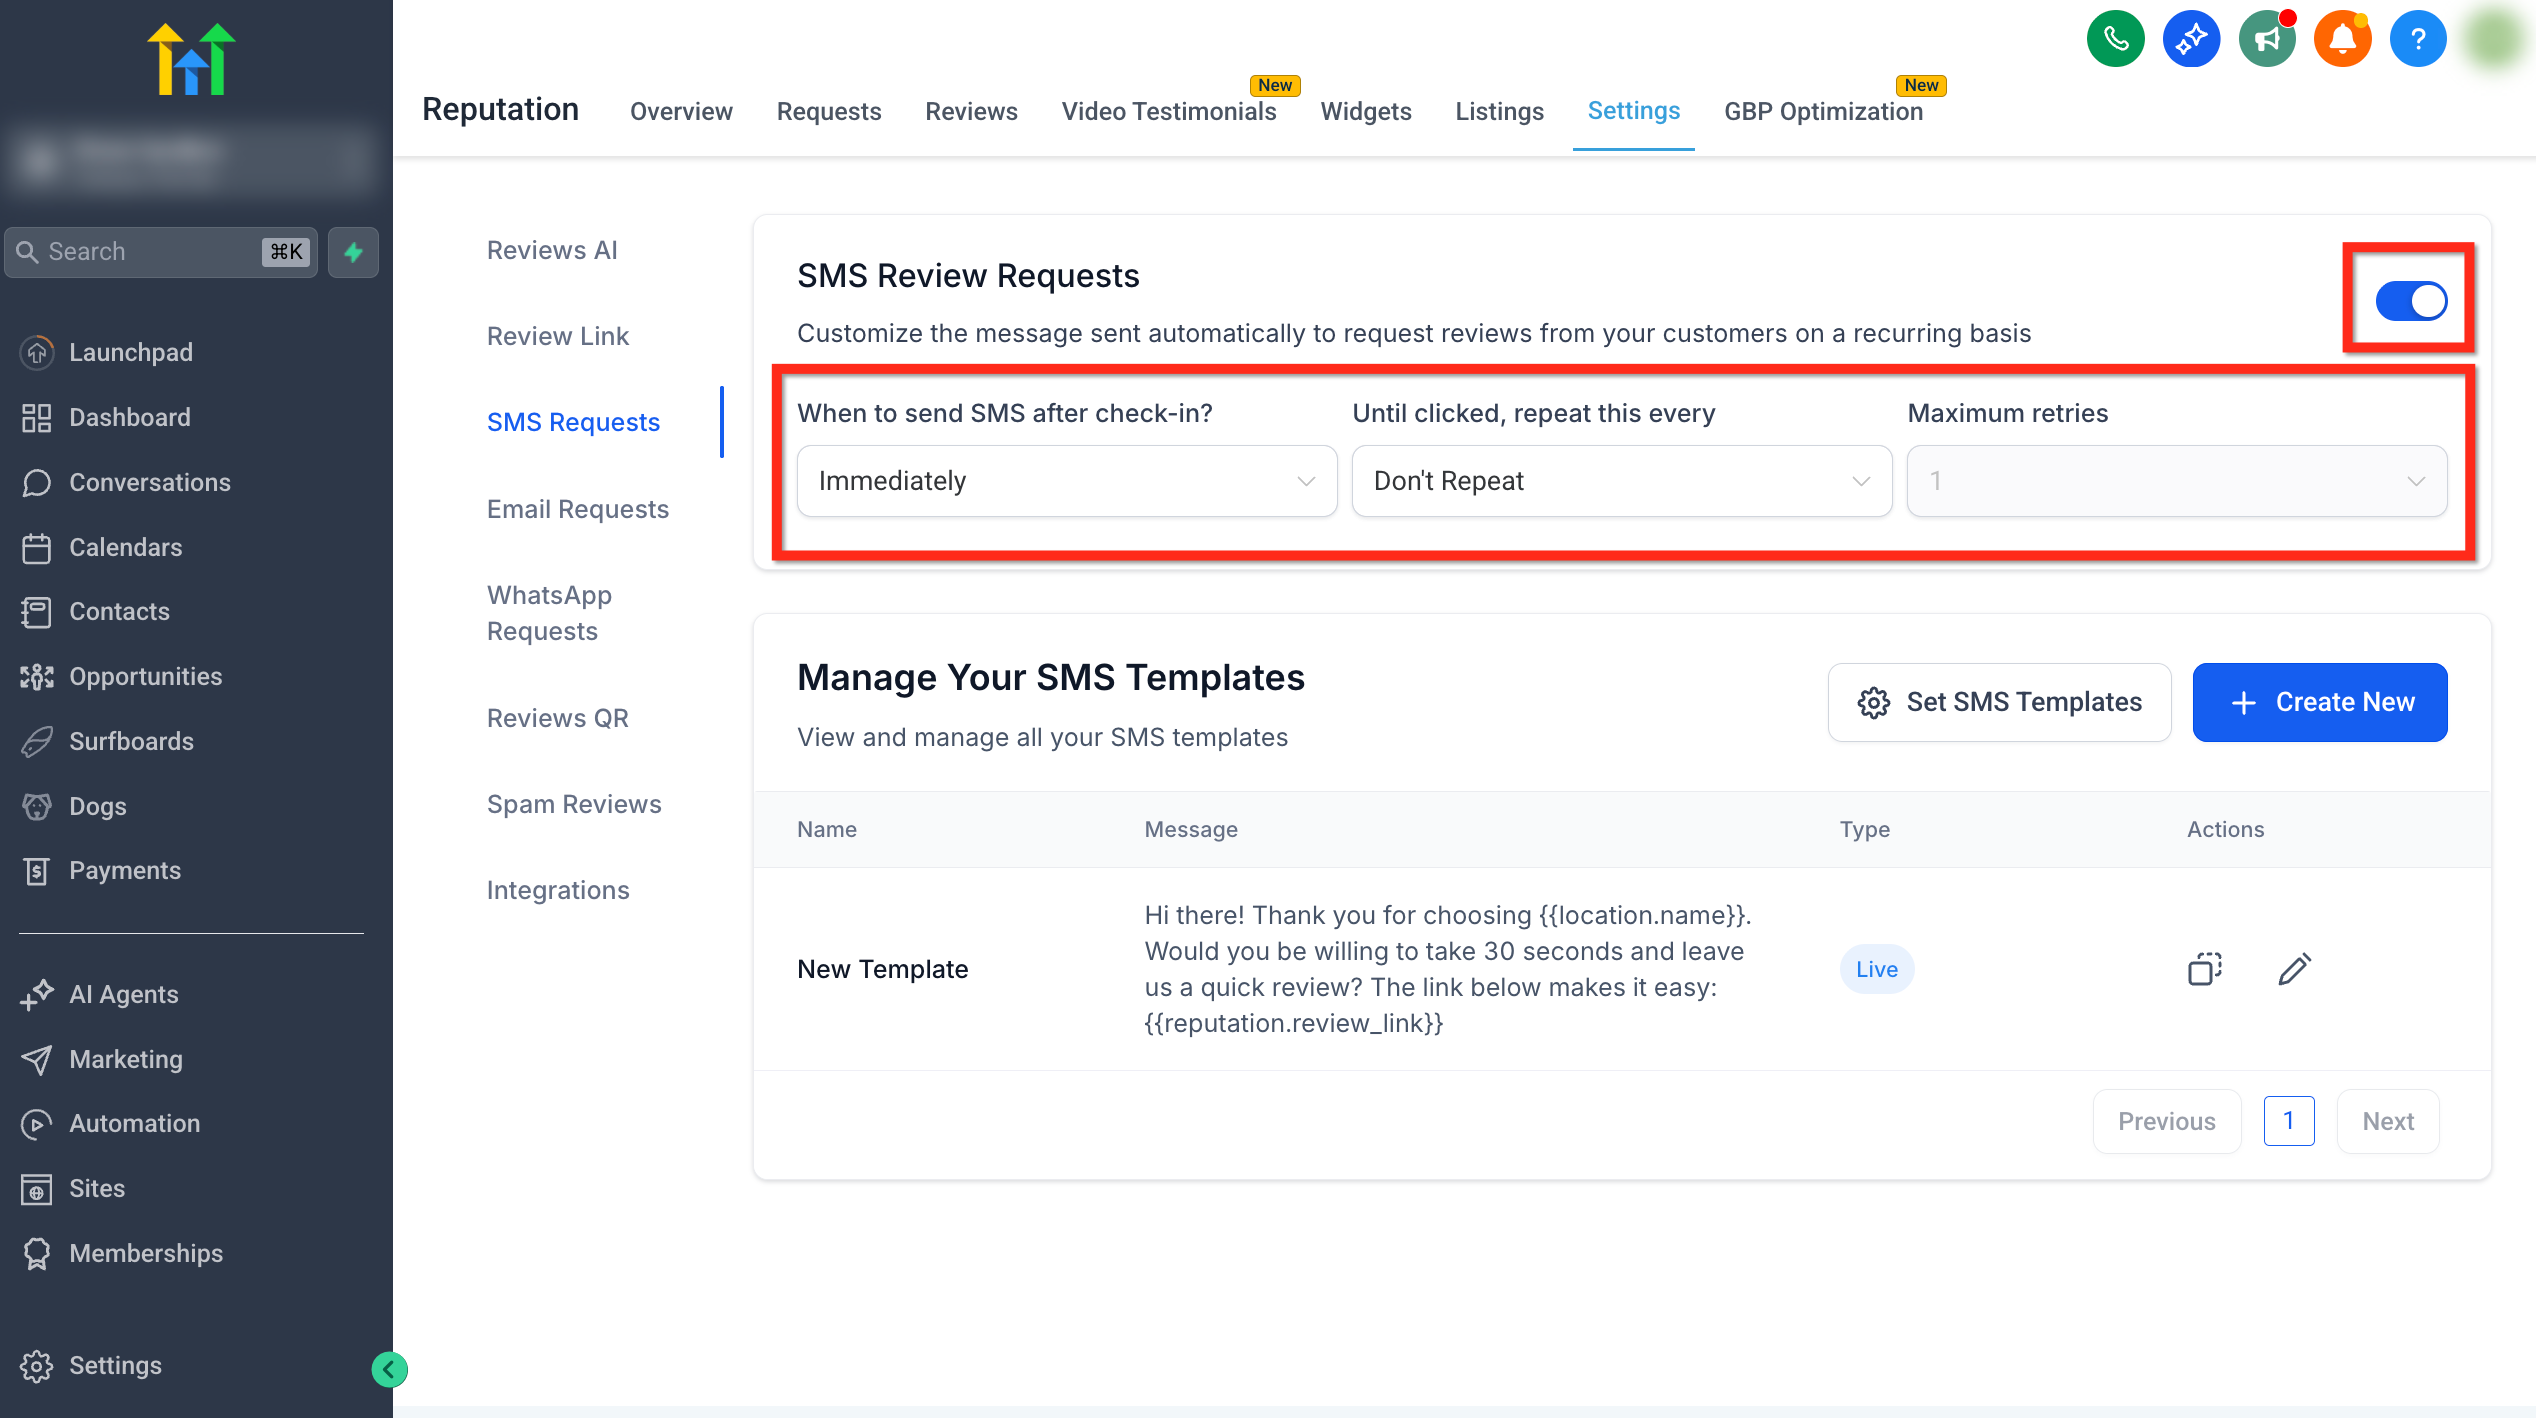
SMS timing, retries and the template list. - Set When to send SMS after check in to the delay before the first text.
- Set the repeat interval and Maximum retries (two or three retries is a sensible start).
- Pick the Default sender number the texts will come from.
- Click Create New, choose Scratch or PreBuilt Templates, and give the template a name.
- Write the message in the business voice and include {{reputation.review_link}} where the link should appear, then click Save.
- Repeat for one or two shorter retry messages so the follow up does not read as a copy of the first text.
- Click Set SMS Templates, pick the Live template, assign a template to each Retry slot, then click Save.
Part 03 of 06
Turn on email requests and build the branded version.
Email is the second channel. It gives you room for the logo, a short thank you and a clear button. The email builder has a Review Link element that drops the link in for you.
- Go to Reputation, then Settings, then Email Requests, and toggle on Enable Email Review Requests.
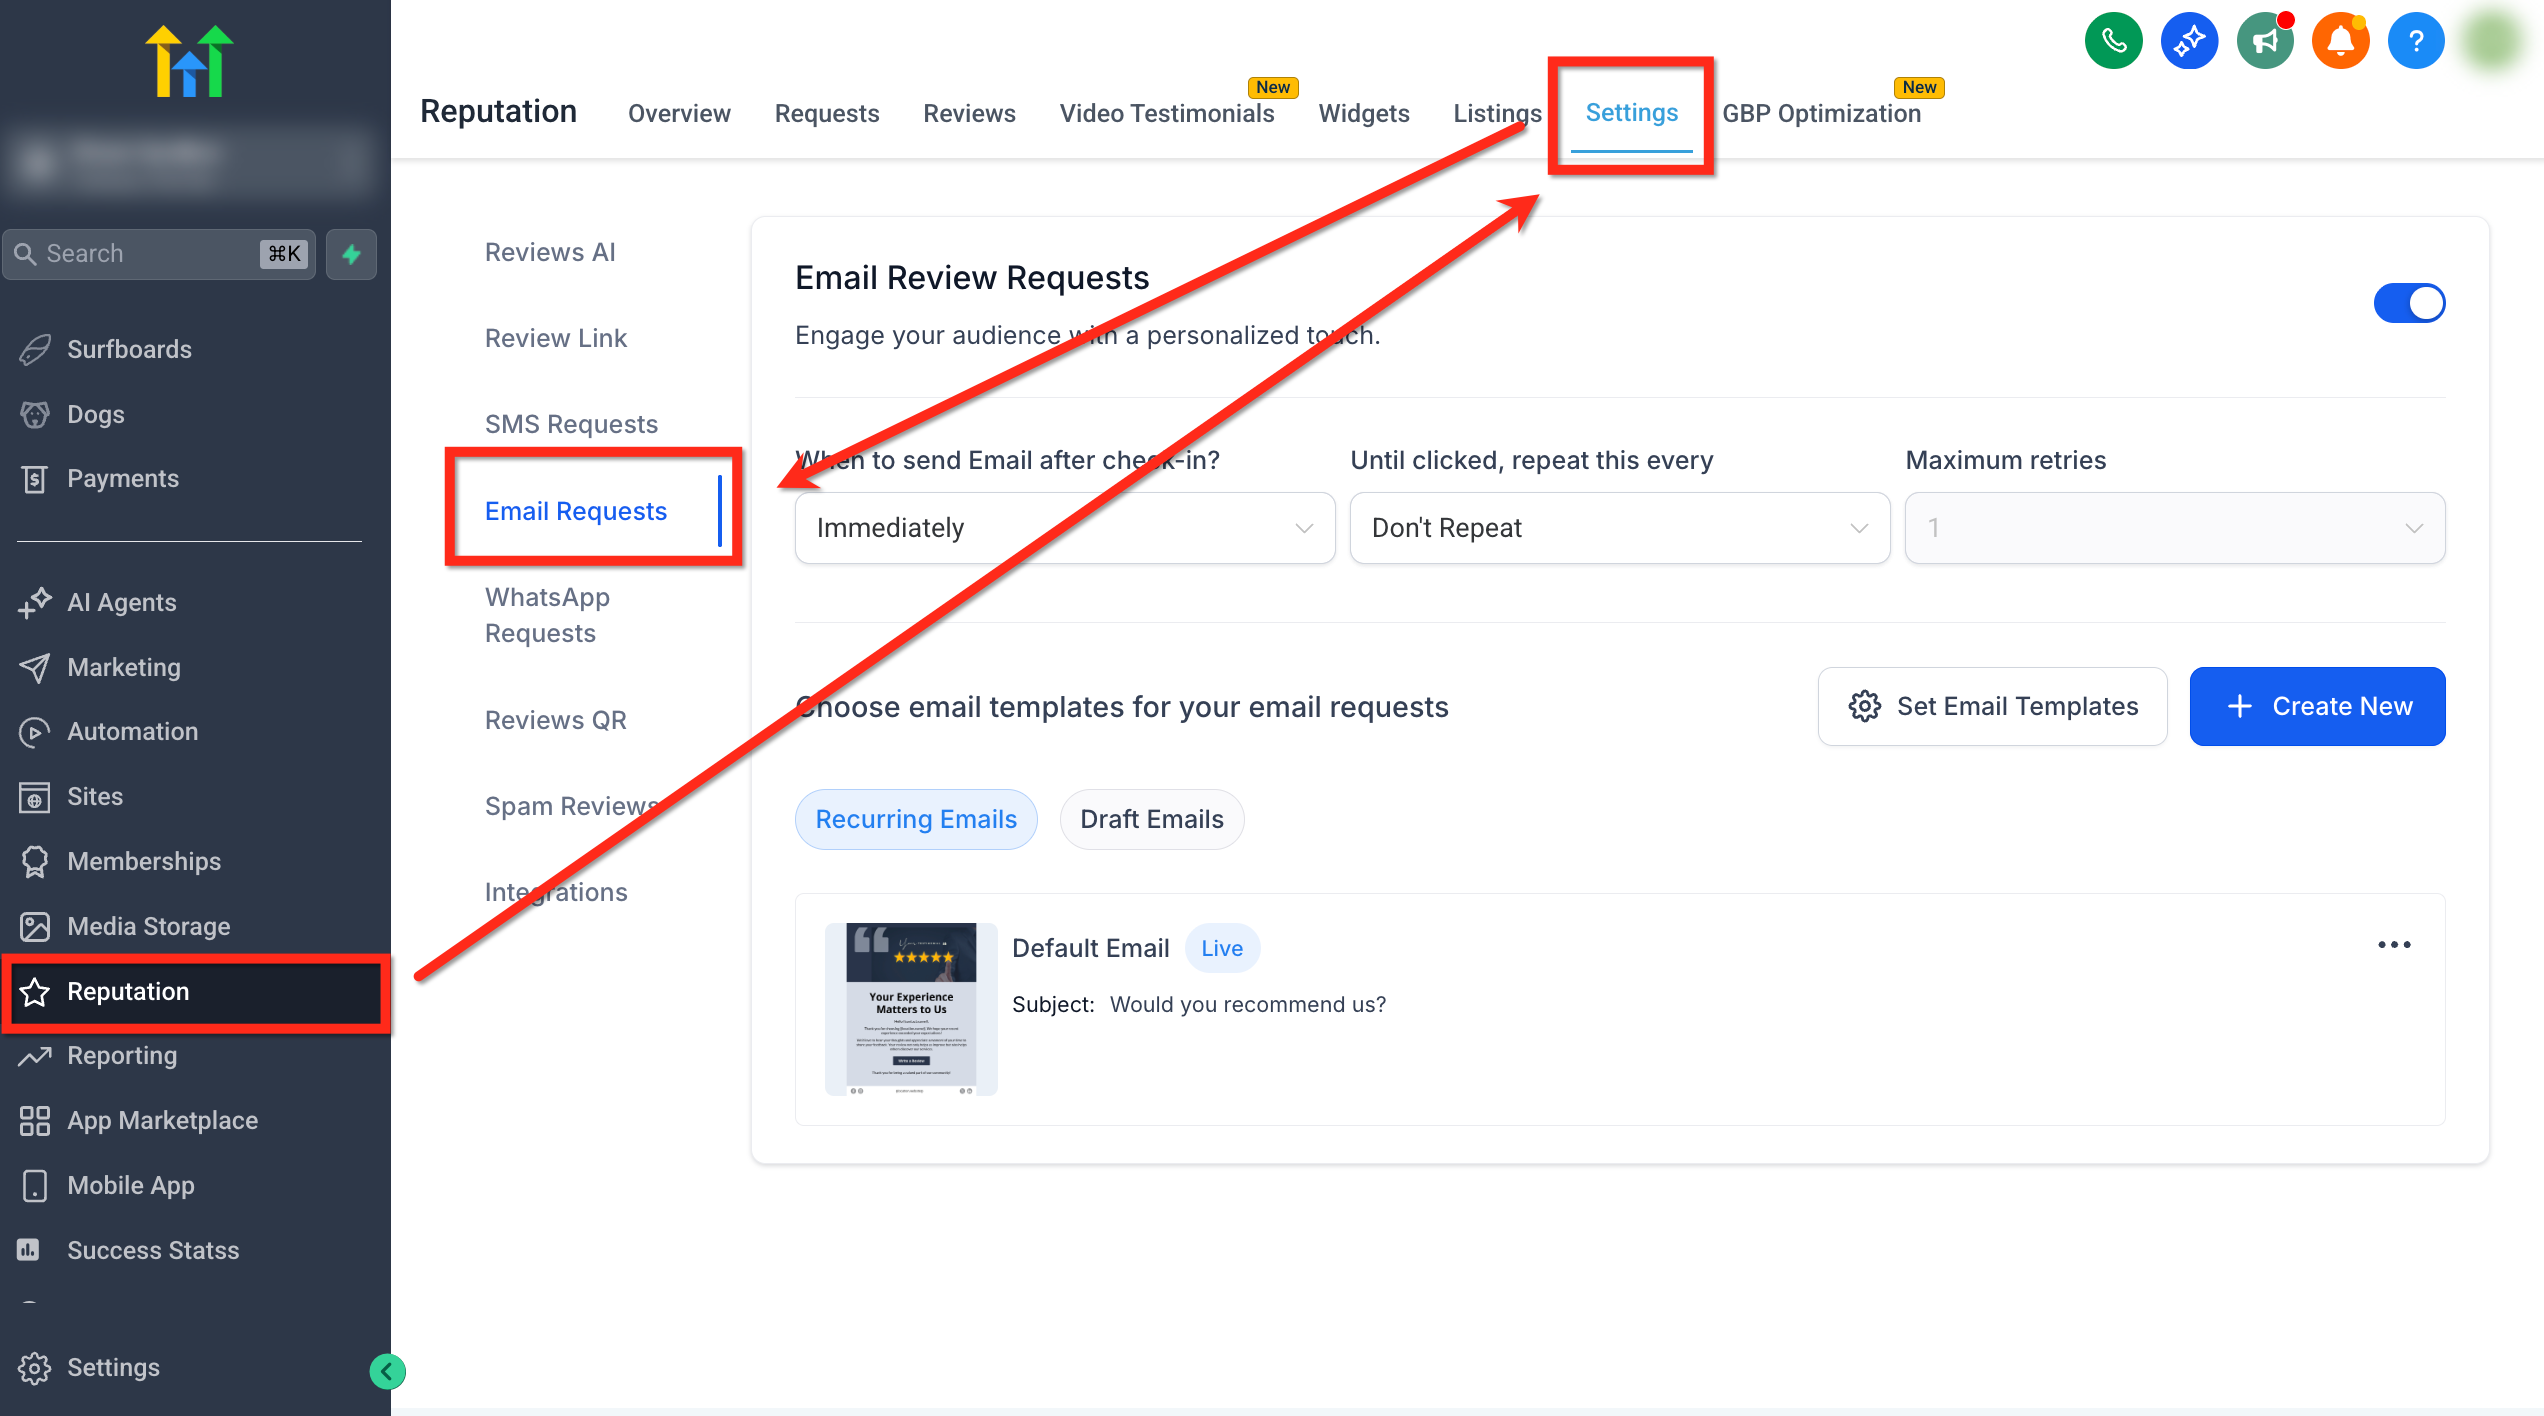
Assign the live and retry email templates. - Set When to send Email after check in, the repeat interval and Maximum retries.
- Pick the Default sender email.
- Click Create New to design from scratch, or Import from Template Library to start from a template.
- In the drag and drop builder, drag the Review Link element into the layout and keep the copy short.
- Click Save.
- Click Set Email Templates, choose the Live template, assign the Retry templates, adjust the subject lines, then click Save.
Part 04 of 06
Send it from a workflow so nobody has to remember.
This is the part that makes it automatic. The Send Review Request action fires the templates you just built. Hook it to the moment a job closes and the ask happens every time. You can still send one by hand from Quick Actions or the Requests tab when you need to.
- Go to Automation, then Workflows, and open the workflow that runs when a job is complete (or create one with the trigger you chose).
- Click the plus sign below the trigger and add the Send Review Request action.
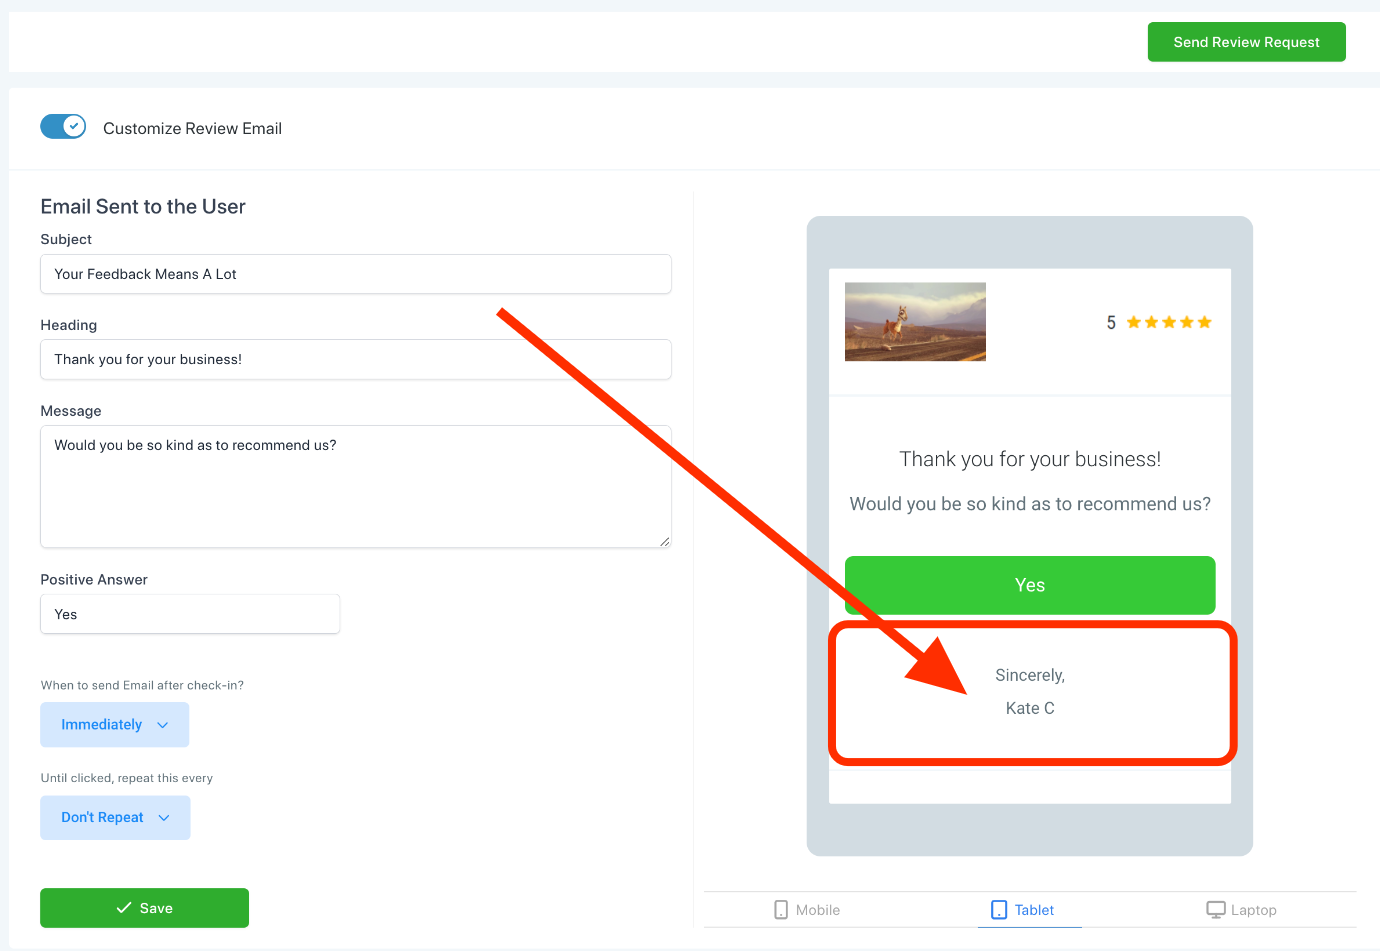
The Send Review Request action with the channel selector. - Select the channel SMS.
- Add a second Send Review Request action and select the channel Email.
- Save the workflow and publish it.
- For a one off request, click the Quick Actions button in the top left above the sidebar and select Send Review Request (the signed in user becomes the sender).
- For a manual send with full details, go to Reputation, then Requests, choose the individual request option, fill in the contact and send.
Part 05 of 06
Turn on Reviews AI and start in Suggestive.
Reviews AI has three modes: Off, Suggestive and Auto Responses. Suggestive drafts up to four replies per review and you edit before posting. Auto Responses posts on its own by the rules you set. Start in Suggestive, read the drafts for a week or two, then move to Auto Responses for the routine reviews.
- From Agency View, go to AI Suite, then AI Setup.
- Find the subaccount, click its three dot menu, and select Manage AI access.
- Under Reviews AI, select Suggestive, then click Done.
- In the subaccount, go to Reputation, then Settings, then Reviews AI, and confirm Suggestive is selected.
- Open a new review under Reputation, read the suggested replies, edit one to match the business voice, and send it.
- When the tone is right, return to Reputation, then Settings, then Reviews AI, and select Auto Responses.
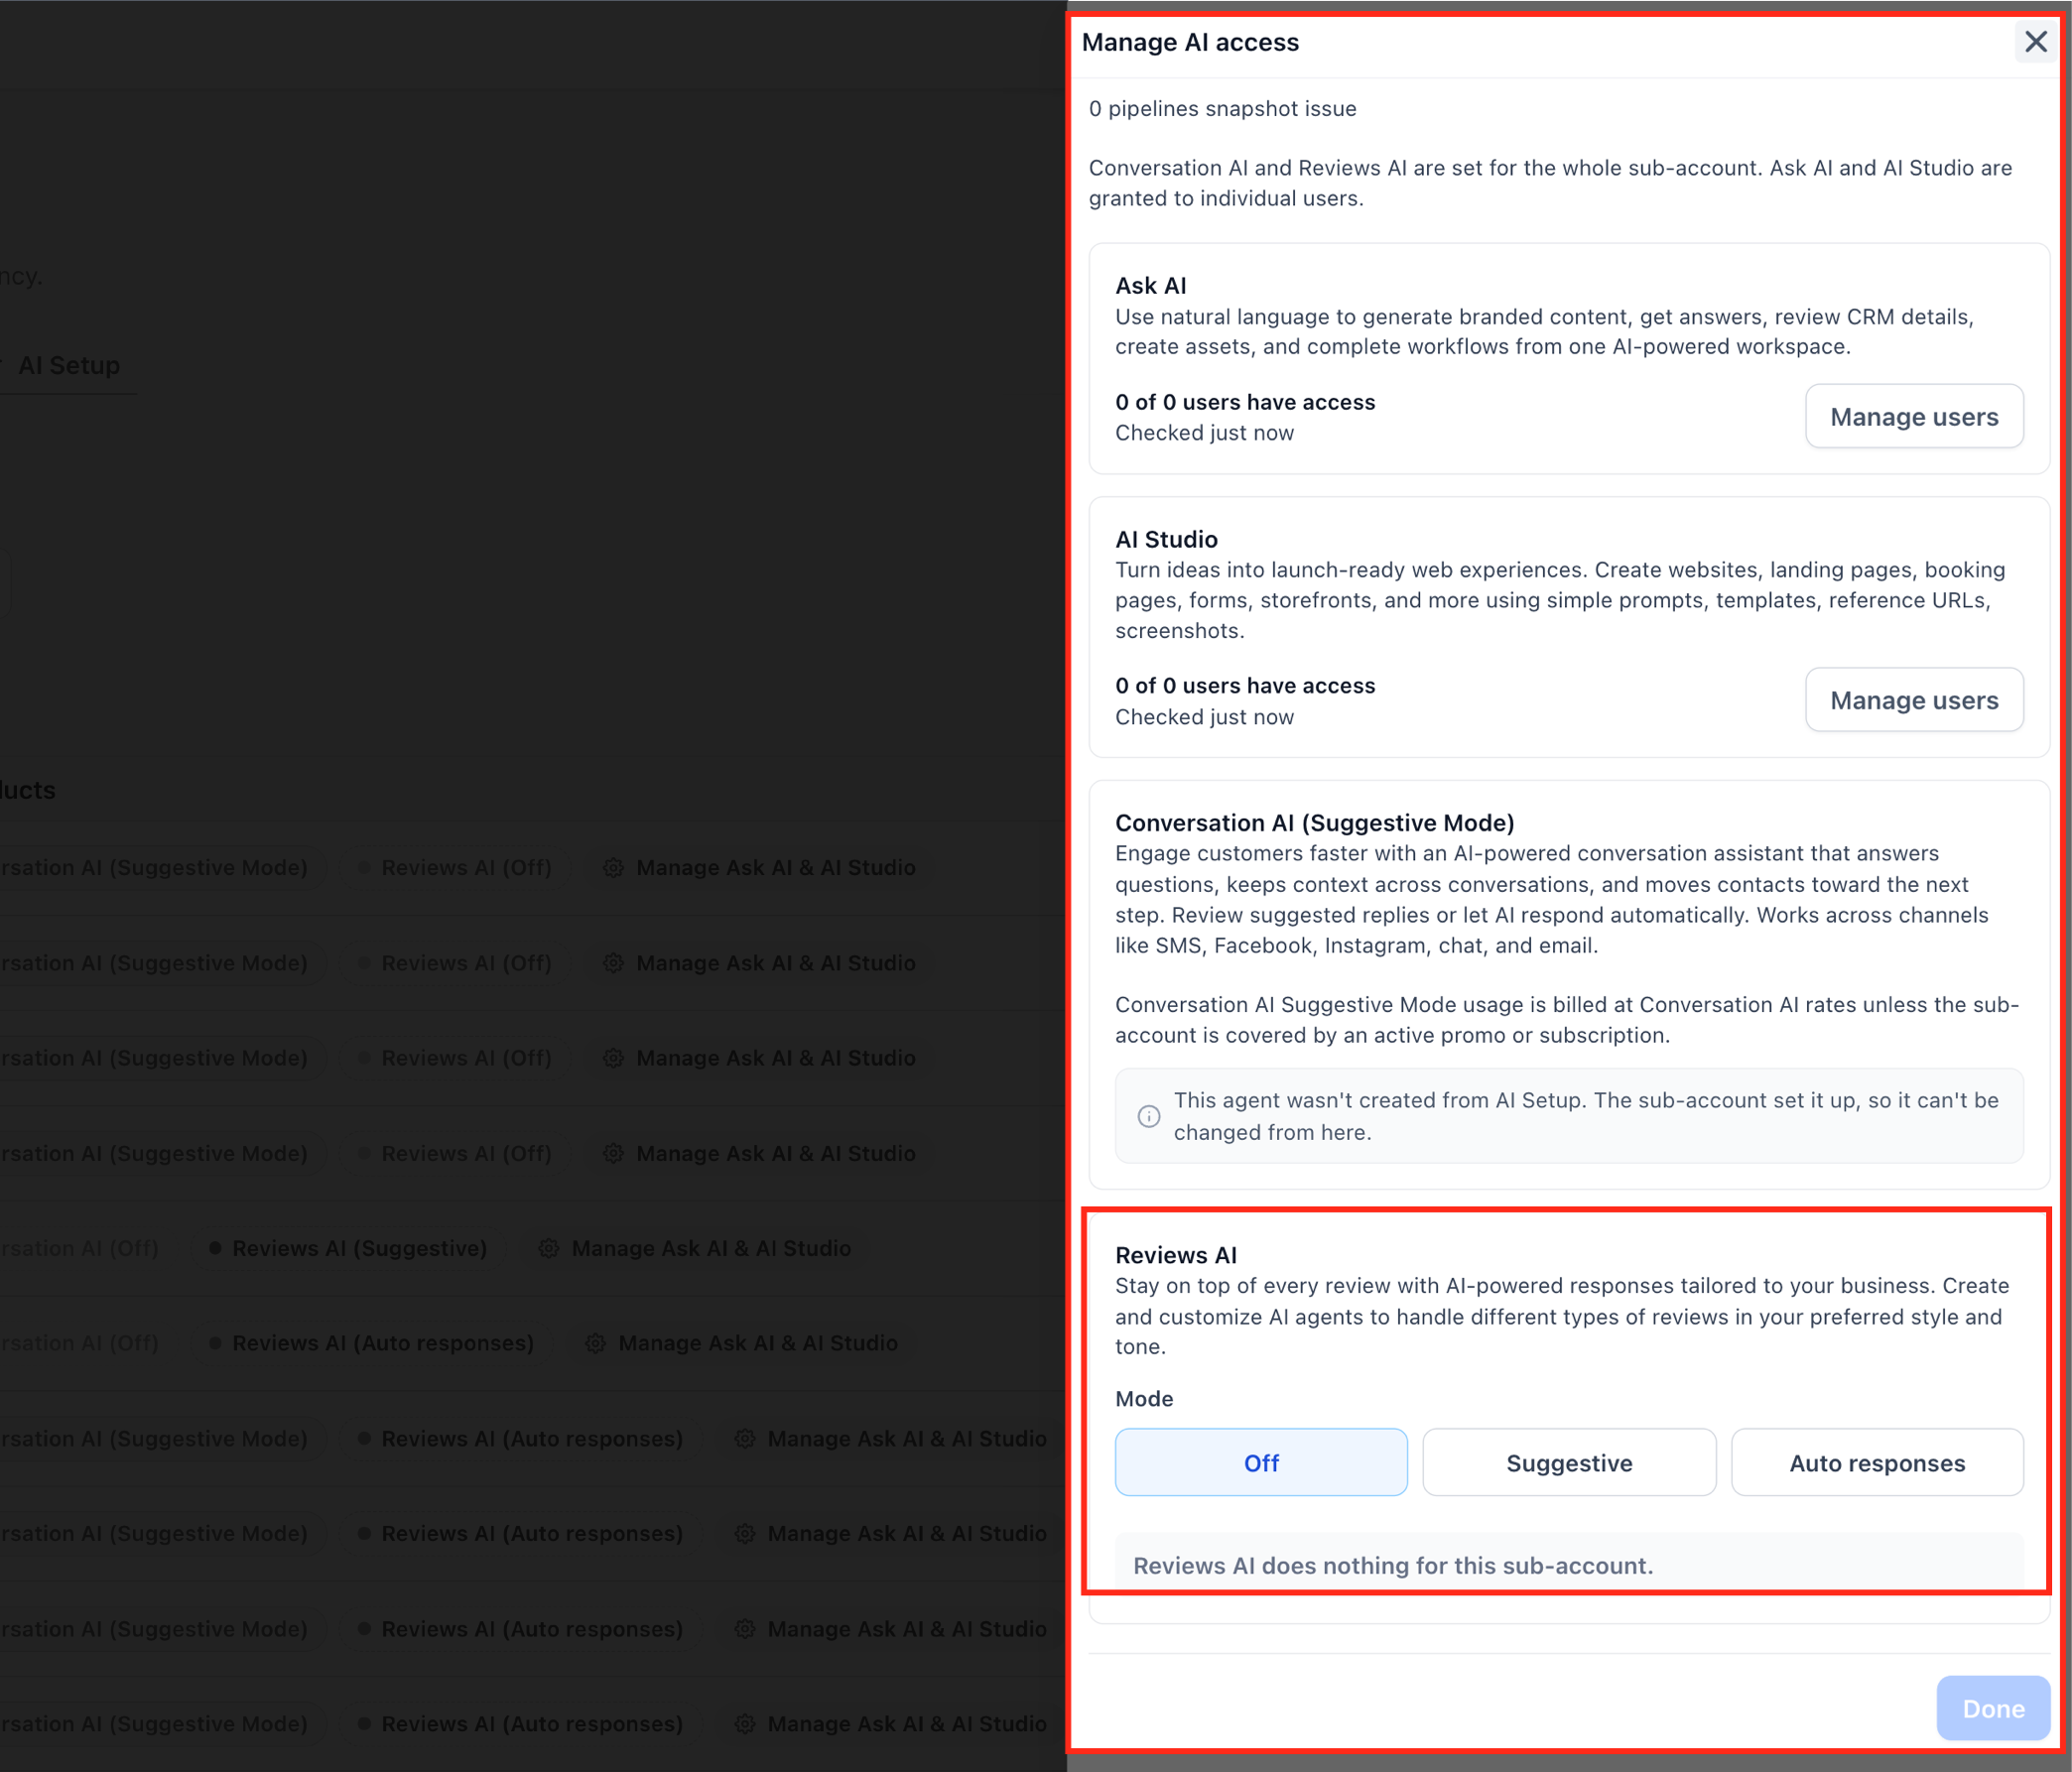
Pick Suggestive first, then move to Auto Responses. - Set the autoresponse rules: a reply template per star rating, a wait time before sending, a footer with the business name, and the sources (Google, Facebook) it should answer.
Part 06 of 06
Put the reviews on the website where buyers can see them.
The last step turns reviews into sales. The Review Widget pulls Google and Facebook reviews onto any page and updates on its own. Filter it to the best ratings and match it to the brand.
- Go to Reputation, then Widget.
- In the Layout tab, pick the Widget Type, the Review Source, a Minimum Ratings threshold and the Max Number of Reviews.
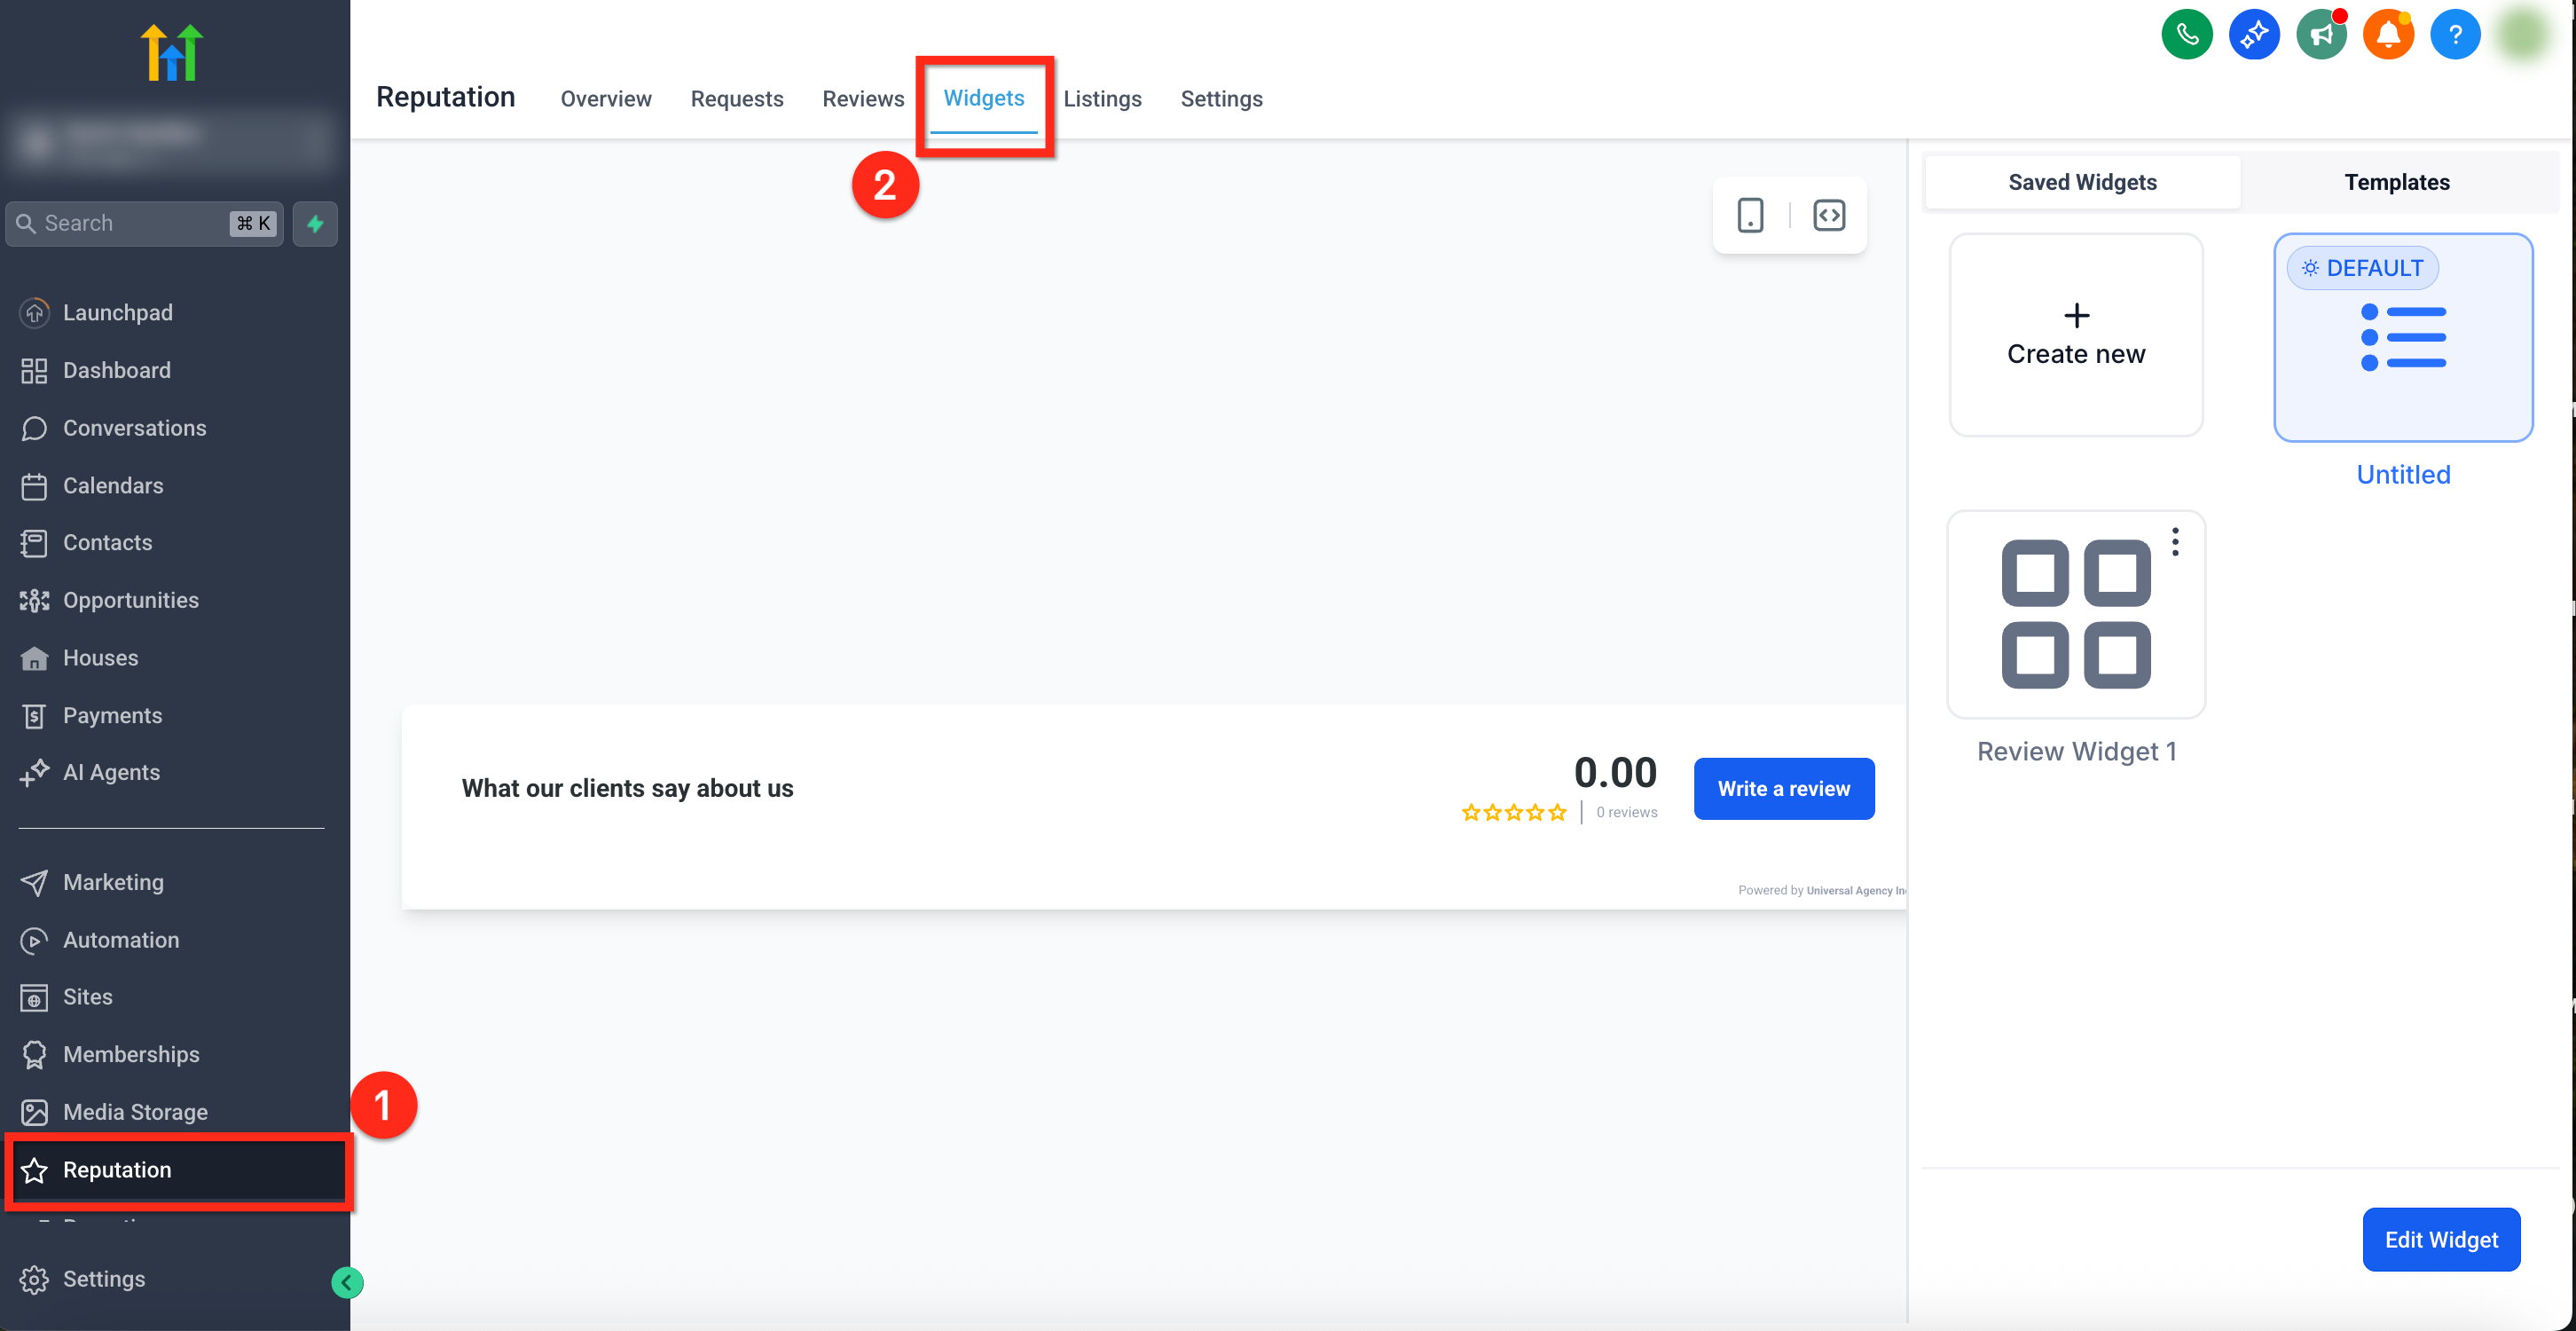
The widget builder tabs. - Turn on Exclude Reviews Containing No Description so only written reviews show.
- In the Content tab, set the title and heading.
- In the Appearance tab, pick the theme, font and colors to match the site.
- In the Settings tab, turn on Display Date and Display Reviewer Icon, then copy the embed code.
- Paste the code into a code block on the website, or use the Review Widget element on a HighLevel funnel page.
Test it
Test it before a real customer sees it.
Run the whole chain on your own contact record first.
- Add yourself as a contact with your real mobile number and email, then push the contact through the workflow trigger.
- Go to Reputation, then Requests, and confirm the request shows Queued and then Sent.
- Check your phone. The text should arrive after the delay you set with a working review link.
- Check your inbox. The email should show the branded layout and the review button.
- Do not click the link yet. Wait for the repeat interval and confirm the first retry arrives.
- Click the review link. Confirm no further retries arrive for that channel.
- Leave or find a test review and confirm Reviews AI shows suggested replies under Reputation.
When a step fails
When it does not work check these first.
The usual causes, and the fix for each.
- Request shows Failed
- Check the phone number is valid. For email, make sure the SMTP login email matches the sender address you picked.
- Request sits in Queued
- Requests go out immediately unless other requests are queued ahead. Wait, or expect it to send after one day.
- Email never shows Delivered
- Only Twilio confirms SMS delivery. Mailgun does not report a Delivered status for email, so this is normal.
- No Google review link in the message
- Google Business Profile must be integrated first. Connect it under Settings, then Integrations, and set the Review Link.
- Reviews AI settings are missing
- Reviews AI must be enabled at the agency level. Check Agency, then SubAccounts, then Features & Limits. If it was disabled there, every AI reply option is hidden.
- Retries keep going after a click
- The schedule stops only when the tracked review link is clicked. Use the {{reputation.review_link}} token, not a pasted URL.
Questions
Which questions come up about review requests in GoHighLevel?
- What happens after a customer clicks the review link?
- The repeat schedule stops for that channel. No more retries go to that contact.
- How many retries should I set?
- Most teams start with two or three. The right number depends on how customers respond and on compliance rules in your industry.
- Do I need Google Business Profile connected first?
- Yes. Google must be integrated before HighLevel can send Google review links. You can connect it and send a test request during a 30 day GoHighLevel trial through Michael's link.
- What is the difference between Suggestive and Auto Responses?
- Suggestive drafts up to four replies per review and you choose and edit before sending. Auto Responses posts replies on its own by the rules you set for star rating, wait time, footer and source.
- Will the review widget update by itself?
- Yes. It syncs with Google and Facebook, and new reviews appear based on your filters and display settings. If you are comparing review tools, see the GoHighLevel alternatives.
- Does Reviews AI cost extra?
- Each review gets free suggestions, and regeneration costs a small fee after the free attempts. Each sent AI assisted reply is billed once, so replying twice to the same review is two charges.
From the field
Michael’s take.

I set the review link and the SMS template first, then I send a request to my own phone before I touch the workflow. If the text reads like a robot wrote it, nobody clicks. Two short sentences, the customer's first name, the link. That is the whole message.
Where people go wrong is retries. They set five and wonder why customers get annoyed. Two or three is plenty. The other mistake is turning on Auto Responses on day one. Run Suggestive for a couple of weeks, edit the drafts, and you will see where the AI misses the voice. Then switch it on for the four and five star reviews and keep reading the rest yourself.
This build pays off the week it goes live. Reviews drive the map ranking, the ad conversion rate and the first impression on every quote. Automating the ask is the cheapest marketing a local business will ever do.
Go deeper
The features behind this build.
Every feature this guide touches has its own page in the library, with the settings, limits and Michael’s notes.
- Reputation Management & ReviewsCustomize review request messages in HighLevel
- Reputation Management & ReviewsHow to send review requests in HighLevel
- AI EmployeeMaximizing Customer Engagement with Reviews AI: a Guide to Suggestive and Autopilot Modes
- Reputation Management & ReviewsReputation Management: Customizing & Displaying the Review Widget
- Reputation Management & ReviewsReputation overview dashboard in HighLevel
- Reputation Management & ReviewsCustomizing Review Widgets in Reputation
- Related guideGoHighLevel reputation management
Get the guide
Take it with you. The PDF is yours.
The whole build, cover to cover, as a PDF you can keep open on a second screen or print for the team. HighLevel's Founder page opens alongside it.
Next step
Want this built for you inside your own account?
Start your HighLevel trial through Michael and the CRM Pros team comes with it. We will set up the review workflow with you and make sure the first request goes out right.
The how to library has step by step HighLevel builds for Conversation AI, Voice AI, funnels, calendars, workflows and AI Studio. Go back to the full list.
Back to the GuidesAll the step by step builds