
01Who this is for
- Ecommerce owners can add quick add on offers without leaving the checkout flow.
- Online course creators can present a supplemental module as a bump after the primary enrollment.
- Service based businesses can propose a premium add on when a client completes a feedback survey.
02Order bumps, explained
Order bumps are an upsell element that appears inside a HighLevel survey when the Sell Products element is used. After a main product is placed, a bump product can be added and displayed in either a Classic or Modern visual style. Each bump can be customized for colors, icons, highlight text and price visibility, and you can choose from three layout templates.
The bump respects recurring product rules so only one recurring item may exist in a survey. Bumps are optional; you can toggle them on or off, rearrange their order, and set them to allow single or multiple selections. All settings are saved with the survey and are shown to respondents when they reach the bump section.
03How businesses use order bumps
- Online course creator. Create a survey for enrollment, add the main course as the primary product, then add a bump offering a coaching package. Use the visual options to match the brand colors and display a highlighted call to action. Publish the survey so students see the bump during sign up.
- Fitness studio. Build a member feedback survey, attach the primary membership product, and add a bump for a nutrition plan. Choose the Modern style template, set the highlight text to a short offer, and toggle the price to show the discount. The bump appears after the main product selection.
- SaaS startup. Design a trial sign up survey, place the main subscription product, and add a bump for an advanced feature add on. Customize the background and headline colors to align with the app theme, and hide the price if the add on is free. Enable the bump and save the survey for launch.
04The numbers and rules that matter
- Multiple template selections (Template 1, 2, 3).
- Support for multiple bump products per survey.
- Smart recurring rules ensure only one recurring product per survey.
- Compatible with Stripe, PayPal, and any other supported HighLevel payment processors.
05How to set up and use order bumps in HighLevel
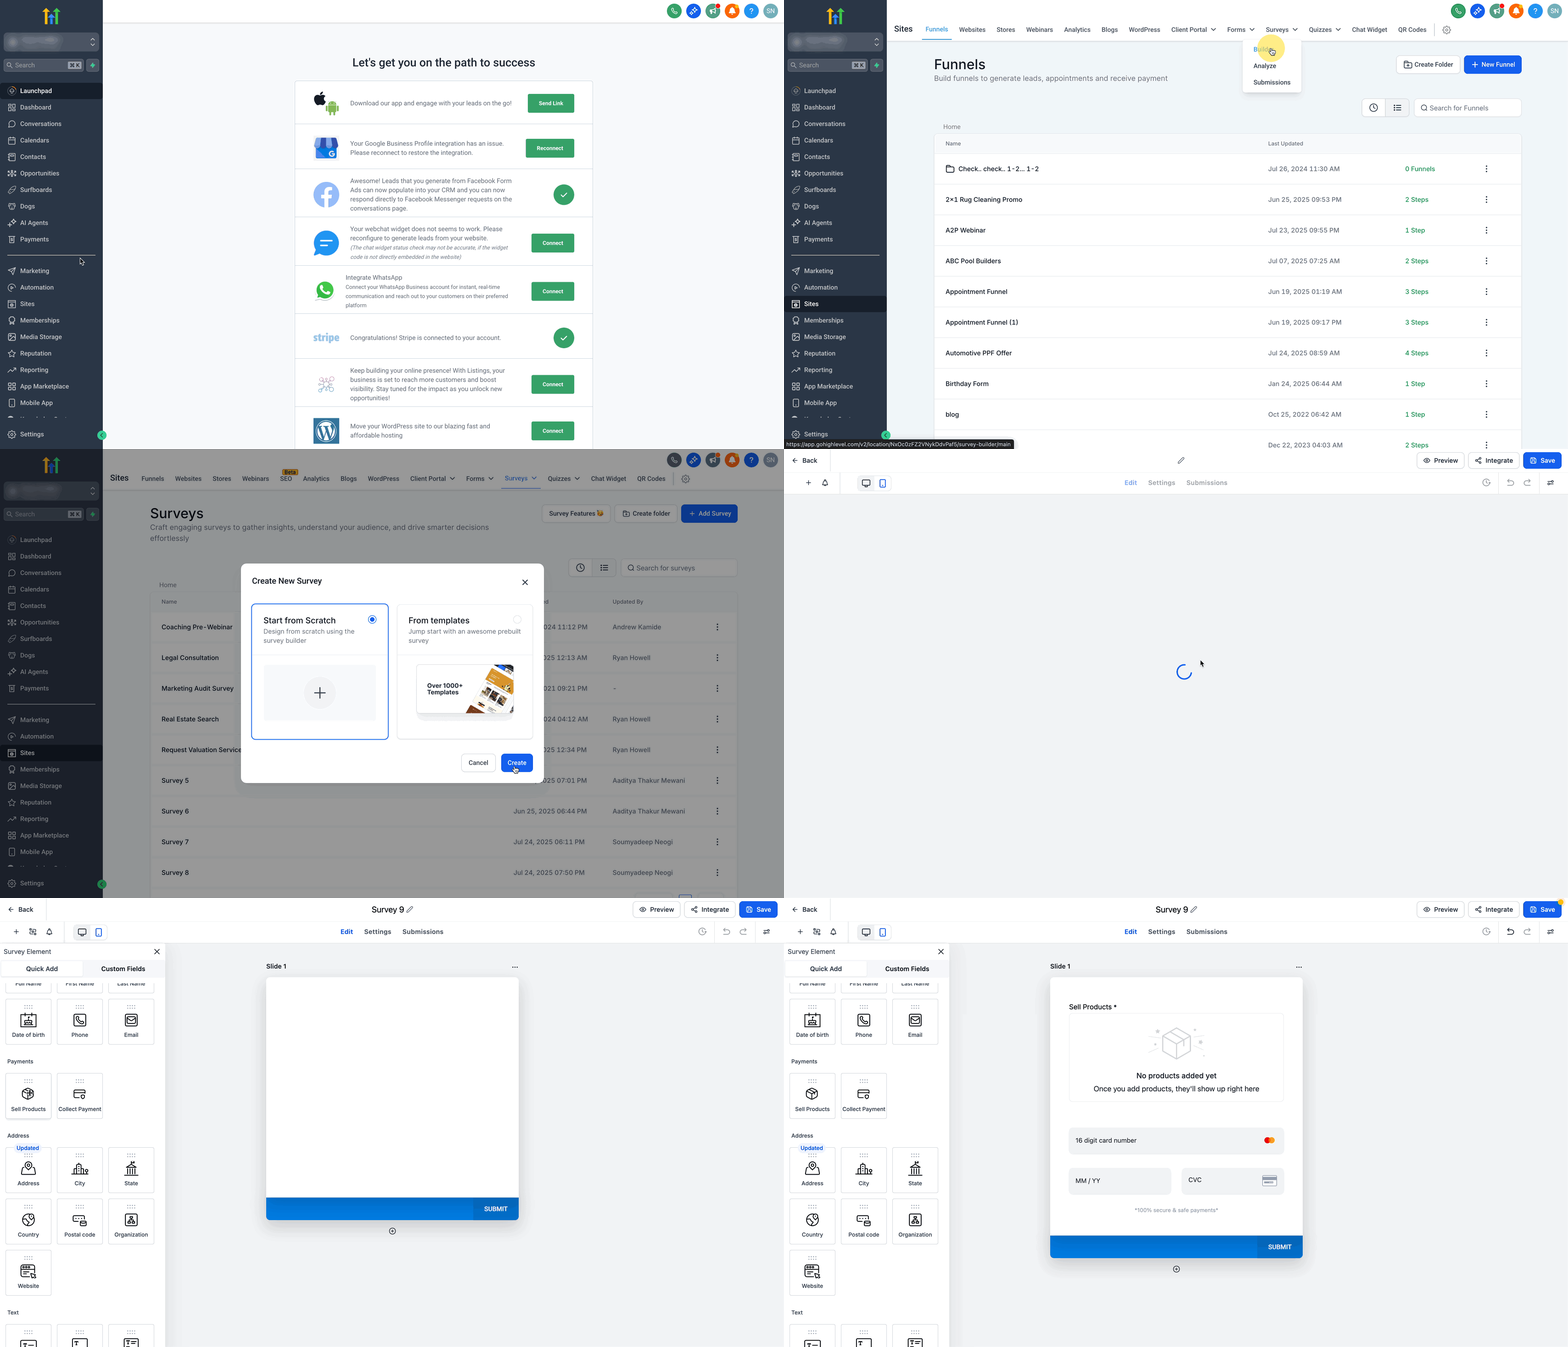
Create a survey
- Log in to your subaccount.
- Open Sites in the left menu, choose Surveys, then click Builder.
- Press the + Add Survey button.
- Select Start from Scratch or a template and click Create.
- Drag the Sell Products element from the element bar onto the canvas.
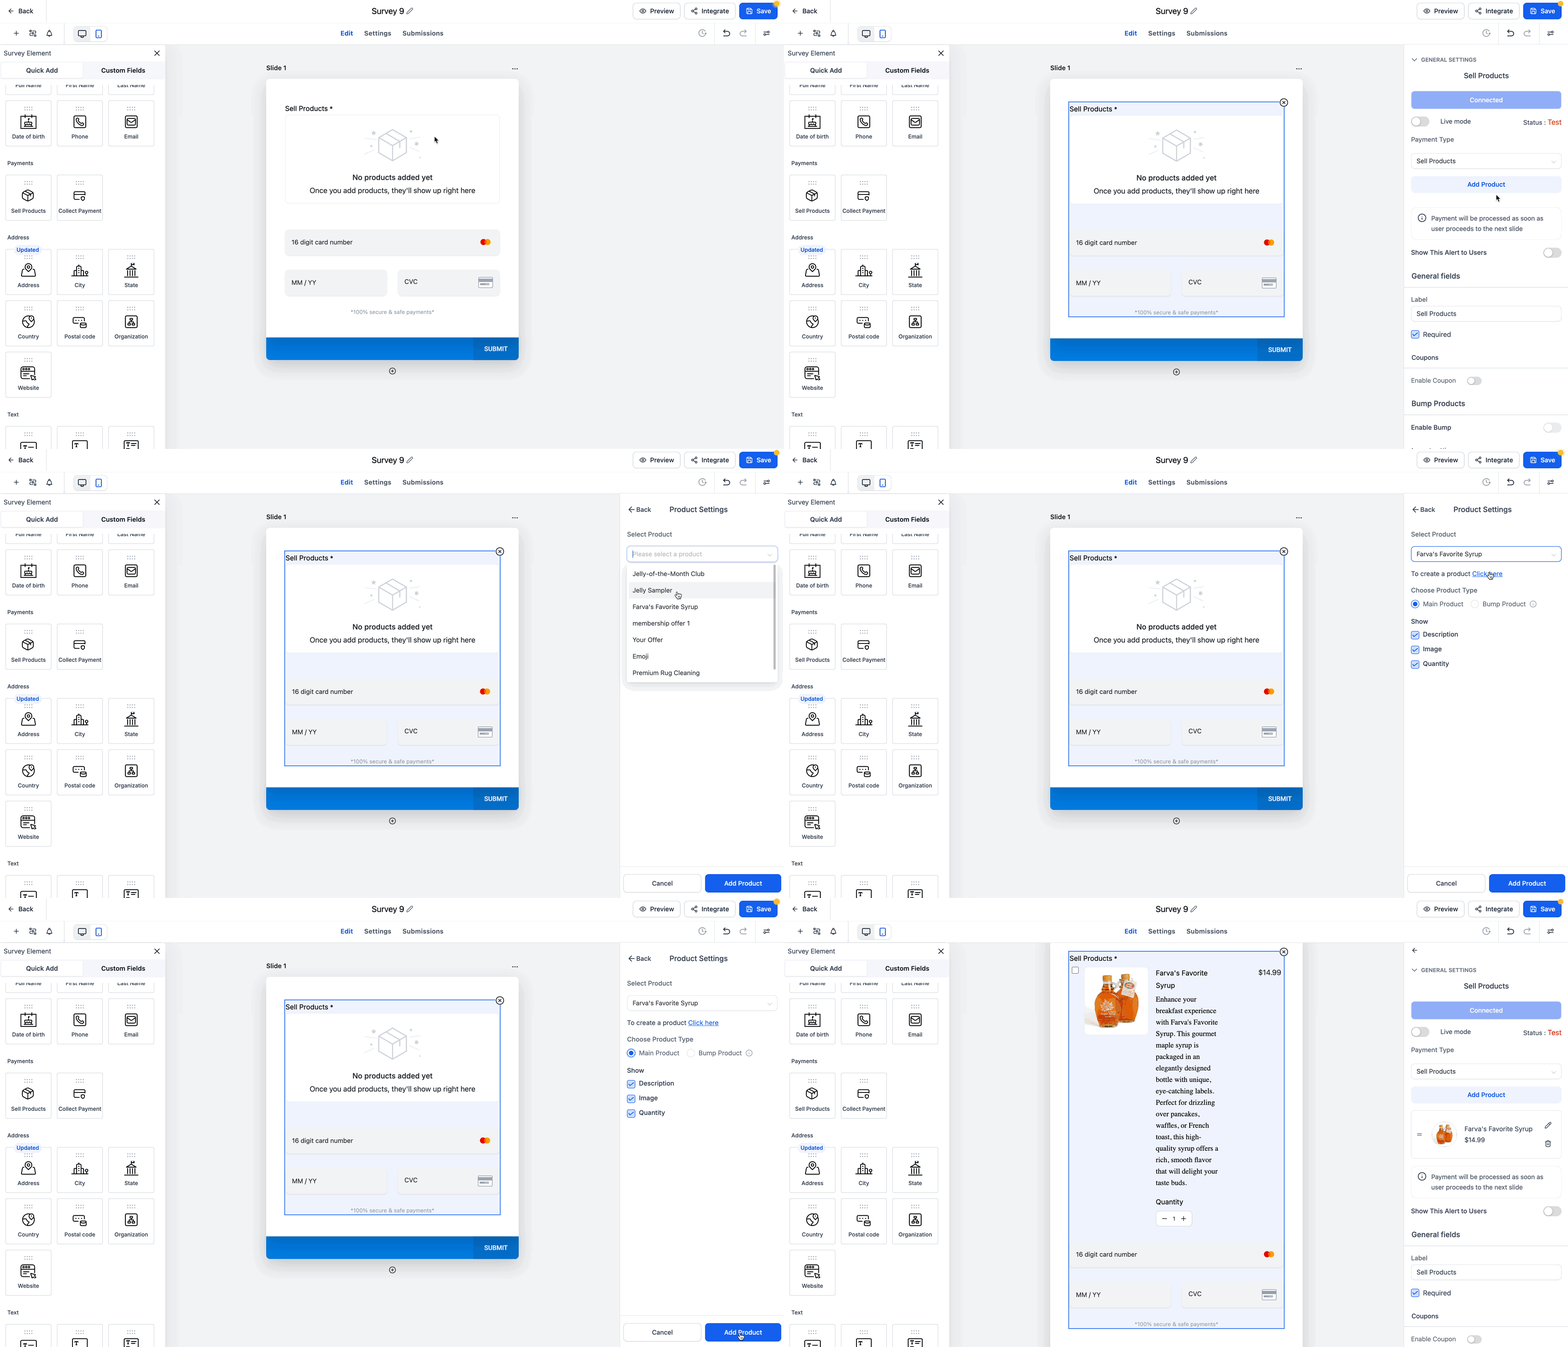
Add your main product
- Click the Sell Products element on the canvas.
- In the right panel, select Add Product.
- If you need a new product, open the product creation page via the provided link and create it.
- If you already have products, choose one from the Please select the product dropdown.
- Set the Product Type to Main Product.
- Toggle the Description option to show or hide it.
- Toggle the Image option to show or hide it.
- Toggle the Quantity option to show or hide it.
- Click Add Product to place the main product on the survey.
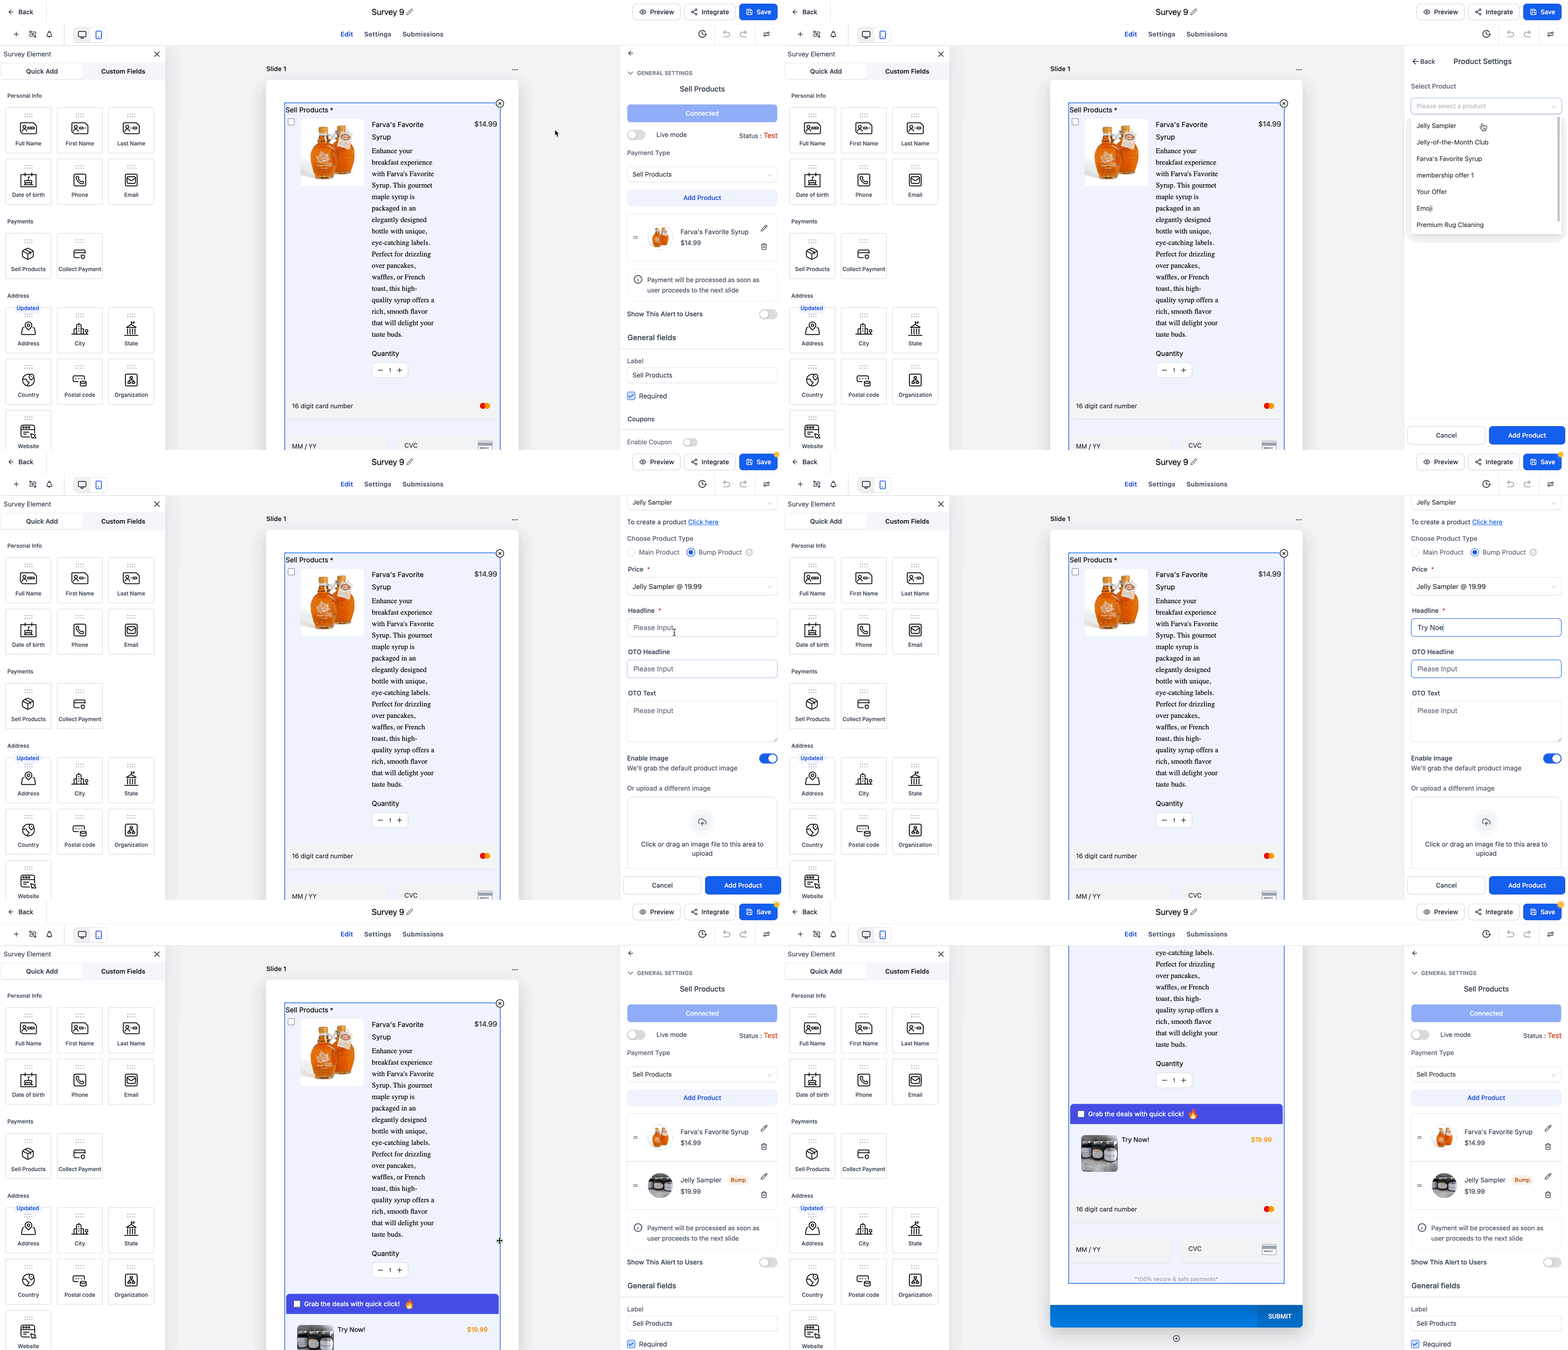
Add your bump product
- Click Add Product again.
- Create a new product or pick an existing one from the dropdown.
- Select Bump Product as the Product Type.
- Enter a headline that describes the bump offer.
- Enable or disable the image, uploading a new one if needed or letting the system pull it from the product record.
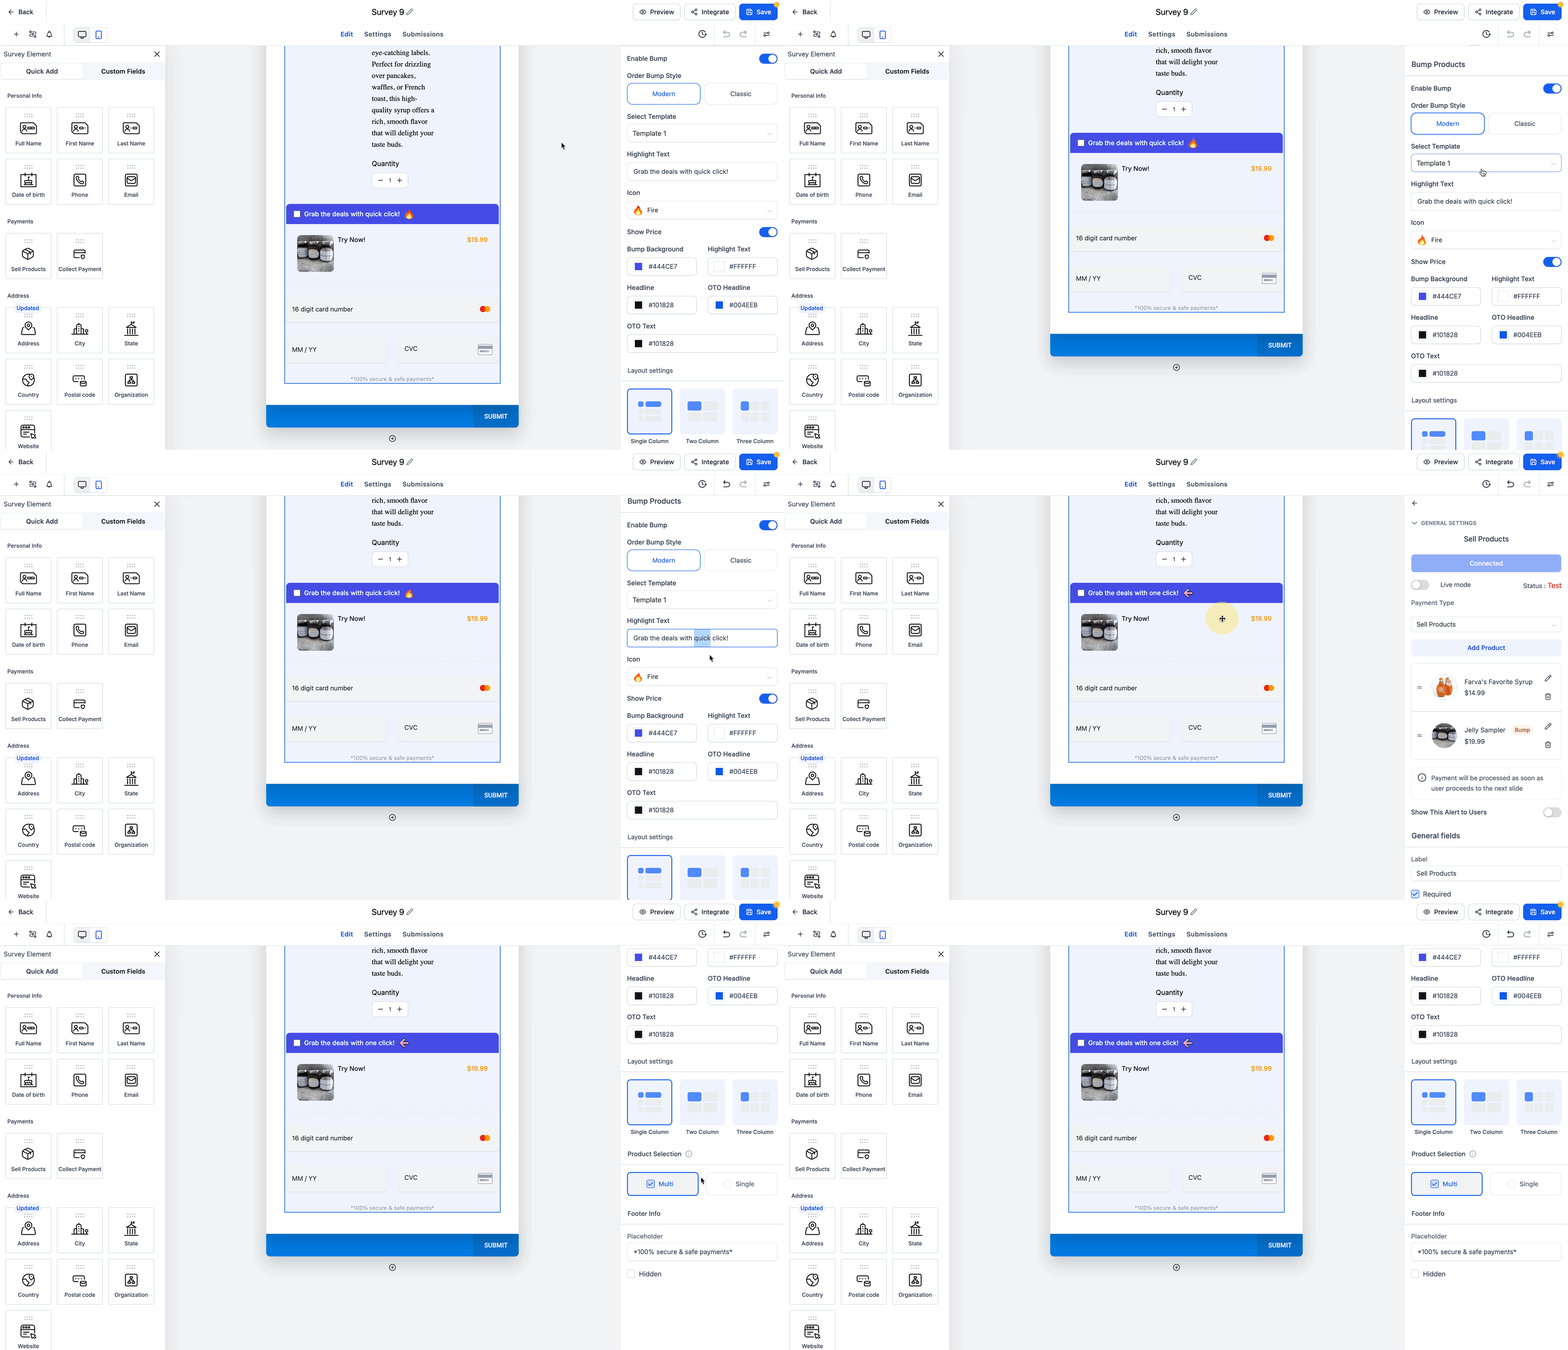
Customize the bump product content & visuals
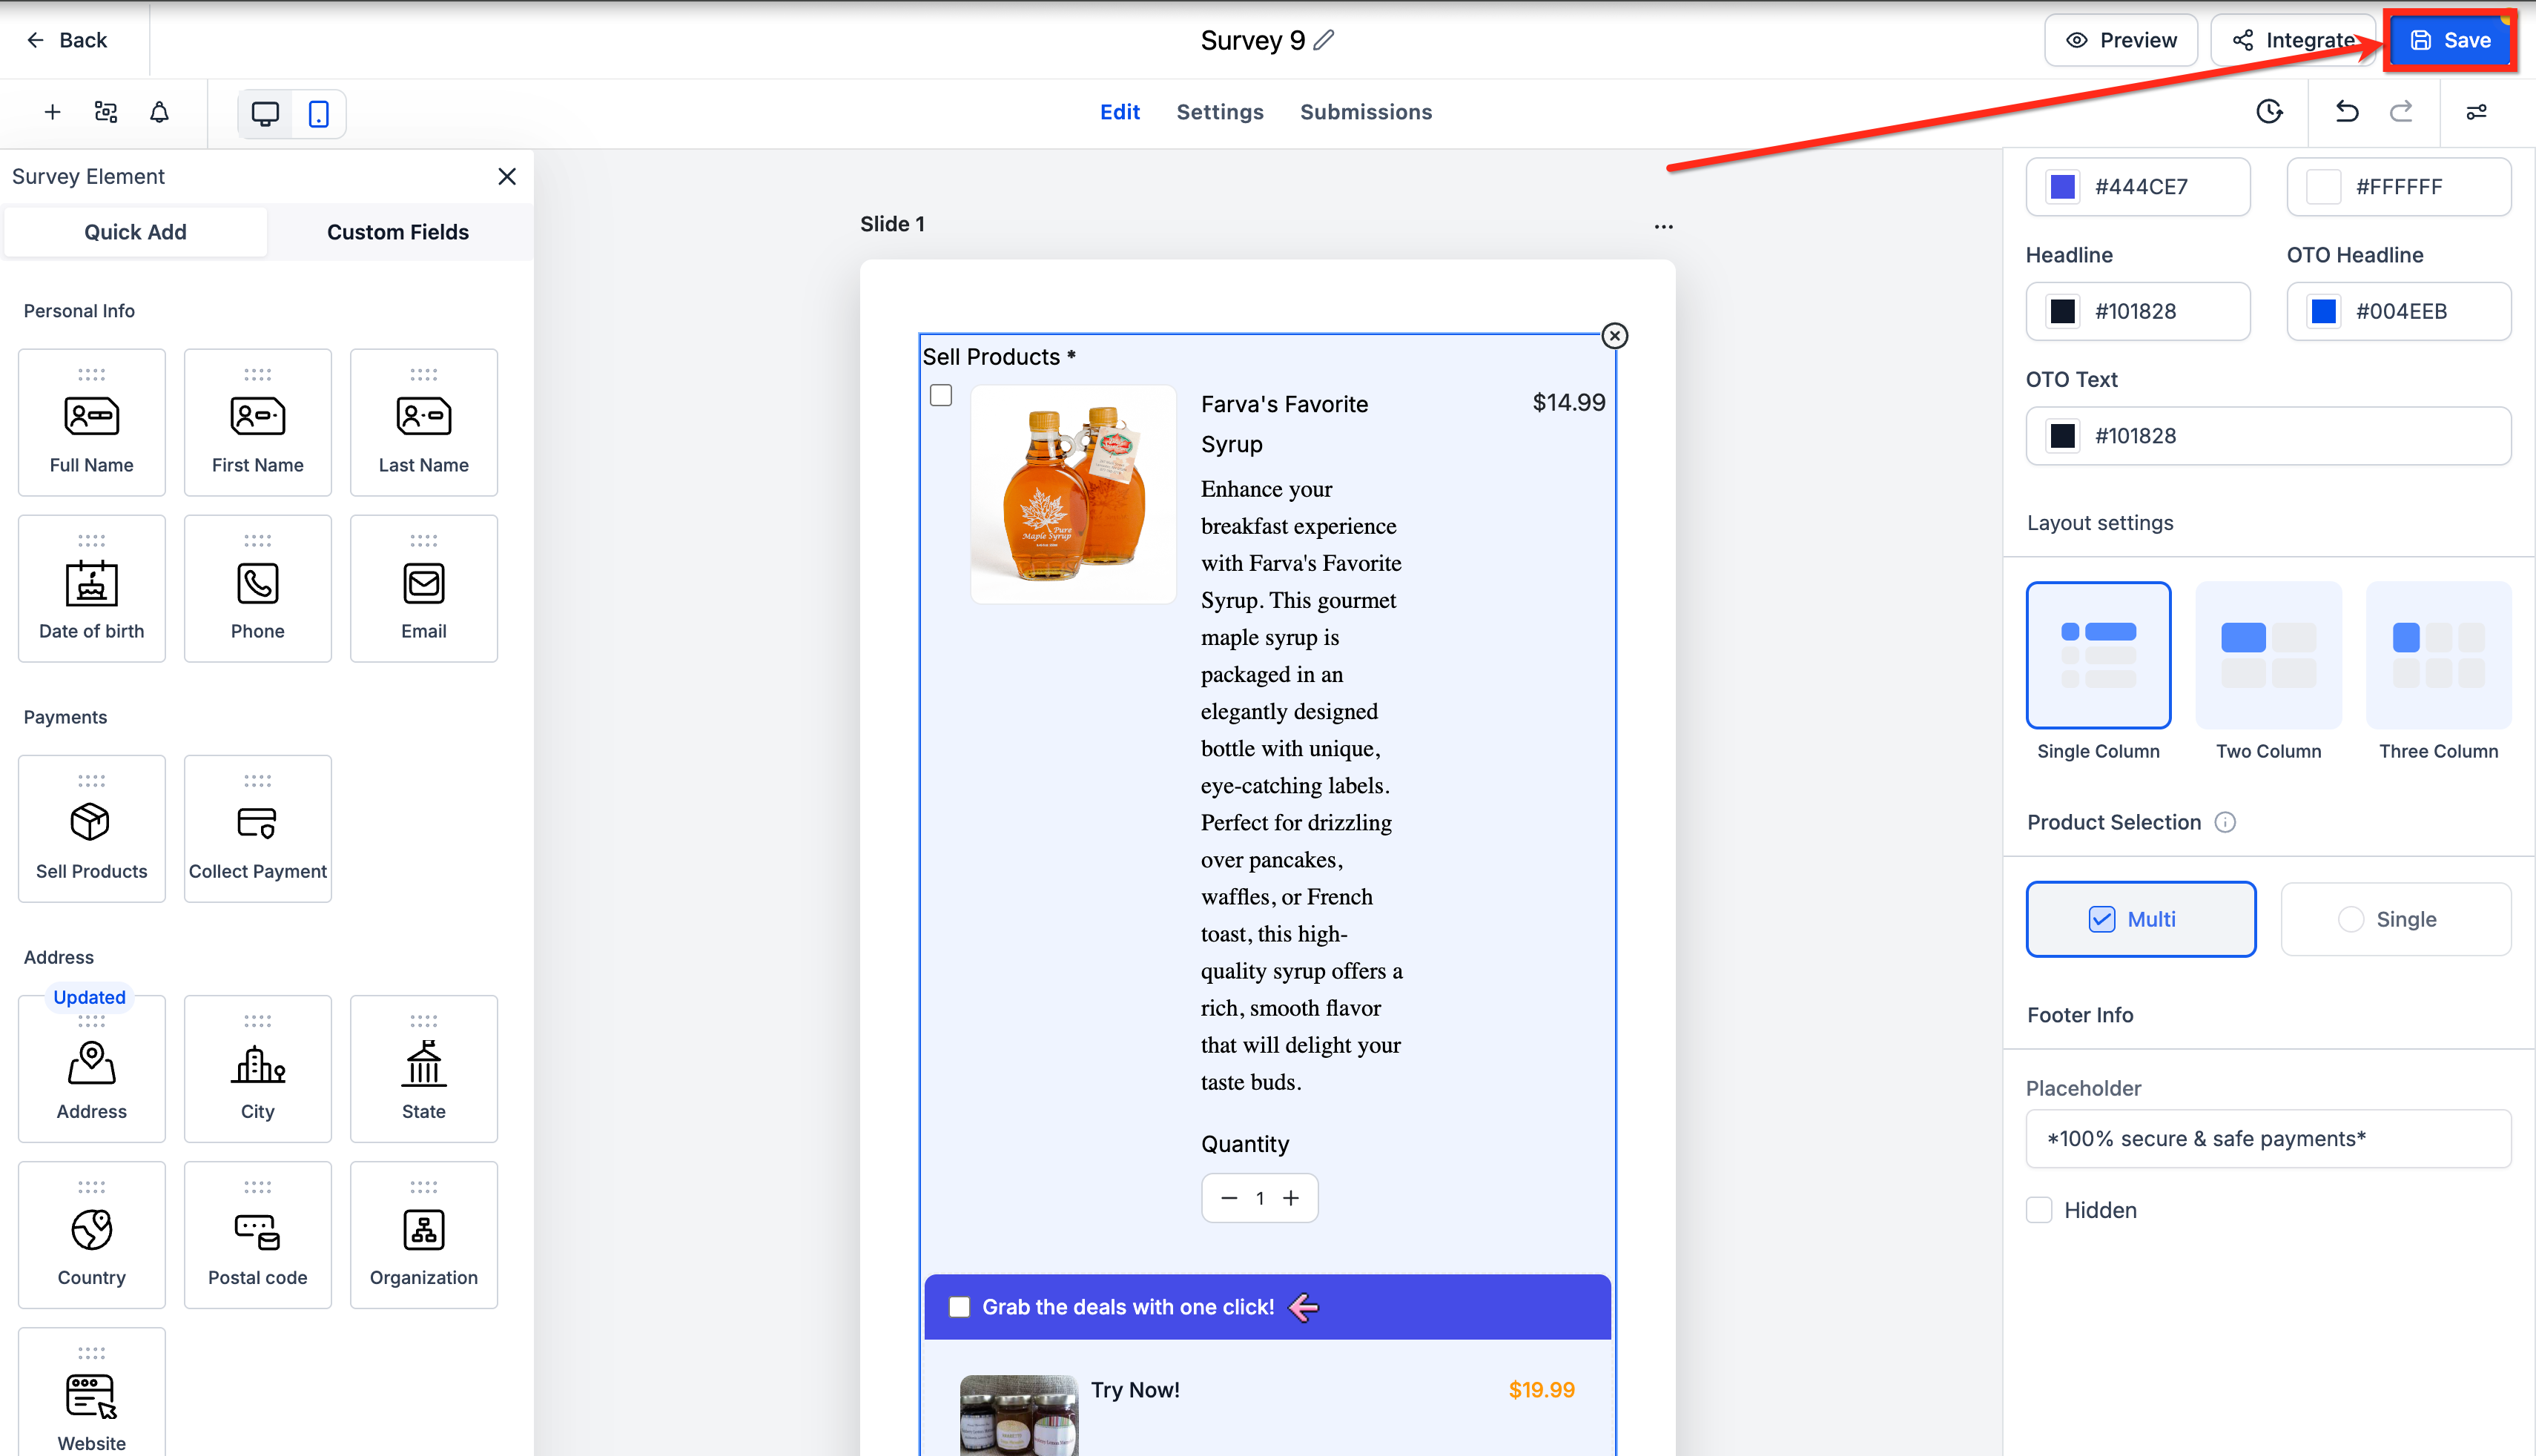
- Choose the Order Bump Style, selecting either Modern or Classic.
- Pick a template from the Select Template list.
- Enter highlight text that draws attention to the offer.
- Select an icon to display beside the highlight text.
- Toggle Show Price or Hide Price for the bump.
- Set the background color for the bump area.
- Choose a color for the highlight text.
- Choose a color for the headline.
- Set the color for the OTO headline.
- Set the color for the OTO text.
- Select a layout option: Single, Two, or Three column.
- Choose whether customers can select a single bump or multiple bumps.
- Toggle Footer Info on or off.
- Decide to hide or keep the placeholder text.
06What it looks like in HighLevel
07Settings that matter
- Order Bump Style. Switches between Classic and Modern visual designs for the bump.
- Select Template. Chooses one of the predefined layout templates for the bump display.
- Highlight Text. Creates the short, attention grabbing message shown with the bump.
- Icon. Adds an icon next to the highlight text for visual emphasis.
- Show Price / Hide Price. Controls whether the bump price is displayed to the respondent.
- Background color. Sets the background shade of the bump section.
- Highlight text color. Defines the font color of the highlight message.
- Headline color. Sets the color of the bump headline.
- OTO headline. Specifies the color for the one time offer headline.
- OTO text colors. Specifies the color for the one time offer description text.
- Layout Settings. Determines if the bump appears in a single, two column, or three column layout.
- Product Selection. Allows respondents to choose a single bump or multiple bumps.
08Things to know before you rely on it
- Only one recurring product can be set per survey, either as the main product or a single bump.
- Bump products will not appear unless a main product is added first.
- Multiple bump products can be added to the same survey.
- All supported HighLevel payment processors work with order bumps.
09How it connects to the rest of HighLevel
- Export survey responses to Google Sheets Export to Sheets
- Find and export survey submissions Access submissions
- Integrate payments with surveys Payments integration
Michael's take

Wondering if the extra effort of setting up a bump inside a survey is worth it? It can be a good option when you have a product that naturally complements what you’re already selling. Think a fast track service or a premium add on.
If I were creating a new survey, I’d first make sure the main offer is solid, then draft an upsell that feels like a logical next step. After that I’d play with the modern style and colors to keep it on brand, and finally run a quick test to confirm the bump shows up and the payment flow works.