
01Who this is for
- Marketing agencies can embed upsell offers directly in client funnels, adding extra revenue streams without leaving the form.
- Ecommerce merchants can present a complementary product as a bump, encouraging higher basket values during checkout.
- Service providers can offer add on packages as bumps, letting prospects select extra services while completing a booking form.
02Order bumps in forms, explained
Order bumps are a form element that appears next to a main product inside a HighLevel form. When a visitor selects the main product, the bump offers become visible, allowing an additional purchase with a single click. The feature supports both Classic and Modern visual styles and lets you use several templates for the bump layout.
The bump settings live inside the Sell Products element on the form builder. You can toggle visibility, change colors, icons, highlight text, price display, and layout columns. Multiple bump products can be added, but only one recurring product is allowed per form. Bumps work with any payment processor supported by HighLevel, such as Stripe or PayPal.
To access the feature, open the form builder, add the Sell Products element, then configure the main product followed by any bump products. All customizations are saved with the form and apply whenever the form is displayed on a website or embedded page.
03How businesses use order bumps in forms
- Ecommerce store. Add a main product representing the primary purchase, then create a bump product for a complementary accessory. Choose a modern template, set highlight text, and enable the price display. The bump appears on the checkout form, letting shoppers add the accessory with one click.
- Online course creator. Create a main product for the core course, then add a bump product offering a coaching package. Select the classic style, customize background and headline colors, and turn on the footer note about secure payments. The extra offer is shown on the enrollment form.
- Local service provider. Set up a main product for a standard service appointment, then add a bump product for an extended warranty. Pick a template, write highlight text like "Protect your investment", and hide the price if desired. Customers can select the warranty directly within the booking form.
04The numbers and rules that matter
- Smart recurring rules that ensure only one recurring product is configured per form.
- Order bumps work smoothly with Stripe, PayPal, and any other supported HighLevel payment processors.
05Before you start
- Be logged into the appropriate subaccount.
- Have at least one product created in the platform, or be prepared to create one during the setup.
06How to set up and use order bumps in forms in HighLevel
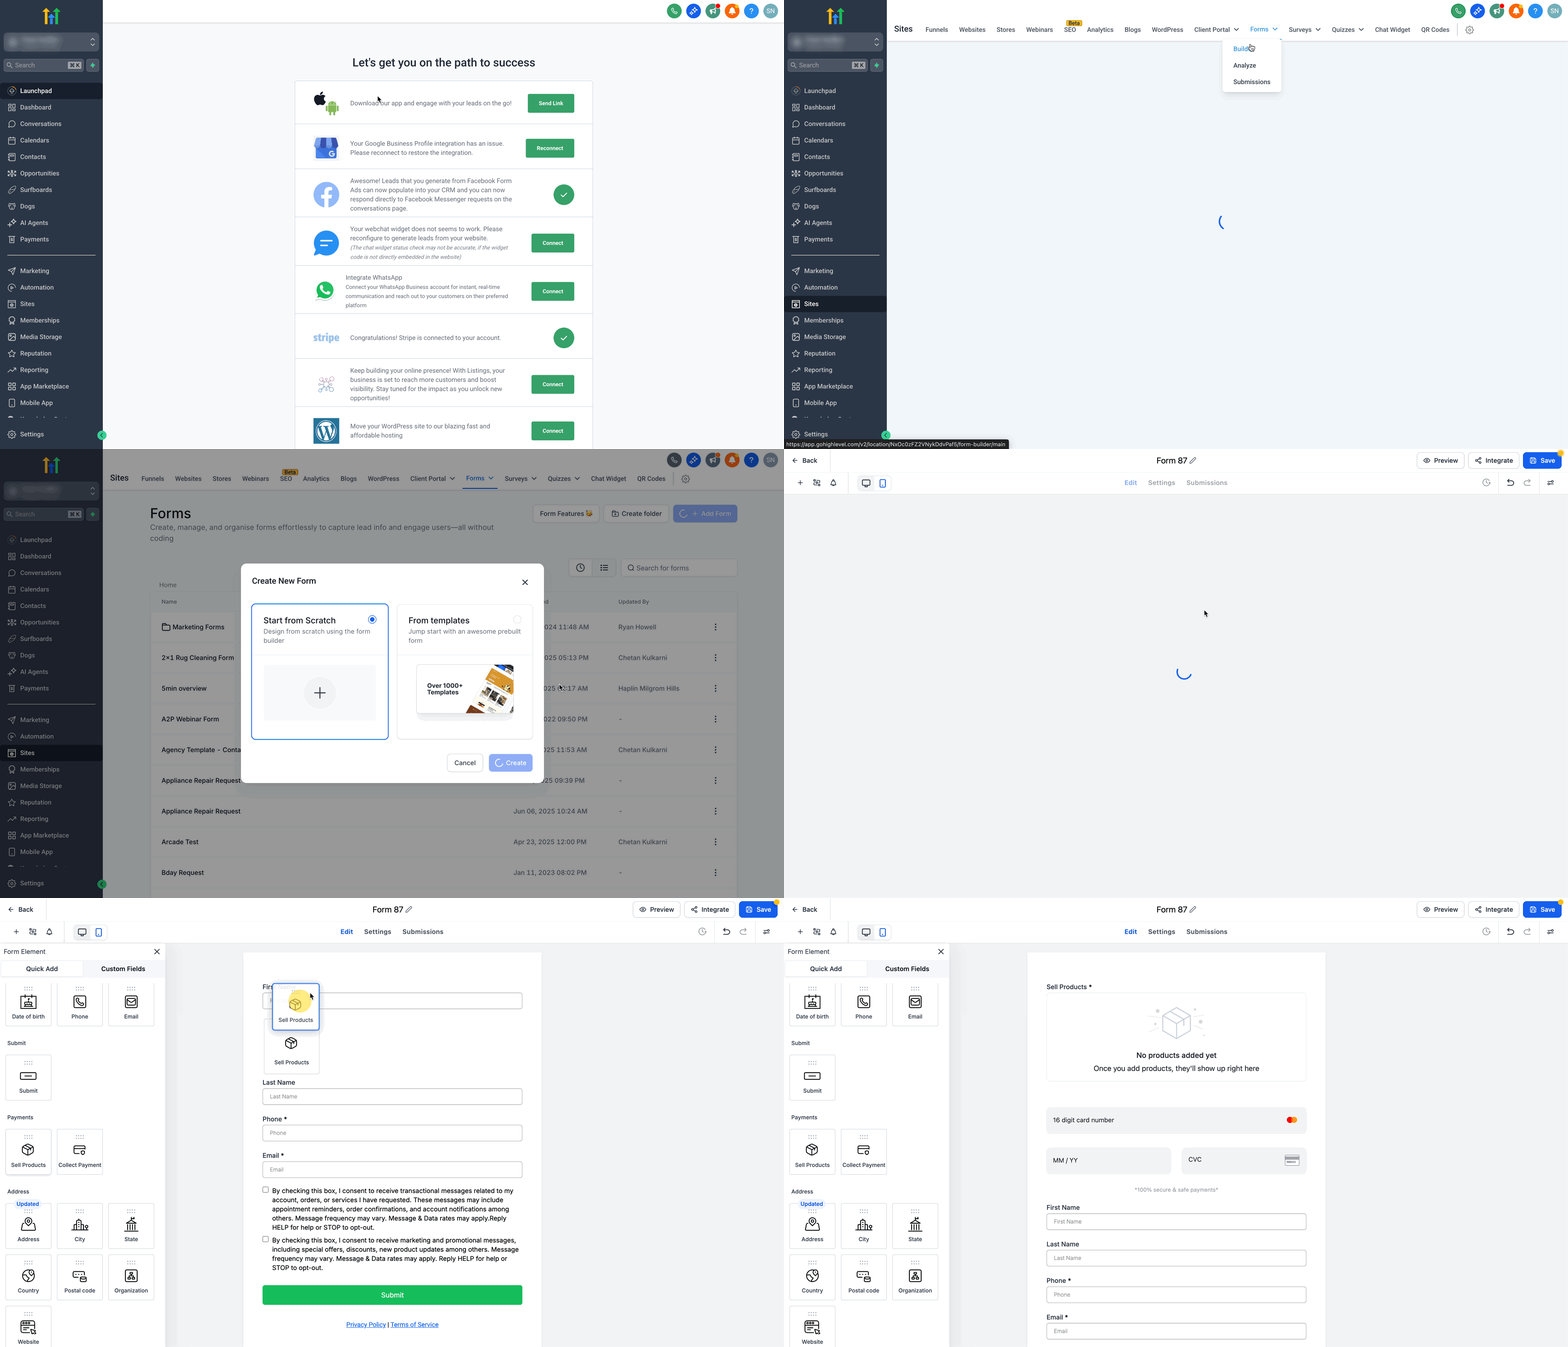
Create a form
- Log in to the subaccount.
- Open Sites, choose Forms, and click Builder.
- Press + Add Form.
- Select Start from Scratch or a template, then click Create.
- Drag the Sell Products element onto the form canvas.
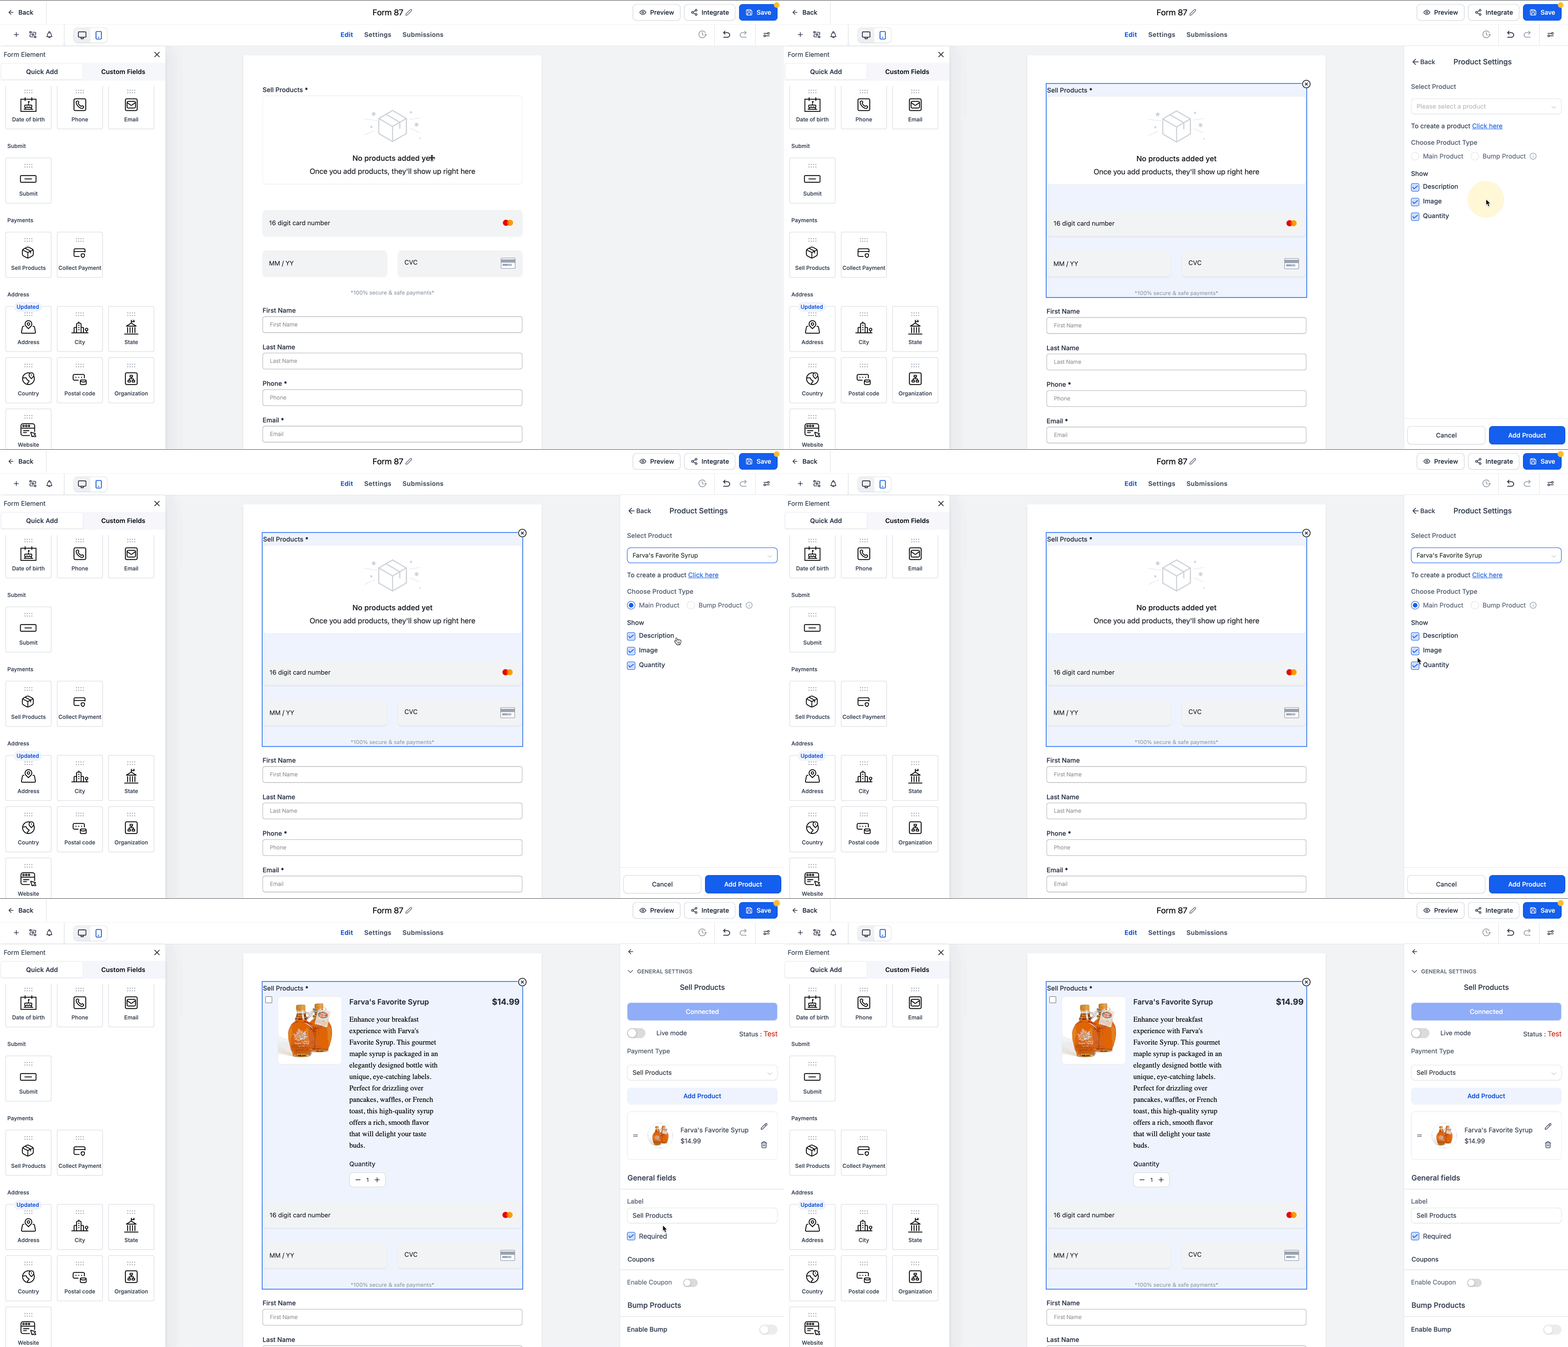
Add your main product
- Select the Sell Products element on the canvas.
- In the right panel, click Add Product.
- If no product exists, click the provided link to open the product creation page and set one up.
- If products already exist, pick one from the Please select the product dropdown.
- Set Product Type to Main Product.
- Toggle Description, Image, and Quantity options as needed.
- Click Add Product to place the main product on the form.
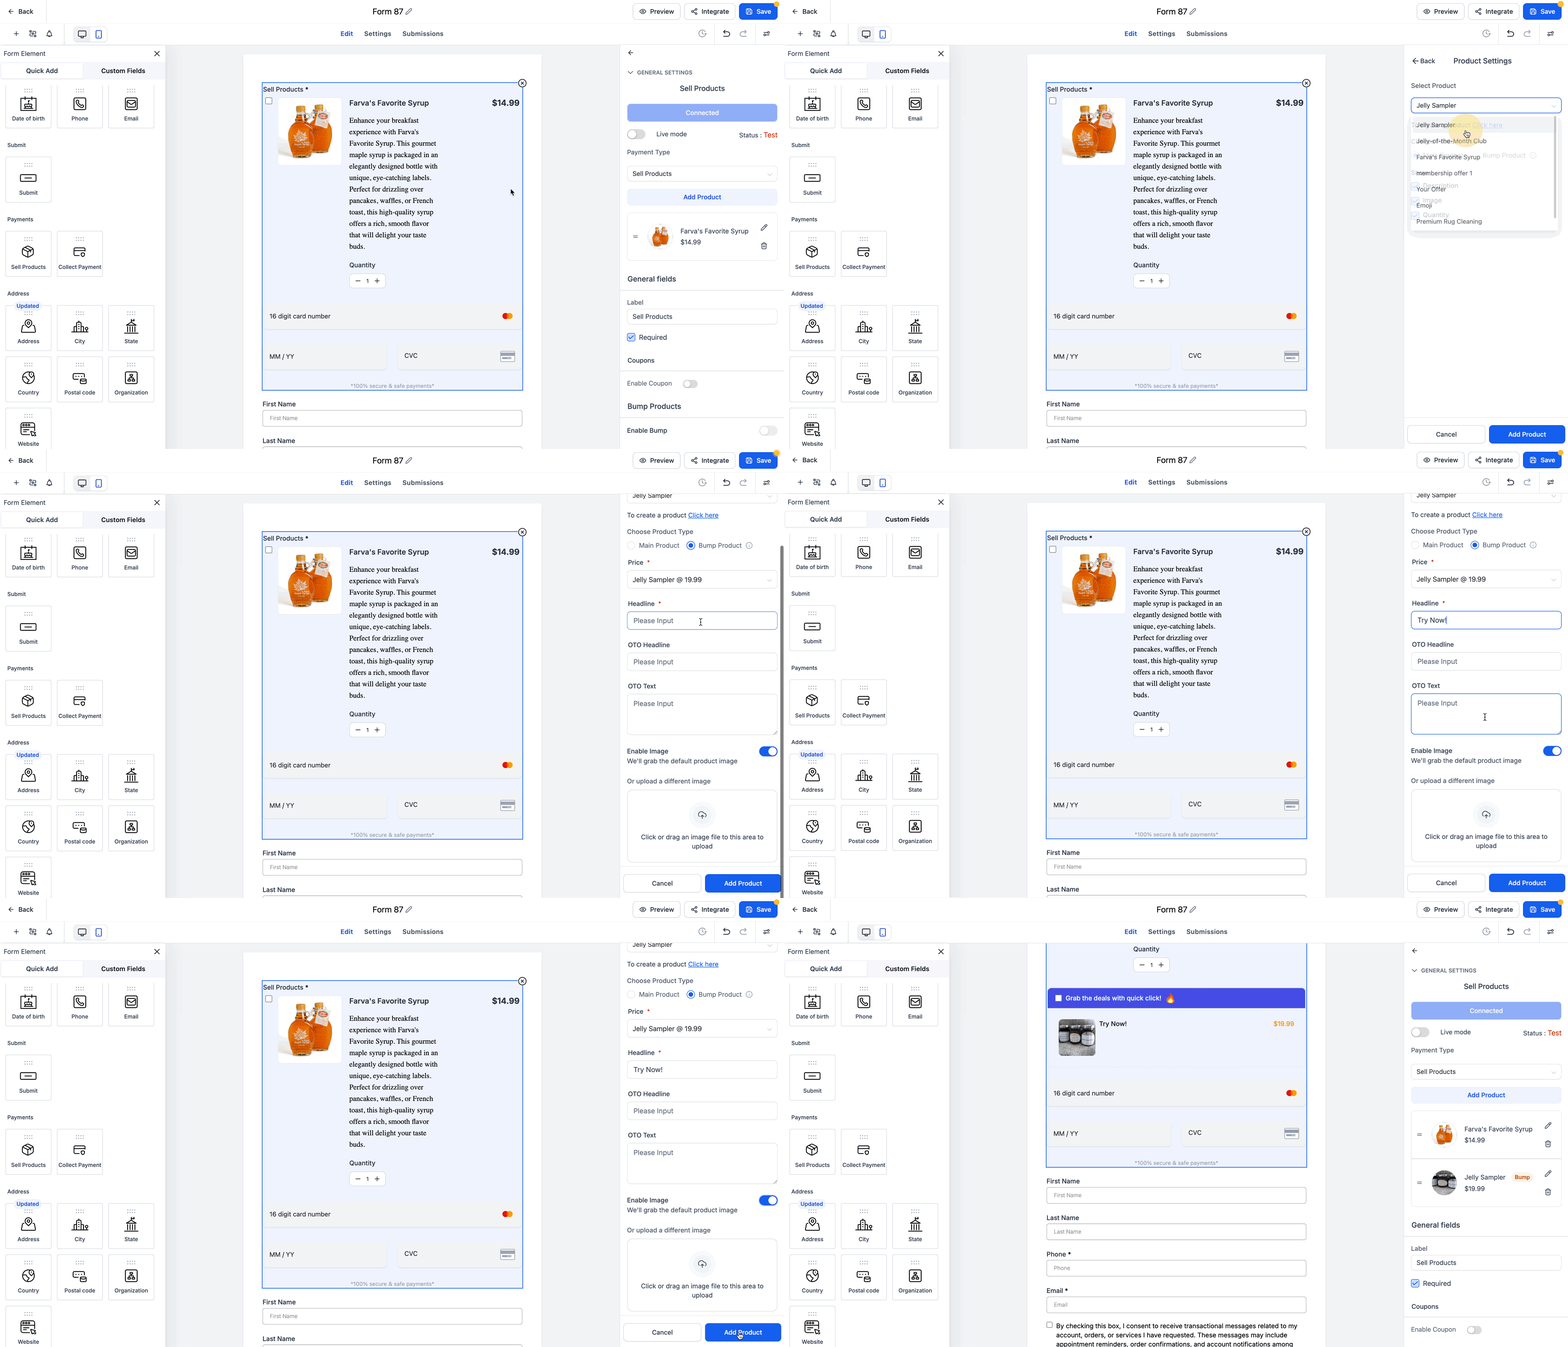
Add your bump product
- Click Add Product again.
- Create a new product or select an existing one from the dropdown.
- Set Product Type to Bump Product.
- Enter a headline for the bump offer.
- Enable or disable an image for the bump.
- Upload an image or let the system retrieve it from the product record.
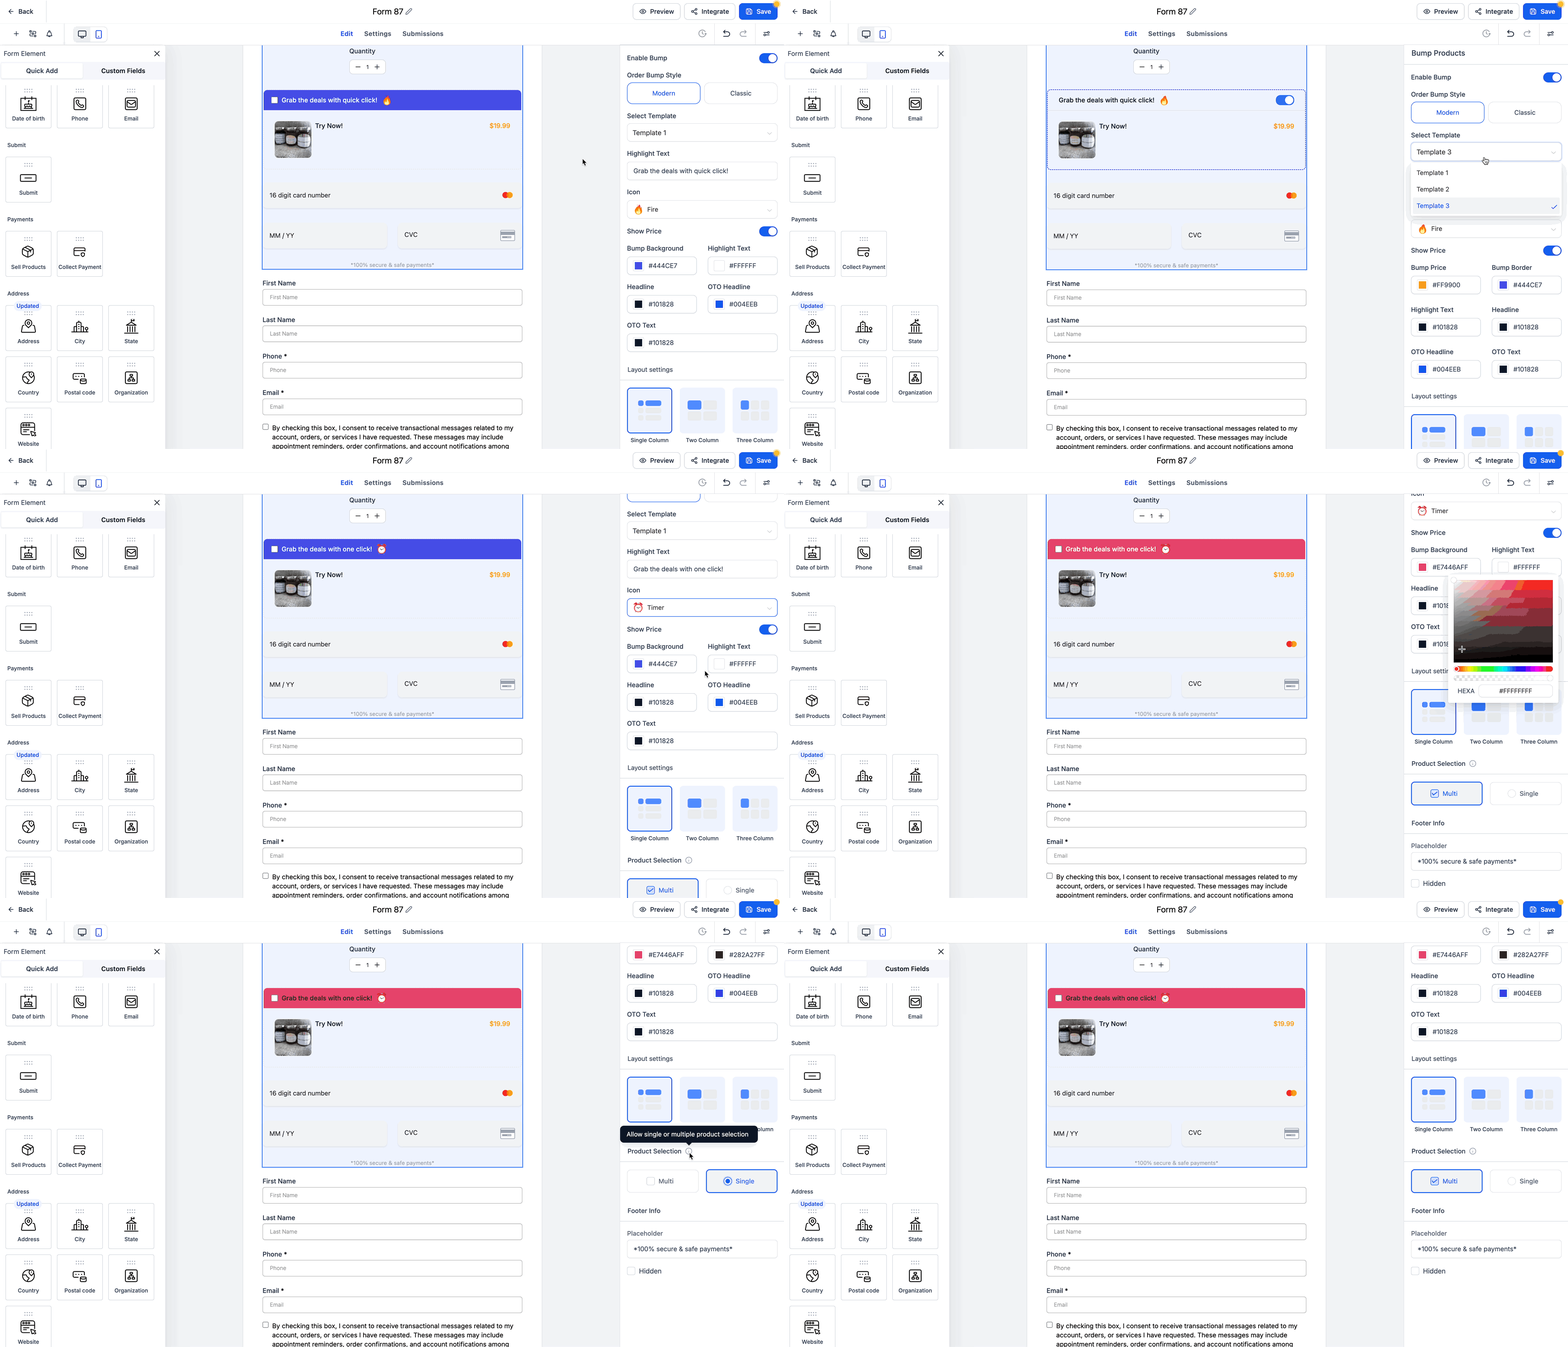
Customize the bump product content & visuals
- Under Order Bump Style, choose Modern or Classic.
- Select a template (Template 1, 2, or 3) from the dropdown.
- Enter highlight text that will grab attention.
- Choose an icon to display beside the highlight text.
- Toggle Show Price or Hide Price for the bump.
- Set the background color for the bump area.
- Define colors for highlight text, headline, OTO headline, and OTO text.
- In Layout Settings, select a Single, Two, or Three column layout.
- Choose whether customers can pick a single or multiple bump products.
- Toggle Footer Info on or off and decide whether to keep the placeholder text.
Save your form
- Click Save in the top right corner to store all changes.
07What it looks like in HighLevel
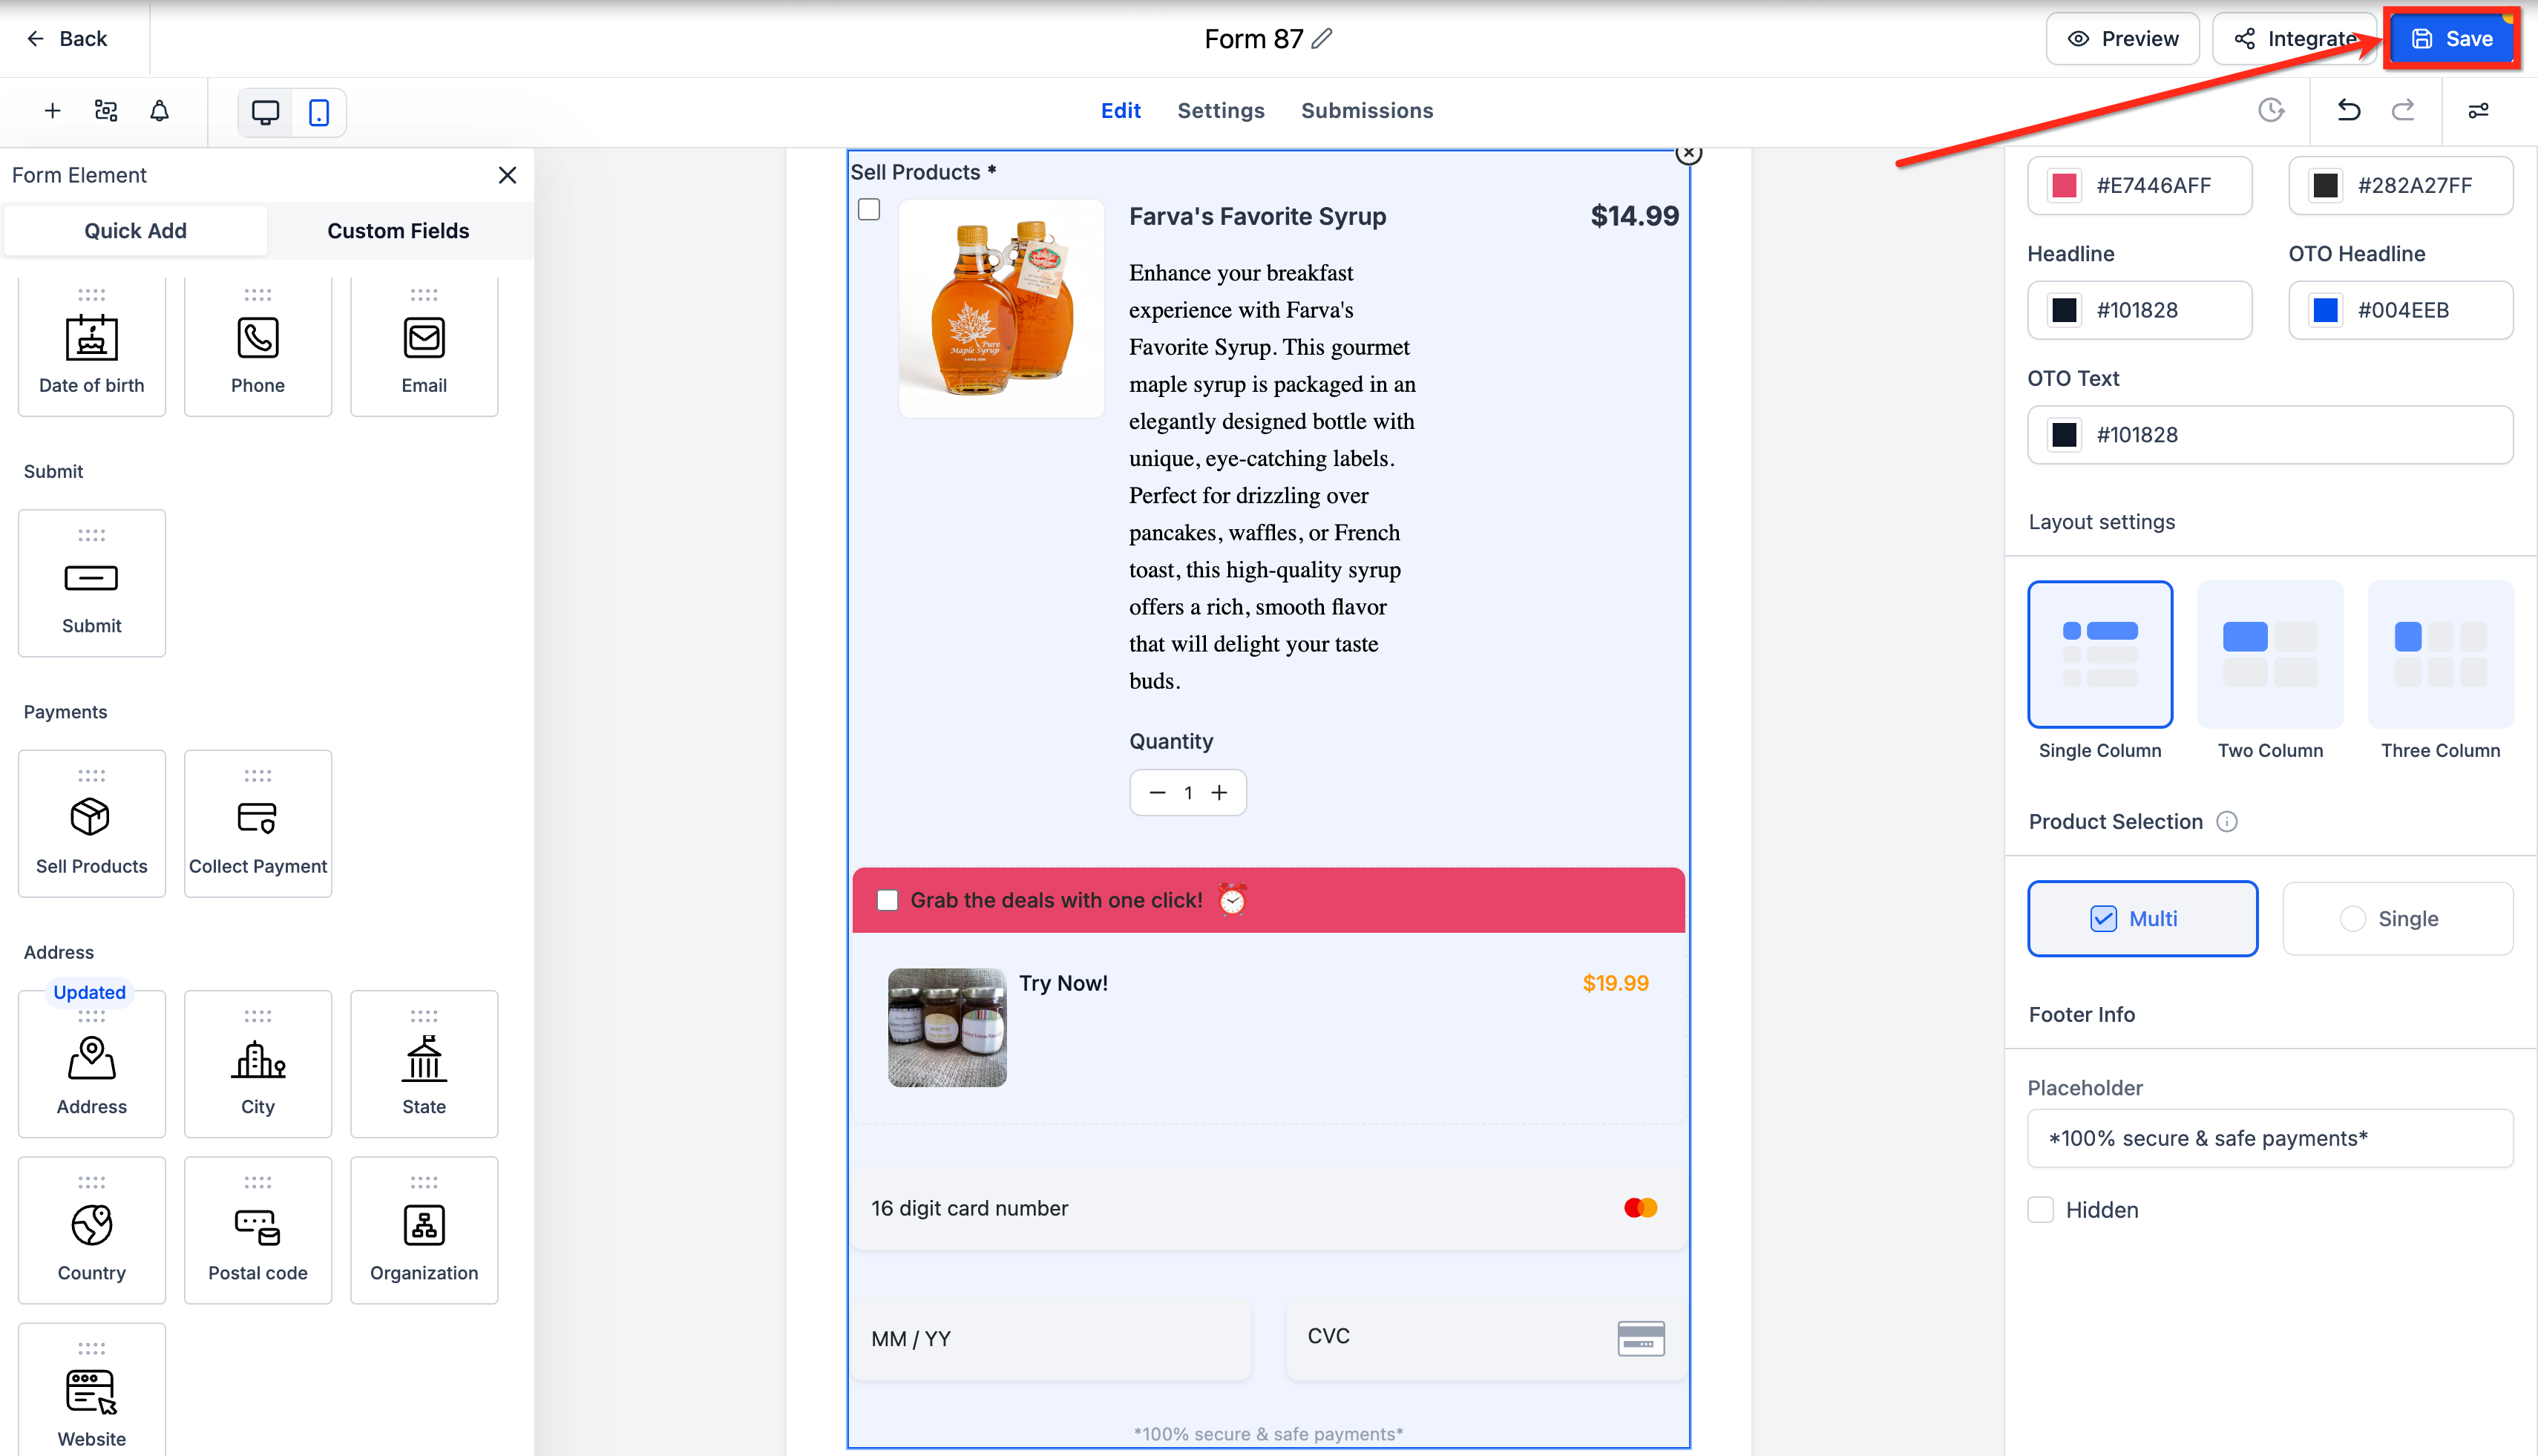
08Settings that matter
- Order Bump Style. Chooses between the Classic or Modern visual presentation for the bump.
- Select Template. Selects one of three predefined layouts for the bump’s appearance.
- Highlight Text. Provides a short, eye catching line displayed with the bump.
- Icon. Adds an icon next to the highlight text.
- Show Price / Hide Price. Controls whether the bump’s price is displayed to the user.
- Background color. Sets the background shade of the bump area.
- Highlight text color. Defines the color of the highlight snippet.
- Headline color. Sets the color of the bump’s main headline.
- OTO headline. Customizes the color of the one time offer headline.
- OTO text colors. Adjusts the color of the one time offer descriptive text.
- Layout Settings. Allows selection of a single, two column, or three column layout.
- Product Selection. Determines if users can pick a single bump product or multiple ones.
09Things to know before you rely on it
- Only one recurring product may be configured per form; either the main product or a single bump product can be recurring.
- Bump products will not appear unless a main product is added to the same form.
- Multiple bump products can be added to a single form, expanding upsell possibilities.
- Any form that includes the Sell Products element can utilize order bumps.
- Order bumps work with all payment processors supported by HighLevel, including Stripe and PayPal.
10If something goes wrong
- Bump product does not appear on the form. Add a main product first, as bumps only display when a main product is present.
- Recurring payment conflict between products. Ensure that only one product in the form is set as recurring.
11How it connects to the rest of HighLevel
- Learn how to build and share contact forms in HighLevel Contact form builder
- Set up email alerts and auto responders for your forms Email notifications
- View HighLevel pricing and plan options Pricing
- Start a free 30 day trial of HighLevel 30 day trial
Michael's take

Order bumps add an extra option to the form. I recommend testing a single, low cost add on that complements the core product.