
01Who this is for
- Founders who need a quick way to bill clients for setup fees and one off services.
- Agency owners who want to track payments for each client without leaving the platform.
02Invoices, explained
The invoice feature creates professional billing documents that live within HighLevel. You can choose a one time invoice or a recurring invoice, attach products from the Products tab, apply discounts, taxes, and custom payment schedules. All settings such as business branding, email sender, payment options, reminders, and late fee rules are controlled from the global defaults.
Invoices are managed under Payments > Invoices & Estimates. After you build an invoice, you can preview the final layout, send it by email or SMS, or copy a payment link to paste into any external message. The system tracks status from Draft to Sent and records any manual payments you log.
03How businesses use invoices
- Digital marketing agency. The agency adds a client, selects a one time product for a website launch fee, applies a discount, and enables partial payments. After saving, they copy the invoice link and paste it into a proposal email.
- Software consultant. The consultant creates a recurring invoice for a monthly retainer, sets the due after days value, and turns on automatic email reminders. They send the invoice manually to ensure the client receives the first bill immediately.
- Fitness studio. The studio builds a one time invoice for a new member sign up fee, adds optional tax, enables tip payments, and uploads a membership agreement as an attachment. They send the invoice from HighLevel and the client pays via the live payment link.
04Before you start
- Set up Global Invoice Defaults (optional but recommended) before creating any invoice.
05How to set up and use invoices in HighLevel
Set up global invoice defaults
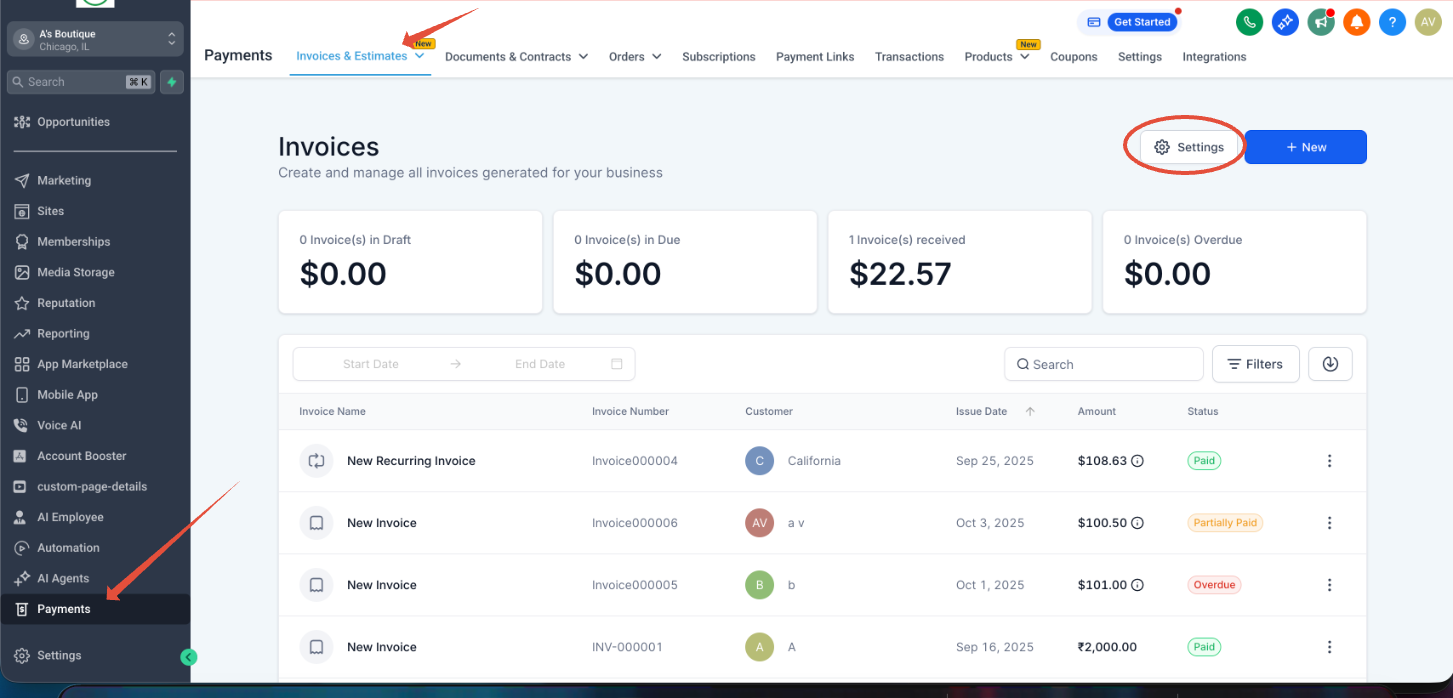
- Navigate to Payments > Invoices & Estimates > All Invoices.
- Click the Settings button inside the Invoices tab.
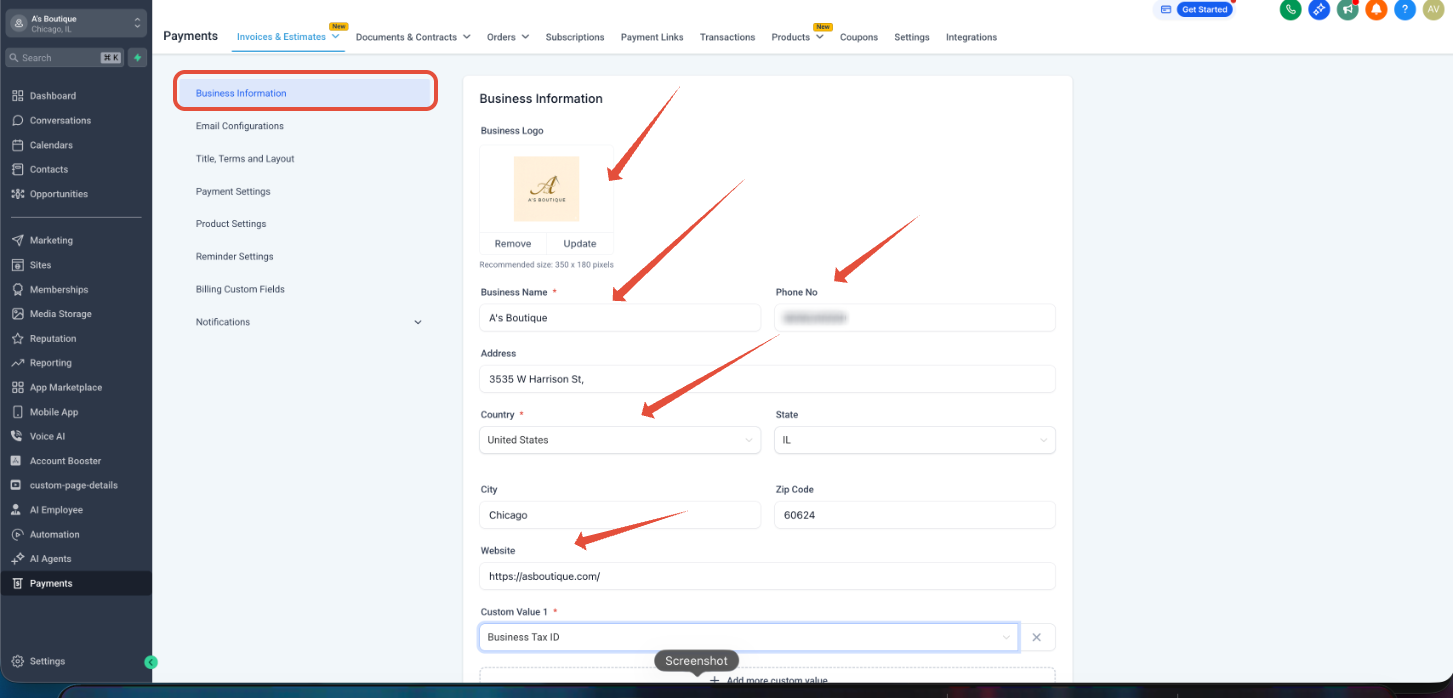
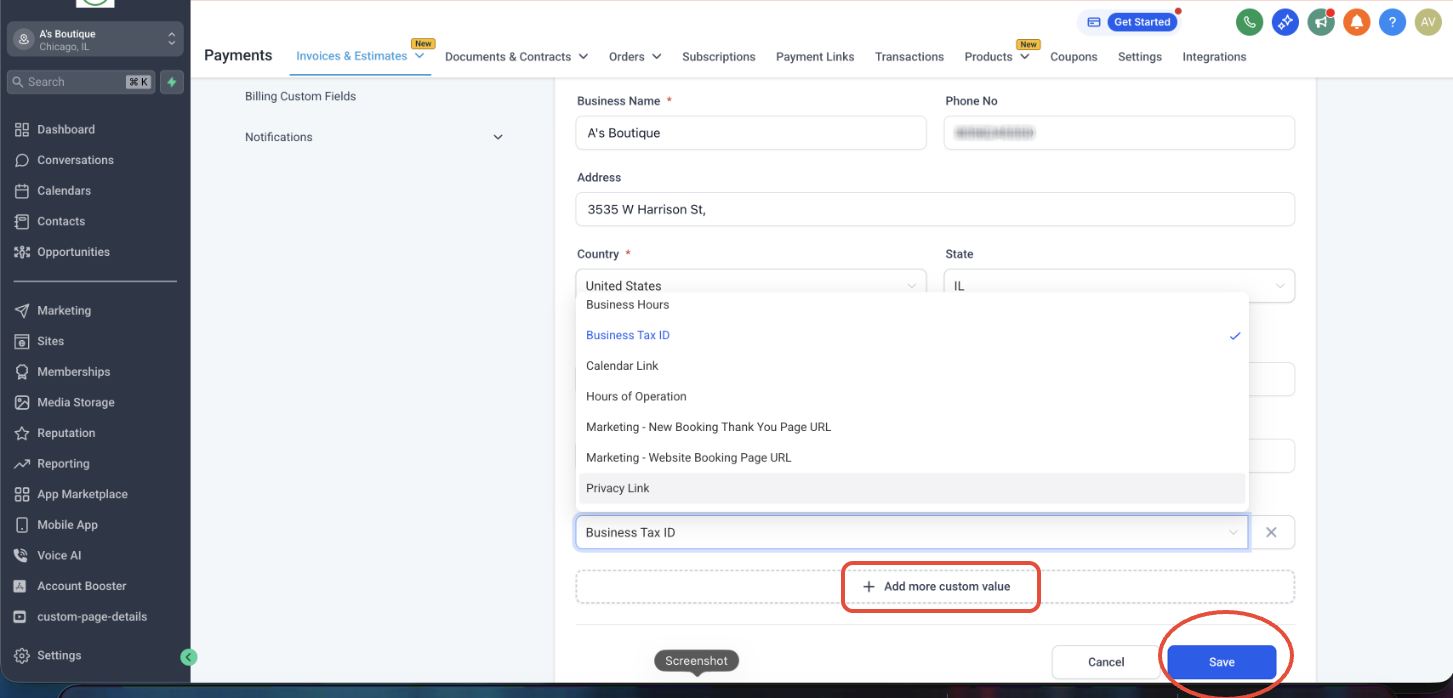
- Enter your business logo, name, phone, address, website and any custom values, then click Save.
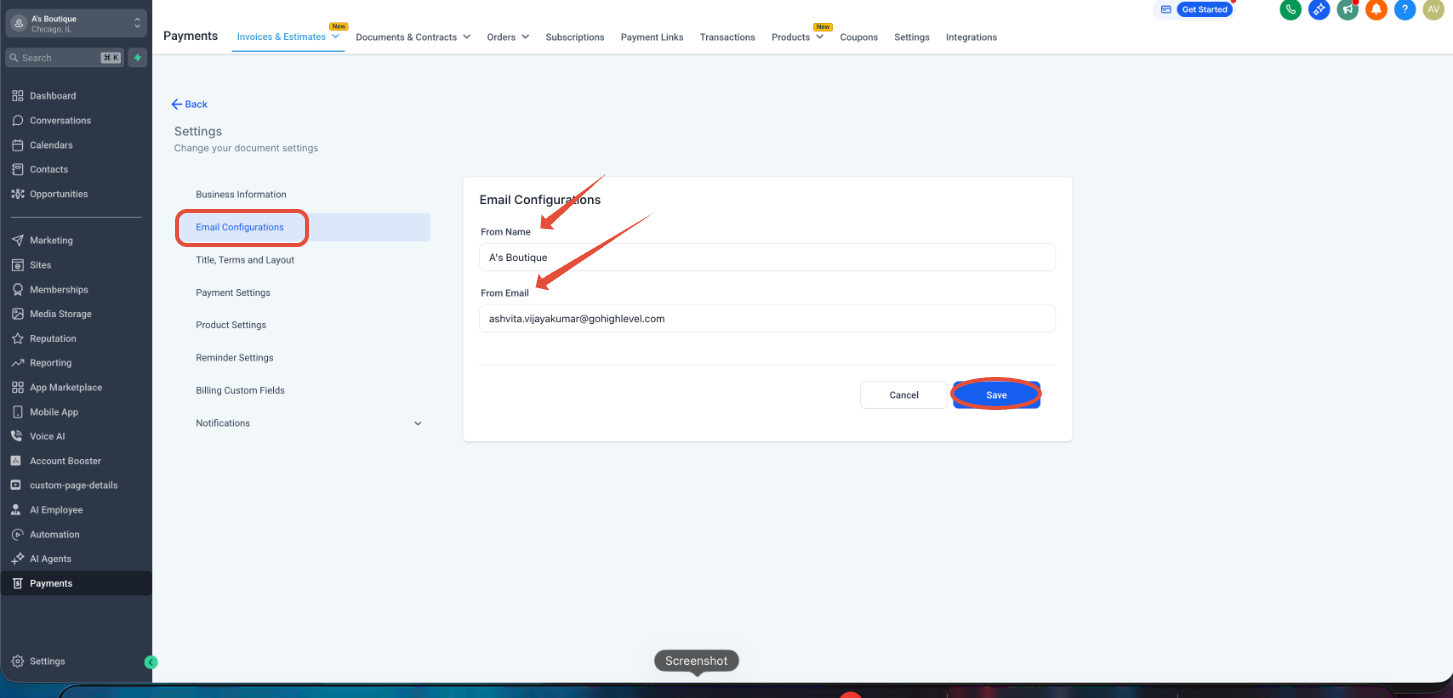
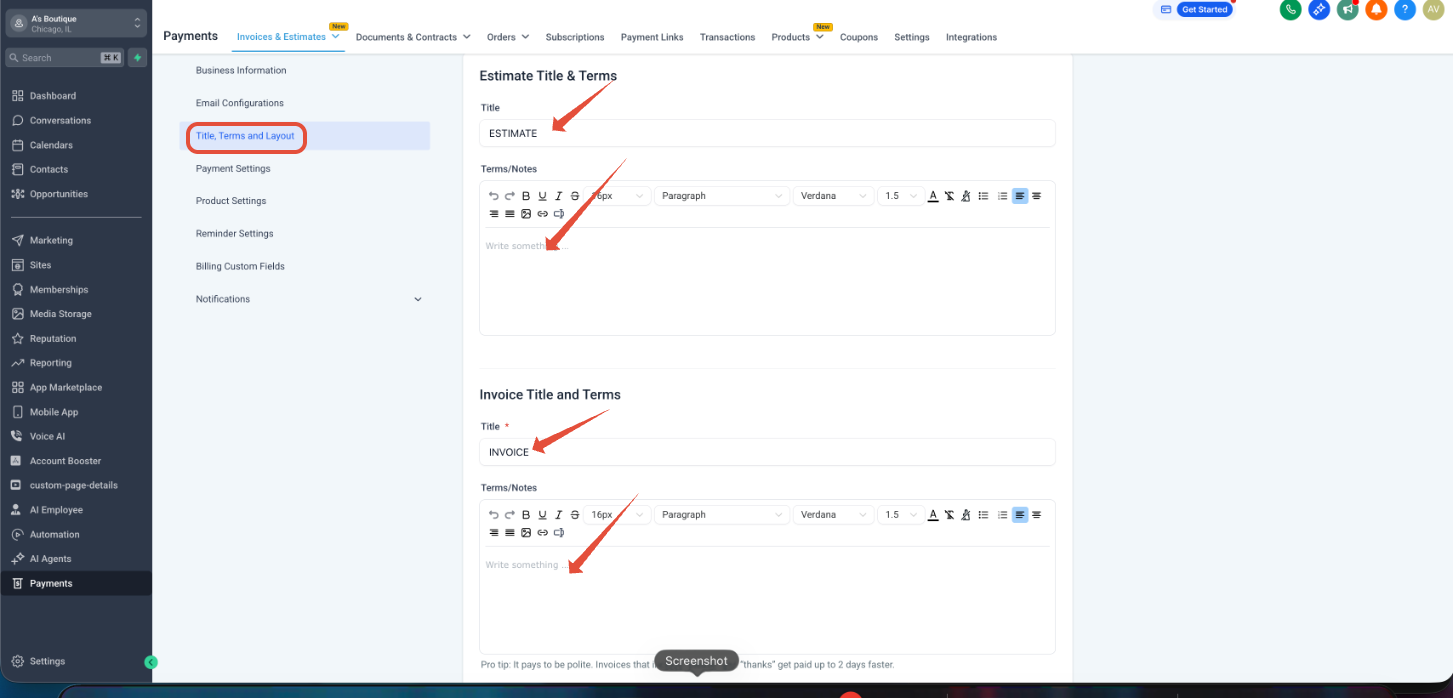
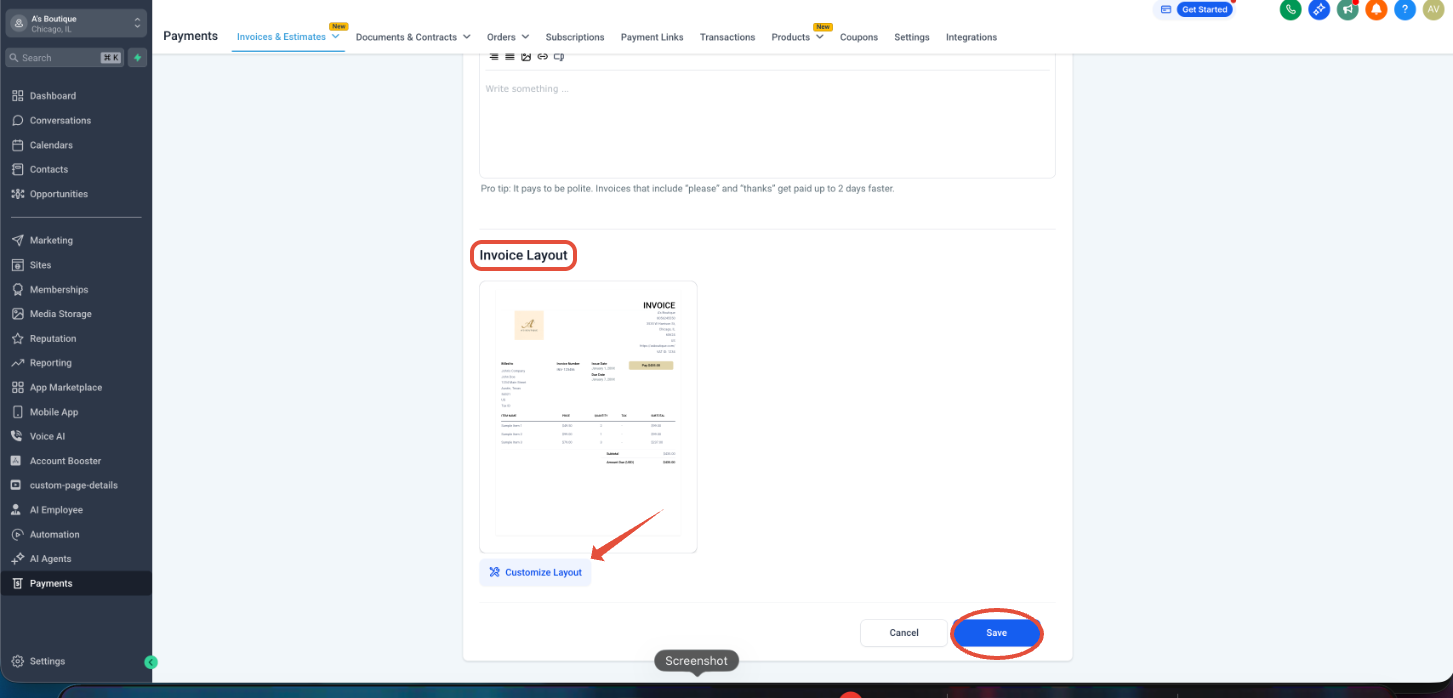
- Configure email sender, title, terms, layout, payment options, reminders, custom fields and notifications as needed, and click Save.
Create a new invoice
- Go to Payments > Invoices & Estimates > All Invoices.
- Click the + New button and choose New invoice from the dropdown.
- Select the client, edit the invoice number, issue date and due date, then edit business information and click Save.
- Click Add an item and choose a product from the Products tab; adjust price and quantity directly on the line.
- Click the Add discount icon, pick flat or percentage, enter the value and click Save.
- Click Add Tax below the discount area or toggle Enable tax automatically to apply tax.
- Click Add Payment Schedule, select Percentage or Fixed Amount, enter the amount and due date, and click Save.
- Use the Additional Options section to enable terms & conditions, late fees, processing fees or tip collection as required.
- Click the Save button to store the draft before sending.
Send an invoice
- Click Save to ensure the invoice is stored.
- Click the three dot menu next to Save and choose Preview to view the final layout.
- Click the small downward arrow in the Send dropdown to copy the live payment link and mark the invoice as Sent.
- Click Send, select Email, Text or both, edit the email elements via the mail preview, and save the template.
- In Additional Options set Test or Live mode, then click Save to complete the send.
Copy an invoice link
- Open the invoice you want to share.
- Click the three dot menu next to the invoice.
- Select Copy Link.
- Paste the copied link into Outlook, Gmail or any other email client.
06What it looks like in HighLevel
07Settings that matter
- Business Information. Controls the logo, name, phone, address and website that appear on every invoice.
- Email Configurations. Sets the From email address and name used when the invoice is emailed.
- Title, Terms and Layout. Allows editing of the invoice title, payment terms and visual layout, including button colors and label names.
- Payment Settings. Manages due after days, invoice prefix, default Stripe methods, partial payments, late fees, and tip options.
- Reminder Settings. Defines email and SMS reminder templates, subject lines, frequencies, business hours and time zone for sending reminders.
- Billing Custom Fields. Adds additional fields to the invoice that can be filled from a dropdown.
- Notifications. Enables and customizes email and SMS templates for customer and team alerts such as invoice received, payment successful, or auto payment failures.
08Things to know before you rely on it
- Recurring invoices cannot be backdated; they always start on the current or a future date.
- If Stripe Connect is not used, payments must be recorded manually after the invoice is sent.
- Only one reminder is created by default; you must add extra reminders manually and disable the 3 day reminder for invoices with less than three days to expiry.
- Partial payments, late fees and tip collection work only when the corresponding options are enabled in Payment Settings.
09If something goes wrong
- Logo missing on older invoices. Upload a new logo to the Media Library and update Business Details; the logo will appear on unpaid invoices but not on already paid ones.
- Unable to type terms and conditions in the editor. Clear browser cache and cookies, close all tabs, then log back into HighLevel to reload the text editor.
- Invoice shows Sent but the client never received it. Clear the browser's cache and cookies, log out and back in, then resend the invoice. If the issue persists, contact support.
10How it connects to the rest of HighLevel
- Full invoice workflow including creation, editing, tax and discount options Invoice workflow
- Configure global tax settings used by invoices Tax settings
- Review all payments features and plan requirements Payments features
- See pricing and plan options for invoice capabilities Pricing
- Start a free trial to test invoicing in HighLevel 30 day trial
Michael's take

Invoices are essential for any business that wants to get paid on time, but they add complexity if you try to master every setting at once.
If you have a simple one off fee, stick to a one time invoice and ignore the recurring options.