
01Who this is for
- Restaurant managers benefit because they can oversee table status and guest flow without juggling separate systems.
- Front of house staff gain a clear view of which tables are free, reserved, or need attention, helping them seat guests quickly.
- Owners of small cafés can track orders and payments directly from each reservation, reducing manual paperwork.
02Restaurant reservations, explained
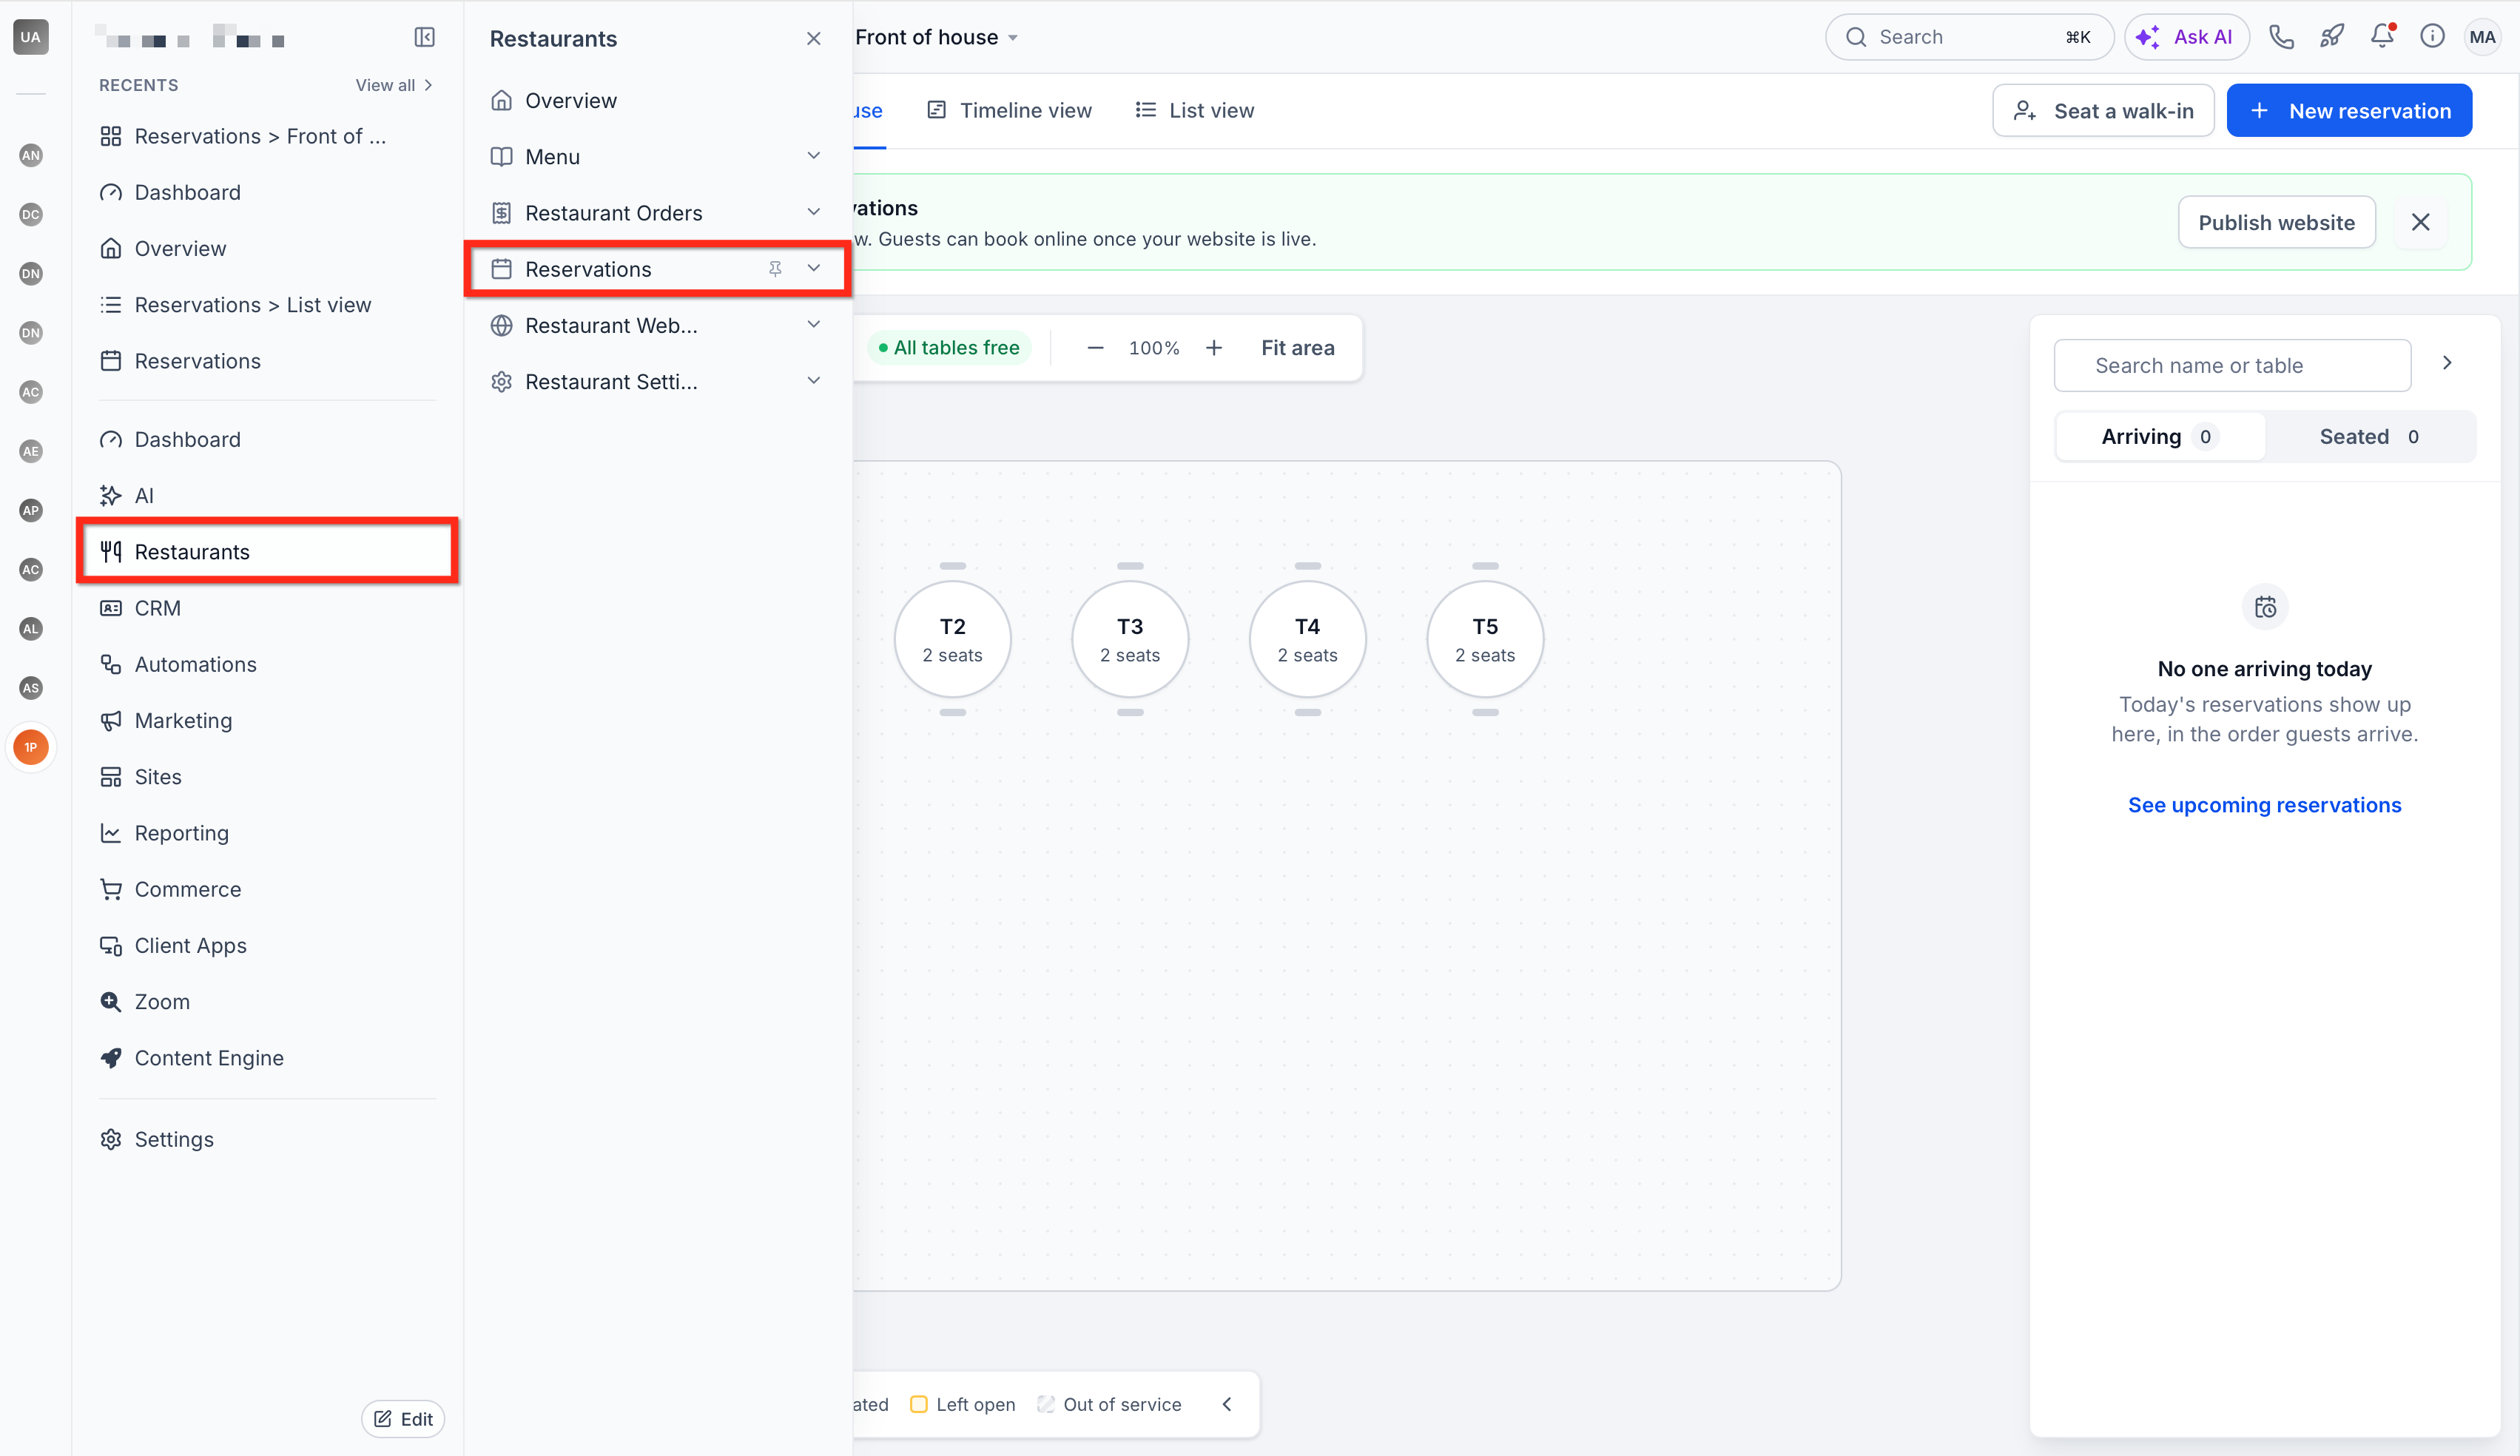
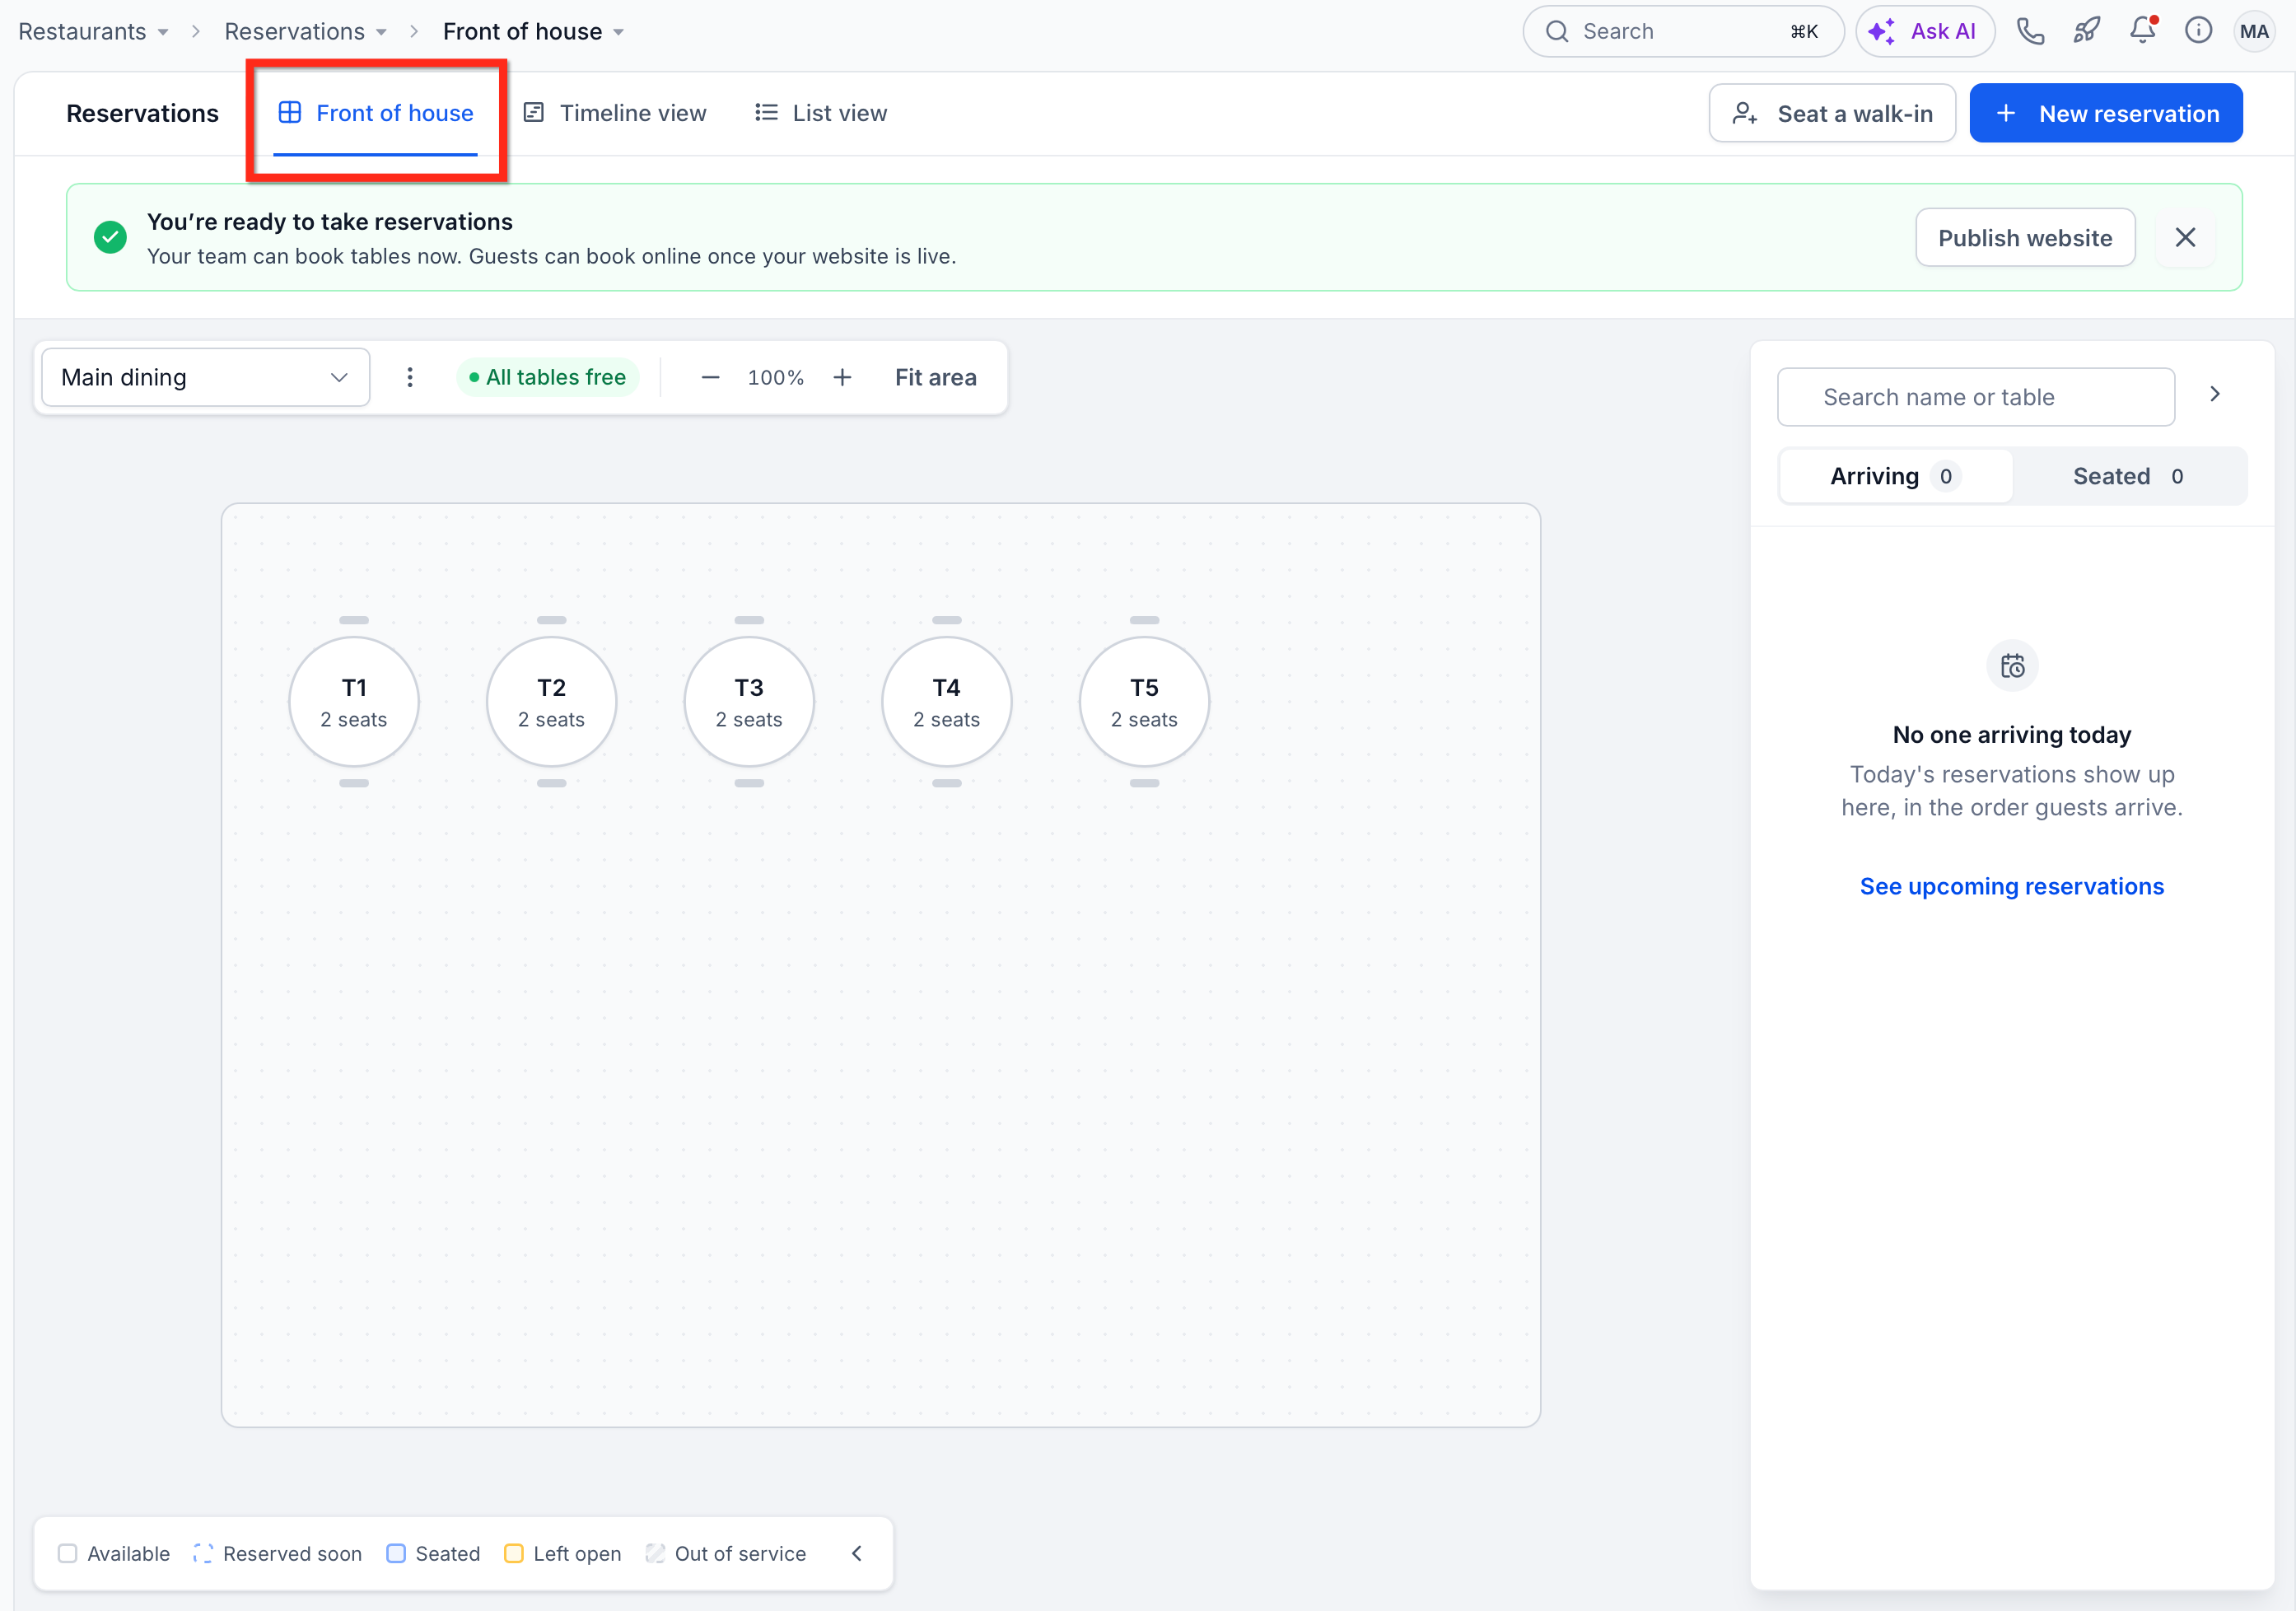
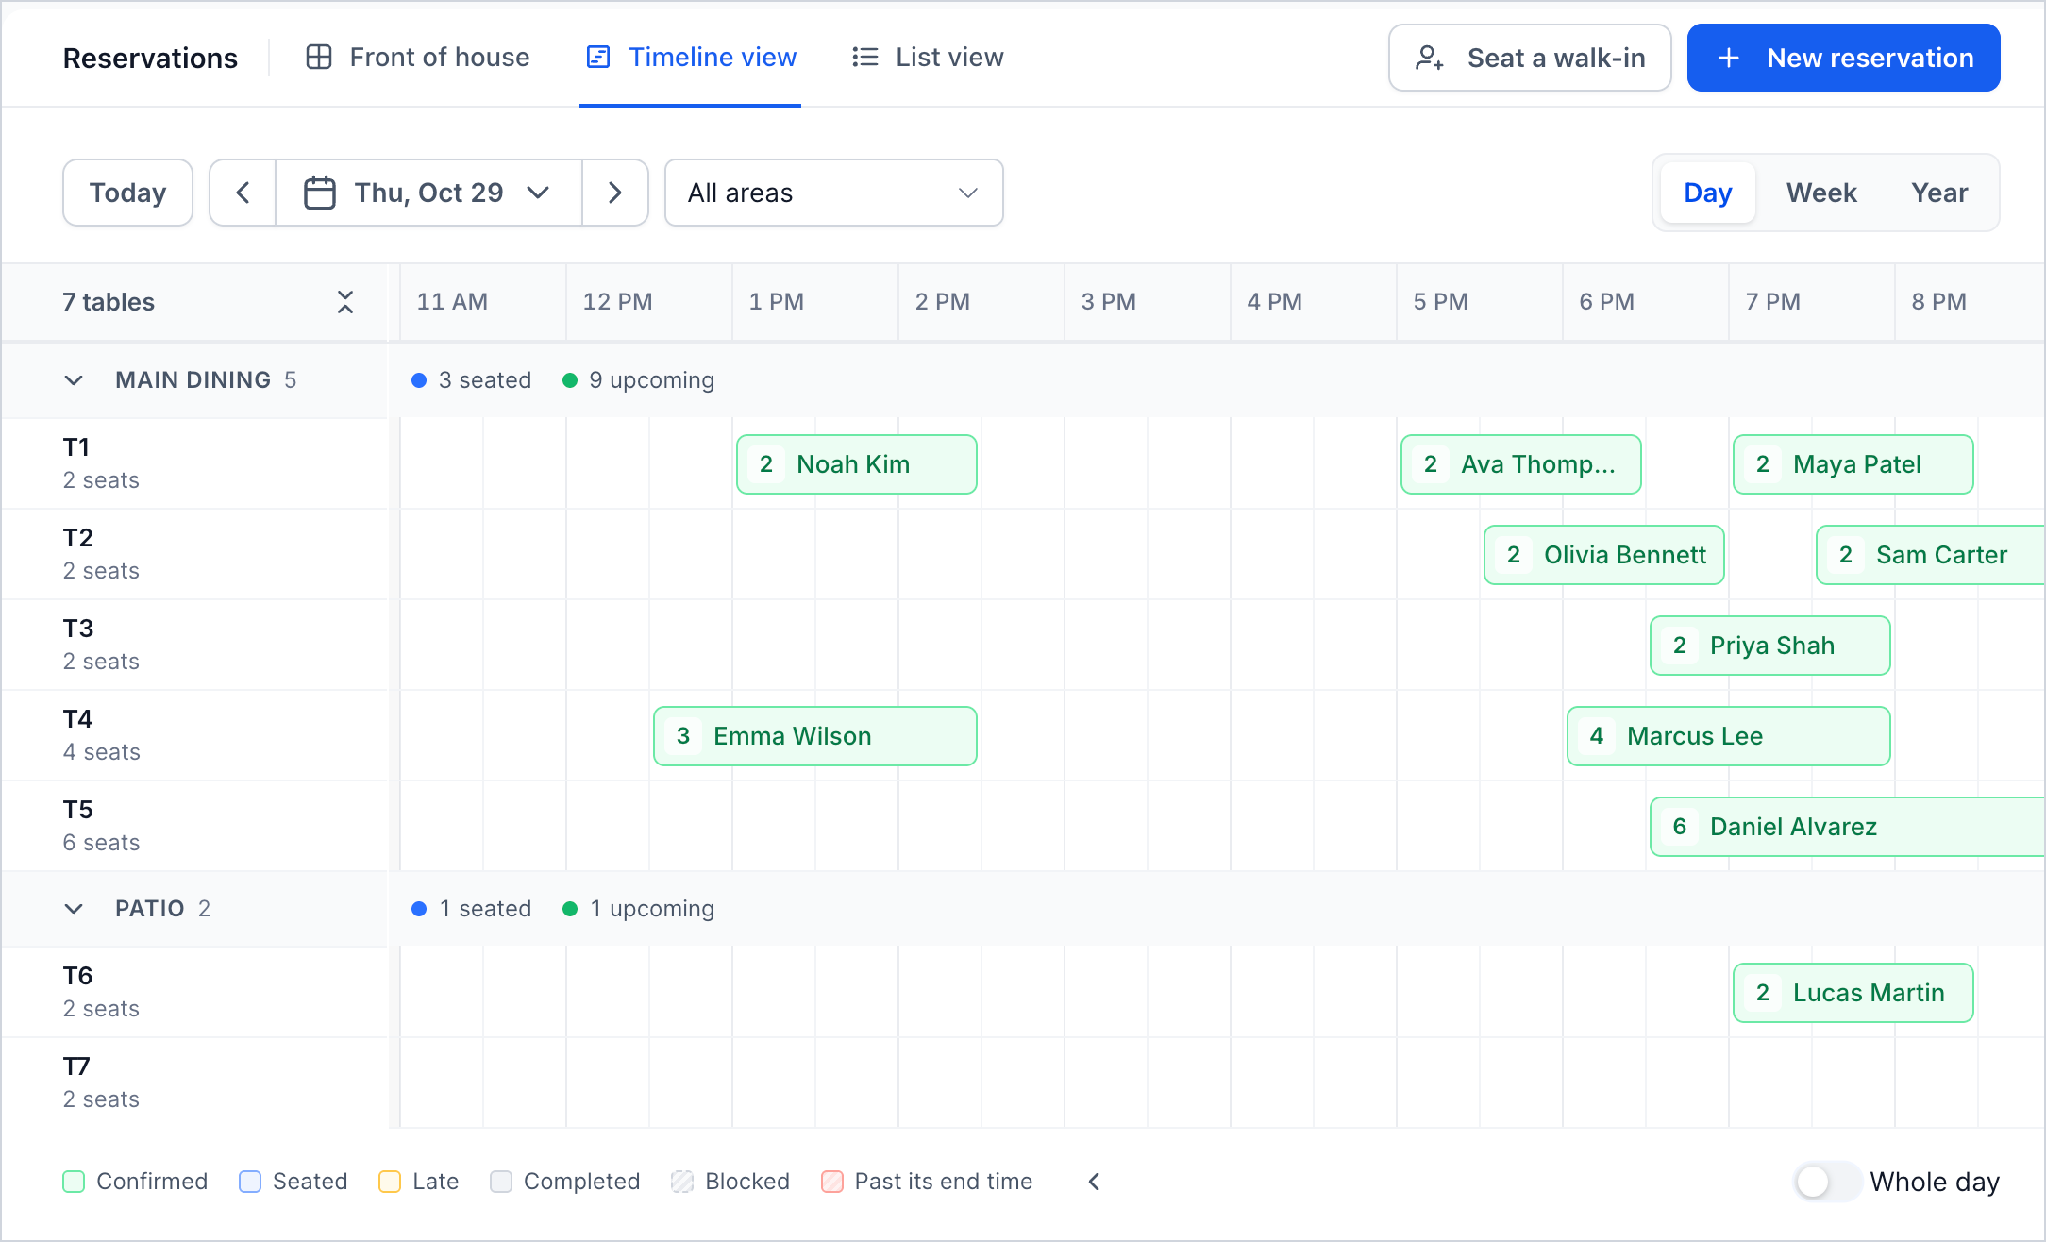
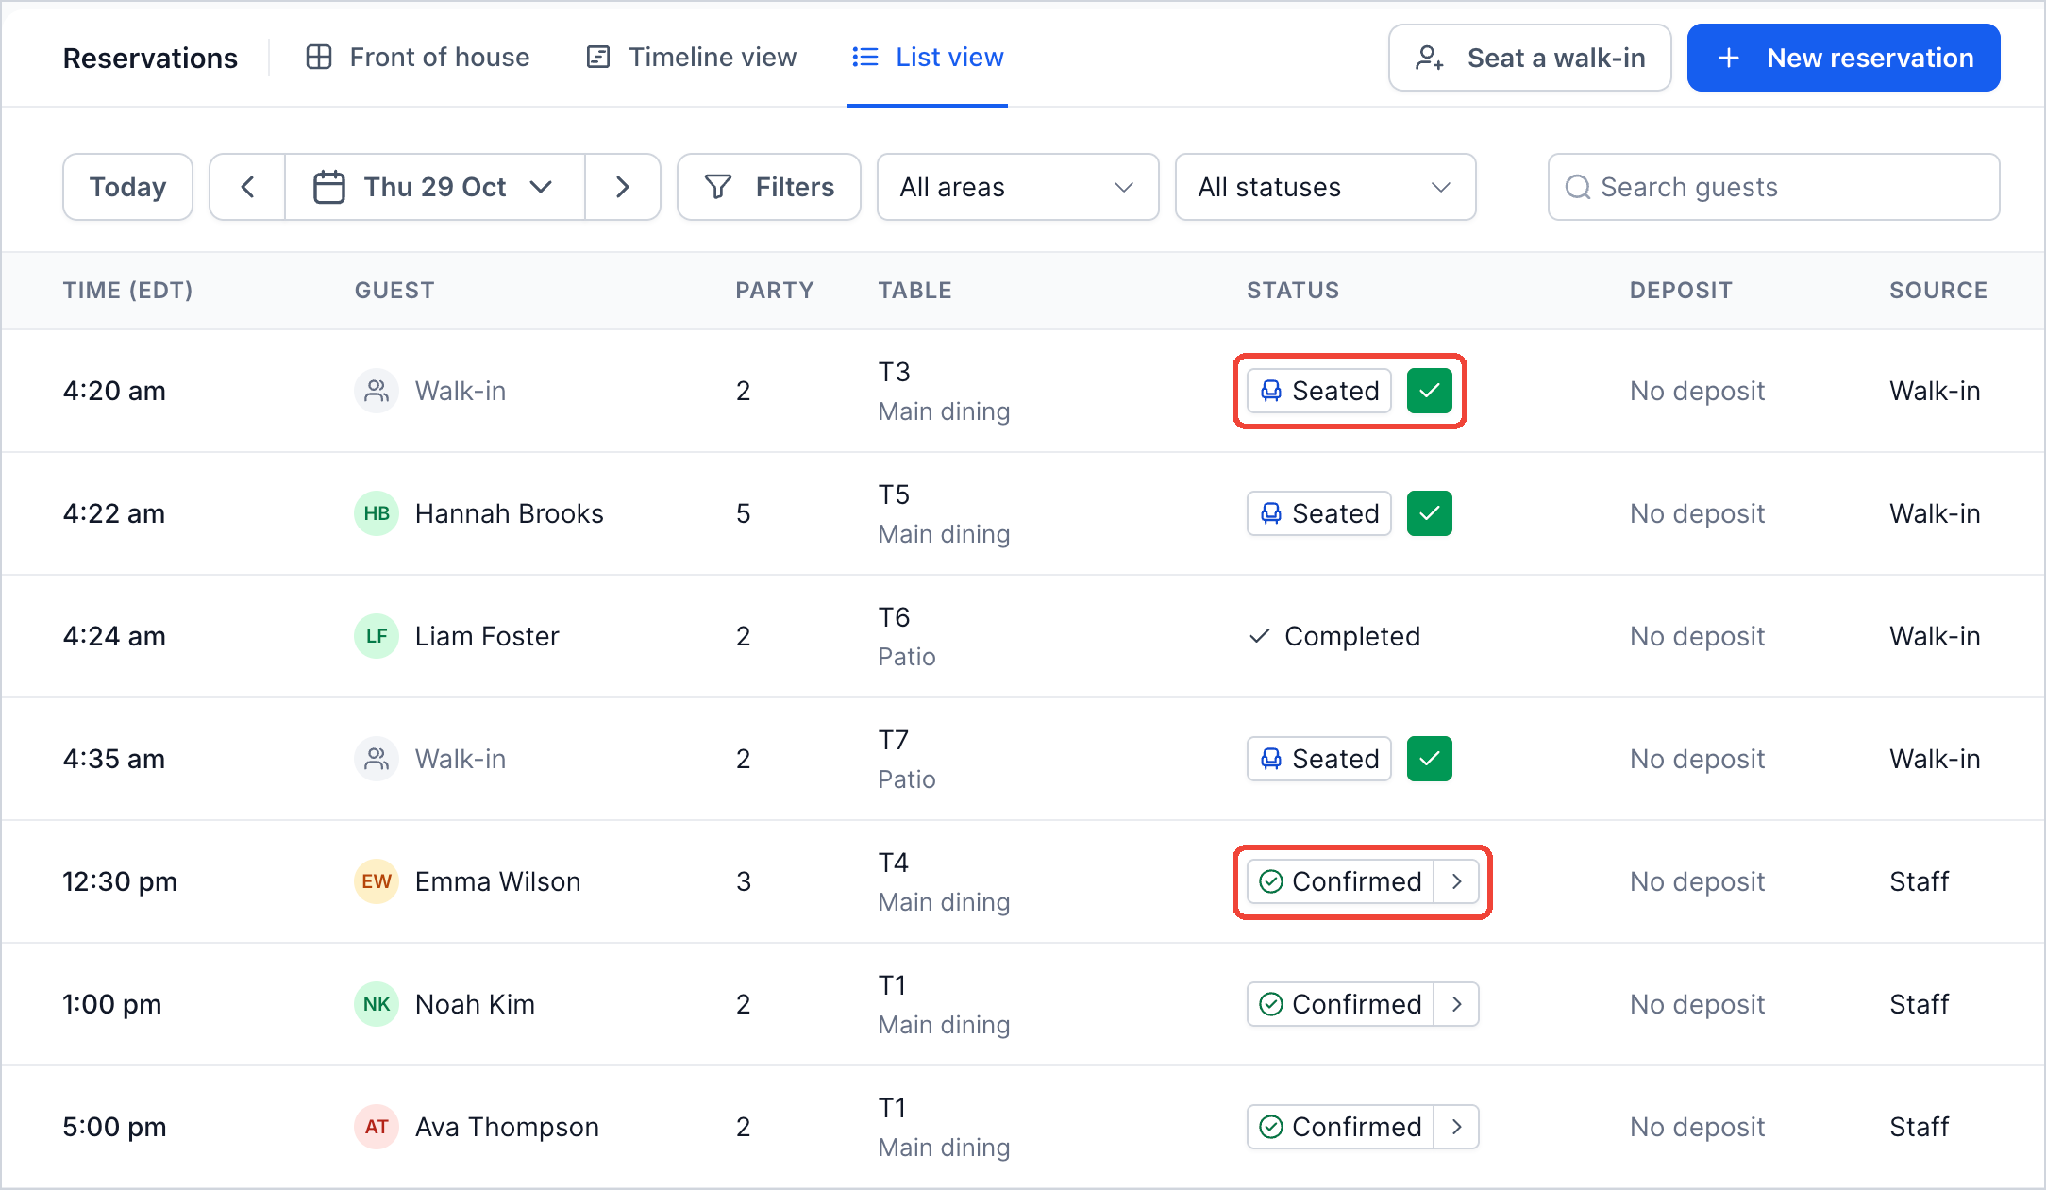
Reservations lives inside the HighLevel platform under Restaurants > Reservations. It presents three visual modes: Front of house shows an interactive floor map, Timeline arranges bookings across time slots, and List offers a searchable table of reservations. Each reservation record stores the guest’s details, order history, payments, and activity timestamps.
Team members create new bookings, seat walk ins, edit or move existing reservations, and close tables once payment is recorded. All changes appear in the reservation’s activity log, providing a single source of truth for the dining experience.
The feature integrates with the restaurant website, allowing guests to book online once the site is published. Notification settings in Restaurant Settings control the emails and texts sent for confirmations, reminders, and cancellations.
03How businesses use restaurant reservations
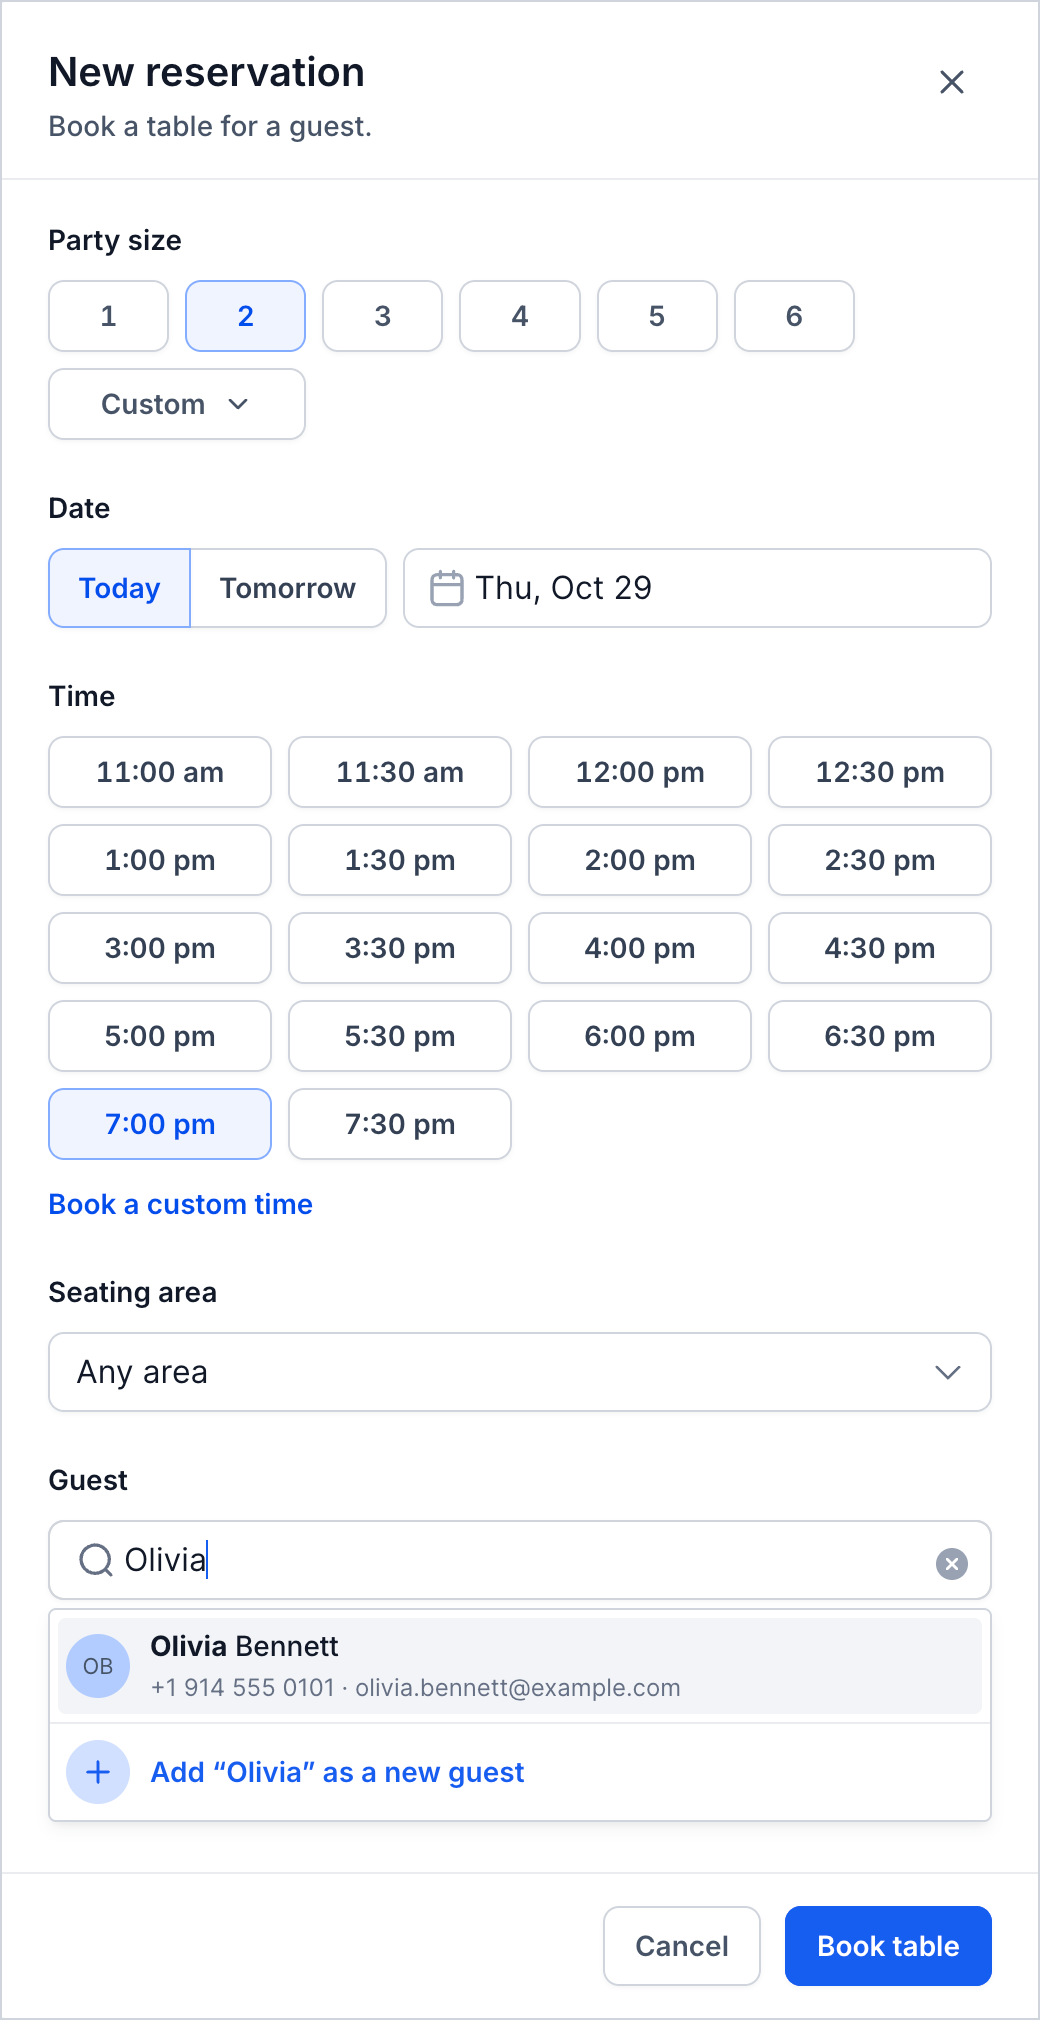
- Family restaurant. The staff can quickly book a table for a family of four by selecting the party size, date, and time. HighLevel automatically suggests a suitable table, and the team can add any special requests such as a high chair before confirming.
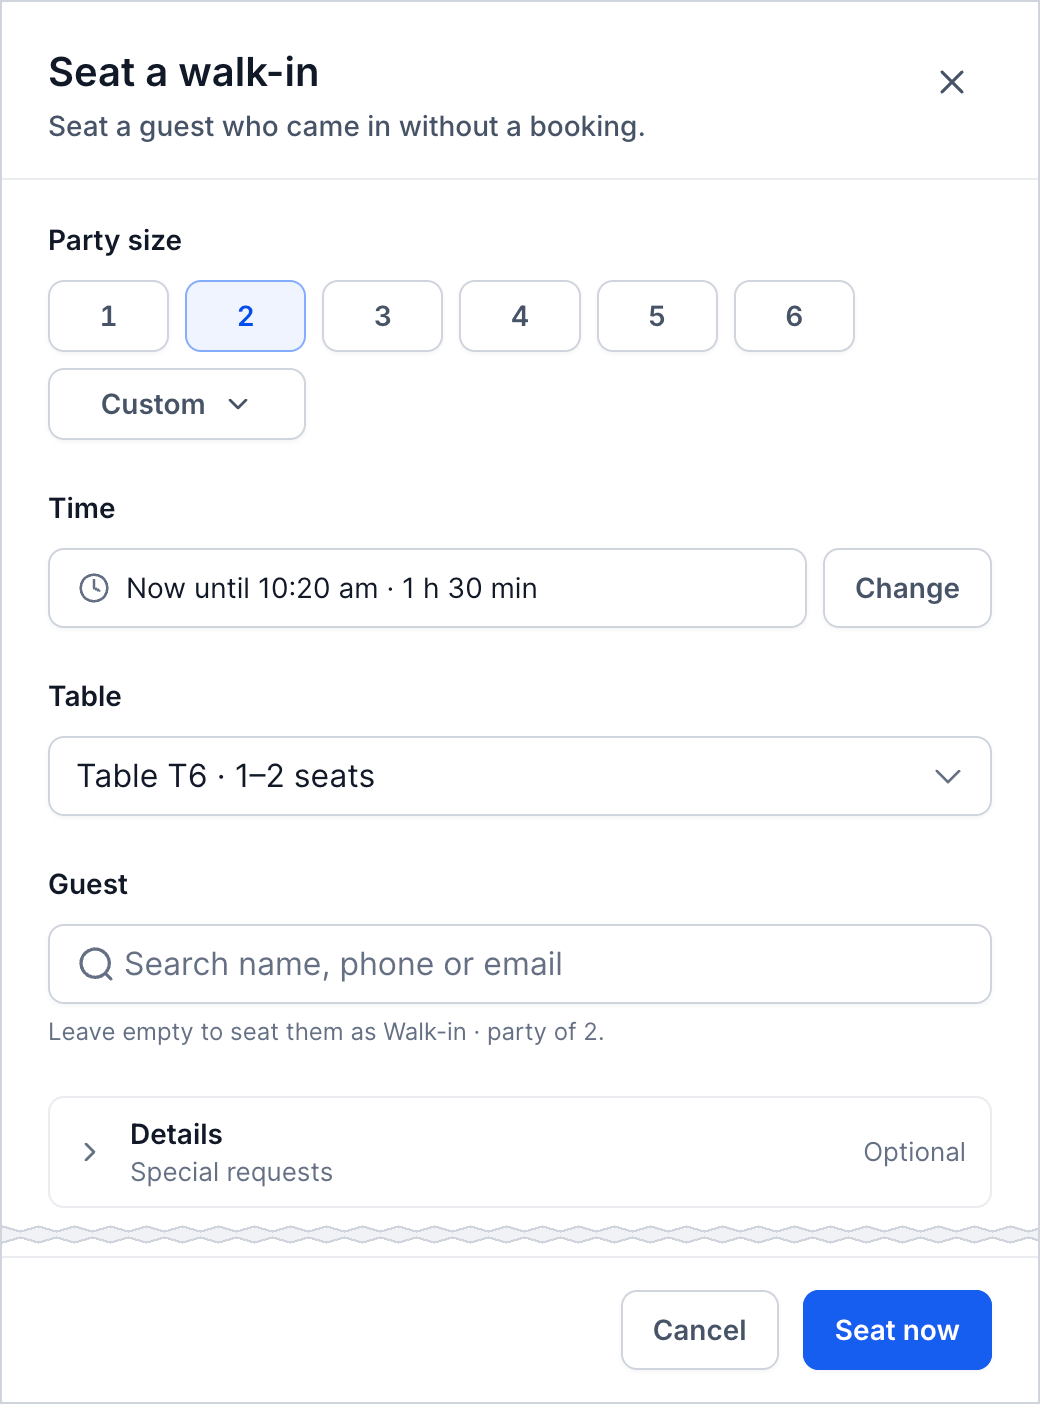
- Coffee shop with walk ins. When a patron arrives without a reservation, an employee clicks Seat a walk in, selects the party size, and lets the system choose an available seat. The guest can be seated immediately, and the table status updates in Front of house.
- Fine dining venue. After guests are seated, servers add rounds of menu items from the restaurant menu, send each round to the kitchen, and later capture payment through the reservation. The entire dining session stays linked to a single booking record.
04The numbers and rules that matter
- Party size: 1 to 6, or Custom for larger parties.
- Table status indicators: Available, Reserved soon, Seated, Left open, Out of service.
- Online booking respects reservation hours, maximum party size, seating areas, table durations and deposit settings.
05Before you start
- Create a floor layout with each area and table defined in the restaurant setup.
- Add a complete menu so orders can be taken from reservations.
- Publish the restaurant website if you want guests to book online.
06How to set up and use restaurant reservations in HighLevel
Book a table for a guest
- Select New reservation from the Reservations screen.
- Pick the party size between 1 and 6, or choose Custom for larger groups.
- Choose Today, Tomorrow, or a specific date for the reservation.
- Select an open time slot; if no table is free, you will see a notice and can try another day or Book a custom time.
- Optionally set a specific seating area, otherwise leave as Any area.
- Search for the guest by name, phone, or email; add a new guest if needed by entering a first name and contact information.
- Enter any special requests such as allergies or seating preferences.
- Click Book table to have HighLevel assign a suitable table.
Seat a walk in guest
- Click Seat a walk in on the Reservations page.
- Enter the party size of the arriving guests.
- Review the displayed time range, which shows how long the table will be held; click Change to adjust if needed.
- Confirm the automatically chosen table, or pick a different one from the list.
- Optionally search for an existing guest or leave the Guest field blank to seat as a walk in.
- Press Seat now to mark the table as seated in Front of house.
Edit a reservation
- Open the existing reservation or click an occupied table to view its details.
- In the Overview tab, select Edit booking.
- Modify any of the fields: party size, date, time, seating area, guest, or special requests.
- Click Save changes to update the reservation.
Move a reservation
- Open the reservation you wish to relocate.
- Click Move table within the Overview section.
- Choose another table from the list of tables that fit the party size.
- Confirm the change by clicking Move to.
Cancel a reservation
- Open the reservation to cancel.
- Click the three dot menu in the top right corner of the booking window.
- Select Cancel reservation from the dropdown.
- Enter a reason for the cancellation in the prompt.
- Confirm the cancellation; the table becomes available again.
Take a dine in order
- Open the seated booking and navigate to the Order tab.
- Click Add round to bring up the menu.
- Select each menu item; for items with options, choose the desired add ons, add any kitchen note, set the quantity, and click Add to round.
- When the round is complete, click Send to kitchen to push the order to Restaurant Orders.
Take payment and close the table
- In the booking, click Take payment.
- Verify the Amount due and select a tip option, or choose Custom to enter a different tip.
- Search for the guest or create a new guest record with a phone number or email, as a guest is required for payment.
- Choose Charge a card for a full card transaction, or select Record manually to enter cash, cheque, bank transfer, or other payment types.
- If splitting the bill, pick Record manually, lower the Amount to the portion the guest pays, and process that payment; repeat for remaining portions.
- Click Charge or Record; once the full amount is paid, the reservation status changes to Completed, the table closes, and the order moves to the Completed tab.
07What it looks like in HighLevel
08Settings that matter
- Reservation hours. Defines the daily time range during which guests can be booked.
- Maximum online party size. Limits the largest group that can book through the restaurant website.
- Customer notifications. Controls email and text messages sent for reservation confirmations, reminders, and cancellation alerts.
09Things to know before you rely on it
- Party size is limited to 1 to 6 by default; larger groups require selecting Custom.
- A table will only appear for moving a reservation if it meets the party size, is active, and is not restricted by minimum party settings.
- Online booking options follow the reservation hours, party size limit, seating area rules, table duration, and any deposit requirements set in Restaurant Settings.
- Walk in guests can be seated without contact details, but a guest record must exist before processing payment.
10How it connects to the rest of HighLevel
- Set up your restaurant floor plan and tables before using Reservations. Restaurant workspace guide
- Configure reservation hours, party size limits, and notification templates. Restaurant Settings
- Publish the restaurant website to enable guest initiated online bookings. Restaurant website guide
Michael's take

Most people think the reservation system is just an online calendar, then they try to juggle separate apps for seating, orders and payments. The result is missed tables, double bookings and a chaotic floor. Instead I would treat Reservations as the single command center for the dining room. Set up the floor layout first, load the menu, then let the team book, seat, order and collect payment all from the same screen. That keeps the guest experience smooth and the staff workflow tidy.
A few test bookings reveal any hidden gaps before the front door opens.