
01Who this is for
- Support teams, they can route common visitor requests right away without typing.
- Sales groups, they can qualify leads through button selections and assign follow up tasks.
- Ecommerce owners, they can let shoppers choose order related actions like tracking or refunds.
02Live Chat Interactive Messenger, explained
The action lives inside the Workflow Builder. When a visitor sends a message that matches a Customer Replied trigger, the platform posts an interactive card to the chat. The card may contain a custom message, an optional image, and up to five buttons.
Each button either continues the workflow through its own branch or opens an HTTPS web page. If the visitor does not click a button within the defined waiting period, a separate Timeout branch runs. The visitor’s selection is highlighted in the chat and appears in the Conversations view for the team.
All settings for the card, text, image, button labels, click behavior and timeout, are edited directly on the Live chat interactive messenger action inside the workflow canvas.
03How businesses use Live Chat Interactive Messenger
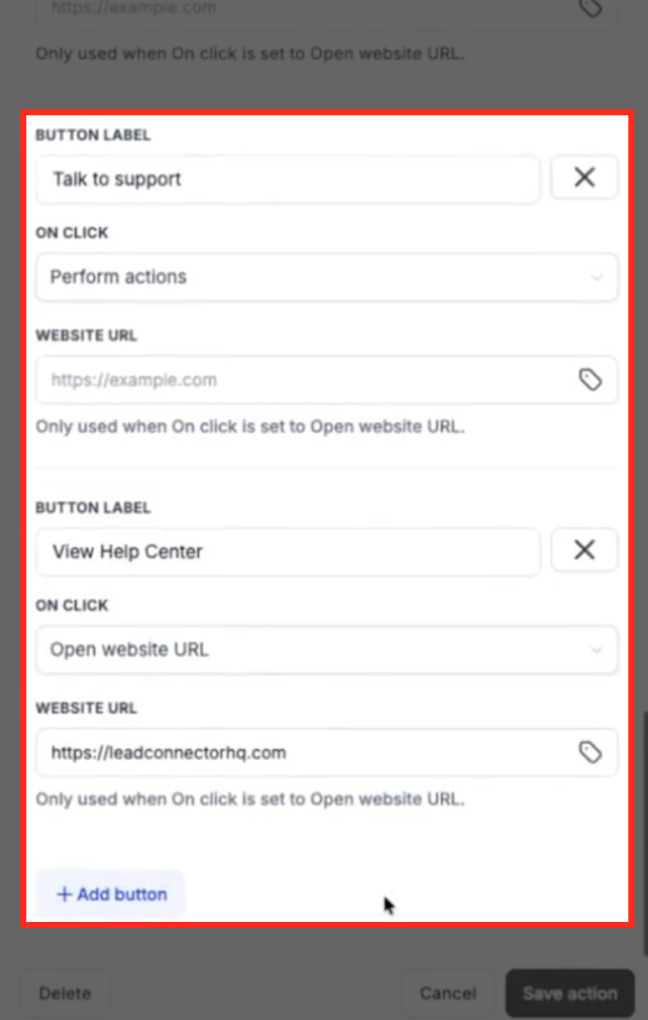
- Support desk. Create buttons such as "Talk to support" or "View Help Center". When a visitor picks a button, the workflow routes the contact to the appropriate support branch or opens a help page. The team can see the selected option in Conversations before responding.
- Online retail store. Add buttons like "Track my order" and "Return / Refund" that trigger distinct workflow branches. Each branch can send a follow up message, apply a tag, or assign the contact to a specialist. Link buttons can direct shoppers to an external FAQ page.
- Lead generation site. Use buttons such as "Speak with sales" or "Schedule demo" that start separate branches. The branches can schedule appointments, send qualification questions, or assign the lead to a sales rep. A timeout branch can follow up if the visitor does not answer.
04The numbers and rules that matter
- Maximum buttons: Each interactive card supports up to five buttons.
- Optional images: Supported formats are JPG, PNG, and WEBP.
05Before you start
- A Live Chat or All in One Chat widget must be configured and installed on the website.
- Access to the Subaccount’s Chat Widget and Workflow Builder areas is required.
- A Customer Replied trigger must exist for the widget you intend to use.
- An HTTPS destination URL is needed for any button that opens a website.
06How to set up and use Live Chat Interactive Messenger in HighLevel
Configure from the Chat Widget Builder
- In the Subaccount view, choose Sites from the left menu.
- Select Chat Widget.
- Open the existing Live Chat or All in One Chat widget you wish to edit.
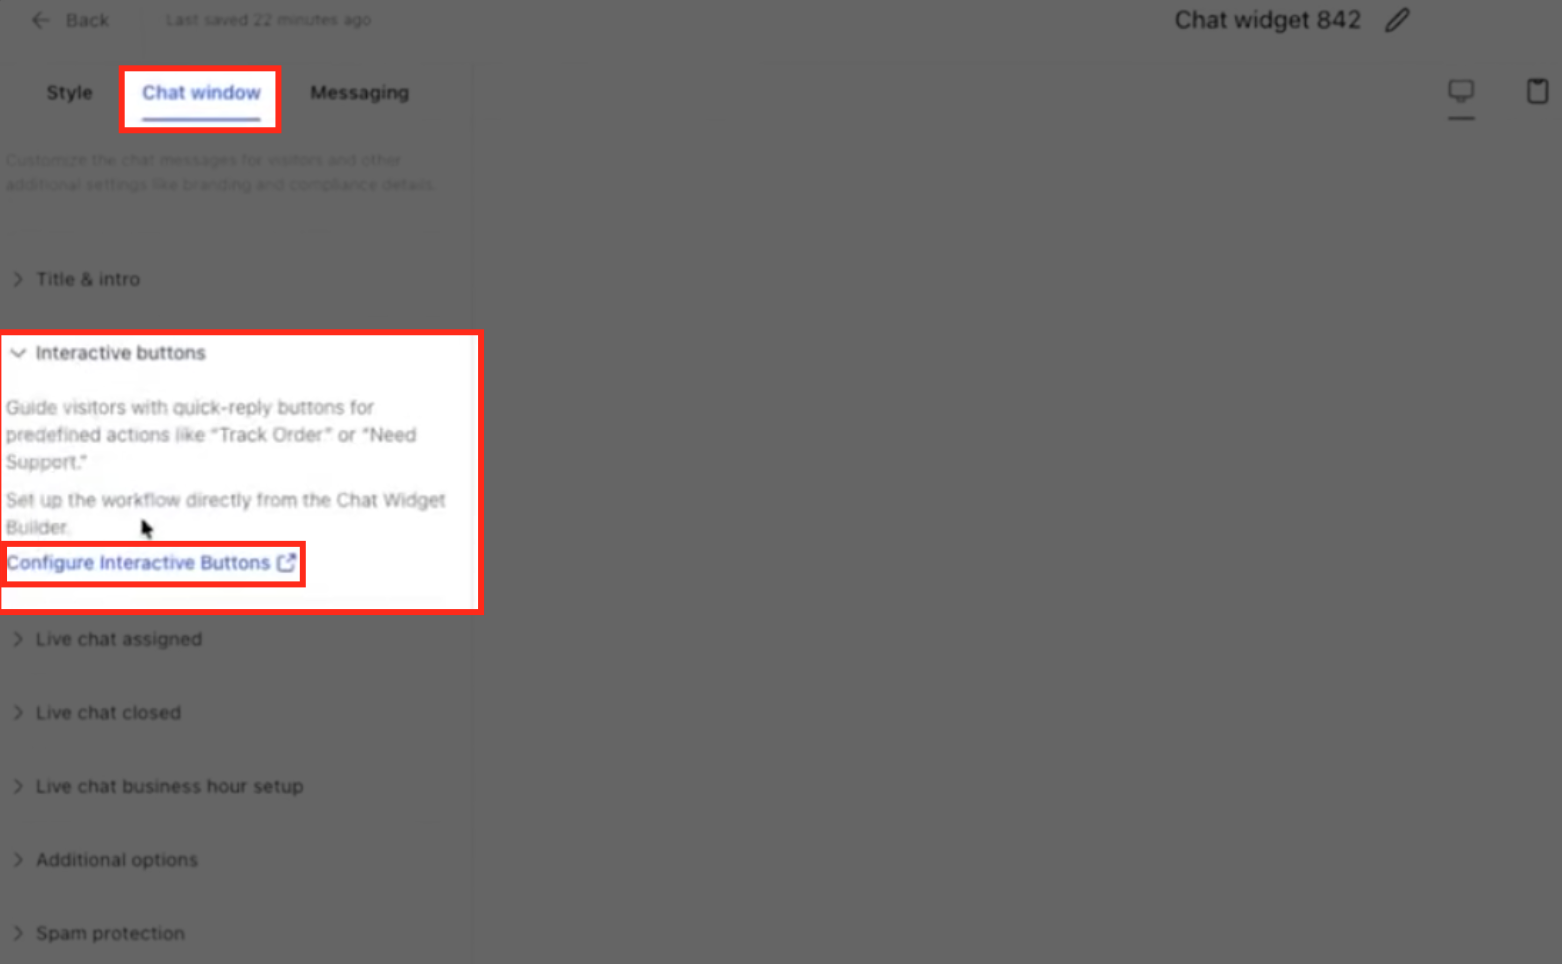
- Within the widget builder, go to the Chat window tab.
- Expand the Interactive buttons section.
- Click the Configure Interactive Buttons button.
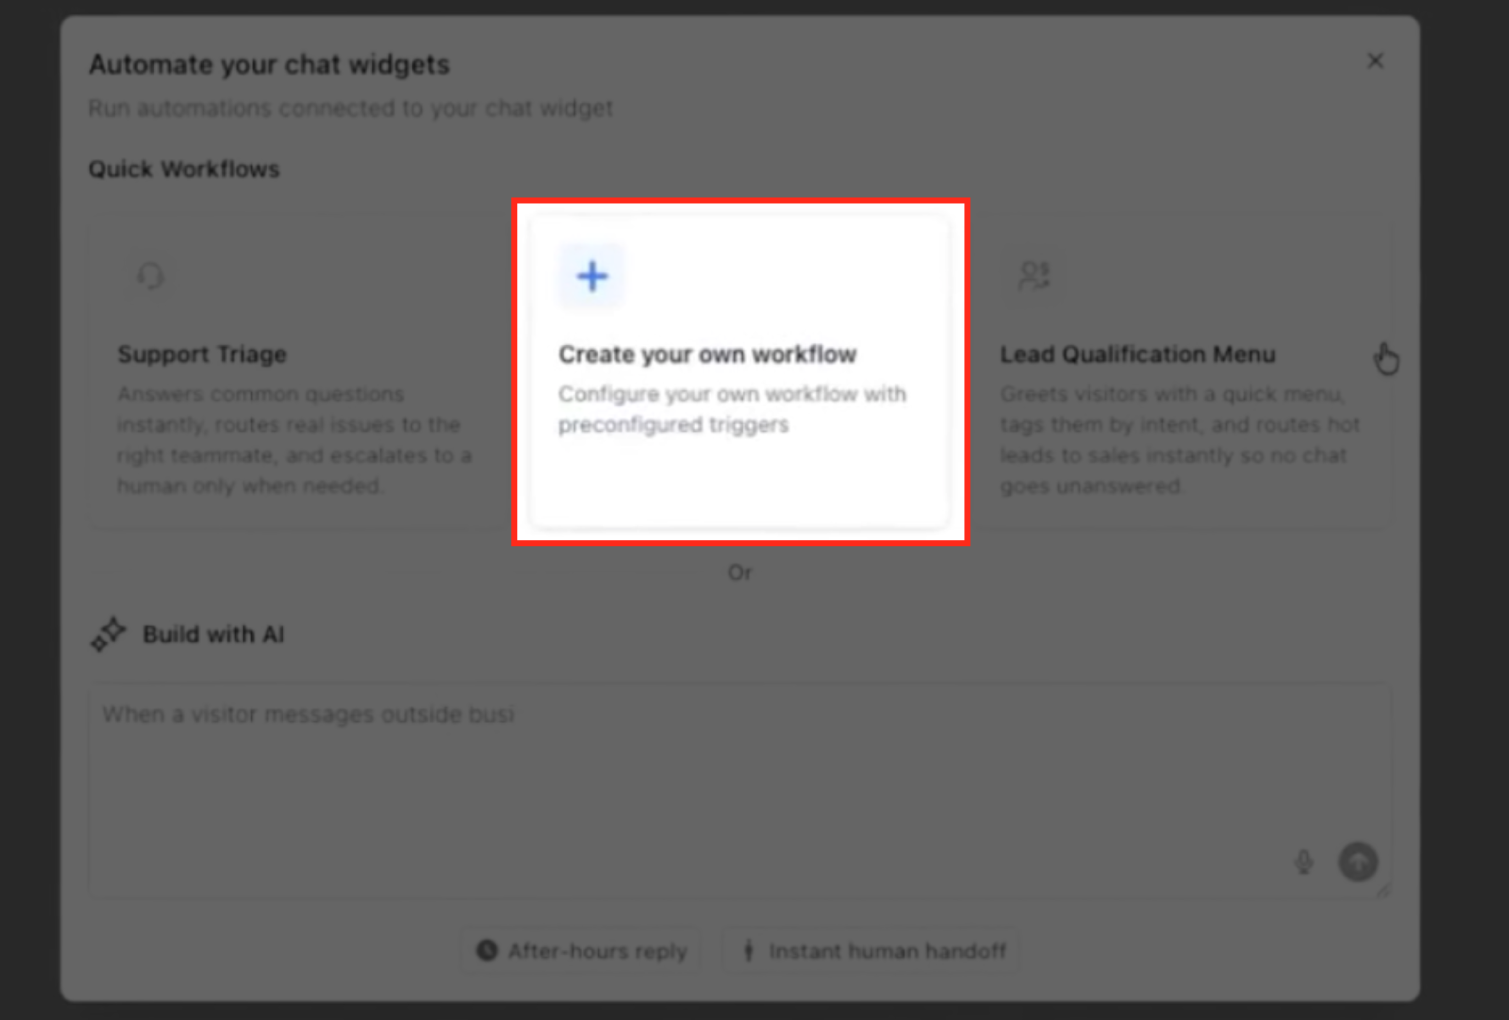
- In the Automate your chat widgets window, pick Create your own workflow.
- Select Create your own workflow to open a workflow linked to the widget.
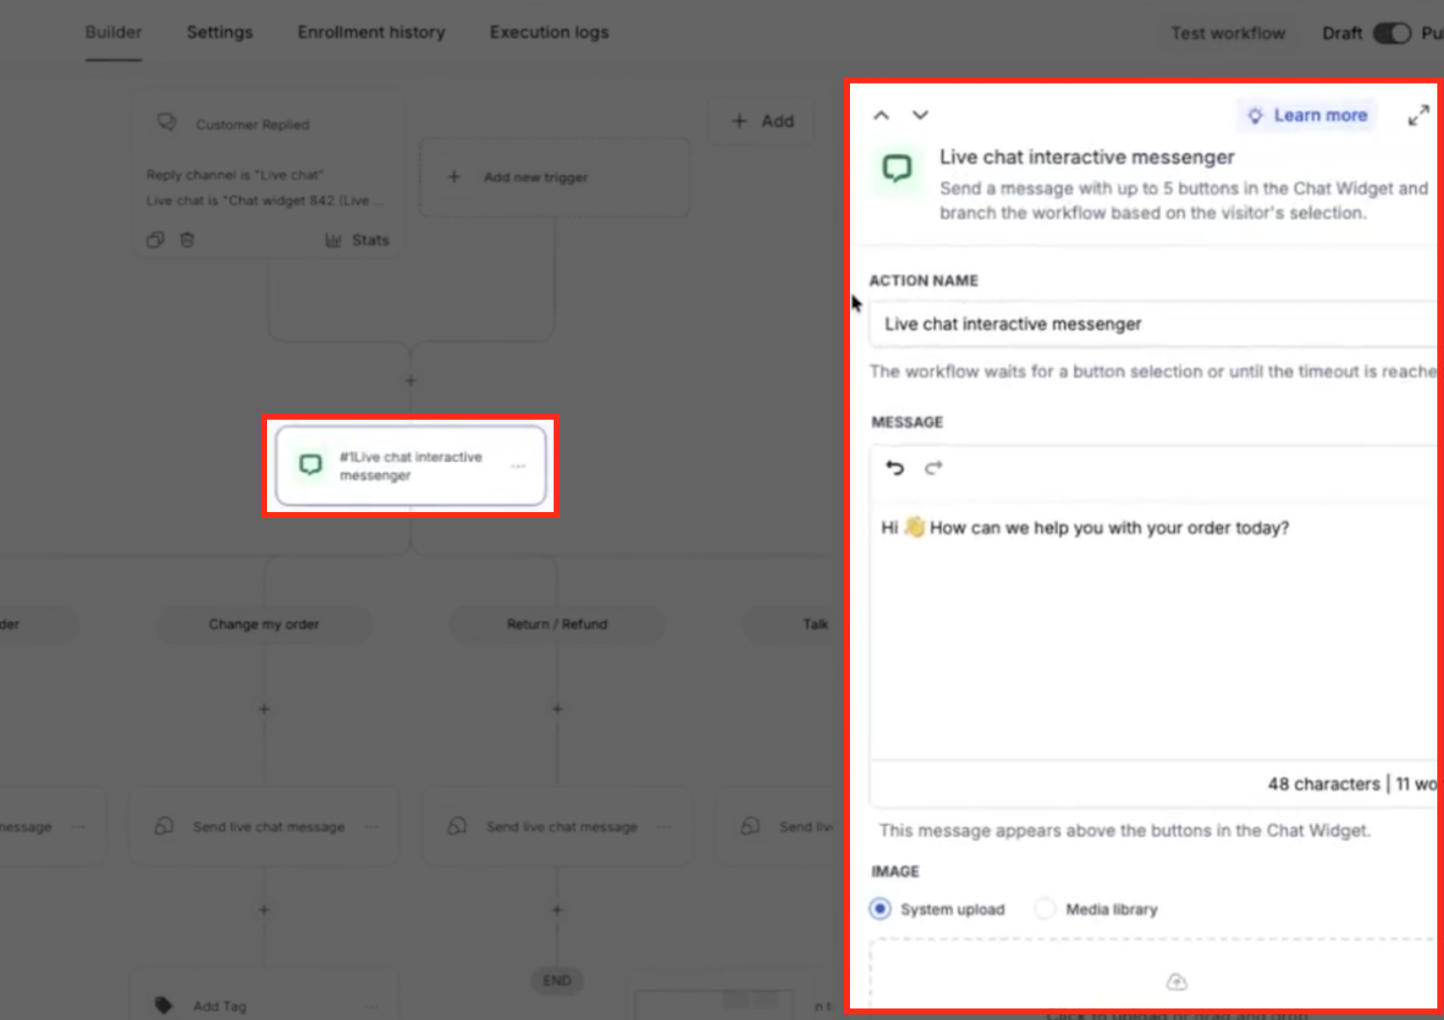
- In the Workflow Builder, locate the pre added Customer Replied trigger and Live chat interactive messenger action.
- Open that action to set up the message, image, and buttons.
Configure from the Workflow Builder
- Navigate to Automation > Workflows from the Subaccount view.
- Click Create Workflow or open an existing workflow.
- Add a new trigger and choose Customer Replied.
- Name the trigger and click + Add Filters.
- Set filters to target the correct widget by Reply Channel and widget selection.
- Save the trigger.
- Add the Live chat interactive messenger action on the canvas and open it to configure.
Configure the Message, Image, and Buttons
- Open the desired workflow in Automation > Workflows.
- Click the Live chat interactive messenger action to open its settings.
- Enter the greeting or question in the MESSAGE field.
- Optionally add an image by selecting System upload or Media library under IMAGE.
- Fill in the BUTTON LABEL for the first button.
- Choose the ON CLICK behavior, Perform actions or Open website URL, and provide a URL if needed.
- Add more buttons by clicking + Add button and repeat the label and ON CLICK setup for each.
- Save the action.
Configure Button Branches and Timeout
- Open the Live chat interactive messenger action in the workflow and set the response timeout period, then save.
- On the canvas, locate a button branch and click the + icon beneath it.
- Add the desired follow up action (send message, add tag, assign user) to that branch and save.
- Repeat the previous two steps for every additional button branch.
- Click the + icon under the Timeout branch, add its fallback action, and save.
- Review all branches to confirm correct routing before publishing.
Publish and Test the Workflow
- In Automation > Workflows, verify the trigger, interactive messenger action, and button branches, then set the workflow to Publish.
- Visit the site where the chat widget is installed and open the chat window.
- Send a test message such as "Hello" to fire the workflow.
- Confirm the interactive card appears with the configured message, image, and buttons.
- Click a workflow button and ensure it highlights, other workflow buttons disable, and the branch runs.
- Click a link button to verify it opens the HTTPS page, and run a test without selecting any button to check the Timeout branch executes.
- Return to the Subaccount, open Conversations, locate the test chat in the Team inbox, and view the recorded button selection.
07What it looks like in HighLevel
08Settings that matter
- ACTION NAME. Renames the interactive messenger action for easier identification in the workflow.
- MESSAGE. The text displayed to the visitor on the interactive card.
- IMAGE. An optional picture (JPG, PNG, WEBP) that appears with the message.
- BUTTON LABEL. The text shown on each interactive button.
- ON CLICK. Determines whether the button runs workflow actions or opens an HTTPS URL.
- WEBSITE URL. The HTTPS address opened when a button is set to open a website.
- Timeout period. How long the workflow waits for a visitor to click a button before following the Timeout branch.
09Things to know before you rely on it
- A maximum of five buttons can be added to a single interactive card.
- Images may be JPG, PNG, or WEBP and must be uploaded from the system or chosen from the Media library.
- Each button that performs actions creates its own workflow branch on the canvas.
- Only the first workflow button a visitor selects is processed; subsequent buttons become unavailable.
- Link buttons remain clickable even after a workflow button is chosen.
- The Timeout branch runs only when no button is selected within the configured waiting period.
- The interactive card appears only after a visitor message triggers the Customer Replied workflow.
- The button selection timeout is separate from the Chat Widget’s general inactivity or chat closure settings.
10How it connects to the rest of HighLevel
- Set up a chat widget on your website to enable Live Chat interactions. Chat widget setup
- Customize the chat widget appearance and add video avatars for a richer experience. Widget customization
- Install the widget and automate chat assignment rules for efficient routing. Live chat automation
Michael's take

Live Chat Interactive Messenger feels like a modest convenience that can quickly reduce back and forth typing for routine questions. It’s especially handy for businesses that get a lot of repeat requests, like order status checks or simple support routing.
A small ecommerce shop could set up buttons for "Track my order" and "Return / Refund" so shoppers get an instant path to the right workflow. I would first test the button flow on a staging site to make sure the timeout and branch actions line up before pushing it live.