
01Who this is for
- Founders of consulting firms who need dedicated preparation time before client calls.
- Service based small businesses that travel between appointments and require transition periods.
- Clinic managers who want to allocate documentation time after patient visits.
02Pre and post buffers, explained
Pre and post buffer settings add reserved minutes immediately before or after a booked appointment. The platform includes those minutes when it calculates which slots are open for new bookings. The buffers are set per calendar and do not change the length of the actual appointment.
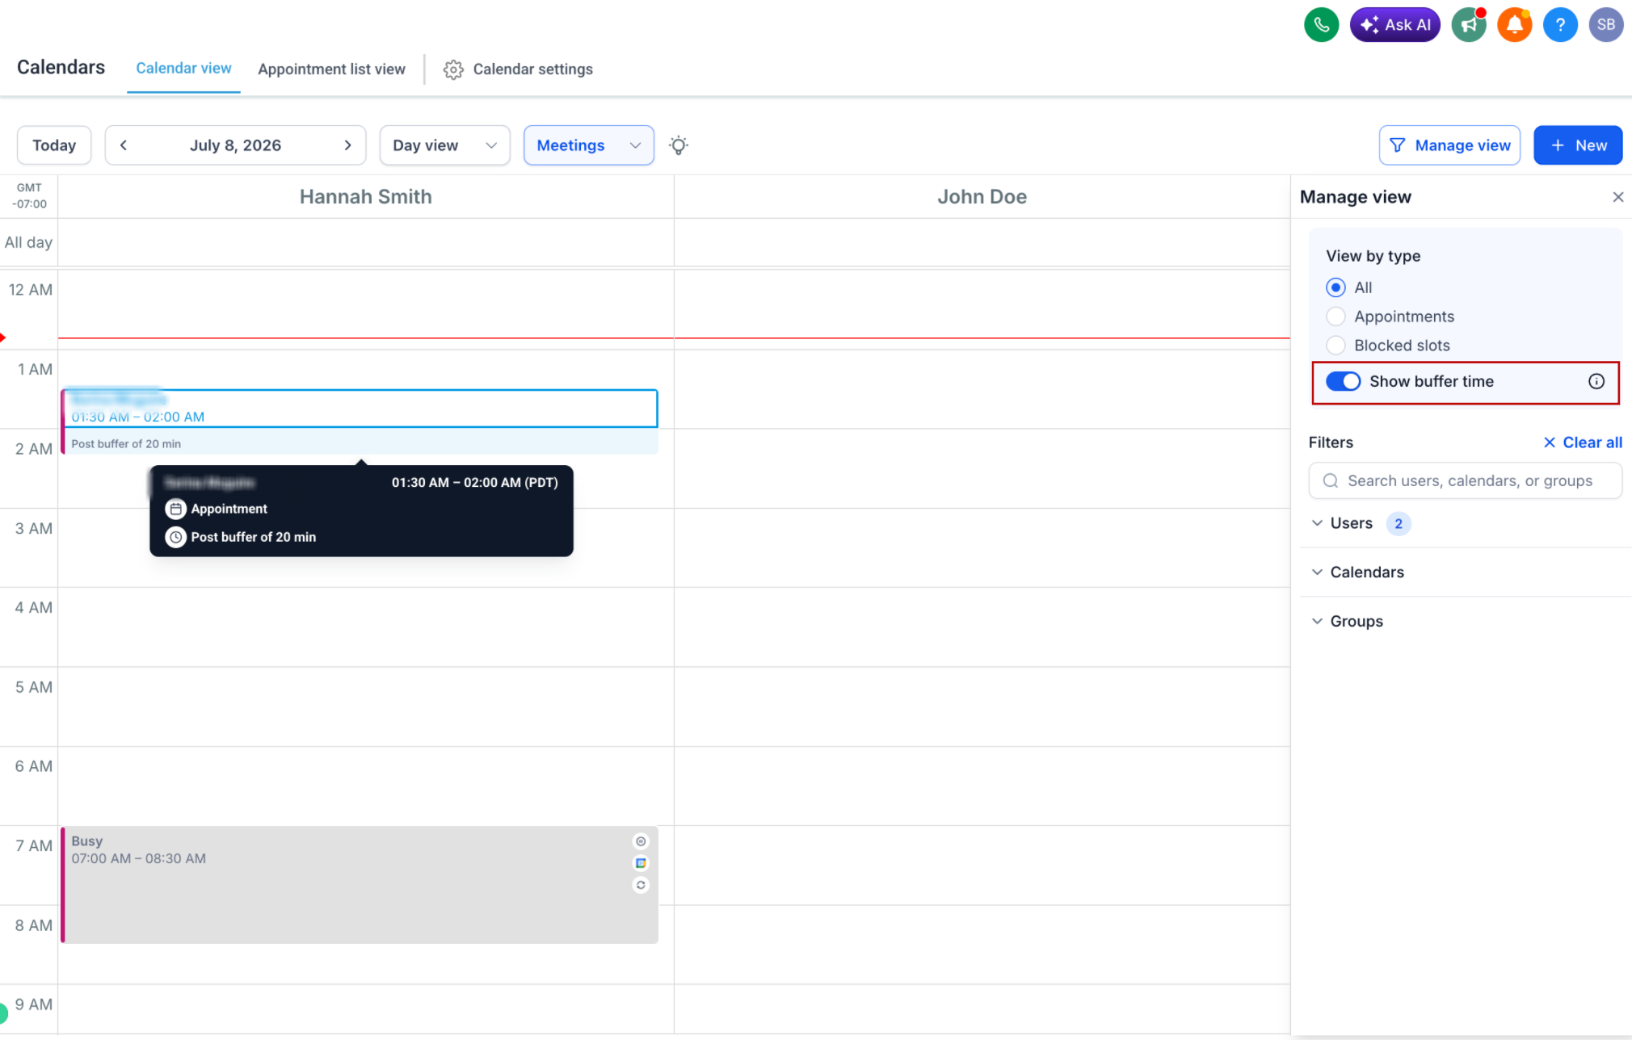
When the Show buffer time option is turned on, the calendar view displays the reserved periods as separate blocks in Day and Week layouts. These visual blocks help users see why certain times are unavailable without opening the calendar settings. Hiding the blocks does not free the time; the underlying buffer remains active.
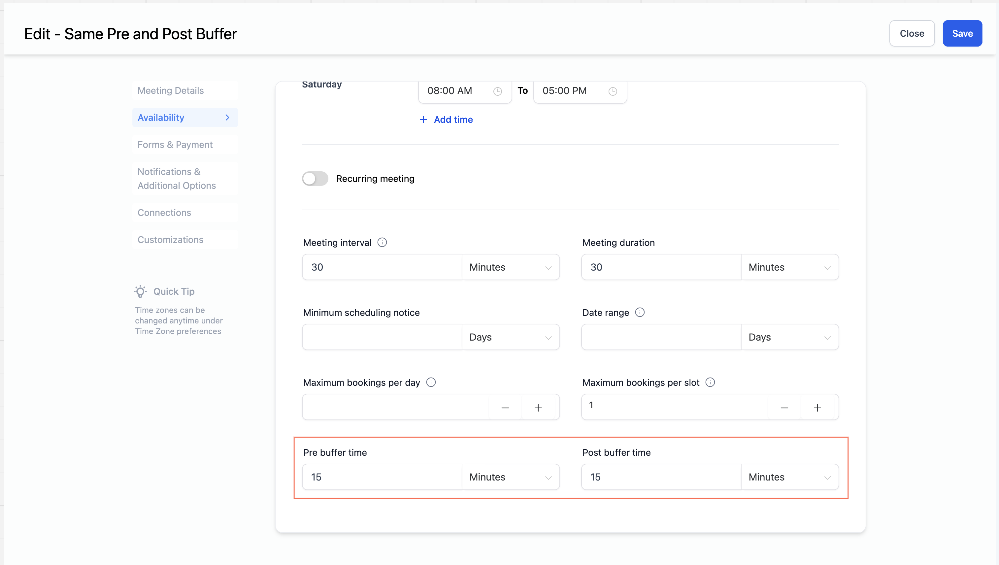
The buffer configuration lives inside each calendar’s Availability settings. The feature can be accessed from the Calendars section of the platform.
03How businesses use pre and post buffers
- Consulting firm. The firm adds a pre buffer to each client meeting to allow research and setup. After configuring the buffer in the calendar’s Availability settings, the team can see the reserved time as a block in the Week view, ensuring no other meetings are scheduled too close.
- Home repair service. Technicians set a post buffer after each service visit to cover travel to the next location. By enabling Show buffer time, the schedule shows these transition blocks, helping dispatchers plan routes without overlapping appointments.
- Healthcare clinic. The clinic configures a post buffer for each patient appointment to allow charting and paperwork. Staff view the buffer blocks in the Day calendar, making it clear when rooms are occupied for administrative work.
04The numbers and rules that matter
- Pre buffer time and Post buffer time are set per calendar.
- Setting a buffer to 0 removes it from future availability calculations.
05How to set up and use pre and post buffers in HighLevel
View buffer time in calendar view
- Open the Calendars section.
- Open Calendar view.
- Click Manage view.
- Turn on Show buffer time.
- Use the available Users, Calendars, Groups, or other supported filters to view the relevant schedule.
Set up pre and post buffer time
- Open the Calendars section.
- Open Calendar settings.
- Select the calendar where you want to configure buffer time and click Edit.
- Open the Availability settings.
- Locate Pre buffer time and Post buffer time.
- Set the desired duration for either or both buffer types.
- Save your changes.
Remove buffer time
- Return to the calendar’s Availability settings.
- Set the Pre buffer time or Post buffer time value to 0.
- Save your changes.
06What it looks like in HighLevel
07Settings that matter
- Pre buffer time. Specifies how many minutes to reserve before each appointment.
- Post buffer time. Specifies how many minutes to reserve after each appointment.
- Show buffer time. Controls whether the reserved buffer periods appear as blocks in Day and Week calendar views.
08Things to know before you rely on it
- Buffer blocks appear only in Day and Week calendar views; they are hidden in other views.
- Displaying buffers does not modify appointment lengths or availability calculations.
- Using both pre and post buffers can cause overlapping reservations that make apparently open slots unavailable.
- Buffer settings from a user’s other calendars can affect availability on Round Robin and Collective calendars.
09If something goes wrong
- Buffer time is not visible in the calendar view. Confirm that the calendar is displayed in Day or Week view and that Show buffer time is turned on in Manage view.
10How it connects to the rest of HighLevel
- Adjust calendar availability settings to see how buffers influence open slots. Calendar availability settings
- Learn how to add multiple meeting locations, which can be combined with buffer times for travel planning. Multiple meeting locations
- Explore all calendar and appointment features available in HighLevel. All calendar features
Michael's take

Skipping buffers can leave your team scrambling between back to back meetings, with no room for a quick prep or a few notes afterward.
When you add pre- and postbuffers, you give yourself and your staff transition time, and the Calendar view can show those gaps.