
Home/HighLevel/Guides/Set up Conversation AI
HighLevel Guides · Volume 01 · AI
How to set up Conversation AI in GoHighLevel and let it book the call.
This build puts an AI bot on your inbound messages. It answers the first reply, collects the lead's details, books the appointment on your calendar and hands the thread to a person when it should. By the end you will have one primary bot running on your chosen channels, tested in Suggestive mode and ready for Autopilot. HighLevel is the same platform many people still search for as GoHighLevel.
What you are building
What you are building and what it does.
A lead texts, messages your Facebook page or opens your chat widget. The bot replies within a set wait time, asks for name, email and phone, offers open slots from your booking calendar and books the appointment. If the bot cannot answer or the conversation runs long, it sends a fallback message and escalates to a team member. The whole thing runs on one bot marked as primary, so every general inbound message on those channels lands with it.
- One Conversation AI bot set as primary on SMS, Facebook, Instagram or chat
- Leads get a reply inside your chosen wait time, day or night
- The bot collects name, email and phone before it offers a time
- Appointments land on your HighLevel calendar without a human in the loop
- A message cap, fallback message and AutoEscalation hand the thread to a person
- A test passed in Suggestive mode before the bot runs on Autopilot
Before you start
Before you start have these ready.
Have these ready and the build runs without a stop.
- A HighLevel subaccount with Conversation AI available
- A booking calendar already configured in that subaccount
- A decision on one calendar or multiple calendars for booking
- The channels where the bot will respond (SMS, Facebook, Instagram, WhatsApp, chat widget or Live Chat), connected and working
- A short description of the business, the services and the tone you want
- Conversations AI Provider Support enabled under Settings, then Labs, if you plan to use a Claude or Gemini model
Part 01 of 06
Create the bot and pick its job.
HighLevel gives you three ways to build a bot. For a lead capture bot that books appointments, start a prompt based bot from the Appointment Booking option. It gives you the prompt fields and the calendar options you need later.
- Go to AI Agents, then Conversation AI, and click + Create Bot.
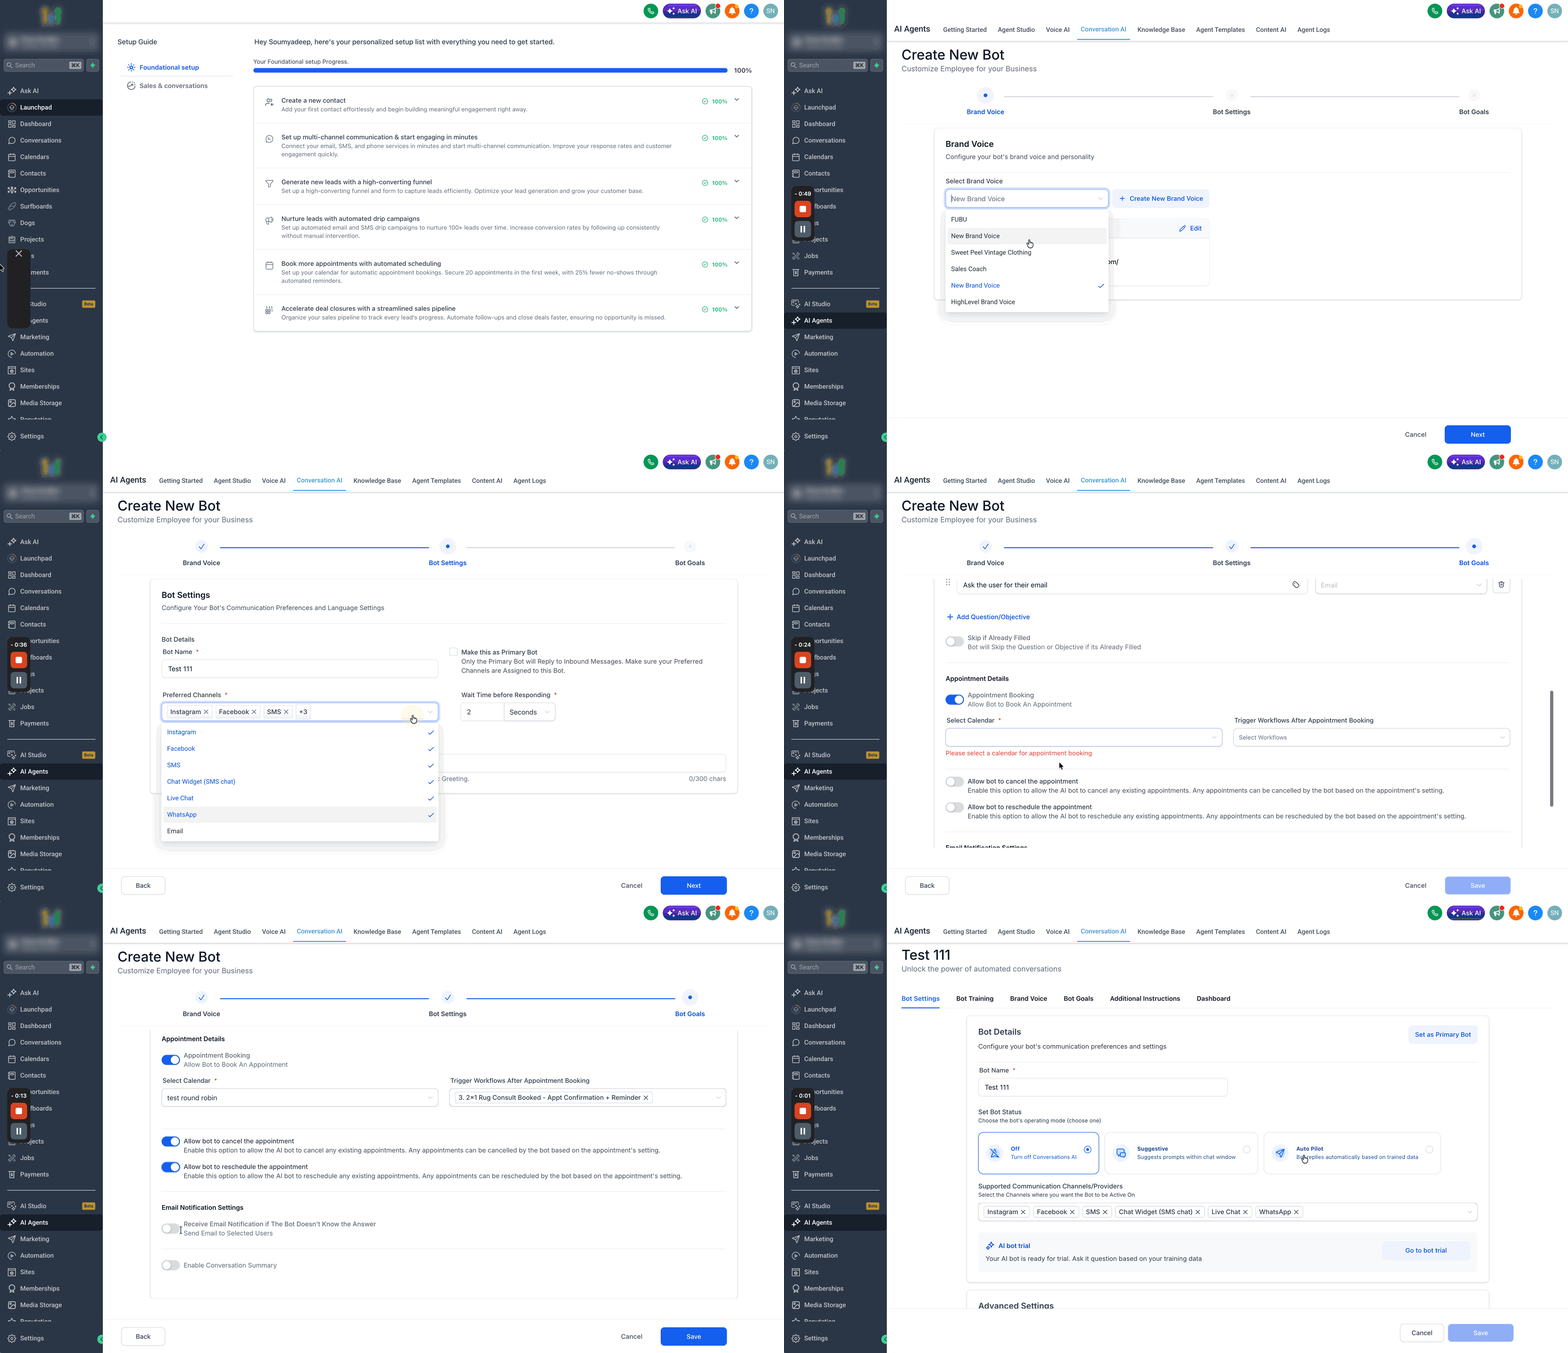
Create Bot offers Guided Form Setup, Prompt Based Bot and Flow Based Builder. - Select Prompt Based Bot.
- Choose Appointment Booking.
- Continue into the bot editor.
- Open Bot Settings and enter the bot name.
- Set the wait time before responding.
- Enter the initial message the bot sends first.
- Save the bot.
Part 02 of 06
Write the instructions so it sounds like you.
The Build tab holds the prompt. Personality sets who the bot is and how it sounds. Goal sets the outcome it chases. Additional Information holds the rules and boundaries. Keep each field clear and do not write the same rule twice.
- Open the Agents List and select your bot.
- Select the Build tab.
- In Personality, write who the bot is, its role and its tone.
- In Goal, state the main outcome: collect the lead's details and book an appointment.
- In Additional Information, add the rules, the services you offer and what to do with questions it cannot answer.
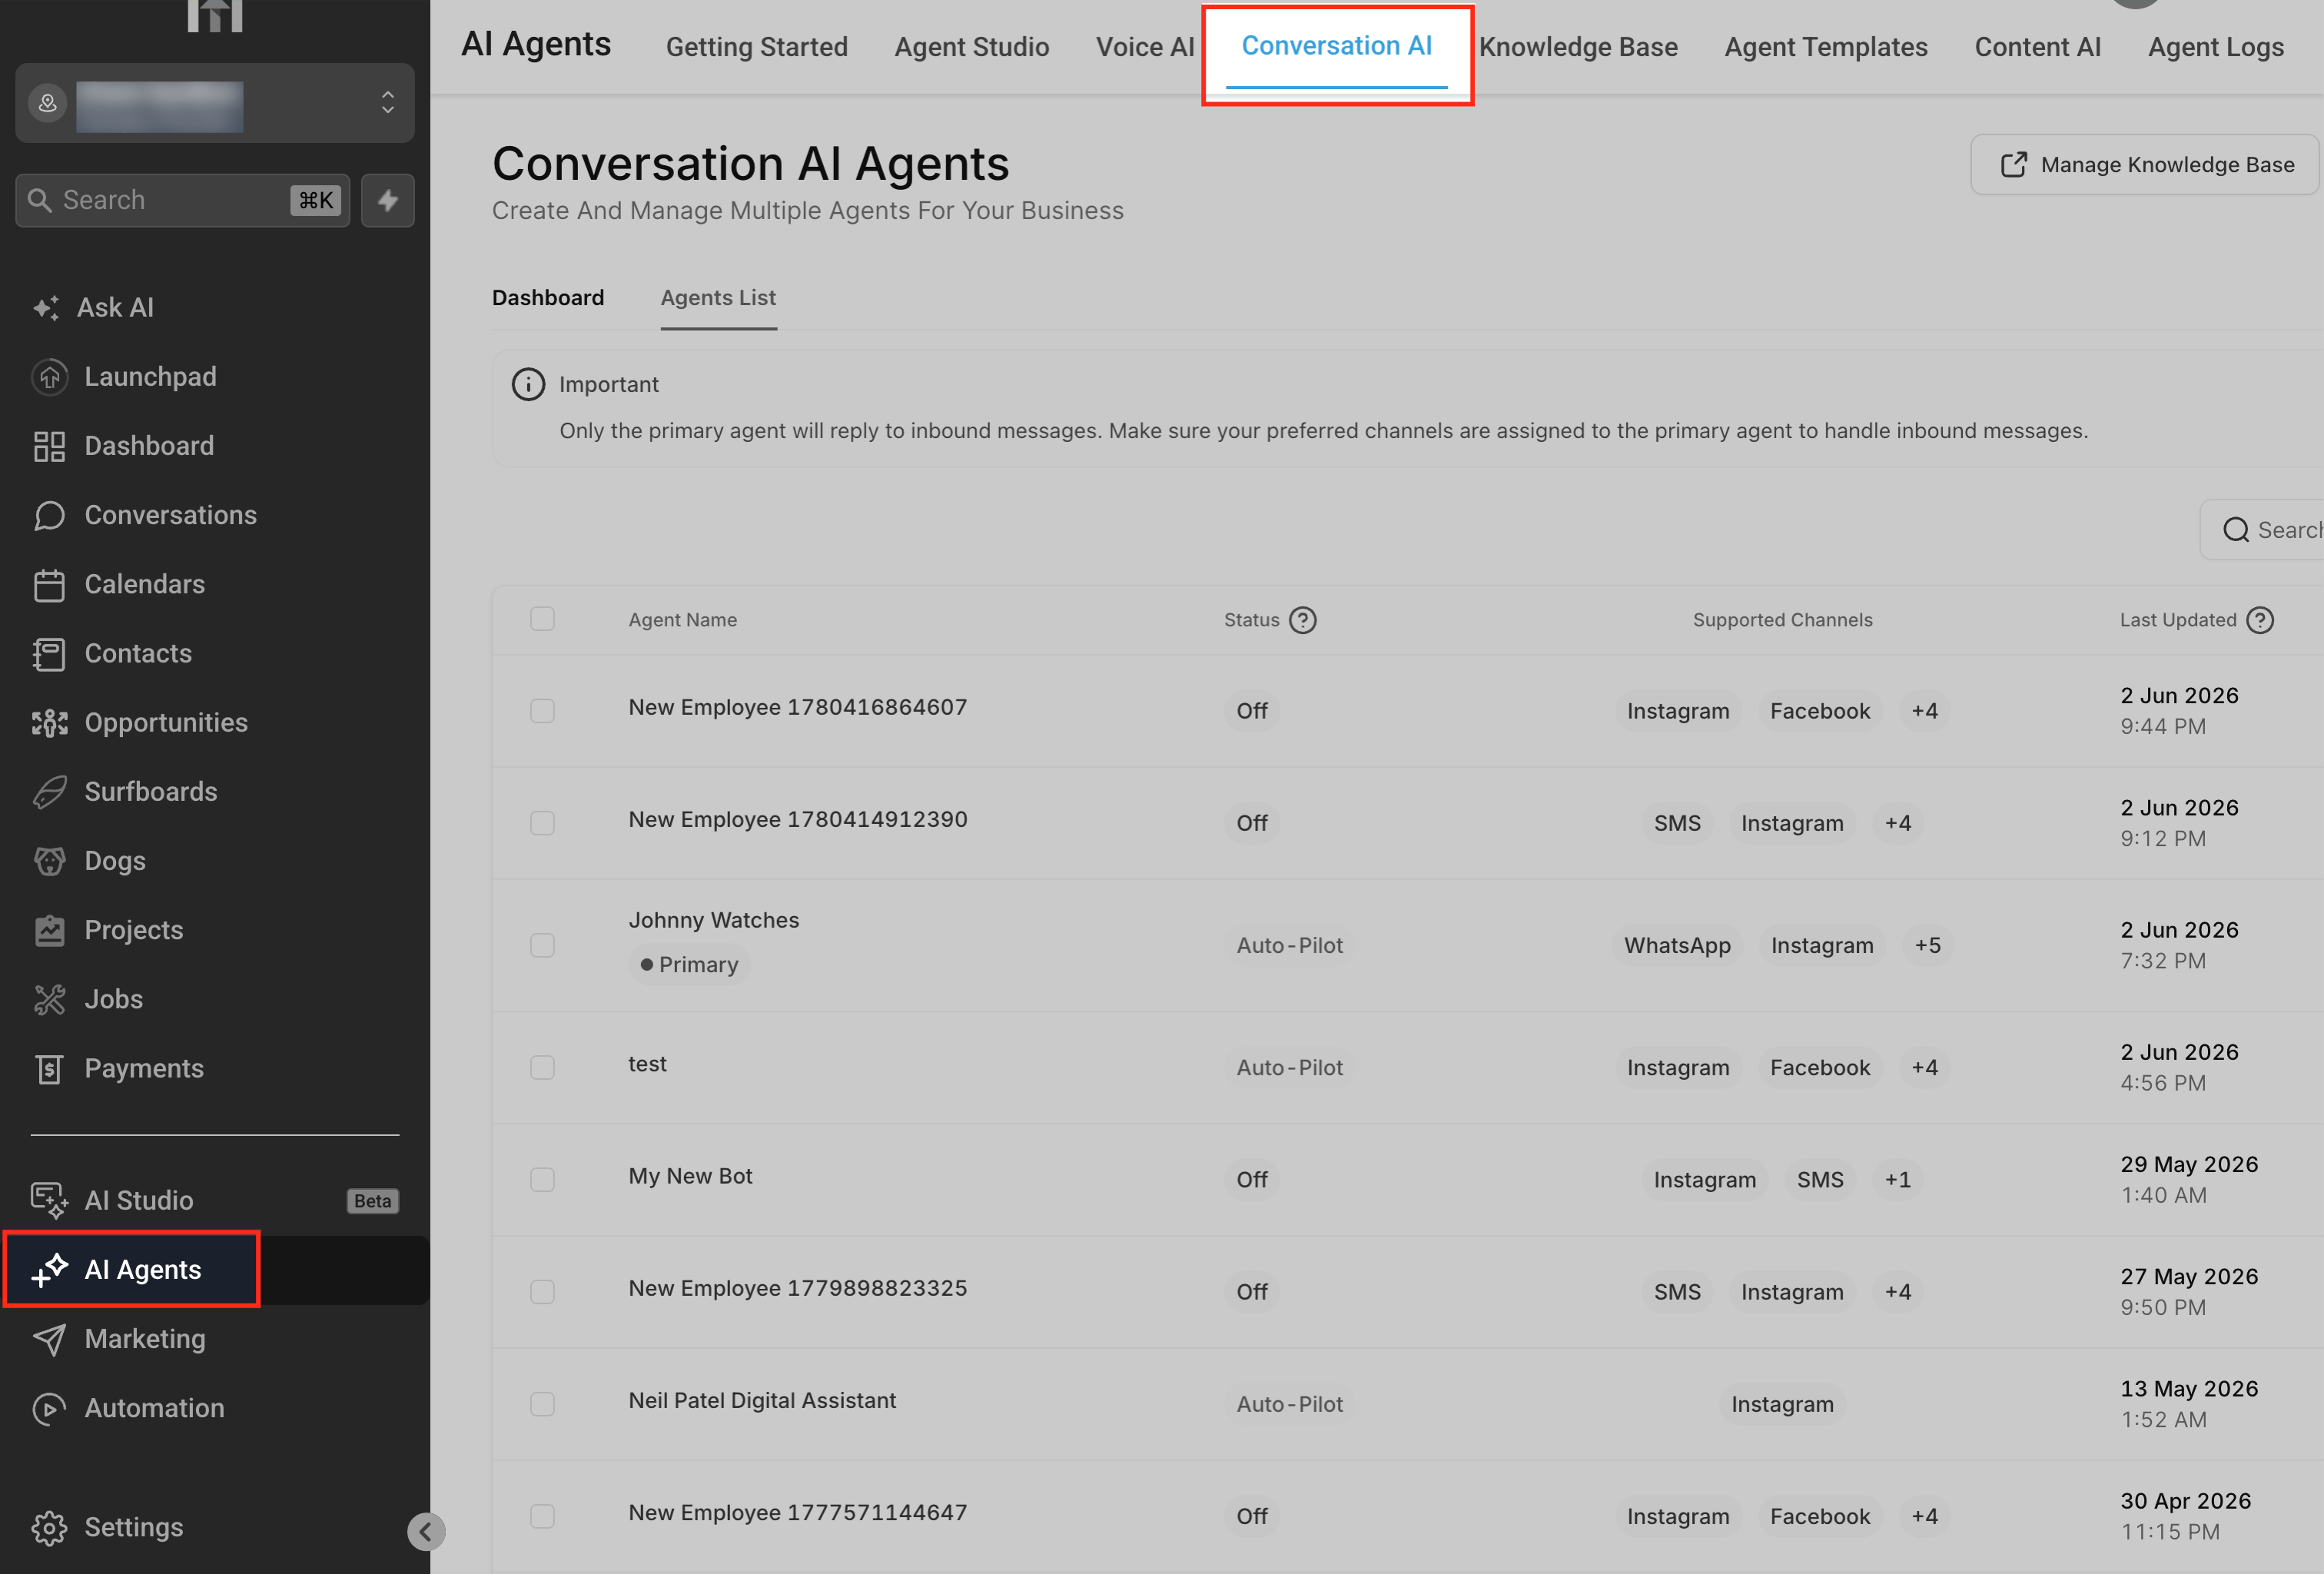
The Build tab holds the prompt fields that control how the bot behaves. - Click Add Custom Value to insert business or contact details where you want them personalized.
- Review the available word count and remove any conflicting rules.
- Save the changes.
Part 03 of 06
Set the goals and connect the calendar.
Bot Goals is where the bot learns what to collect and where to book. Pick the contact fields first, then turn on Appointment Booking and point it at your calendar.
- Open Bot Goals.
- Choose the contact information to collect: name, email and phone number.
- Enable Appointment Booking.
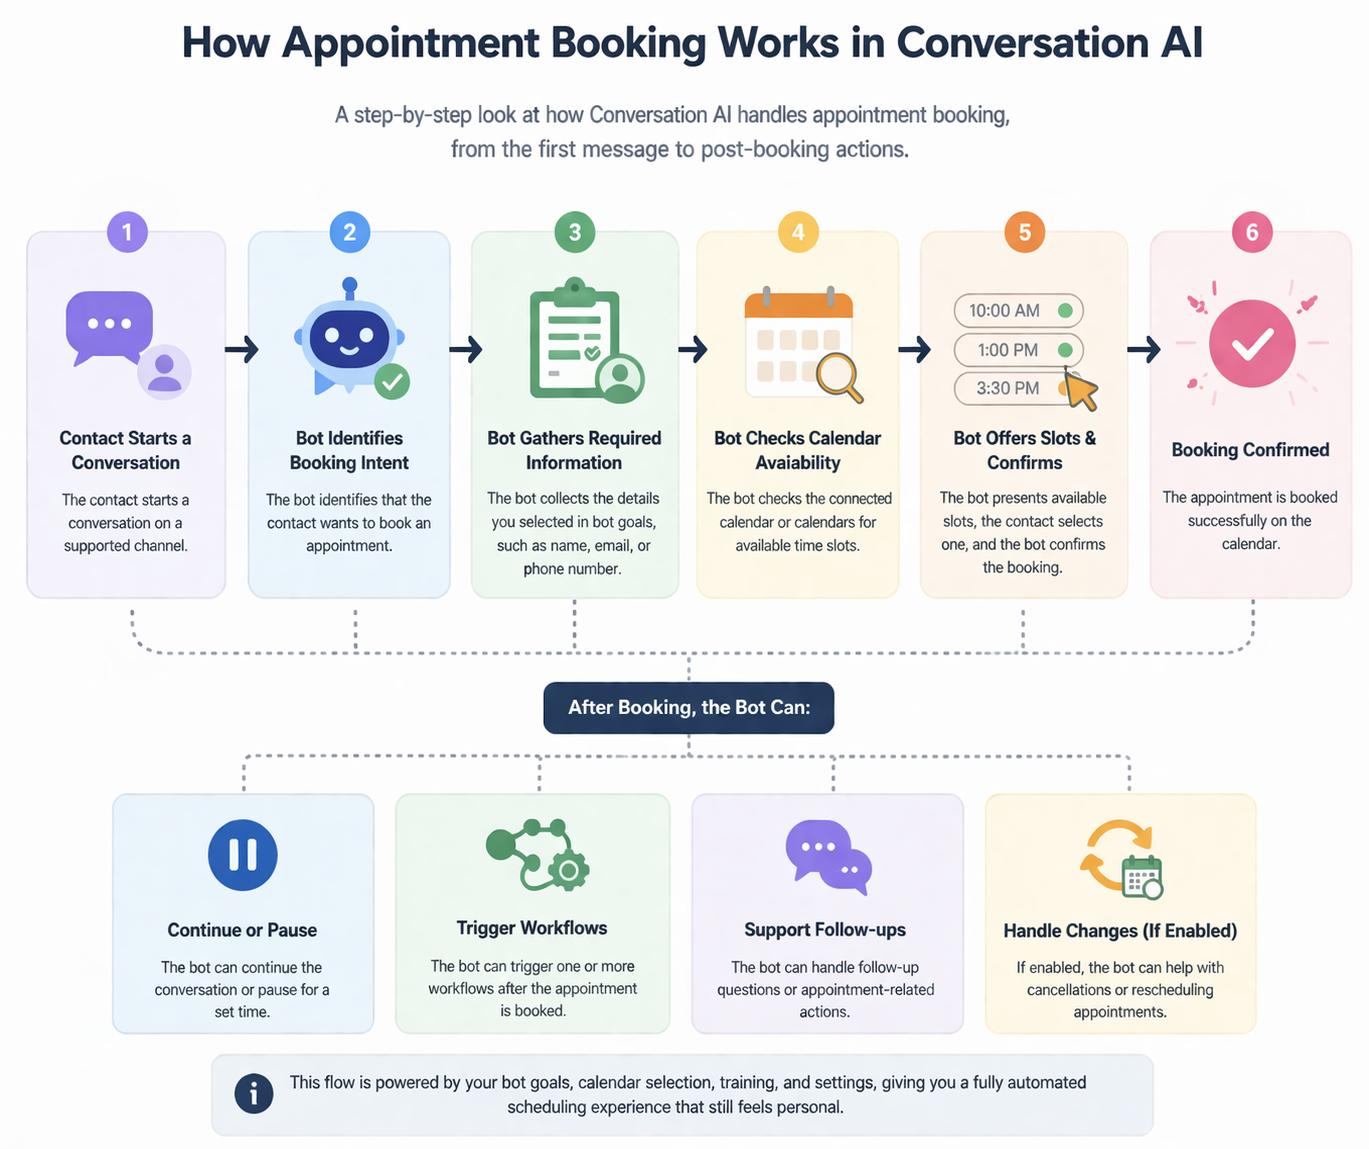
Enable Appointment Booking and choose the calendar type. - Select Single Calendar and choose the booking calendar, or select Multiple Calendars if the bot must route by service.
- If you chose Multiple Calendars, give each calendar a description, supporting keywords and an optional fallback calendar.
- Decide whether the bot may cancel and reschedule, and enable those options if so.
- Set the postbooking behavior: send only the booking link, pause the bot after booking, or trigger a workflow.
- Save the bot.
Part 04 of 06
Set the handoff rule before it ever goes live.
A bot with no limit will keep talking. The advanced settings in Bot Settings cap the number of bot messages, set the fallback message and escalate to a person. Set them now so the first real lead never gets stuck.
- Open your bot and select Bot Settings.
- Locate Maximum messages a Bot can send in a Conversation and enter a value from 1 to 100.
- Set Minimum Response Delay and Maximum Response Delay in seconds.
- Write the Fallback Message the bot sends when it cannot answer or hits its limit.
- Add any words or phrases to Content Filters that the bot must not discuss.
- Turn on AutoEscalation so the conversation is assigned to a human agent after the limit or when frustration is detected.
- Click Save at the bottom of the panel.
Part 05 of 06
Connect the channels and make it primary.
A bot only answers on the channels listed in its settings, and only the primary bot answers general inbound messages. Skip this part and the bot never sees a message.
- Go to AI Agents, then Conversation AI, then Agent List, and select your bot.
- Go to Bot Settings, then Supported Communication Channels/Providers.
- Select every channel where the bot should be active.
- Click Save.
- Back in the Agent List, select the bot and click Set as Primary.
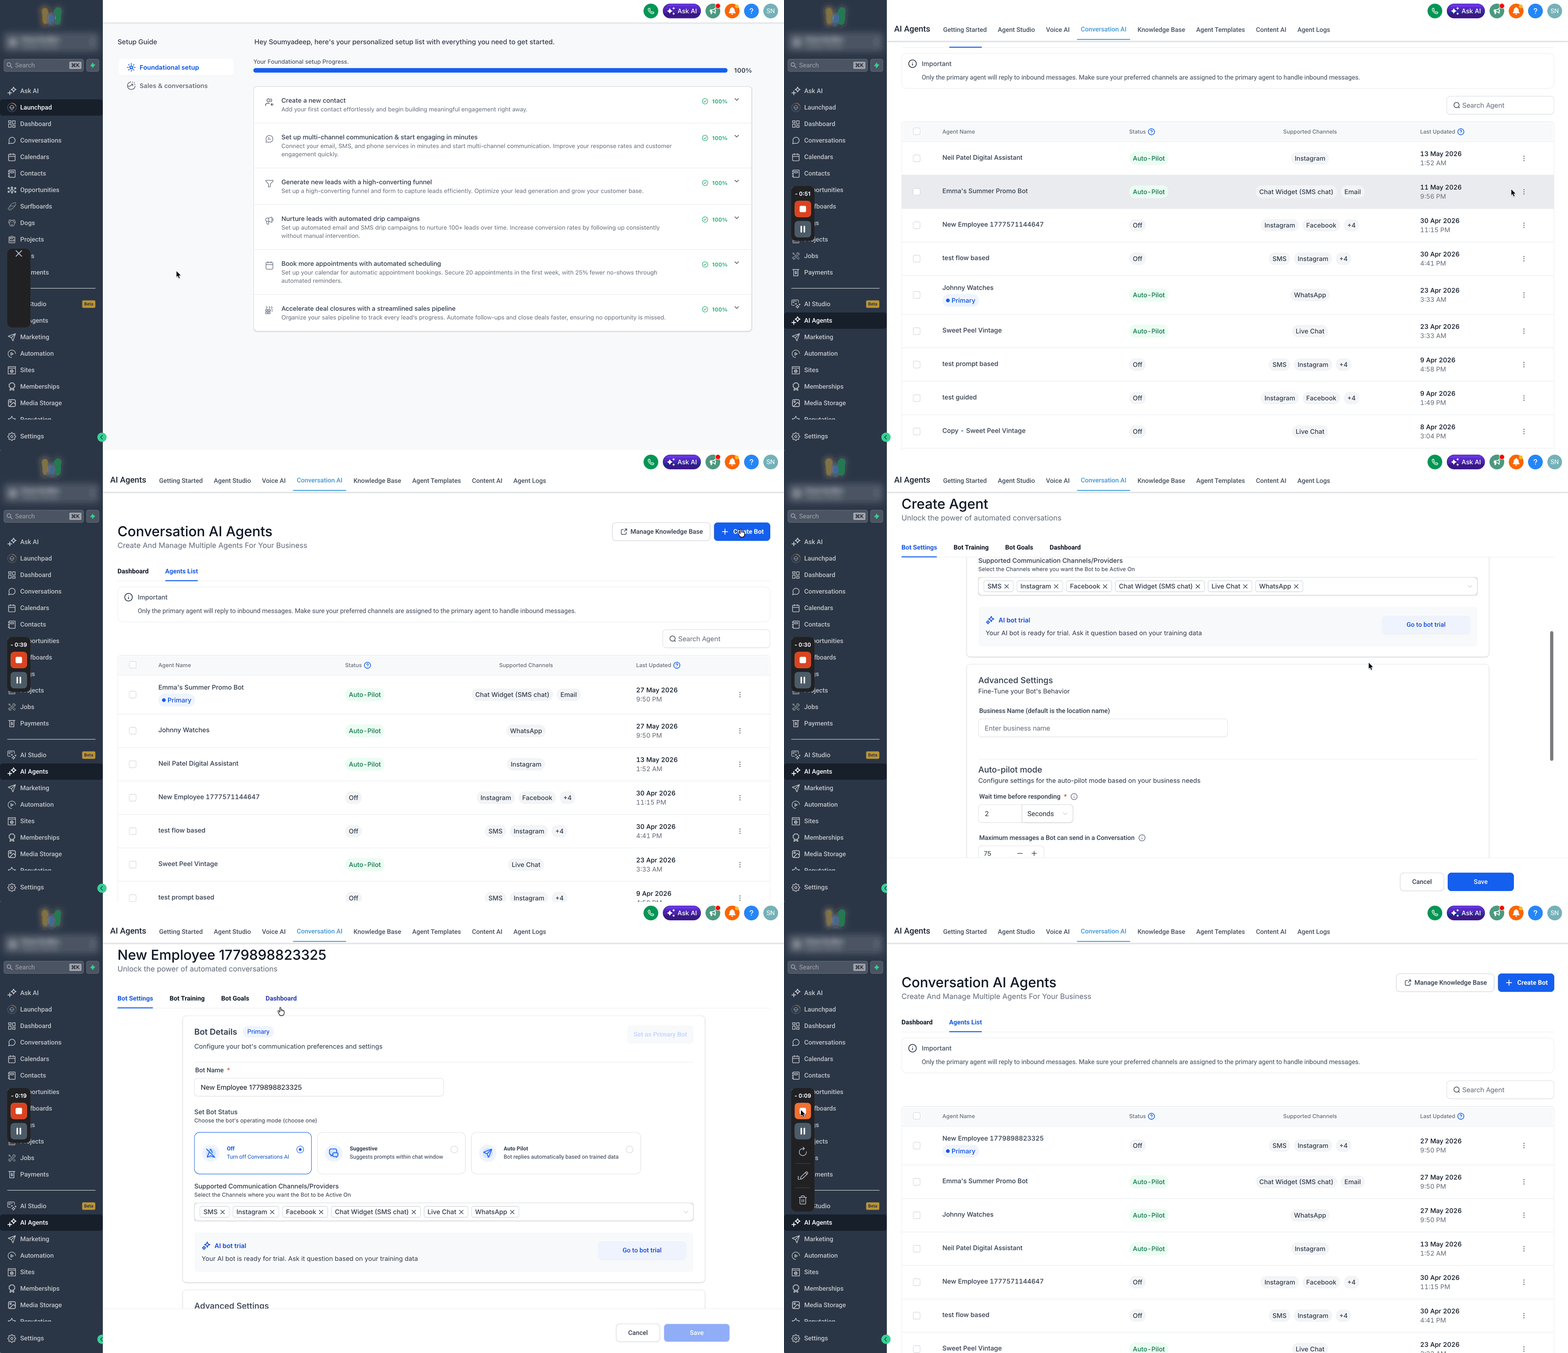
Set as Primary makes this bot the default responder on its channels. - Click Save.
Part 06 of 06
Go live in Suggestive then switch to Autopilot.
New bots may be set to Off by default. Suggestive mode drafts replies for your team to review and send. Autopilot sends them on its own. Run Suggestive first, read what the bot wants to say, then flip the switch.
- Open Bot Settings and find the bot status.
- Set the status to Suggestive.
- Click Save.
- Watch the next real conversations in the Conversations inbox and review each suggested reply before sending.
- After the suggested replies match what you would say, return to Bot Settings and set the status to Autopilot.
- Click Save.
Test it
Test it before a real lead does.
Run these from the test panel and then from a real phone on each channel.
- Use the test panel on the bot to send a sample first message. The bot should reply with the initial message after the wait time.
- Reply with a question about your services. The bot should answer from the prompt and Bot Training, not guess.
- Say you want to book. The bot should ask for the contact details you chose in Bot Goals before it offers times.
- Pick a time. The bot should confirm and the appointment should appear on the selected calendar.
- Ask to reschedule or cancel if you enabled it. The bot should handle it cleanly.
- Ask something it cannot know. The bot should send the fallback message instead of inventing an answer.
- Send a real message from your phone on each connected channel. The bot should respond there, which proves the channel and primary settings are right.
When a step fails
If it is not working check these first.
These are the issues HighLevel documents for this feature.
- The bot is saved but never replies
- Check the bot status in Bot Settings and set it to Suggestive or Autopilot. Then confirm the bot is connected to the channel the message came in on.
- The bot answers on SMS but not on Facebook or Instagram
- Open Bot Settings, then Supported Communication Channels/Providers, and add the missing channel. The bot only engages on the channels listed there.
- A second bot ignores general inbound messages
- Only the primary bot answers general inbound traffic. A nonprimary bot responds only when a workflow triggers it and its channels match the workflow step.
- The bot stops replying in the middle of a conversation
- It hit its message limit and went to sleep. Mark the conversation as Read to reset the counter, or raise the limit in Bot Settings.
- The bot ignores an instruction
- The instruction may be vague, may conflict with another rule, or may belong in Bot Goals, Bot Training or Response Style Settings. Remove the duplicate and test again.
- Multiple calendars or services booking is missing
- Those options are only available on prompt based bots. Rebuild the bot as a Prompt Based Bot.
Questions
What do people ask about Conversation AI in GoHighLevel?
- What is the difference between Suggestive and Autopilot?
- Suggestive mode creates reply suggestions your team reviews and sends by hand. Autopilot sends the replies automatically based on the bot's configuration. Run Suggestive first and read what the bot wants to say, then switch to Autopilot once the test passes. You can try both modes during a 30 day GoHighLevel trial through Michael's link.
- Does the bot reply as soon as I save it?
- Not always. New bots may be set to Off by default. Check the status in Bot Settings and switch it to Suggestive or Autopilot when you are ready, and confirm the bot is connected to the right channel. To keep it quiet outside set times, see whether you can set working hours for Conversation AI.
- Should I use one calendar or multiple calendars?
- Use one calendar when every request should land in the same booking path. Use multiple calendars when the bot must route by service, department or intent. Multiple calendars require a prompt based bot, and each calendar needs a description, supporting keywords and an optional fallback calendar so the bot can choose.
- Can I set a different message limit per channel?
- No. The maximum message limit is set at the bot level and applies to SMS, Facebook, Instagram, WhatsApp and every other enabled channel. In Bot Settings you can enter a value from 1 to 100. If the bot hits the limit it stops replying until the conversation is marked as Read.
- Can the bot cancel or reschedule appointments?
- Yes, when the cancellation and rescheduling options are enabled in the bot's appointment settings. Test both paths before going live. Conversation AI is a usage based feature, so check GoHighLevel pricing and the GoHighLevel plans compared before you turn it on for every channel.
- Can I have more than one primary bot?
- No. Only one bot can be primary at a time. If you switch primary bots later, reassign the channels to the new one or those channels go quiet.
From the field
Michael’s take.

The first thing I do is decide which channel the bot sits on. Most Founders build the prompt first and skip that part, then wonder why the bot never speaks. It never speaks because it is not attached to the SMS number or the Facebook page. Map the channel, build the bot, then connect the two.
Where people go wrong is the calendar. If the description does not say plainly what that calendar is for, the bot guesses. Write the description like you are explaining it to a new hire, add the keywords a real lead would use, and test the cancel path before you put the bot on every channel. The other mistake is jumping straight to Autopilot. Suggestive mode costs you a week of reading replies. It saves you a bad reply going to a real lead.
This build pays off the first week your inbox has more messages than your team can answer the same hour. A reply inside the wait time, the right three fields collected and a slot booked on the calendar is the whole job. Keep the message cap tight, keep the fallback honest, and let AutoEscalation hand the hard ones to a person.
Go deeper
The features behind this build.
Every feature this guide touches has its own page in the library, with the settings, limits and Michael’s notes.
- AI EmployeeHow to Set Up a Conversation AI Bot
- AI EmployeeAppointment booking in Conversation AI in HighLevel
- AI EmployeeConversation AI advanced settings overview
- AI EmployeeCustomize Conversation AI Agent Responses with Prompts and Instructions
- AI EmployeeAutopilot mode in HighLevel Conversation AI for efficient communication
- WorkflowsConversation AI workflow actions in HighLevel
- AI EmployeePrimary vs nonprimary bots in HighLevel Conversation AI
- Related guideHow to hand off Conversation AI to a human
Get the guide
Take it with you. The PDF is yours.
The whole build, cover to cover, as a PDF you can keep open on a second screen or print for the team. HighLevel's Founder page opens alongside it.
Next step
Want this built with the team behind you?
Start your HighLevel trial through Michael and the CRM Pros team comes with it. You get the setup help, the community and the training that go with this build.
The how to library has step by step HighLevel builds for Conversation AI, Voice AI, funnels, calendars, workflows and AI Studio. Go back to the full list.
Back to the GuidesAll the step by step builds