
01Who this is for
- Support agents need a single view to read a request, reply to the customer and add internal notes while keeping all context together.
- Team managers use the ticket actions and right panel fields to assign owners, set priorities and track SLA deadlines across the support queue.
- Customer success specialists benefit from the AI summary and fast reply tools to draft consistent responses quickly.
02Ticket details page, explained
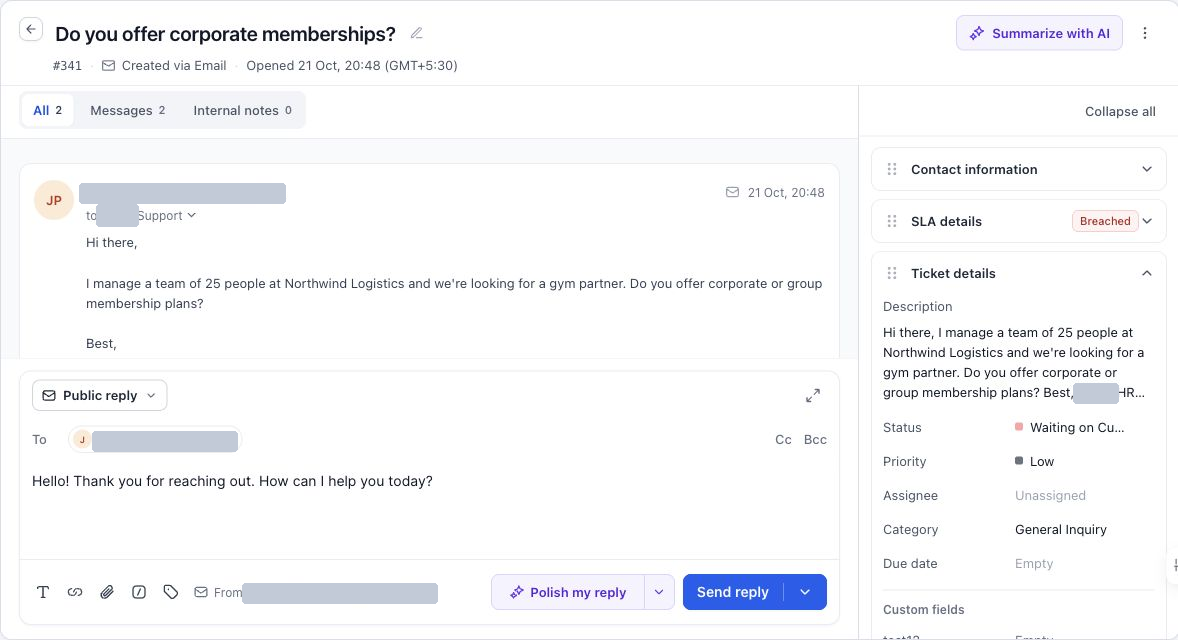
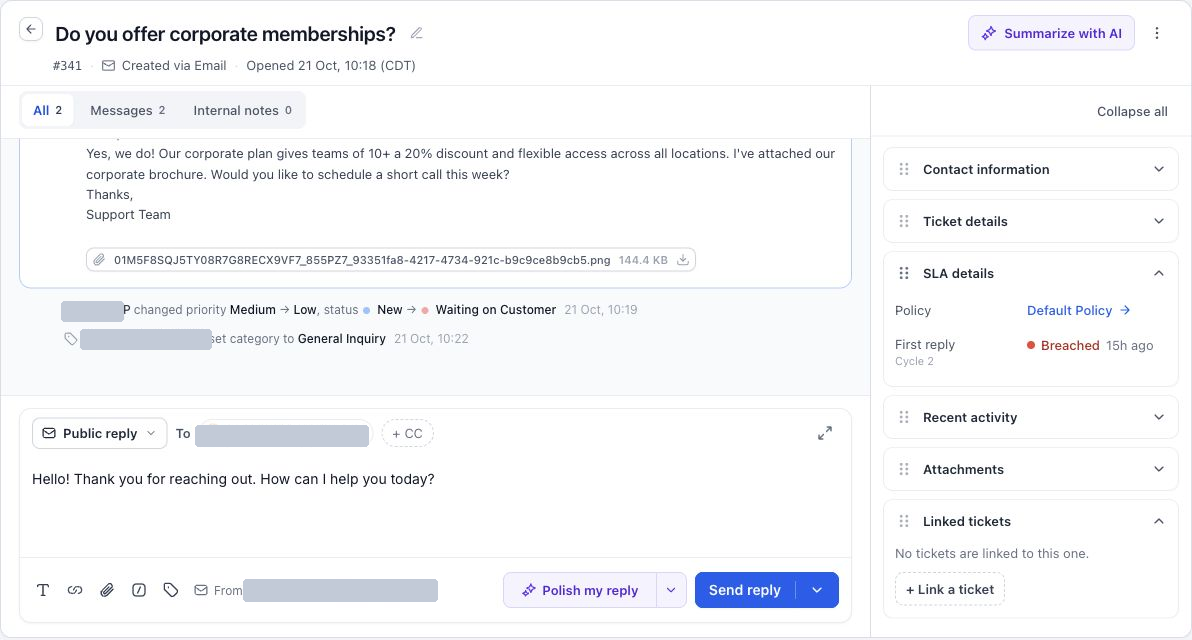
The ticket details page aggregates all information about a support request. The top panel displays the ticket name, ID, source, opened time and a menu of ticket level actions. The main panel holds the full history of messages, internal notes and a reply editor that can switch between public replies and private notes. The right panel provides the customer’s contact data and editable ticket properties such as status, priority, assignee, category, due date and custom fields.
All three panels are accessible from the Tickets list or from the Tickets widget on a contact’s record. Users can rename a ticket for internal clarity, send public replies that are emailed to the contact and any CC recipients, add internal notes that stay within the team, and adjust ticket fields without leaving the page. The interface also includes AI generated summaries, fast reply shortcuts and controls for attaching files or inserting custom values.
03How businesses use the ticket details page
- SaaS company. Support reps open a ticket from the list, rename it to reflect the specific feature issue, then use the public reply editor to answer the client while attaching a troubleshooting guide. Internal notes capture debugging steps for the engineering team.
- Digital marketing agency. Account managers view tickets linked to client contacts, change the status to "In Progress", assign the ticket to the appropriate specialist and add internal notes about campaign details, keeping the client facing reply separate.
- Ecommerce store. Customer service staff open a ticket from a contact record, use the fast reply option to send a standard shipping delay message, and set the due date to follow up after the expected delivery window.
04Before you start
- User must have the manage ticket permission to see the reply editor and edit ticket fields.
- Assign to me is only available for users who are assignable members of the subaccount.
05How to set up and use the ticket details page in HighLevel
Open a ticket
- Navigate to Tickets and click a ticket name in List or Card view.
- Alternatively, open the ticket from the Tickets panel on a contact’s record.
- The ticket loads with top, main and right panels visible.
Rename a ticket
- Select the ticket name or the rename icon in the top panel.
- Enter a new descriptive name that reflects the issue.
- Save the change with the provided control.
Send a public reply
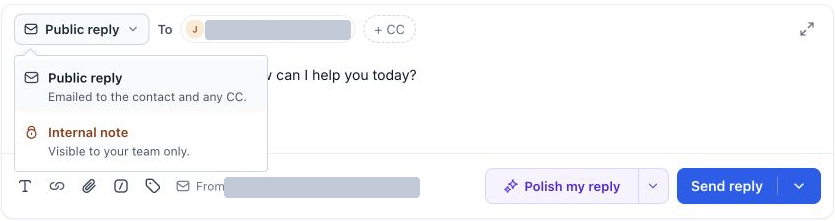
- Choose Public reply in the reply type control of the editor.
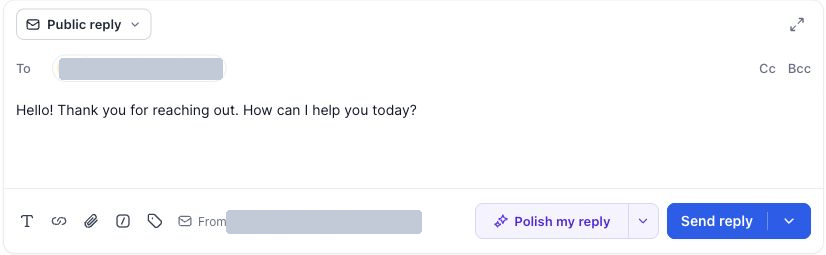
- Check the To address and the displayed From address.
- Add CC recipients if additional contacts should receive the reply.
- Compose the response using formatting, links, attachments, Fast Replies or custom values.
- Review the text, recipient list and any attached files.
- Press Send reply to email the response.
Add an internal note
- Open the reply type control and select Internal note.
- Write the information needed for teammates.
- Click the save/post control to add the note to the ticket.
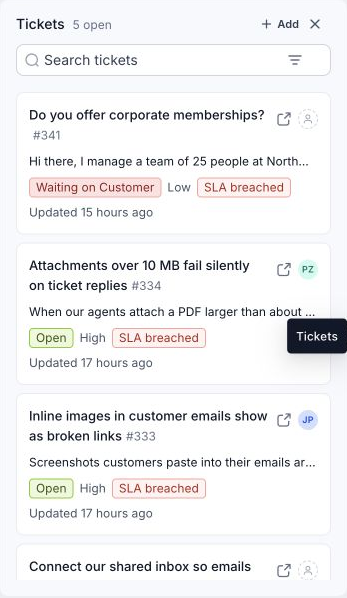
Access tickets from a contact record
- Open the contact’s record.
- Click the Tickets icon in the right side toolbar.
- Review the open ticket count and cards or use Search tickets.
- Select a ticket to open it, or use the Open in new tab control.
- Press Add when a new ticket is required for the contact.
06What it looks like in HighLevel
07Settings that matter
- Ticket name. Displays the request subject and can be edited with the rename control for internal clarity.
- Ticket ID. Provides a unique identifier used for searching and coordinating work.
- Source and opened time. Shows how and when the ticket was created.
- Summarize with AI. Generates a short AI based summary of the ticket content.
- Ticket actions. Opens a menu with options such as Assign to me, Add to workflow, Mark as unread and Delete.
- Reply, type control. Switches the editor between Public reply and Internal note modes.
- Fast replies. Provides reusable response snippets configured in Ticketing Settings.
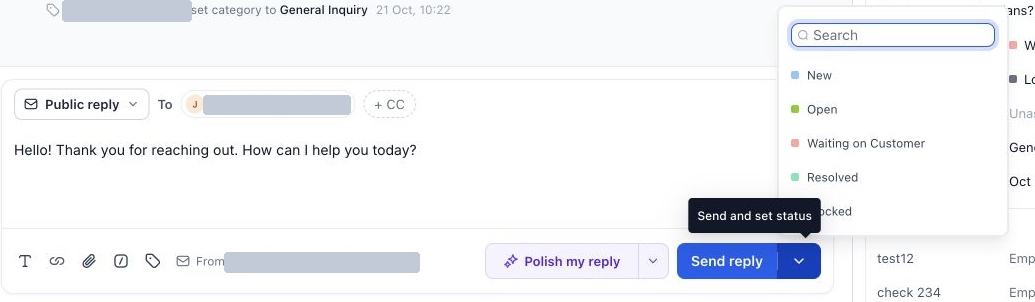
- More send options. Lets the user send the reply and change the ticket’s status in a single action.
- Status. Sets the current stage of the ticket as work progresses.
- Priority. Indicates the urgency of the request based on team definitions.
- Assignee. Assigns a team member responsible for handling the ticket.
- Category. Classifies the issue and optionally selects a subcategory.
08Things to know before you rely on it
- Deleted tickets cannot be restored after confirmation.
- Assign to me may be unavailable if the user is not an assignable member of the subaccount.
- Fast Replies must be set up in Ticketing Settings before they appear in the editor.
09If something goes wrong
- The reply editor is missing or unavailable. Check that the user has the manage ticket permission and that the ticket is fully loaded.
- A public reply cannot be sent. Verify the recipient addresses, message content, attachments and that the email integration is active.
- Assign to me is disabled. Confirm the user is an assignable member of the subaccount.
- A teammate cannot see an internal note. Check the teammate’s ticket access and ensure they are viewing the Internal notes tab.
- A field or section is not visible. Expand the appropriate right panel section and verify field and permission settings.
- An attachment is missing from a reply. Make sure the upload finished and review the file controls before sending.
10How it connects to the rest of HighLevel
- Overview of ticketing features and how tickets fit into the support workflow Ticketing overview
- Guide for creating tickets and linking email integrations Create tickets
- How to automate ticket actions with workflows Ticket automations
Michael's take

People often think renaming a ticket changes the email thread, but it only updates the internal label. I would keep the original subject for email continuity and use the rename field to add a clear short description for the team.
Once the name is set, I’d focus on getting the ticket status right and adding any internal notes needed for the next teammate. A quick review of the right panel fields ensures the ticket moves through the workflow without missing a priority or due date update.