
01Who this is for
- Support managers need consistent status values to track request progress across agents.
- Customer service teams benefit from predefined priorities that signal urgency at ticket intake.
02Ticketing settings, explained
The ticketing feature provides a flexible list of statuses, priorities and categories that agents select when they open or update a request. Each value can have a name, description and colour. You can mark one status as the default start point and indicate which status counts as resolved, which influences SLA timers and reporting.
Ticket categories may include a second level of sub categories, adding an extra dropdown on the ticket form. The form itself can be customized with standard and custom fields, arranging them by drag and drop and marking any as required. Fast replies let agents insert reusable messages, optionally limited to specific agents. Access to ticketing settings is controlled per user, and the entire configuration can be saved in a snapshot and applied to another subaccount.
03How businesses use ticketing settings
- SaaS company. A SaaS firm creates statuses such as New, Investigating, Resolved and maps the Resolved status to stop SLA timers. They also set priorities to prioritize outage tickets.
- Ecommerce store. An online retailer defines categories like Billing with sub categories Refund and Invoice dispute, then adds a custom field for Order ID to the ticket form.
- Digital marketing agency. The agency builds Fast Replies for common client updates, restricts certain replies to senior account managers, and shares the configuration across client subaccounts via snapshots.
04Before you start
- Open the correct subaccount and select Tickets > Settings.
- Use an administrator account to edit ticketing settings.
05How to set up and use ticketing settings in HighLevel
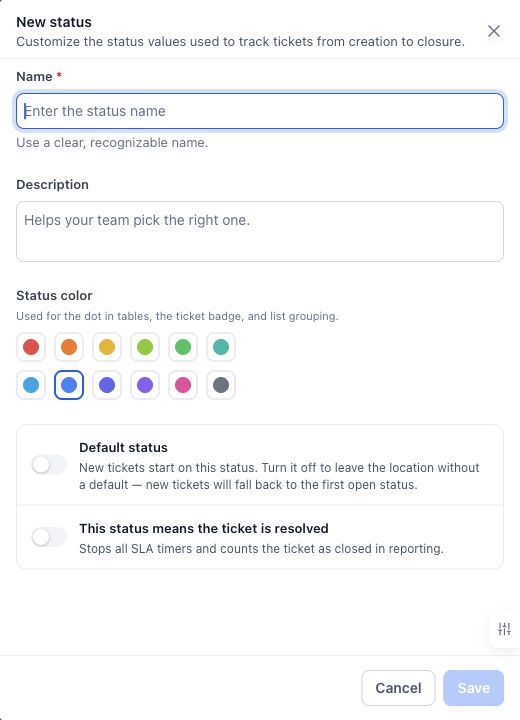
Configure ticket statuses
- Open Settings > Status.
- Select the New status or pick an existing status to edit.
- Enter a Name, add a description, and choose a colour.
- Turn on Default status if new tickets should start there.
- Turn on This status means the ticket is resolved.
- Select Save.
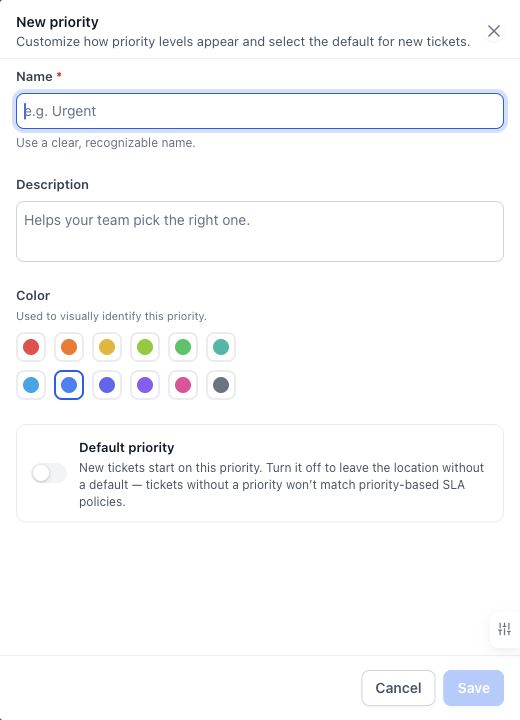
Configure priorities
- Open Settings > Priority and select New priority or open an existing value.
- Enter the name and a description that helps agents choose consistently.
- Choose a colour.
- Enable Default priority if this should be preselected for new tickets.
- Select Save.
- Arrange the values using their drag handles.
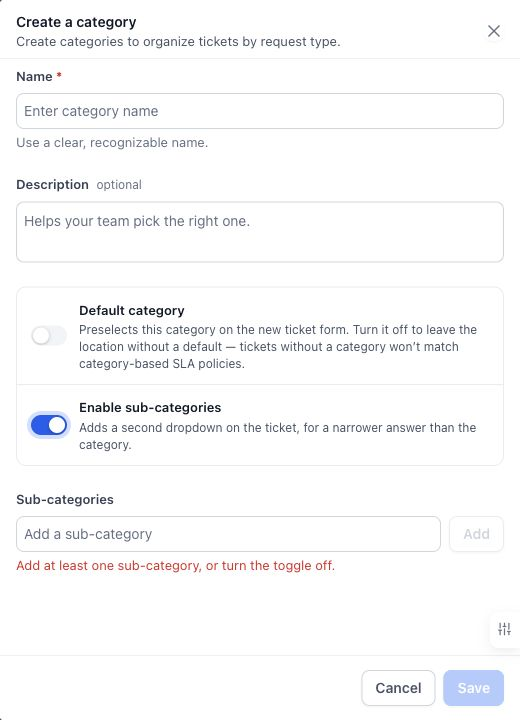
Configure categories and subcategories
- Open Settings > Category and select New category.
- Enter a name and optional description.
- Enable Default category if it should be preselected on new tickets.
- To add a second classification level, enable Enable sub categories.
- Enter each subcategory and select Add.
- Add at least one value when subcategories are enabled.
- Select Save.
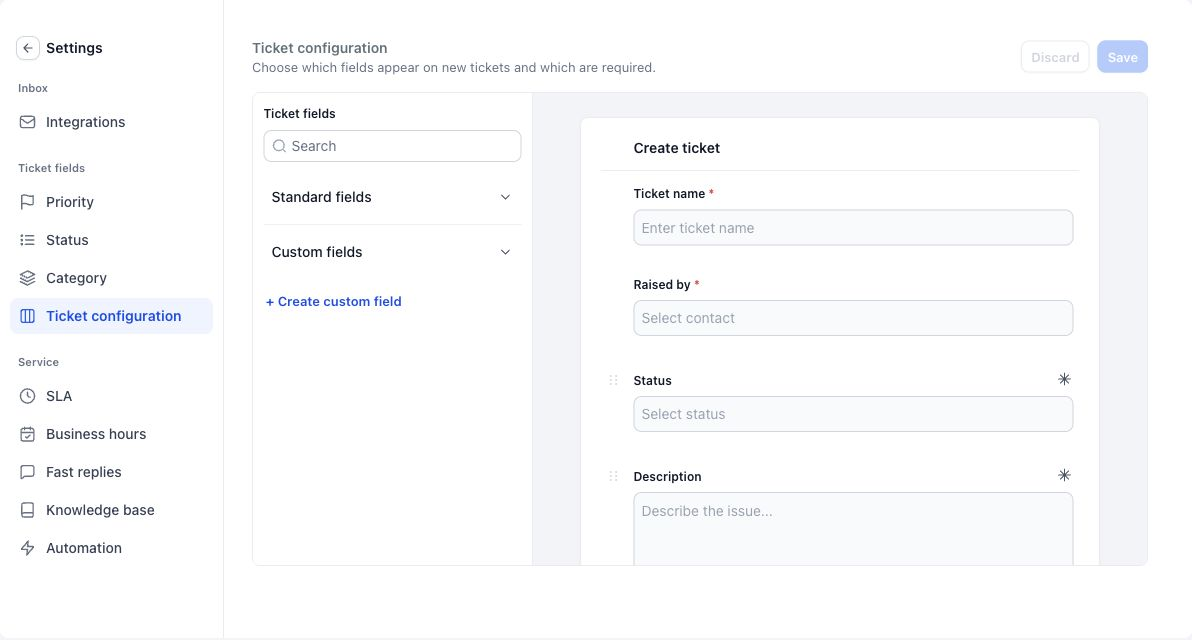
Configure the ticket creation form
- Open Settings > Ticket configuration.
- Expand Standard fields or Custom fields in the left panel, or use search to find a field.
- Add the fields you need to the form preview and drag fields into the desired order.
- Mark supported fields as Required when agents must complete them during creation.
- Remove optional fields from the layout when they are not needed.
- Do not attempt to remove protected fields; the removal control is unavailable for them.
- Review the preview and select Save.
Create and manage Fast Replies
- Open Settings > Fast replies.
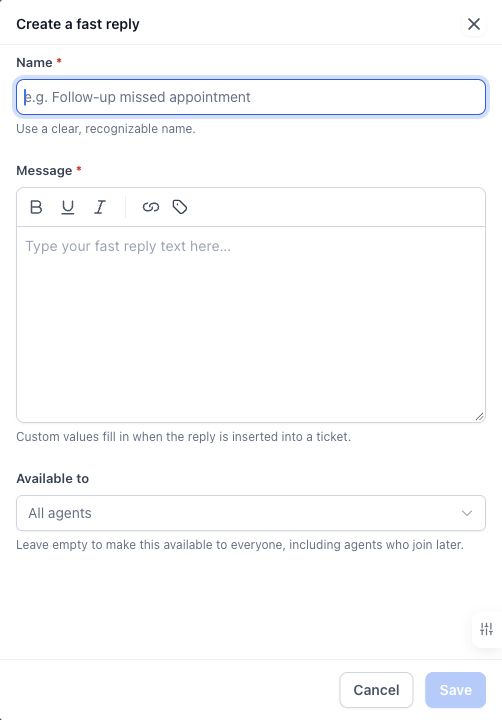
- Select Create a fast reply.
- Enter a recognizable Name and the Message.
- Use formatting and Insert a custom value as needed.
- Under Available to, select specific agents or leave it empty for all agents.
- Select Save.
- Archiving a Fast Reply removes it from normal use.
Manage access and agency availability
- In the subaccount's staff settings, open a user under My Staff.
- Review Roles & Responsibilities > Ticketing for that user.
- Check assigned data restrictions that limit which records the user can access.
- Agency administrators manage feature availability through Subaccounts > Settings > Features and Limits.
- Also verify feature access via SaaS Configurator > Edit details > Features.
Reuse configuration with snapshots
- Create a snapshot that includes Ticketing configuration.
- Apply the snapshot to another subaccount.
- Review the destination's statuses, priorities, categories, field layout, SLA policies, and Fast Replies.
- Connect the destination's email provider separately.
- Review user references and local settings at the destination before the team begins working.
- Do not assume a snapshot migrates customer tickets or message history.
06What it looks like in HighLevel
07Settings that matter
- Name. The label displayed for a status, priority, or category.
- Description. Guidance shown to agents about when to select the value.
- Color. The visual colour attached to a status, priority, or category.
- Default status. Marks the status that new tickets receive automatically.
- This status means the ticket is resolved. Indicates that a status stops SLA timers and counts the ticket as closed in reporting.
- Default priority. Pre selects a priority for newly created tickets.
- Enable sub, categories. Adds a second dropdown for more detailed classification under a category.
- Default category. Pre selects a category when a ticket is created.
- Required. Forces agents to fill a field before a ticket can be saved.
- Available to. Controls which agents can see and use a Fast Reply.
08Things to know before you rely on it
- Only one priority can be set as the default at a time.
- A ticket without a priority will not match SLA policies that require a particular priority.
- Tickets with no category do not match category specific SLA conditions.
- Removing the default status causes new tickets to fall back to the first open status.
- Deletion of a value may be unavailable if it is protected, a default, in use, or required by another setting.
- Fast Replies can be archived or deleted; archiving removes them from normal use.
- Snapshots do not migrate customer tickets or message history to the destination subaccount.
09How it connects to the rest of HighLevel
- Learn the basics of ticketing in HighLevel Ticketing overview
- Set up email integration for ticket creation Email integration
- Automate ticket actions with workflows Ticket automations
- Configure SLA rules and business hours SLAs and business hours
Michael's take

In my experience, setting up the statuses, priorities, categories and Fast Replies gives the team a consistent framework, and using snapshots lets me avoid rebuilding the same configuration in each new subaccount.