
01Who this is for
- Marketing agencies, streamline the setup of client email campaigns by saving common sender details.
- Ecommerce businesses, ensure consistent branding and reply handling across product launch emails.
- SaaS Founders, reduce repetitive data entry when testing newsletters and product updates.
02Sender preferences, explained
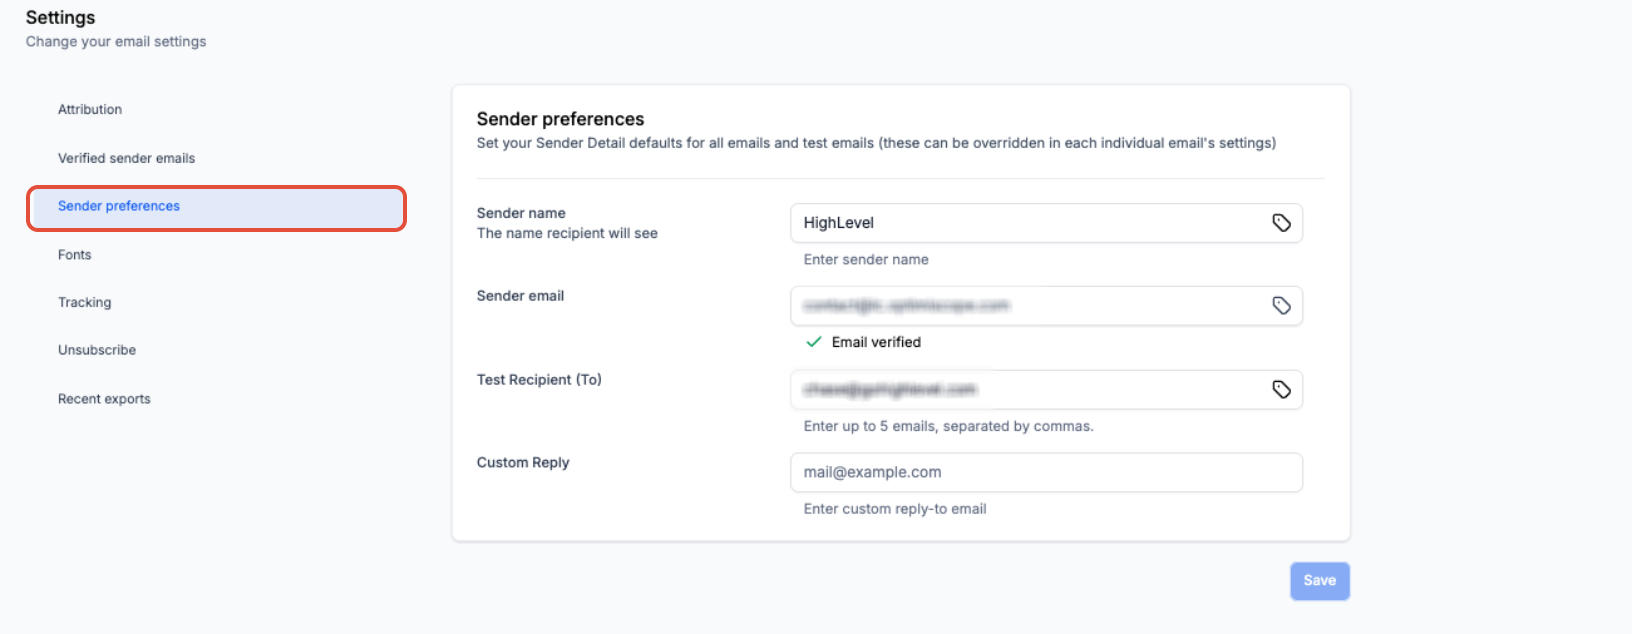
Sender Preferences are account level defaults that prepopulate the Sender Name, Sender Email, Test Recipient(s) and Custom Reply fields when you start a new email campaign or send a test. They do not replace values already stored in existing drafts or scheduled campaigns.
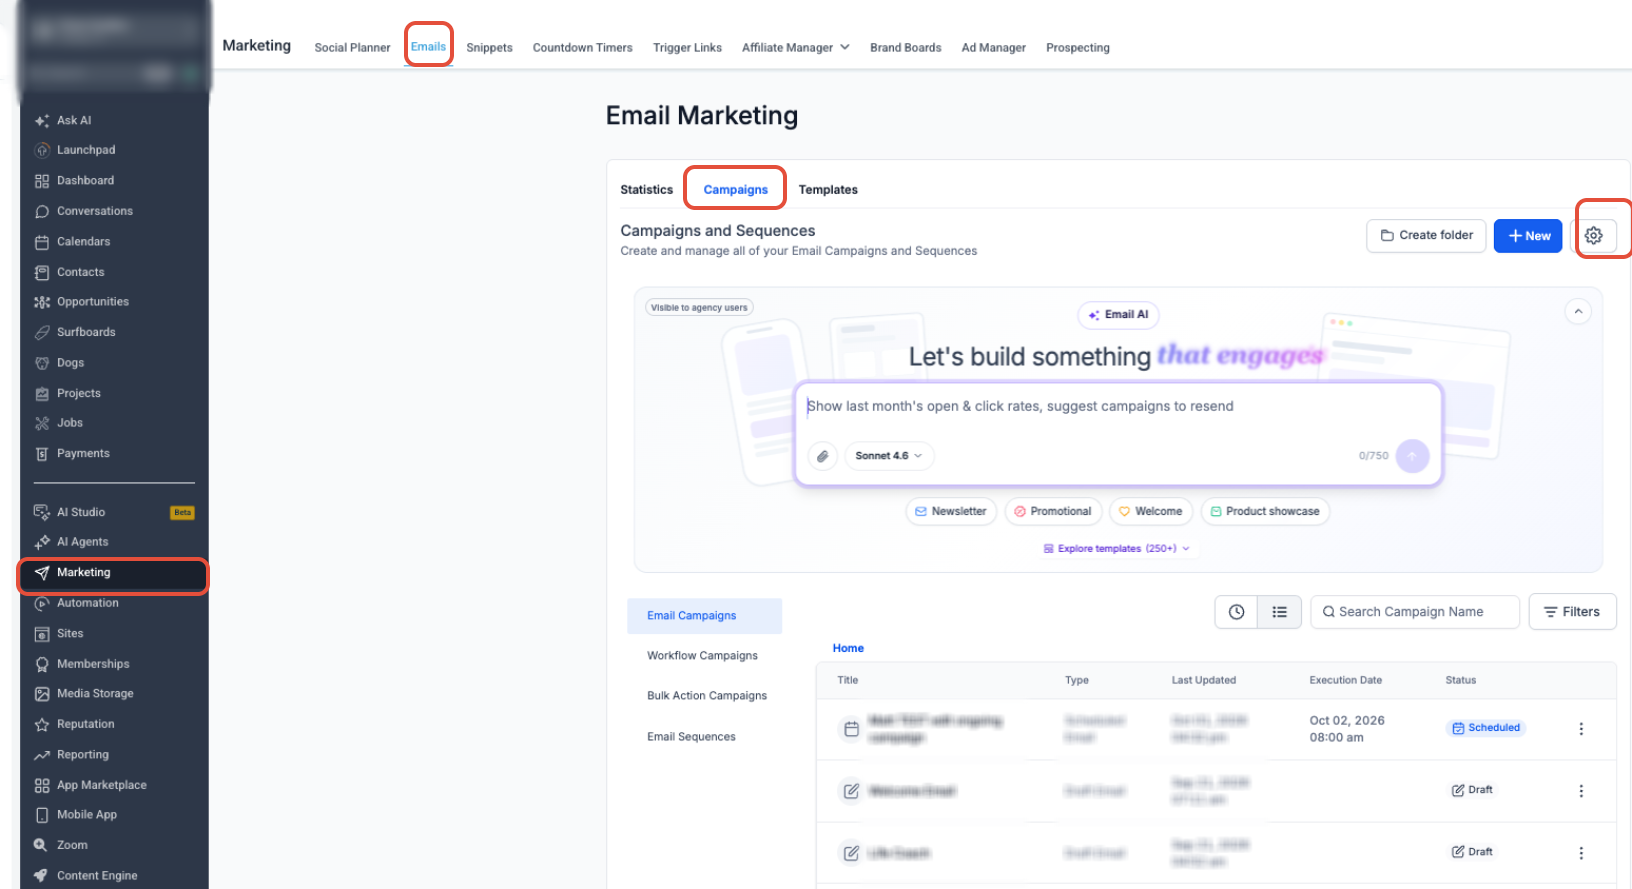
You configure them in the Email Builder under Marketing > Emails > Campaigns > Settings gear icon > Sender Preferences. After you save, each new campaign and test send starts with those values, but you can still overwrite them for an individual campaign. Cloned campaigns keep the sender details of the original instead of picking up newly changed defaults.
03How businesses use sender preferences
- Marketing agency. The agency sets its brand name and shared reply address as the default Sender Name and Custom Reply. When creating client campaigns, the defaults appear automatically, saving time while still allowing client specific overrides.
- Ecommerce store. The store enters its verified sales@store.com address as the Sender Email and adds the marketing team’s five inboxes as Test Recipient(s). New launch emails and test sends use these defaults, ensuring the right people review each message.
- SaaS startup. The startup configures a product specific Sender Name and a separate support@startup.com as Custom Reply. Campaign creators get these values prefilled, but can change the From address for special announcements if needed.
04The numbers and rules that matter
- Add up to 5 email addresses, separated by commas, as Test Recipient(s).
05Before you start
- Verify that the Sender Email address is approved in your account’s email settings before configuring Sender Preferences.
06How to set up and use sender preferences in HighLevel
Configure sender preferences
- Open the Marketing menu and select Emails then Campaigns.
- Click the Settings gear icon.
- Choose Sender Preferences from the list.
- Enter the default Sender Name you want to appear.
- Enter the default Sender Email address.
- Add up to five email addresses for Test Recipient(s).
- Provide a Custom Reply address if replies should go elsewhere.
- Click Save to store the defaults.
07What it looks like in HighLevel
08Settings that matter
- Sender Name. The name shown to recipients in the From field of the email.
- Sender Email. The email address shown in the From field; must be a valid address and may need verification.
- Test Recipient(s). A list of up to five email addresses that receive test copies of a campaign before it is sent to the full list.
- Custom Reply. An optional address where replies are sent, independent of the Sender Email.
09Things to know before you rely on it
- You can add a maximum of five email addresses for Test Recipient(s).
- A saved Sender Email does not bypass domain validation; verification warnings may appear when sending.
- Cloned campaigns inherit the original campaign’s sender details rather than the updated defaults.
- Sender Email must be verified before an email campaign can be sent.
10How it connects to the rest of HighLevel
- Send or schedule a regular email campaign in HighLevel. Send email campaign
- Preview and test your email campaigns in HighLevel. Preview test emails
- Understand UTM parameters for email campaigns. UTM parameters
Michael's take

Sender preferences are a handy way to cut repetitive setup in HighLevel email campaigns.
Teams that never send test emails or rely on a single static sender can skip it.