
01Who this is for
- Founders of AI driven appointment booking services, because the monitor lets them see if daily booking targets are on pace.
- Small businesses using Conversation AI for lead handling, as the tool measures conversation volume against set goals.
- Companies employing Voice AI call automation, to monitor call completion rates and receive alerts when performance slips.
02Agent logs monitor, explained
Agent Logs Monitor is a goal tracking feature inside the Agent Logs section. It measures recorded AI activity, appointments, conversations, calls, workflow triggers, or knowledge base lookups, against a target number, cap, or percentage.
The monitor evaluates progress once each day at a scheduled time. Results are saved as daily checks, which appear on the monitor card and in a seven day chart. Users can set email or webhook notification channels to receive alerts when the monitor is at risk, reaches its goal, or finishes its tracking window.
All settings, metric, comparison type, target value, tracking window, product scope, check time, timezone, and notification events, are configured from the Monitor dashboard. History retains prior versions, and a monitor can be set to repeat automatically or be restarted manually.
03How businesses use agent logs monitor
- Appointment booking service. Create a monitor that tracks the number of appointments booked each day. Set a 30 day window, choose the Appointment activity metric, and assign an email channel to alert the team when the booking goal is at risk or achieved.
- Lead generation agency. Define a monitor for conversation volume using the Conversation AI metric. Schedule a daily check, select specific AI products, and configure a webhook channel so the agency’s reporting system receives progress updates.
- Call center using Voice AI. Set a rate based monitor for call success rates. Choose the Call activity metric, enter a percentage target, and enable daily progress emails to keep supervisors informed of performance trends.
04The numbers and rules that matter
- Supported activity types: Appointments booked, rescheduled, canceled; Conversations handled, volume, contacts reached; Calls completed and Voice AI call metrics; Workflows triggered, SMS sent, bot transfers; Knowledge Base lookups; Success rate, booking conversion, voice call rates.
- Time window options: 7 days, 14 days, 30 days, 60 days, 90 days, Custom.
- Status meanings: On track. For a reach a number goal, progress is at or above the expected steady pace for the current day. Behind. Progress is below the expected pace but within 15% of that pace. At risk. Progress is more than 15% below the expected pace, exceeds a configured limit, or falls below an applicable rate target. Achieved. The monitored goal has been reached. Under the number. Indicates that the measured value is below the specified number for an applicable limit based comparison. Scheduled. The configured tracking window has not started. Missed. The monitoring window has ended without the configured goal being met.
05Before you start
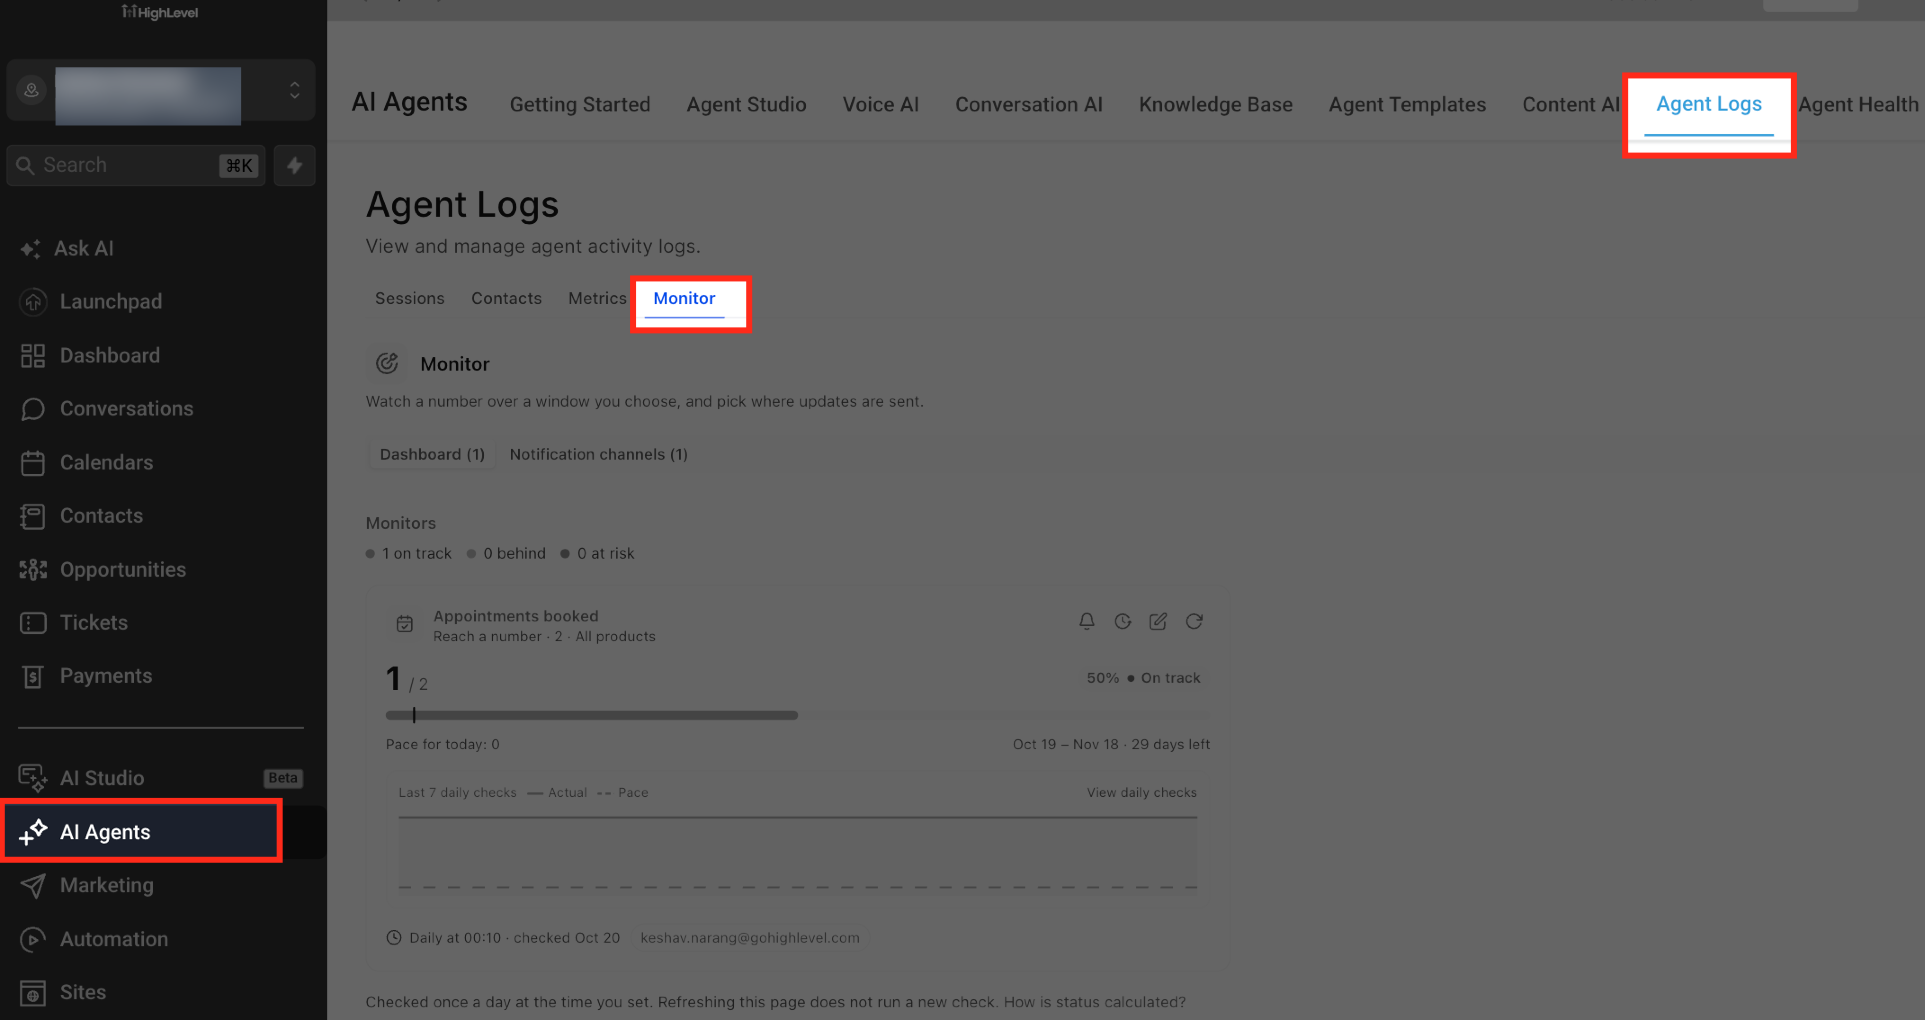
- Open the Subaccount view and select AI Agents, then choose Agent Logs.
06How to set up and use agent logs monitor in HighLevel
Create a new monitor
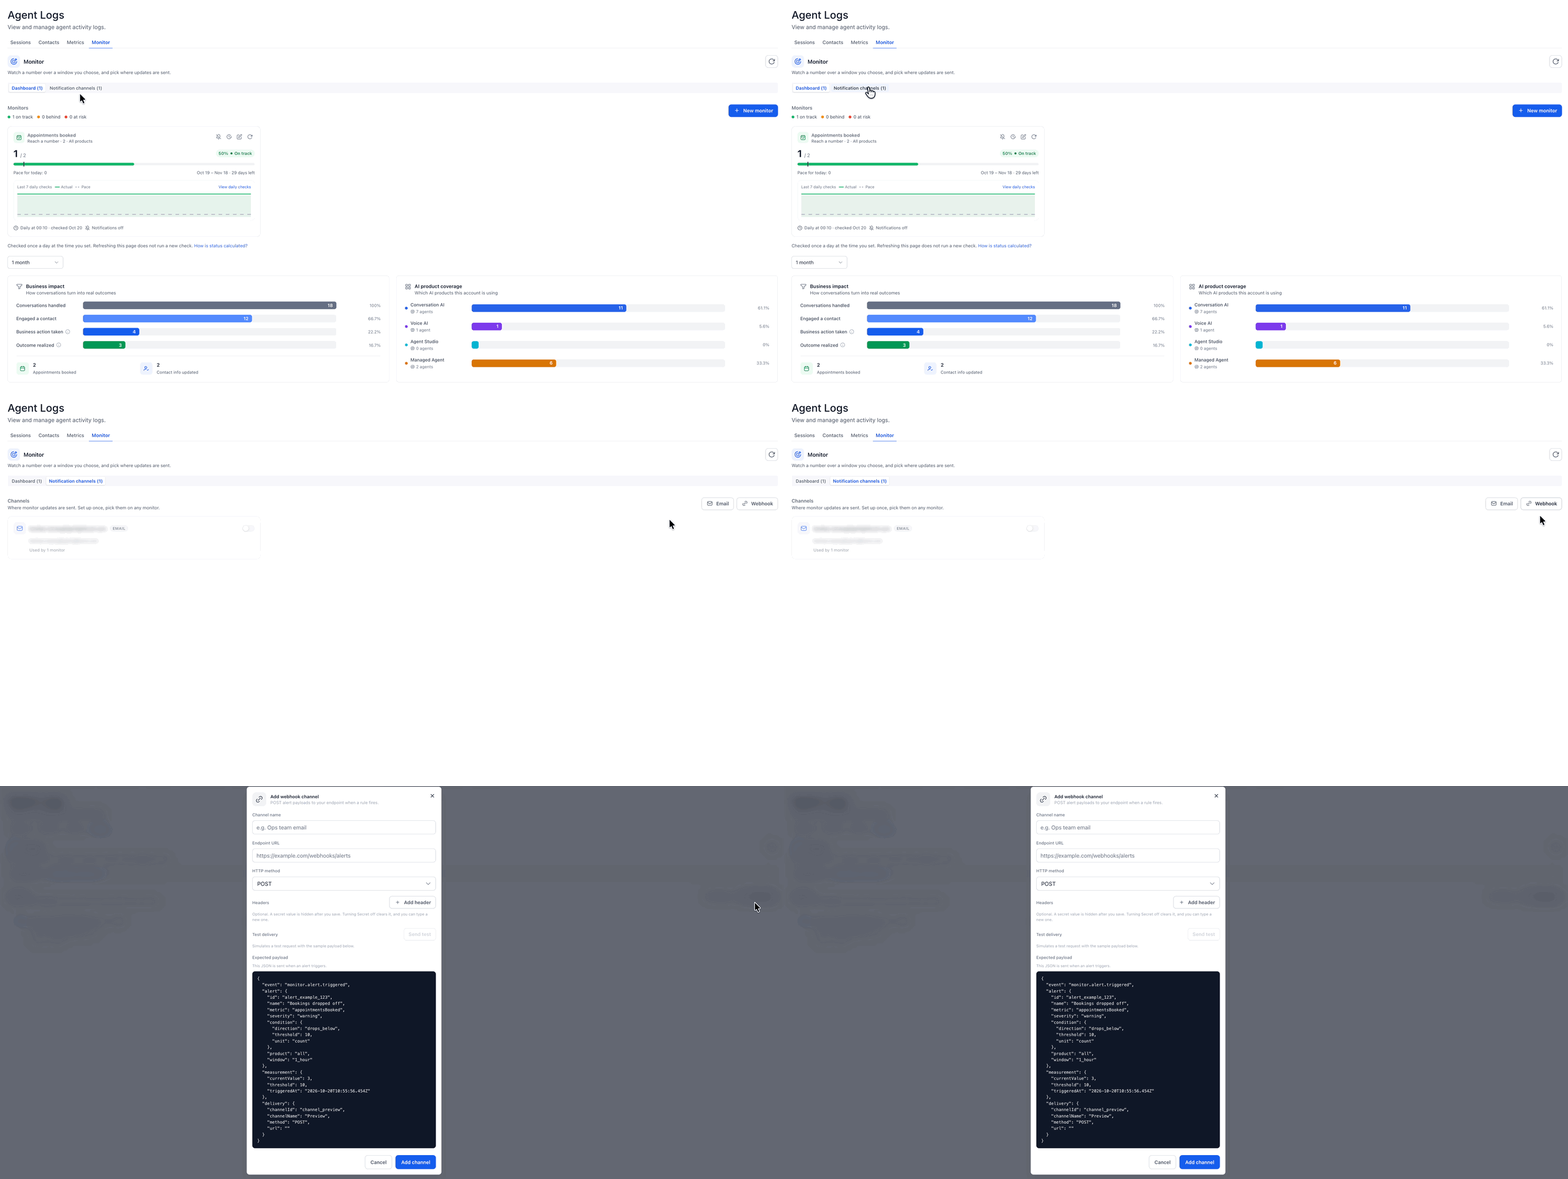
- From the Subaccount view, go to AI Agents > Agent Logs > Monitor > Dashboard.
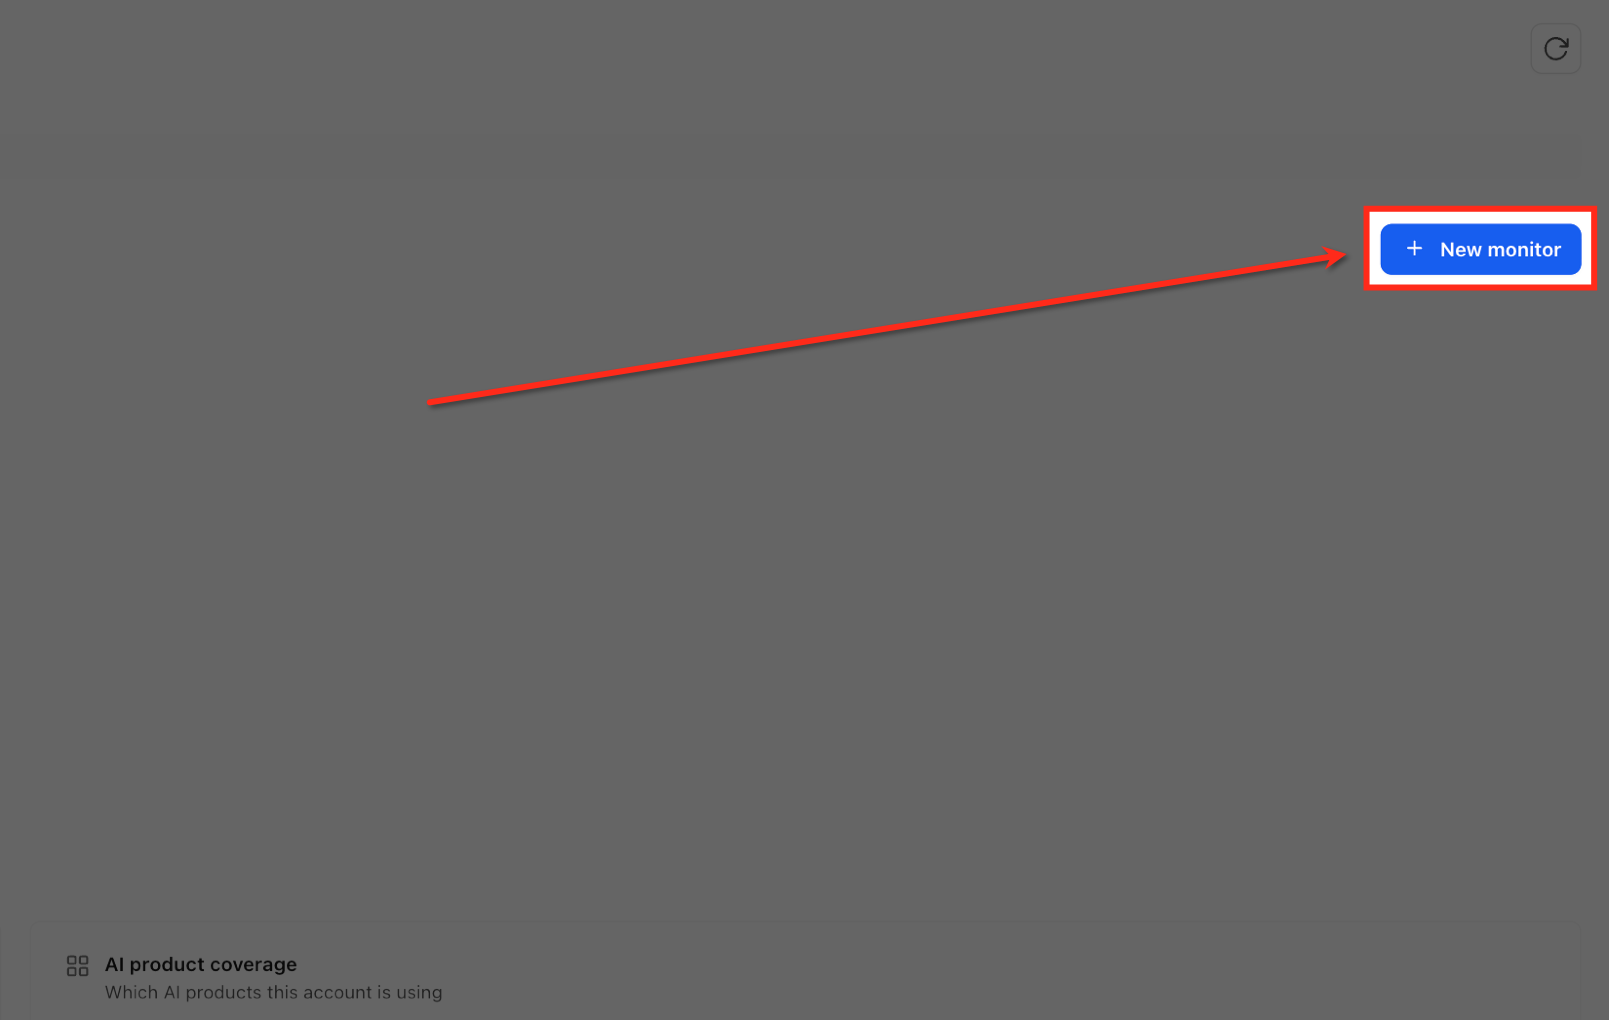
- Select “New Monitor”.
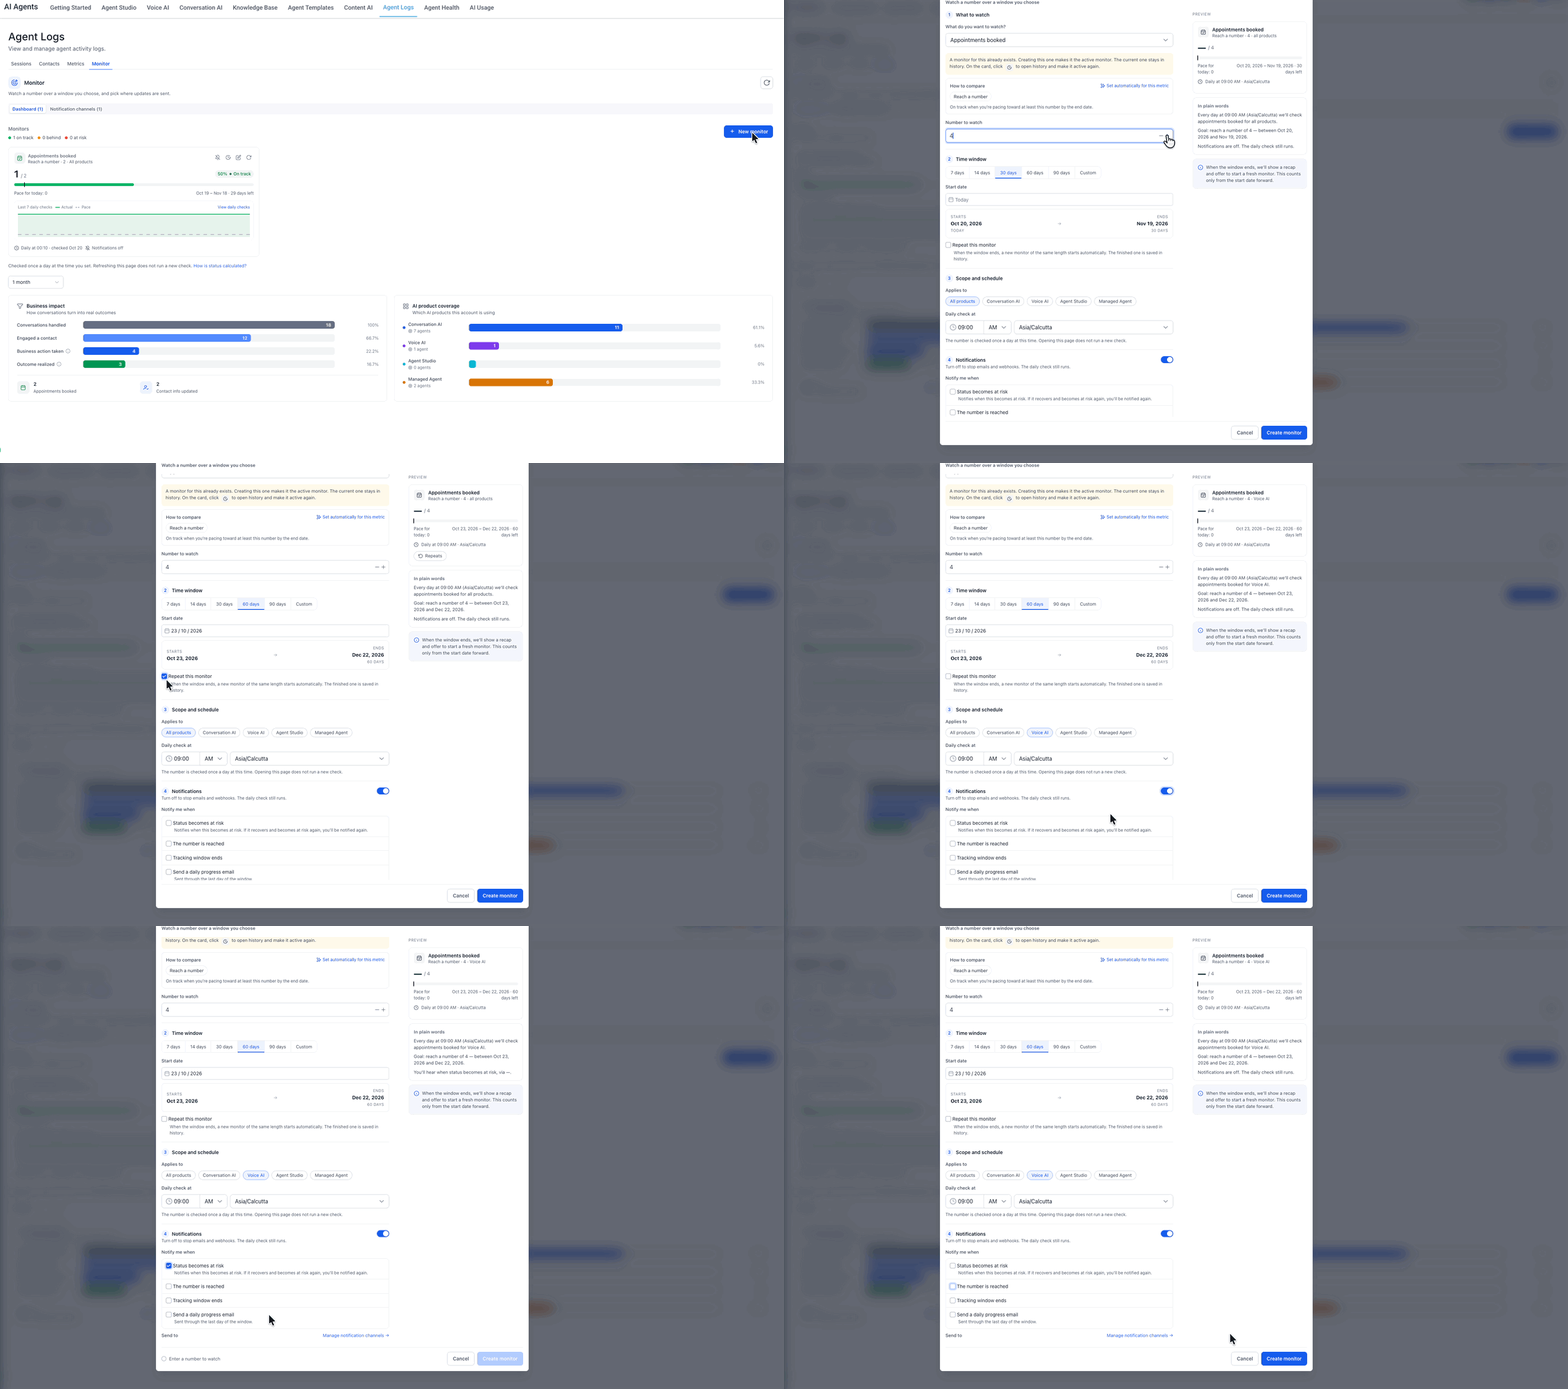
- Choose the metric you want to track.
- Select the comparison type, reach a number, stay under a cap, or percentage target, and enter the target value.
- Under Time window, pick a duration such as 7 days, 14 days, 30 days, or Custom.
- Set the Start date; the end date is calculated from the chosen duration.
- Enable Repeat this monitor if you want consecutive tracking periods.
- Under Applies to, select All products or pick specific AI products.
- Set the Daily check time and choose the appropriate Timezone.
- Review the Preview panel to confirm all selections.
- Click Create monitor to save the configuration.
- Note: Opening the Monitor page does not automatically trigger another check.
Create an email notification channel
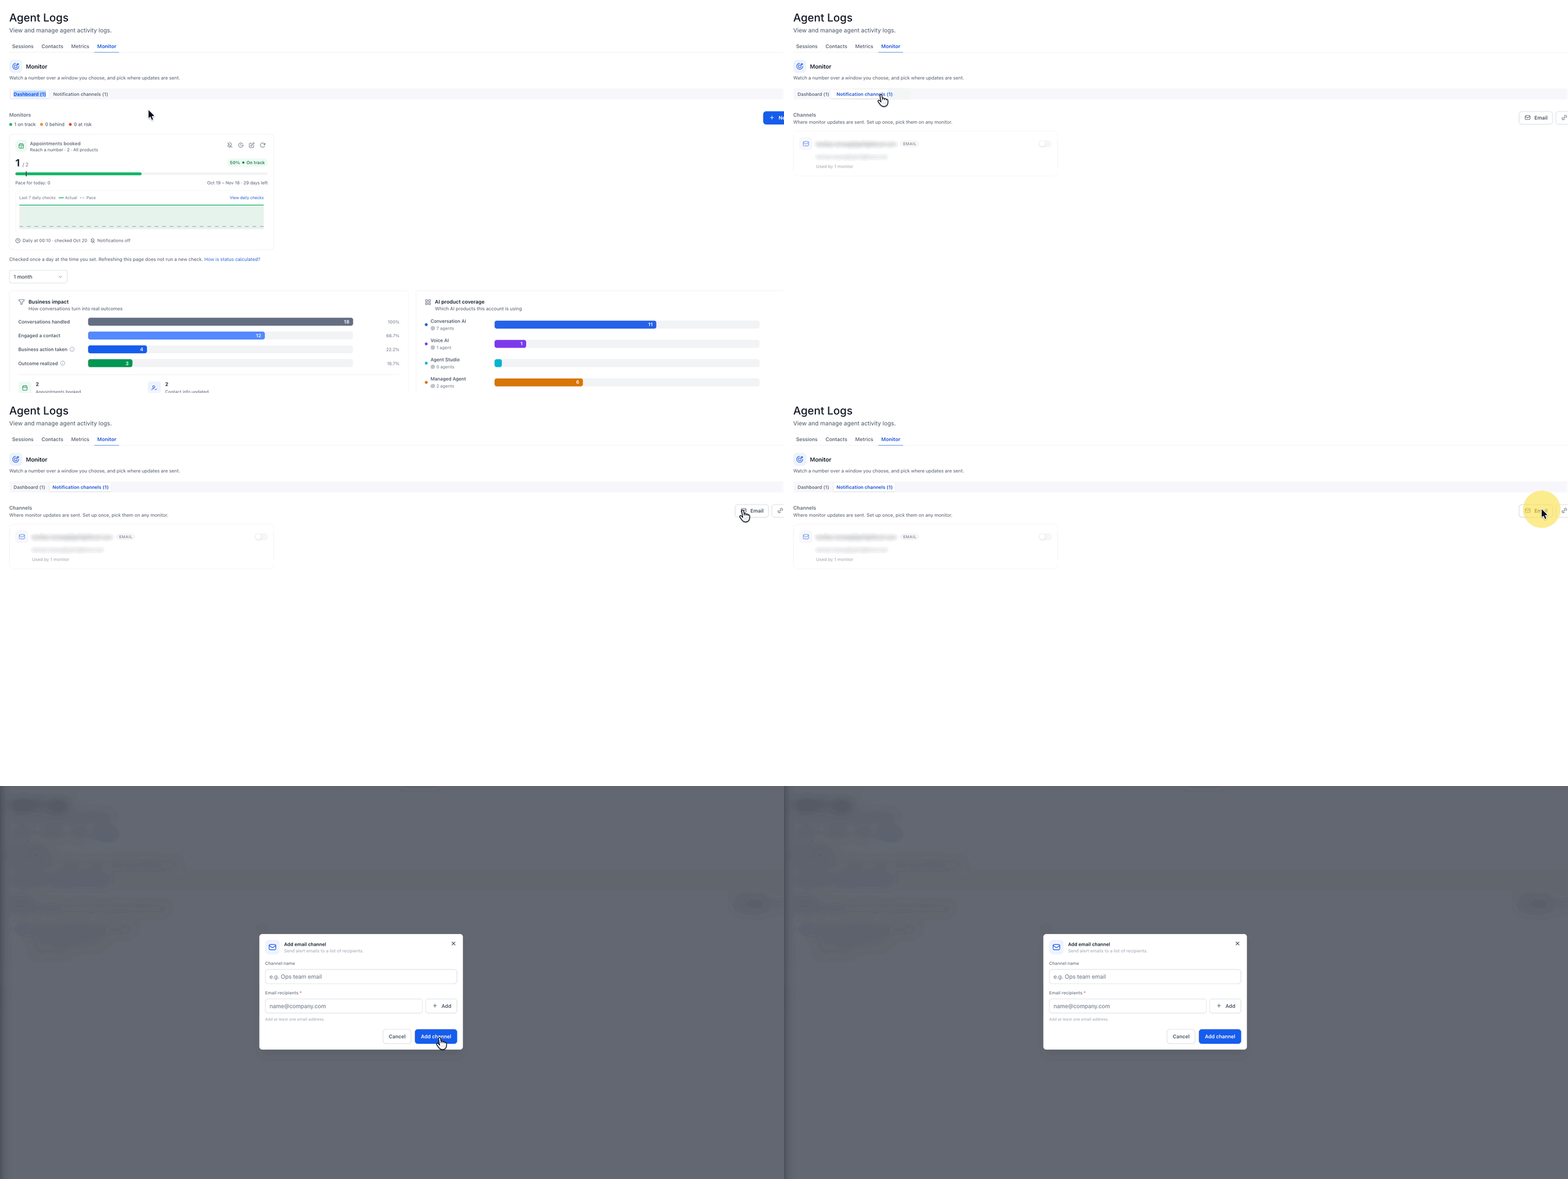
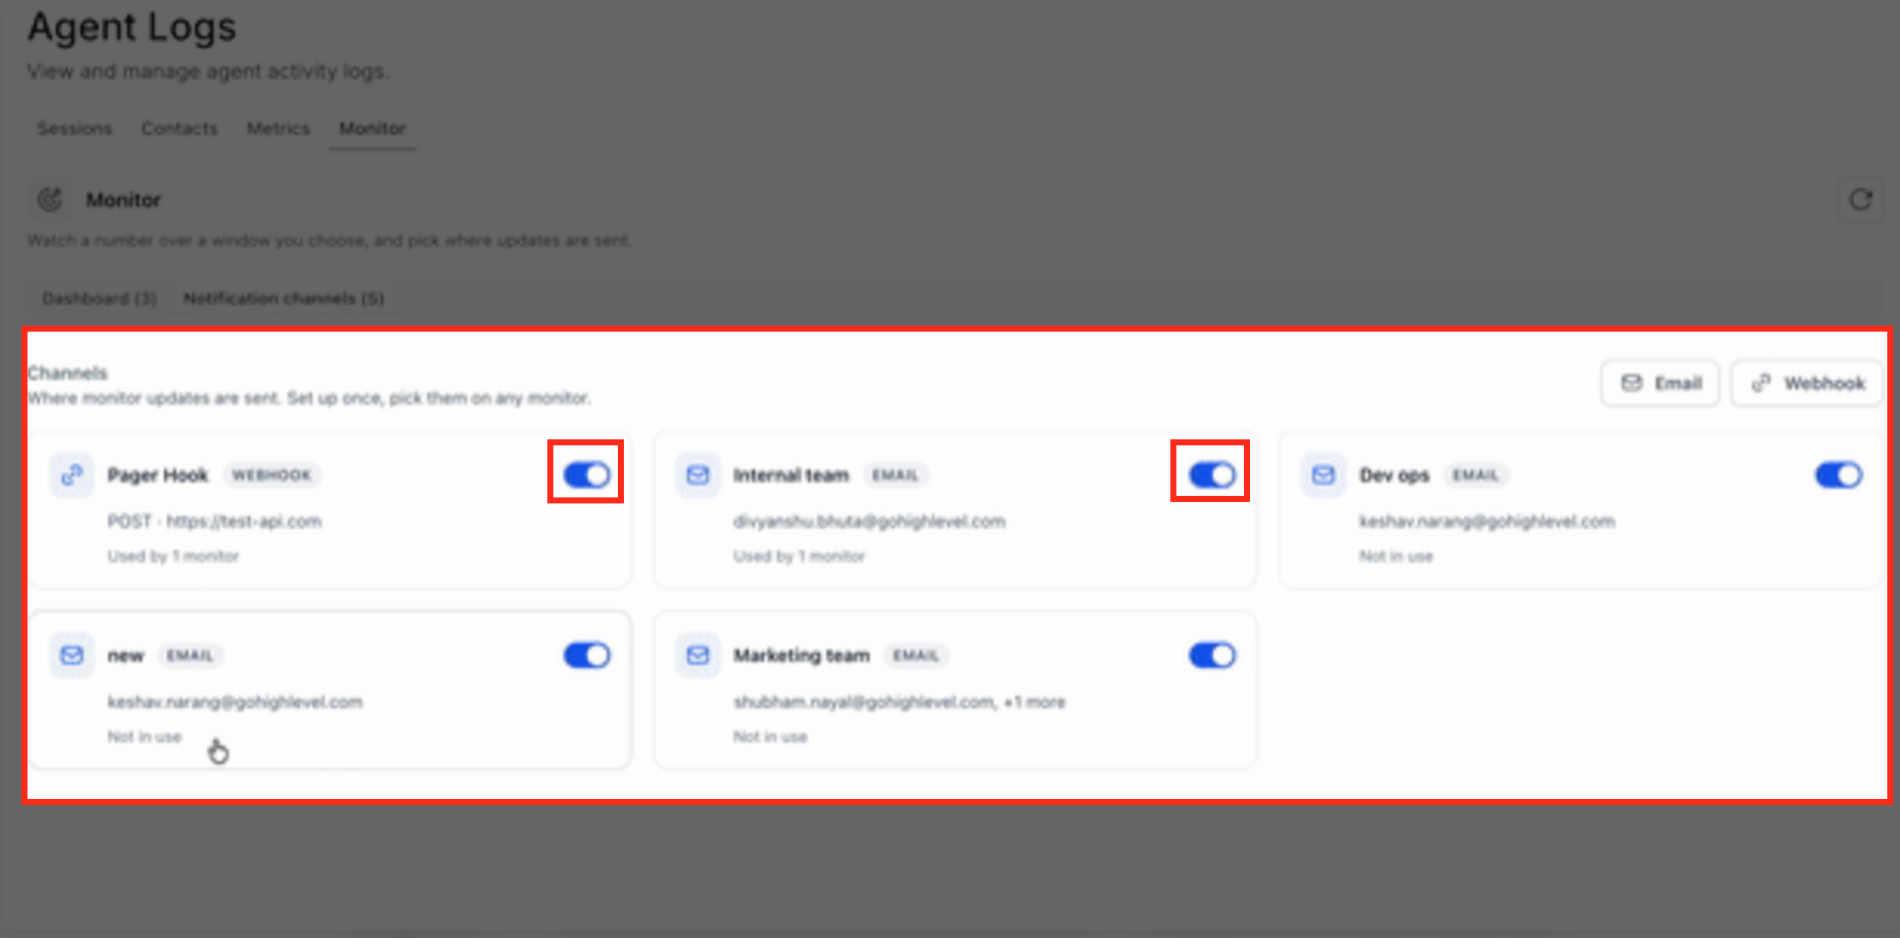
- Select Notification channels.
- Click Email to open the Add email channel dialog.
- Enter a descriptive name in the Channel name field.
- Under Email recipients, type the first recipient’s email address.
- Click Add to include each additional recipient.
- Click Add channel to save the email notification channel.
Create a webhook notification channel
- Select Notification channels.
- Click Webhook to open the Add webhook channel dialog.
- Enter a descriptive Channel name.
- In Endpoint URL, type the destination URL for webhook requests.
- Select the HTTP method (POST is shown).
- Click Add header and provide any required header details.
- Mark a header as secret when it contains sensitive information.
- Optionally click Send test under Test delivery to verify the endpoint.
- Click Add channel to save the webhook notification channel.
Edit monitor settings and notifications
- Locate the monitor on the Dashboard and click its Edit (pencil) icon.
- Modify the comparison type and target value as needed.
- Adjust tracking window, repeat option, AI product scope, daily check time, timezone, and selected notification events or channels.
- Click Save changes.
Run a manual check
- Navigate to AI Agents > Agent Logs > Monitor > Dashboard.
- Find the desired monitor and click its Refresh icon.
- Review the updated value and status after the check completes.
View monitor history and switch versions
- From the Monitor Dashboard, locate the monitor and click its History icon.
- In the History dialog, review the ACTIVE NOW details and OTHER VERSIONS list.
- Click Make active on an eligible previous version to switch.
Repeat a monitor automatically
- From the Subaccount view, go to AI Agents > Agent Logs > Monitor > Dashboard.
- Find the monitor and click its Edit icon.
- Under Time window, enable Repeat this monitor.
- Click Save changes.
Restart a completed monitor version
- From the Subaccount view, go to AI Agents > Agent Logs > Monitor > Dashboard.
- Click the History icon on the monitor card.
- Locate the completed version under OTHER VERSIONS.
- Click Restart for that version.
07What it looks like in HighLevel
08Settings that matter
- Metric. Determines which type of AI agent activity is measured, such as appointments booked or calls completed.
- Comparison type. Defines whether the monitor tracks progress toward a number, stays under a cap, or meets a percentage target.
- Number to watch. The target count or percentage that the monitor aims to reach or stay within.
- Time window. Specifies the duration of the tracking period and the start date for the monitor.
- Repeat this monitor. When enabled, automatically creates a new tracking window after the current one ends.
- Applies to. Selects which AI products contribute to the metric, either All products or specific ones.
- Daily check at. Sets the time of day when the monitor evaluates progress.
- Timezone. Defines the time zone used for the daily check schedule.
- Notify me when. Chooses the events that trigger notifications, such as at risk status, goal reached, or tracking window end.
09Things to know before you rely on it
- Only activity recorded inside the selected time window counts toward progress; earlier activity is excluded.
- Status calculations differ by comparison type: count based targets use expected pacing, while caps and rates use defined thresholds.
- Only one version of a metric can be active at a time; switching versions does not delete other saved versions.
- When Repeat this monitor is active, a new window begins automatically after the current window closes, and the completed window remains in history.
10How it connects to the rest of HighLevel
- View pricing and plan options for features like Agent Logs Monitor. Pricing and plans
- Start a free trial to explore Agent Logs Monitor and other LevelUp 2026 features. 30 day trial
- Learn about scheduling appointments with Conversation AI, which can be monitored by Agent Logs Monitor. Conversation AI appointment booking
Michael's take

Ever wonder how to know if your AI Agents are actually hitting the targets you set without pulling endless reports? Agent logs monitor gives you a daily pulse on those goals, sending you a quick email or webhook when something slips or when you finally hit the mark.
I’d start by setting up a simple monitor for a key metric like appointments booked, add an email channel for my team, and let the daily checks run. Watching the progress chart grow each day is a great confidence boost and catches issues before they become crises.