
01Who this is for
- Agency owners who build client web apps, because they can brand the app URL with their own domain.
- Coaches offering portal access, as custom domains let their members use a familiar web address.
- Software vendors delivering SaaS portals, because they can host the app under their corporate domain.
02Custom domains, explained
The feature lives inside the Client App Builder. When you publish a web app, HighLevel creates a permanent app address. You can change that address later and add custom domains that point to the same app.
Custom domains are configured through the Publish window. You choose either a subdomain (CNAME) or a root domain (A record), add the required DNS records at your registrar, and wait for verification. The original app address continues to work unless you rename it; custom domains remain active.
03How businesses use custom domains
- Dental practice. The practice publishes its patient portal, then adds a subdomain like portal.mypractice.com. After updating the DNS CNAME record, patients log in using the familiar practice URL.
- Real estate agency. The agency creates a property listing app and connects a root domain such as homesales.com. By adding an A record at the domain host, visitors reach the app directly at the main business address.
- Online course platform. The platform publishes a course dashboard and adds up to ten custom domains for different instructor sites. Each instructor sets a subdomain, follows the DNS steps, and students access courses via the instructor’s own URL.
04The numbers and rules that matter
- Up to 10 custom domains per app.
05Before you start
- The web app must be published in Client App Builder before custom domains appear.
- You need access to the domain registrar to add the required DNS records.
06How to set up and use custom domains in HighLevel
Set your app address
- Open the web app and click Publish at the top right.
- Enter the desired name under App address and wait for the Available indicator.
- Click Publish app.
- Allow the publishing process, which typically completes in under a minute.
Connect a custom domain
- Click Publish again to reopen the Publish window.
- Under Custom domains, click Add domain.
- Enter the domain or subdomain and select the connection type (Subdomain CNAME or Root domain A record).
- Follow the on screen instructions to create the DNS records at your provider.
- Wait for the domain to verify.
- If verification is delayed, re check the DNS records and wait for propagation before trying again.
- Open the domain in a browser to confirm the app loads.
07What it looks like in HighLevel
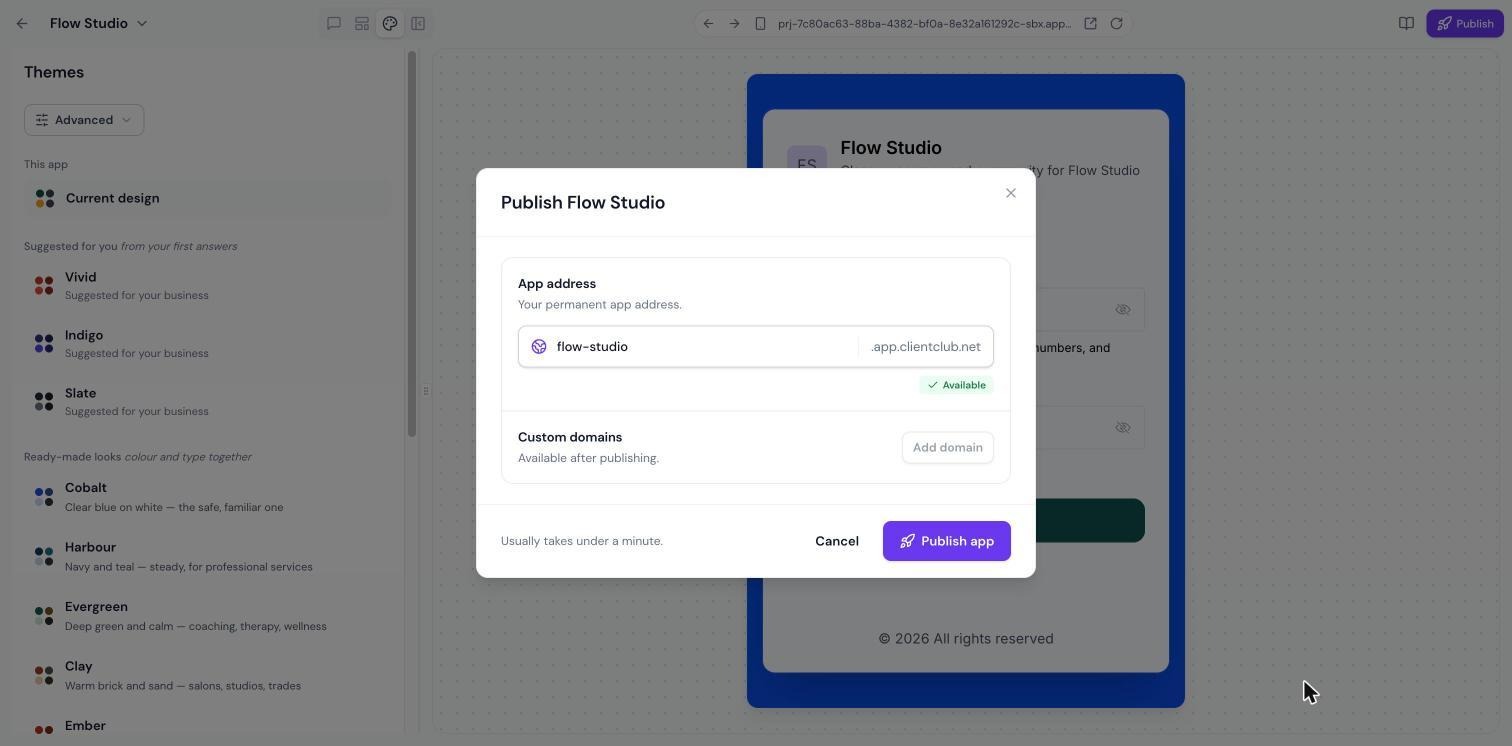
08Settings that matter
- App address. Controls the permanent URL assigned to the web app when it is first published.
- Custom domains. Allows up to ten additional domain or subdomain entries that point to the same web app.
- Connection type. Determines whether the domain uses a CNAME record (subdomain) or an A record (root domain).
09Things to know before you rely on it
- You can attach a maximum of ten custom domains to a single app.
- Custom domains apply only to web apps; mobile apps are published as Android APK files.
10If something goes wrong
- Domain does not verify after adding DNS records.. Check that the DNS records match the instructions and wait for propagation before trying again.
11How it connects to the rest of HighLevel
- Getting started with Client App Builder Client App Builder overview
- Apply branding to your app Theme and branding
- Publish branded Android apps Android publishing
Michael's take

I find it useful to give clients a branded URL for the web app, and the setup process is straightforward once the app is published.
If you don’t have a domain to manage, the feature isn’t useful, and it doesn’t apply to mobile apps, which are published as Android APKs.