
01Who this is for
- Founders who need to set meetings for leads while they are on a call, ensuring no delays.
- Customer support teams that must lock in follow up calls for clients who cannot use the self service calendar.
- Operations managers who schedule internal trainings or team meetings across different time zones.
02Manually booking calendar appointments, explained
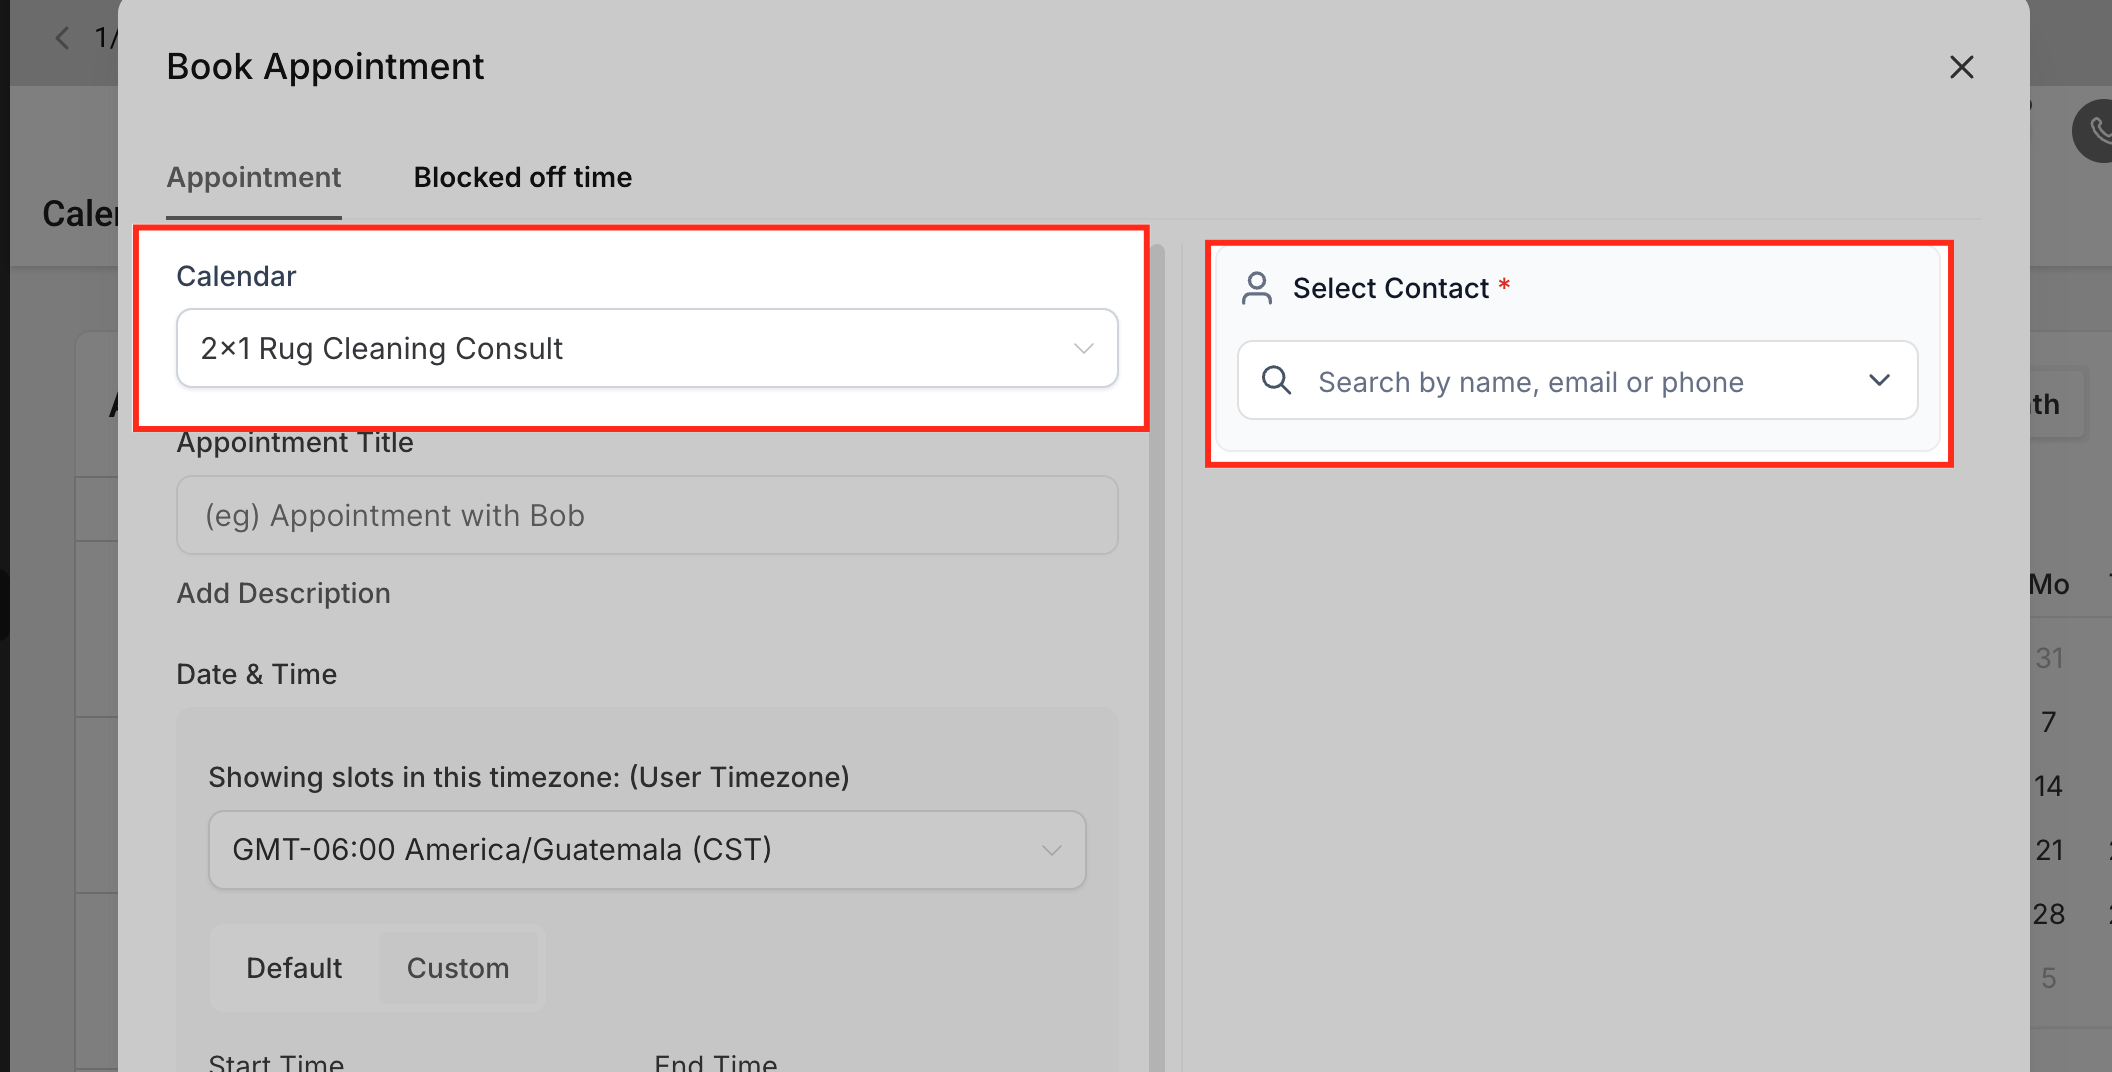
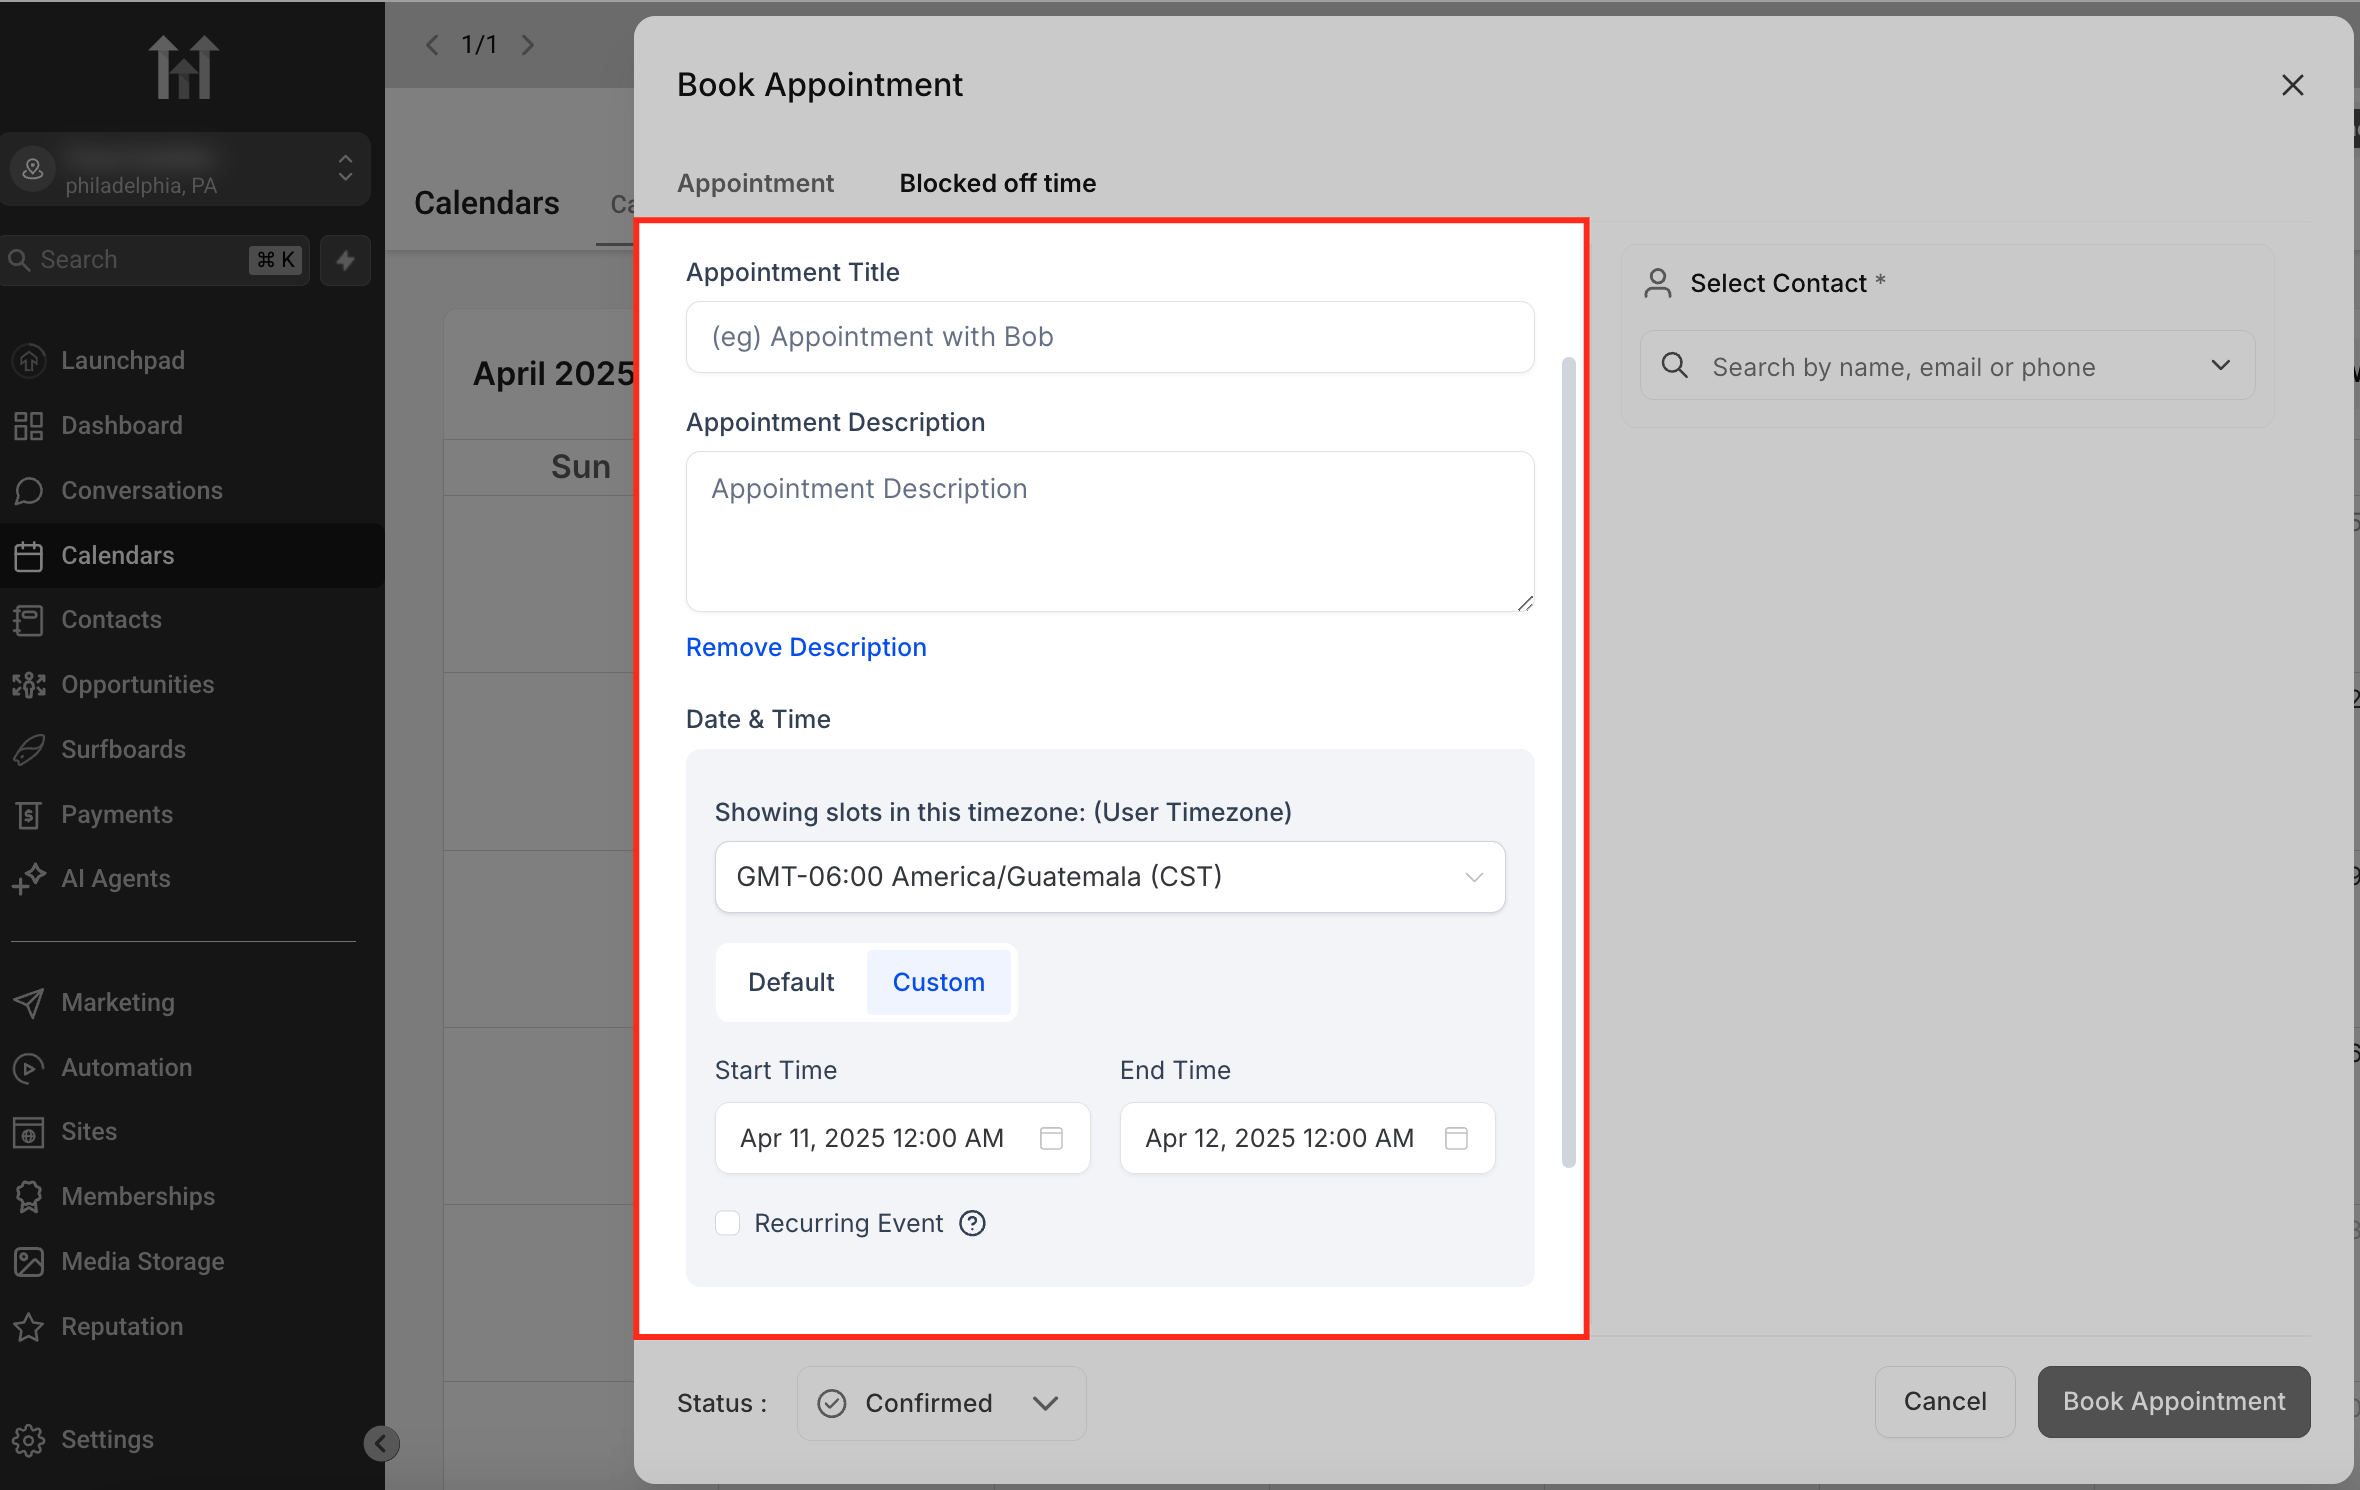
The manual booking feature opens a modal where you pick a calendar, assign a contact and fill in the appointment’s title, date, time, location and recurrence. It automatically shows the contact’s time zone and lets you add a custom meeting link or a physical address. Optional blocked off time can be set to keep certain periods unavailable for new bookings.
You can reach the booking modal from four places: the Conversations tab, the Contacts profile, the Calendar view, or an Opportunity record. After the modal is completed, the appointment appears on the selected calendar and is linked to the chosen contact. All steps are identical regardless of the entry point.
03How businesses use manually booking calendar appointments
- Coaching practice. A coach opens a client’s conversation, clicks the calendar icon, and right away books a consultation while on the call. The appointment is saved to the coach’s calendar and linked to the client’s record.
- Real estate agency. An agent selects a property lead in the Contacts list, opens the Appointments tab, adds a new showing, sets the location and time, and blocks off a lunch hour to avoid double booking.
- SaaS startup. A sales rep opens an opportunity, uses the Book/Update Appointment section to add a product demo, picks the appropriate meeting type, fills in details, and saves the appointment directly on the opportunity page.
04How to set up and use manually booking calendar appointments in HighLevel
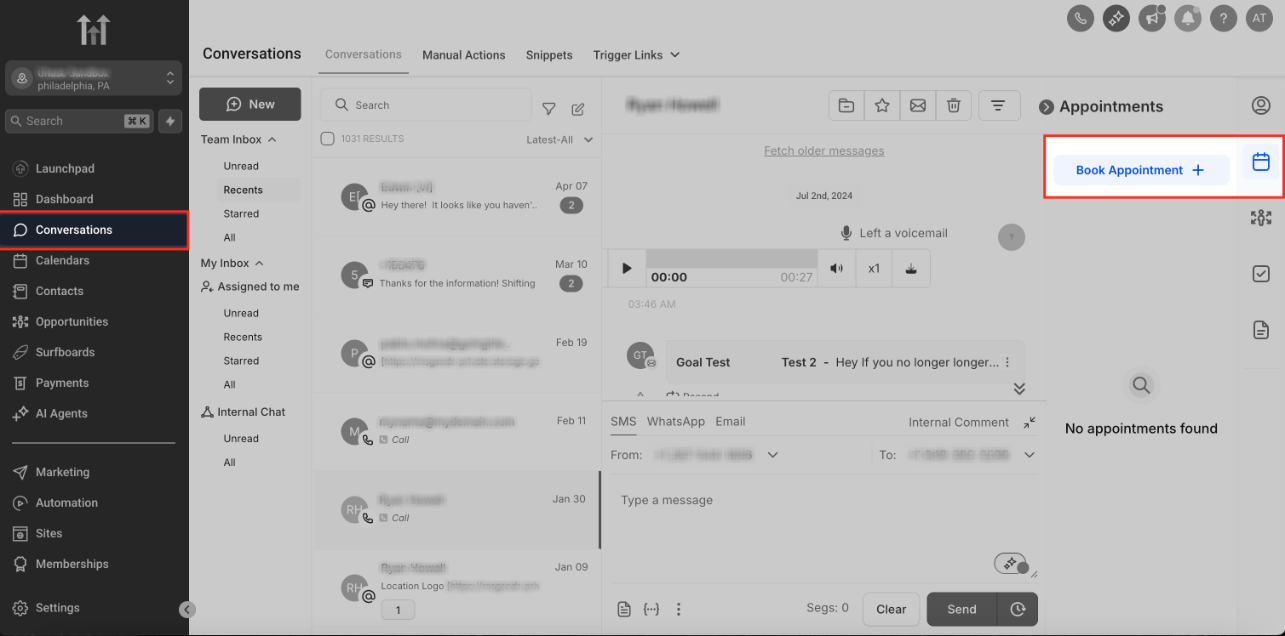
Book an appointment from the Conversations tab
- Open the Conversations tab in HighLevel.
- Select the contact you are messaging.
- Click the calendar icon in the sidebar.
- Press the “Book Appointment” button.
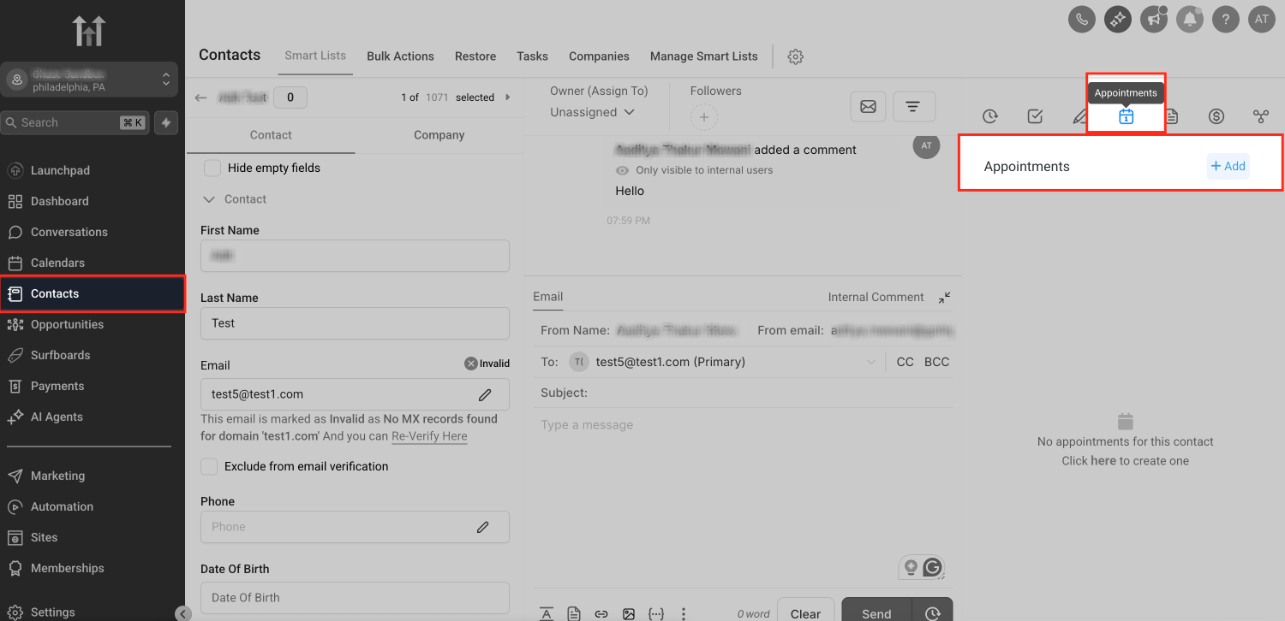
Book an appointment from the Contacts tab
- Navigate to the Contacts area.
- Open the specific contact record.
- Click the Appointments tab on the right side of the contact view.
- Click the +Add button to start a new appointment.
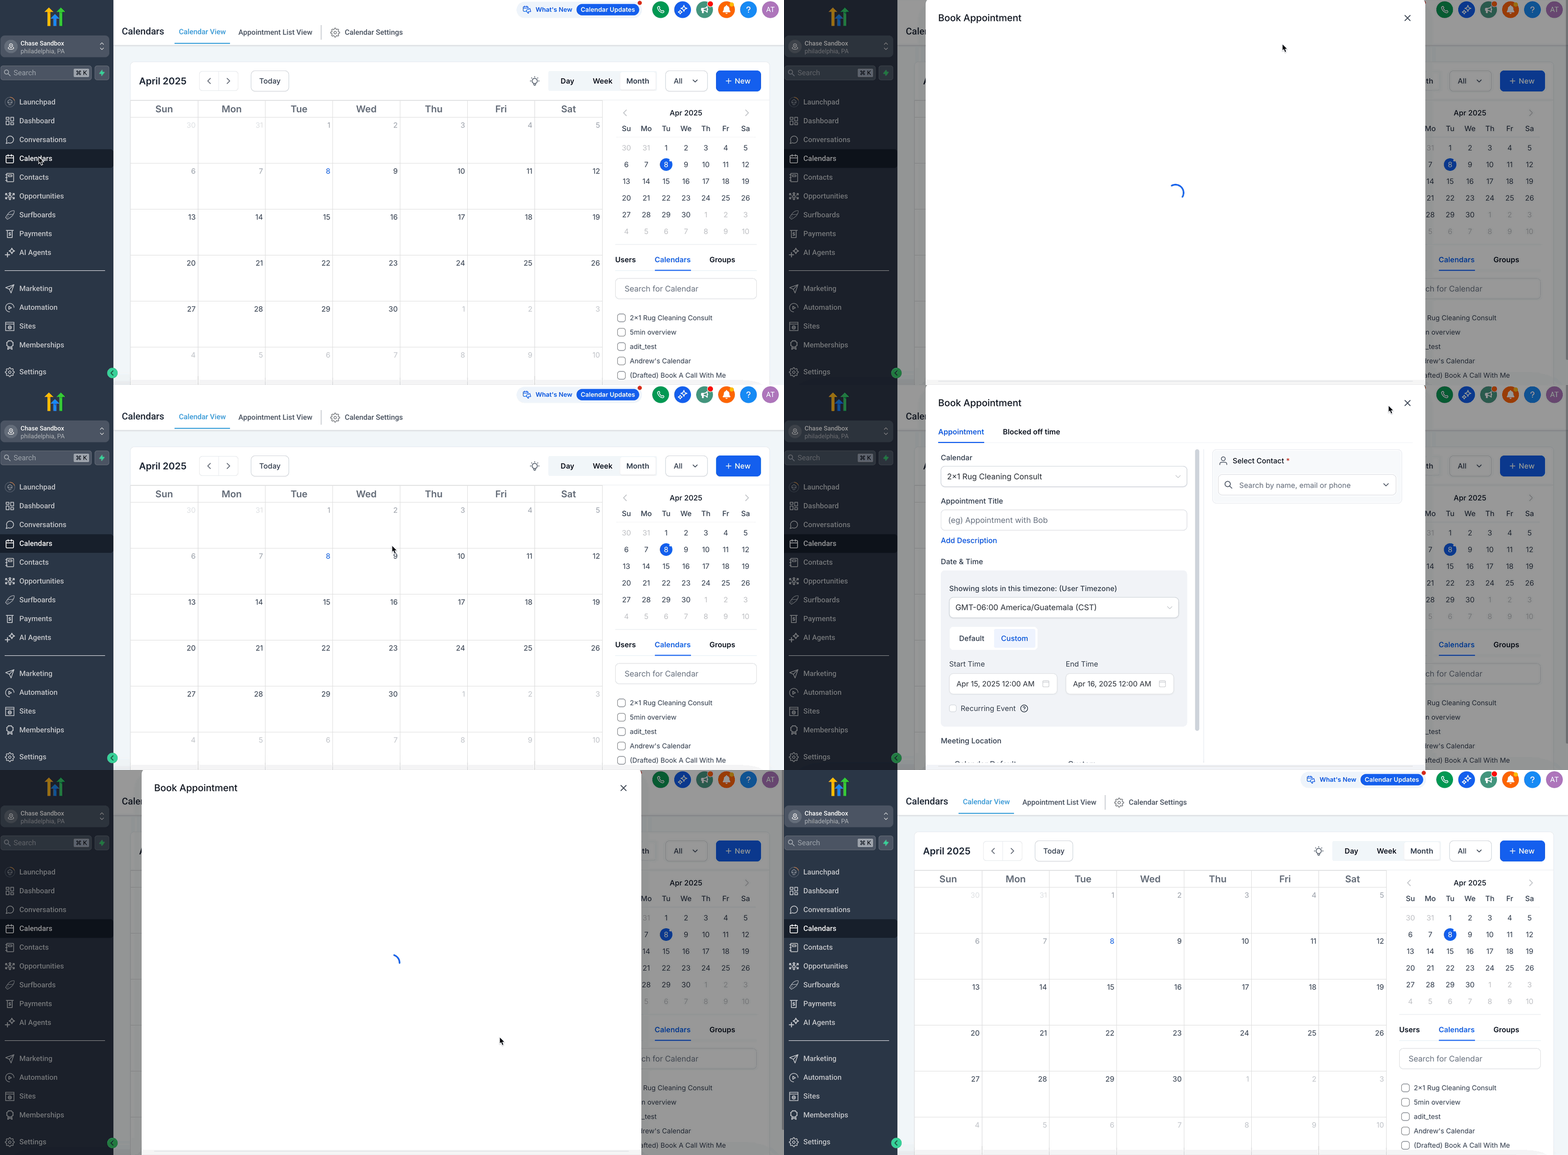
Book an appointment from the Calendar view
- Go to the Calendars section.
- Select Calendar View.
- Click the “New” button or choose a specific time slot on the calendar.
- The appointment booking modal appears for you to enter details.
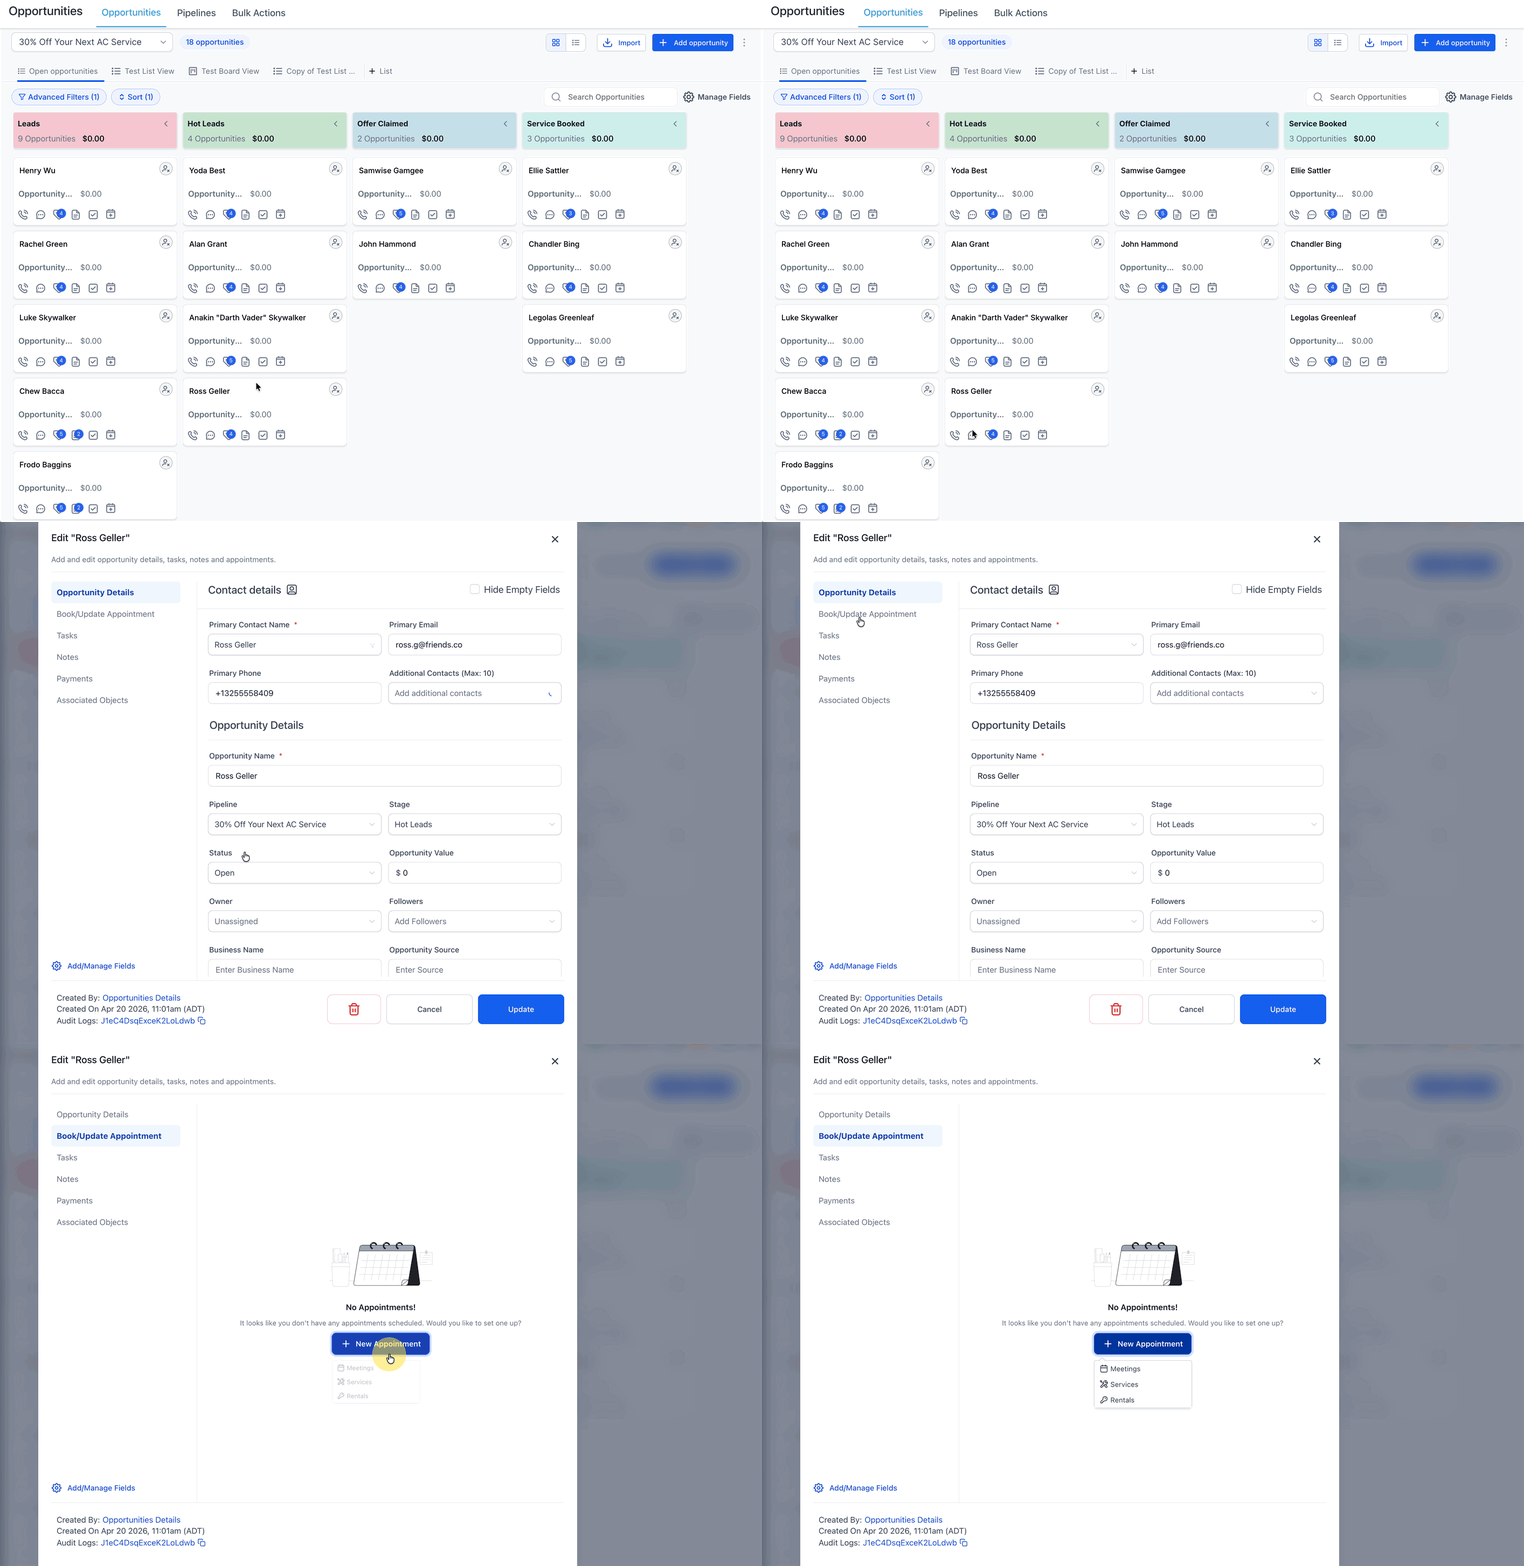
Book an appointment from an Opportunity
- Open the Opportunities list and select the opportunity to modify.
- Locate the Book/Update Appointment section within the opportunity.
- Click the + New Appointment button.
- Choose the type of appointment: Meetings, Services, or Rentals.
- Fill in the appointment information in the modal and click Save.
Finalize the appointment after opening the modal
- Choose the calendar where the appointment will be stored and assign the contact.
- Enter the appointment title, date, time, location and any recurrence options.
- Optionally use the Blocked Off Time tab to reserve periods that should stay unavailable.
- Save the appointment to complete the booking.
05What it looks like in HighLevel
06Settings that matter
- Blocked Off Time. Controls periods that are unavailable for new bookings; it does not delete existing appointments.
- Appointment Title. Defines the subject of the appointment and appears as the event name on the calendar.
07Things to know before you rely on it
- The booking user interface varies depending on whether you start from Conversations, Contacts, Calendar view or Opportunities.
- Blocked Off Time only prevents new bookings; it does not affect appointments already scheduled.
- Time zones are detected automatically and shown in the modal, but can be overridden with custom dates and times.
08If something goes wrong
- The appointment does not appear on the calendar after saving.. Verify that the correct calendar and contact were selected, and check that no filters are hiding the appointment in the calendar view.
09How it connects to the rest of HighLevel
- Use the workflow action to book appointments automatically. Workflow action: Book Appointment
- View and manage all appointments in list view for quick edits. Appointment List View
- Collect payments directly from calendar appointments when needed. Payments tab in calendars
Michael's take

If I were setting up a new sales pipeline, I’d add a quick button in my call script that opens the appointment modal straight from the conversation window. It keeps the flow smooth and cuts down the back and forth that usually kills momentum.