
01Who this is for
- Founders who run agencies need RCS to support richer messaging experiences for their clients.
- Marketing managers can use RCS branding features to deliver interactive content within chat threads.
02RCS sender IDs, explained
The RCS onboarding feature lets a HighLevel subaccount connect a Twilio registered RCS Sender ID to the platform’s LC Phone system. Once linked, HighLevel can route incoming RCS messages and delivery status updates through its backend endpoints.
The setup lives entirely in the Twilio console. Users create the sender, set required webhook URLs, build a Messaging Service, and attach the sender to that service. After the Twilio side is finished, the user provides the generated IDs to the HighLevel team, who completes the final activation.
RCS messaging is only available to accounts that have switched to LC Phone. Carriers and Google must still approve the Sender ID; the onboarding steps do not perform that approval.
03How businesses use the RCS Sender ID
- Digital marketing agency. The agency creates an RCS Sender for each client brand, configures the required webhooks, and attaches it to a Messaging Service. They then send branded carousel messages to prospects through HighLevel.
- Ecommerce retailer. The retailer registers an RCS Sender, adds product images and a banner, and links it to a Messaging Service. HighLevel then delivers interactive order status updates using the RCS channel.
- Healthcare clinic. The clinic sets up an RCS Sender with its logo, configures inbound and status webhooks, and shares the IDs with HighLevel. Patients receive appointment reminders that include clickable actions.
04The numbers and rules that matter
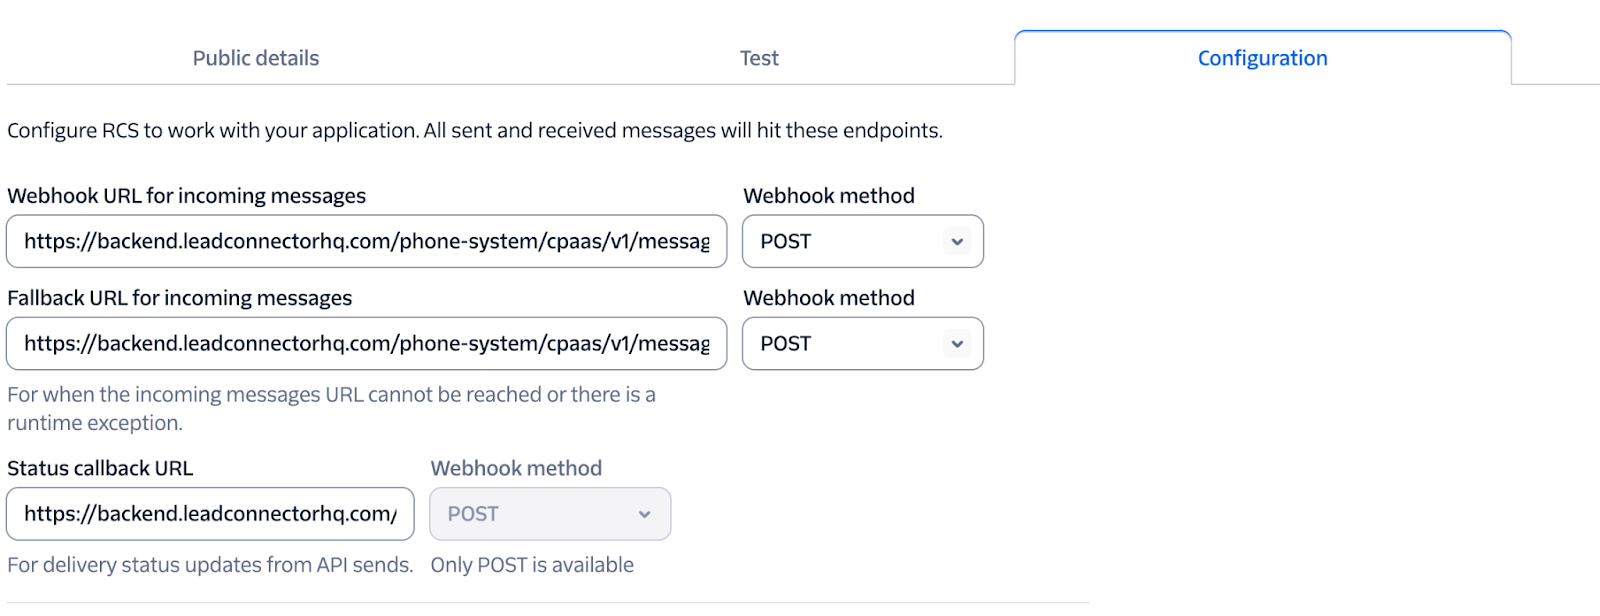
- Incoming Messages URL: Https://backend.leadconnectorhq.com/Phone System/cpaas/v1/messages/incoming (POST).
- Fallback URL: Https://backend.leadconnectorhq.com/Phone System/cpaas/v1/messages/incoming (POST).
- Status Callback URL: Https://backend.leadconnectorhq.com/Phone System/cpaas/v1/messages/status (POST).
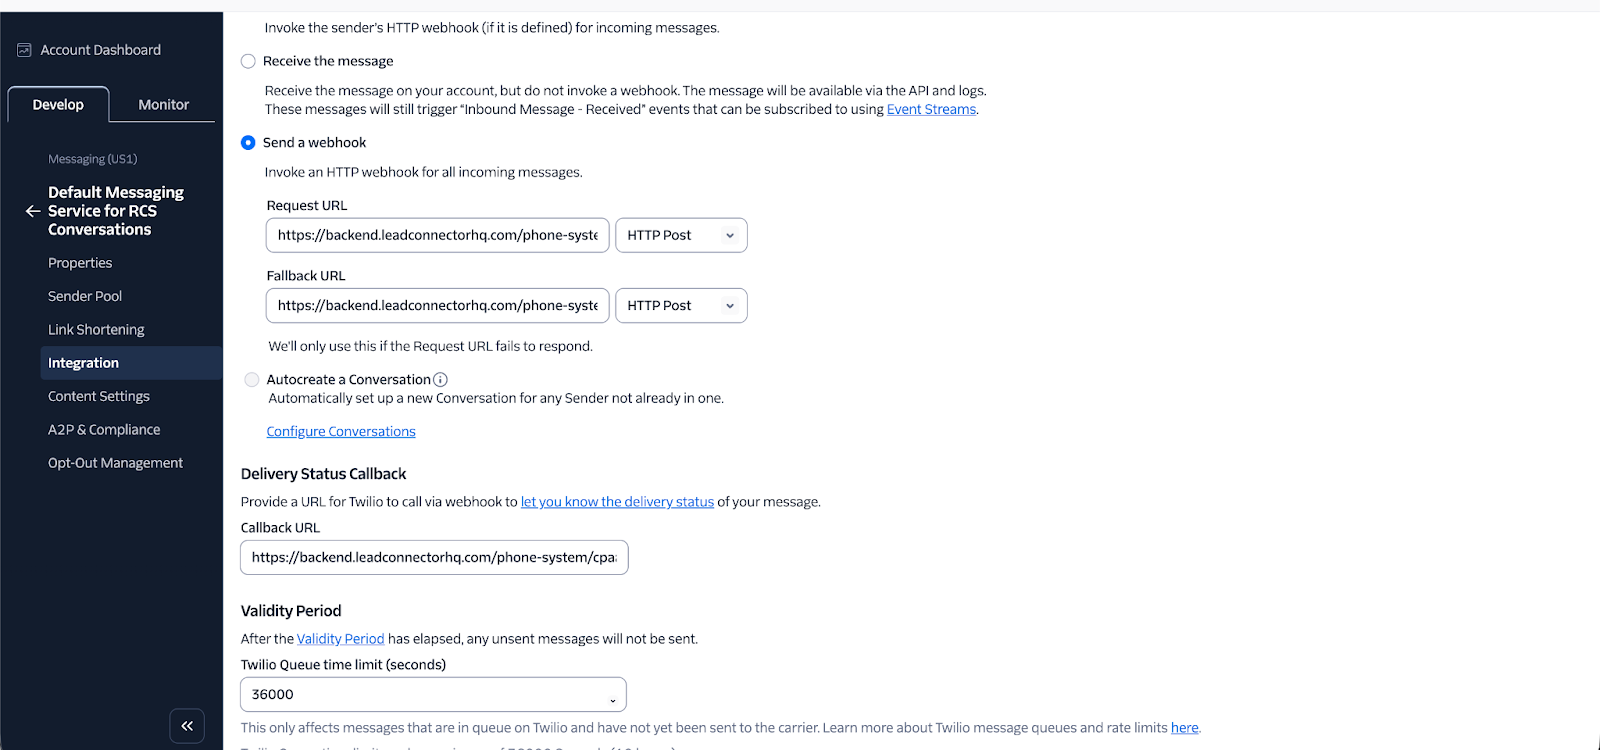
- Messaging Service Incoming Request URL: Https://backend.leadconnectorhq.com/Phone System/cpaas/v1/messages/incoming (HTTP POST).
- Messaging Service Fallback URL: Https://backend.leadconnectorhq.com/Phone System/cpaas/v1/messages/incoming (HTTP POST).
- Messaging Service Delivery Status Callback URL: Https://backend.leadconnectorhq.com/Phone System/cpaas/v1/messages/status.
05Before you start
- An active Twilio account enrolled in RCS.
- Access to the specific HighLevel subaccount where the Sender ID will be used.
06How to set up and use the RCS Sender ID in HighLevel
Onboard RCS Sender ID
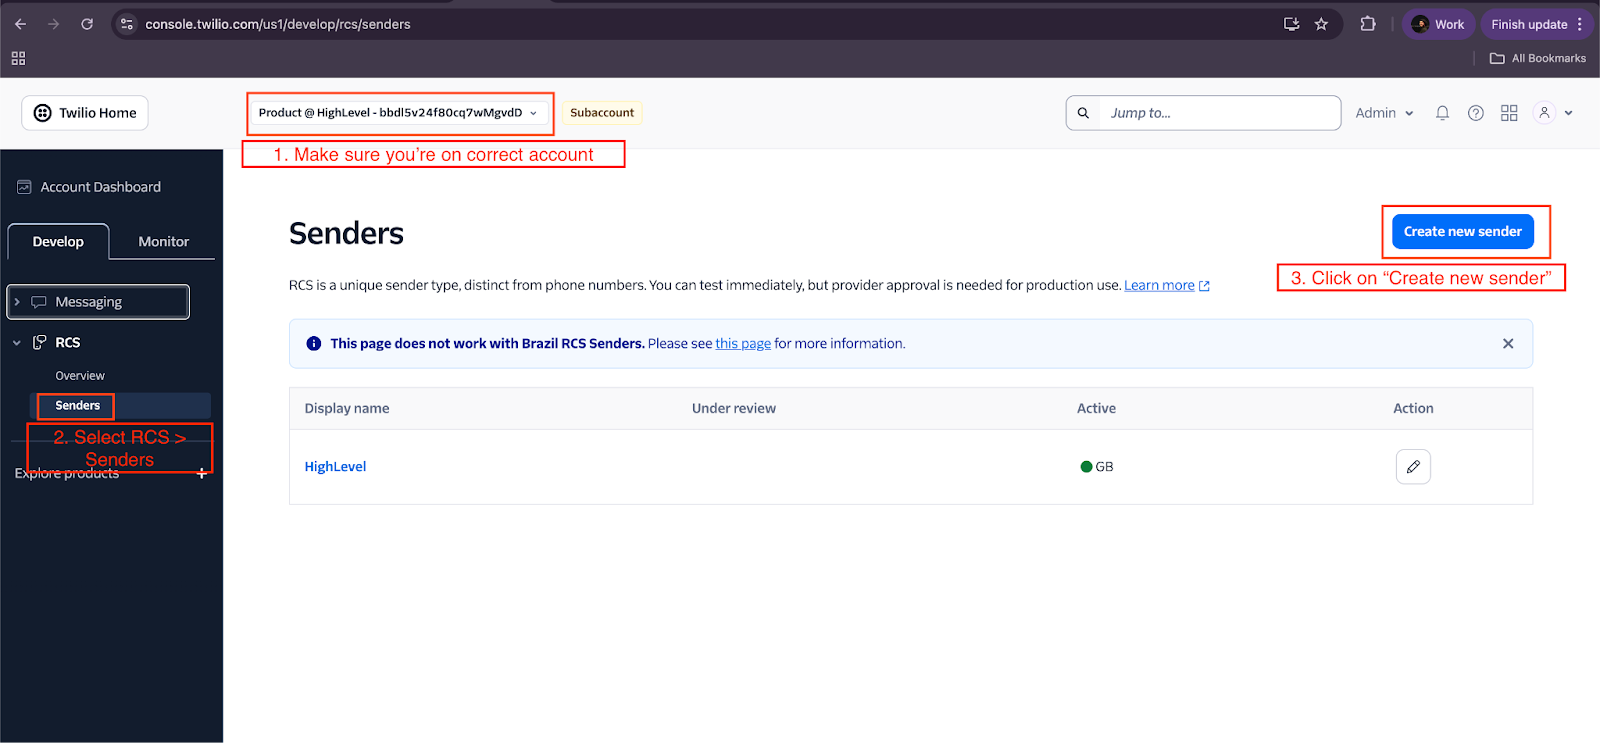
- Verify you are in the correct Twilio subaccount, as Sender IDs are account specific.
- Log in to the Twilio subaccount that will host the RCS Sender.
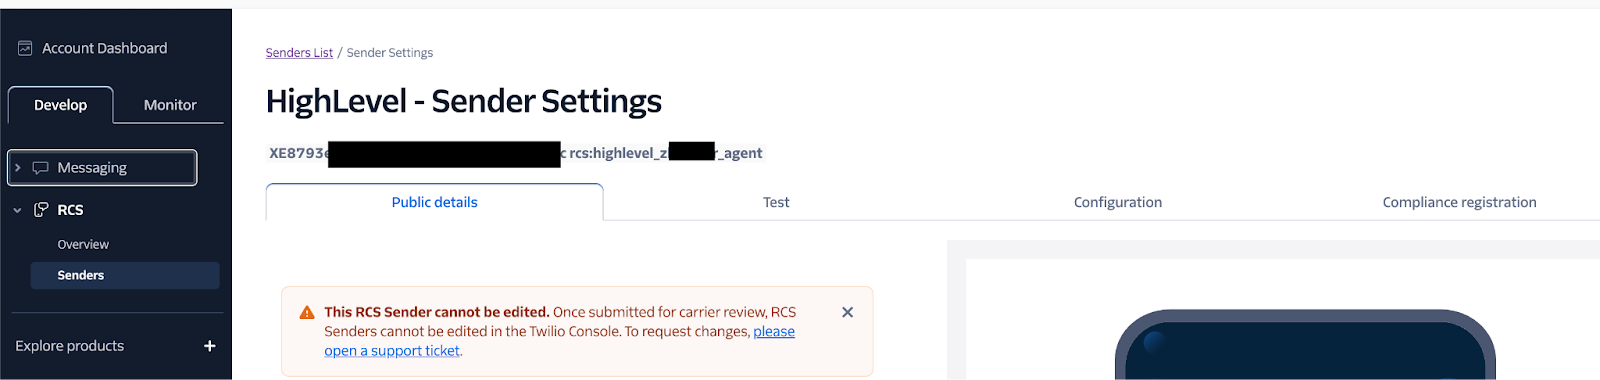
- Navigate to Develop > RCS > Senders and click Create RCS Sender.
- Enter the Sender Display Name, Description, Logo Image, Banner Image, and Accent Color.
- Open the Configuration tab of the new sender and set all webhook URLs to POST as specified.
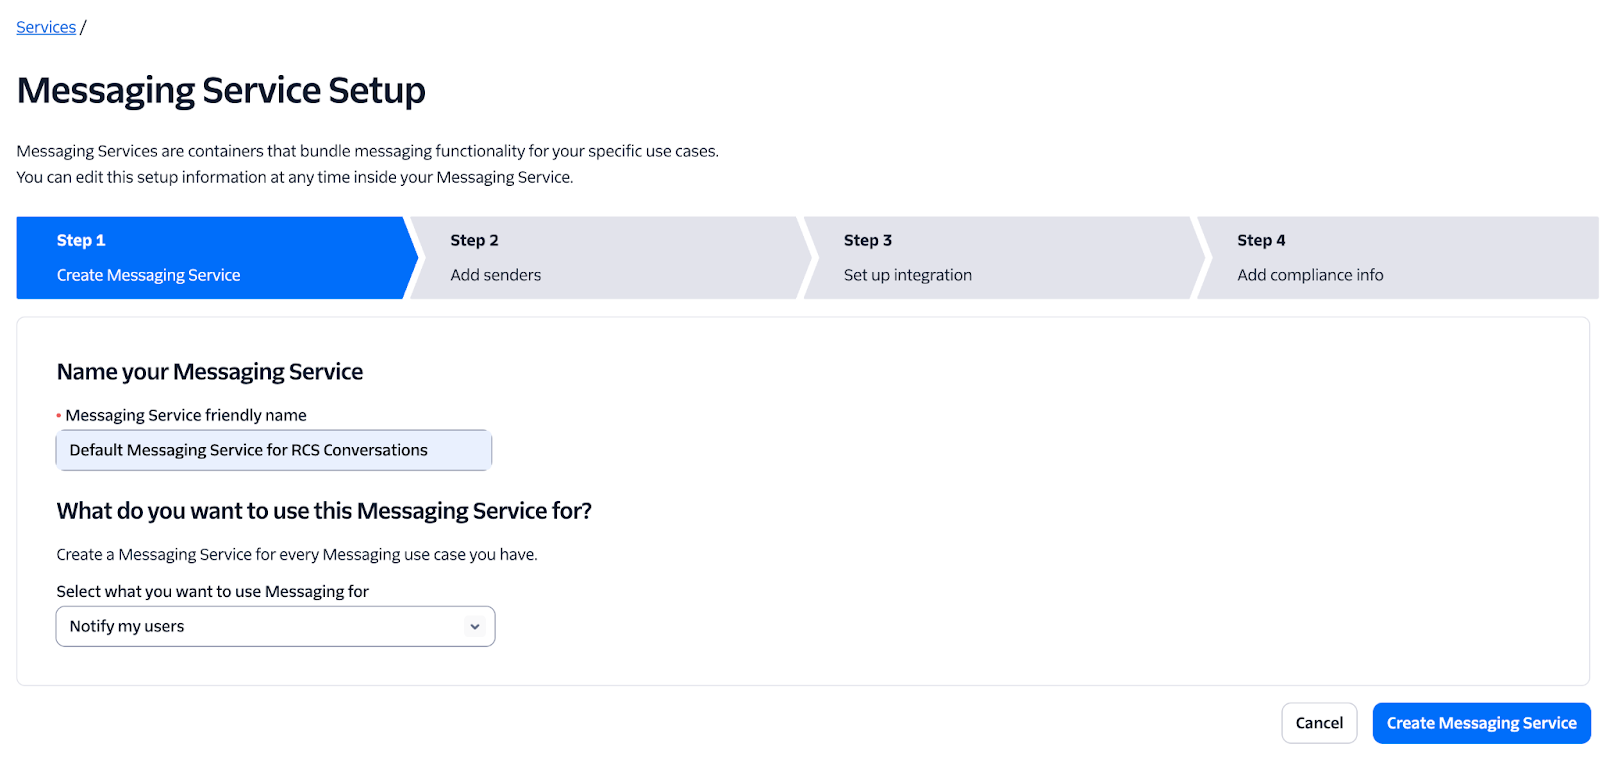
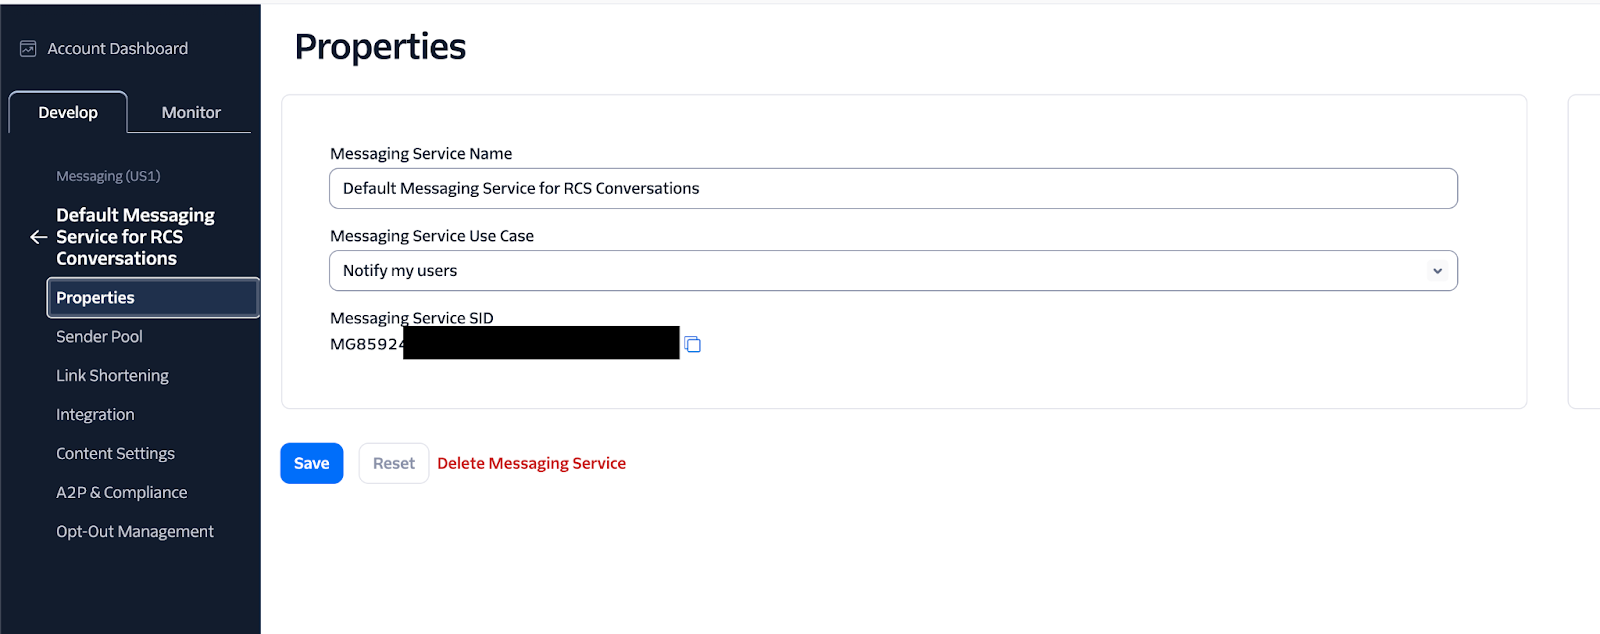
- Go to Develop > Messaging > Services and click Create Messaging Service, naming it appropriately.
- Within the Messaging Service setup, configure the Incoming Messages and Status Callback URLs as instructed.
- Open the created Messaging Service, go to the Sender Pool tab, click Add Senders, select RCS Sender, and add the previously created sender.
- Gather the Account SID, Messaging Service SID, RCS Sender SID, RCS Sender ID, and image URLs and share them with the HighLevel onboarding team.
07What it looks like in HighLevel
08Settings that matter
- Sender Display Name. Controls the name shown to recipients in the RCS chat thread.
- Description. Provides a brief use case description for the sender.
- Logo Image. Sets the brand logo that appears inside the message UI.
- Banner Image. Defines a larger banner shown on the sender’s profile.
- Accent Color. Specifies the brand color used in the RCS interface.
- Incoming Messages URL. Routes incoming RCS messages to HighLevel’s backend.
- Fallback URL. Provides an alternate endpoint for incoming messages if the primary fails.
- Status Callback URL. Delivers delivery status updates to HighLevel.
- Request URL. Configures the Messaging Service’s inbound message endpoint.
- Delivery Status Callback. Sets the URL for the Messaging Service to report message status.
09Things to know before you rely on it
- RCS is supported only for accounts using LC Phone; other phone providers cannot enable it.
- All webhook methods must be set to POST; GET is not allowed.
- Carrier and Google approval of the Sender ID is required after Twilio setup.
- If Messaging does not appear in the Twilio navigation, it must be added via Explore Products.
10If something goes wrong
- Created the sender in the wrong Twilio subaccount.. Recreate the RCS Sender in the correct subaccount and repeat the steps.
- Messaging option is missing from the Twilio navigation.. Click Explore Products in the Twilio console and add Messaging, then return to Develop > Messaging > Services.
- Webhook method set to GET.. Change the method to POST for every webhook URL.
11How it connects to the rest of HighLevel
- Review HighLevel SMS compliance settings for opt out handling. SMS compliance
- Check the SMS delivery troubleshooting checklist for related issues. SMS troubleshooting
- Read best practices to avoid SMS carrier restrictions that may affect RCS. SMS deliverability
Michael's take

RCS onboarding can feel like a maze, especially if you’re new to Twilio’s console and the carrier approval steps. It’s easy to waste time creating a sender in the wrong subaccount or forgetting that every webhook must be POST, which can cause messages to bounce inside HighLevel.
When it works, you get a branded messaging channel that shows your logo and colors directly in the conversation.
If I were to test it, I’d verify the webhooks fire correctly before sending any live campaigns.