
01Who this is for
- Marketing managers at agencies can keep each client’s logo consistent across scheduled posts.
- Small business owners can apply a brand logo to images for every social profile without editing each picture.
- Ecommerce store operators can assign distinct watermarks to different brand stores within the same platform.
02Watermarks, explained
Watermarks are overlay graphics that appear on image posts published through the Social Planner. After a watermark is uploaded, you can control where it sits on the picture, how transparent it looks, its size and any surrounding padding. The platform then adds the chosen watermark automatically to any supported image when the post is sent to the selected social accounts.
You manage watermarks from the Social Planner Settings section. From Marketing select Social Planner, open the Settings tab and choose Watermark. All watermark files, customizations and account assignments are stored there and can be edited, replaced or removed at any time.
03How businesses use watermarks
- Digital marketing agency. The agency uploads a client logo file, adjusts its opacity and size, and assigns that watermark to the client’s Facebook and Instagram accounts. Each new image post for those accounts receives the logo without extra editing.
- Local restaurant. The restaurant adds a PNG of its emblem, sets the alignment to the lower right corner, and links the watermark to its Google Business Profile and Facebook page. All future promotional images posted through the planner display the emblem automatically.
- Real estate brokerage. The brokerage creates a separate watermark for each office location, customizes the scale for each, and assigns the appropriate watermark to the corresponding LinkedIn and Instagram accounts. New property photos posted from the planner carry the correct office branding.
04The numbers and rules that matter
- Minimum 200 × 200 pixels.
- Maximum 5 MB.
- Watermark name up to 30 characters.
05Before you start
- Prepare a PNG or JPG image that meets the minimum 200 × 200 pixel size and does not exceed 5 MB.
- Ensure the social accounts you want to use are already connected in the Social Planner.
06How to set up and use watermarks in HighLevel
Add and assign a watermark to social accounts
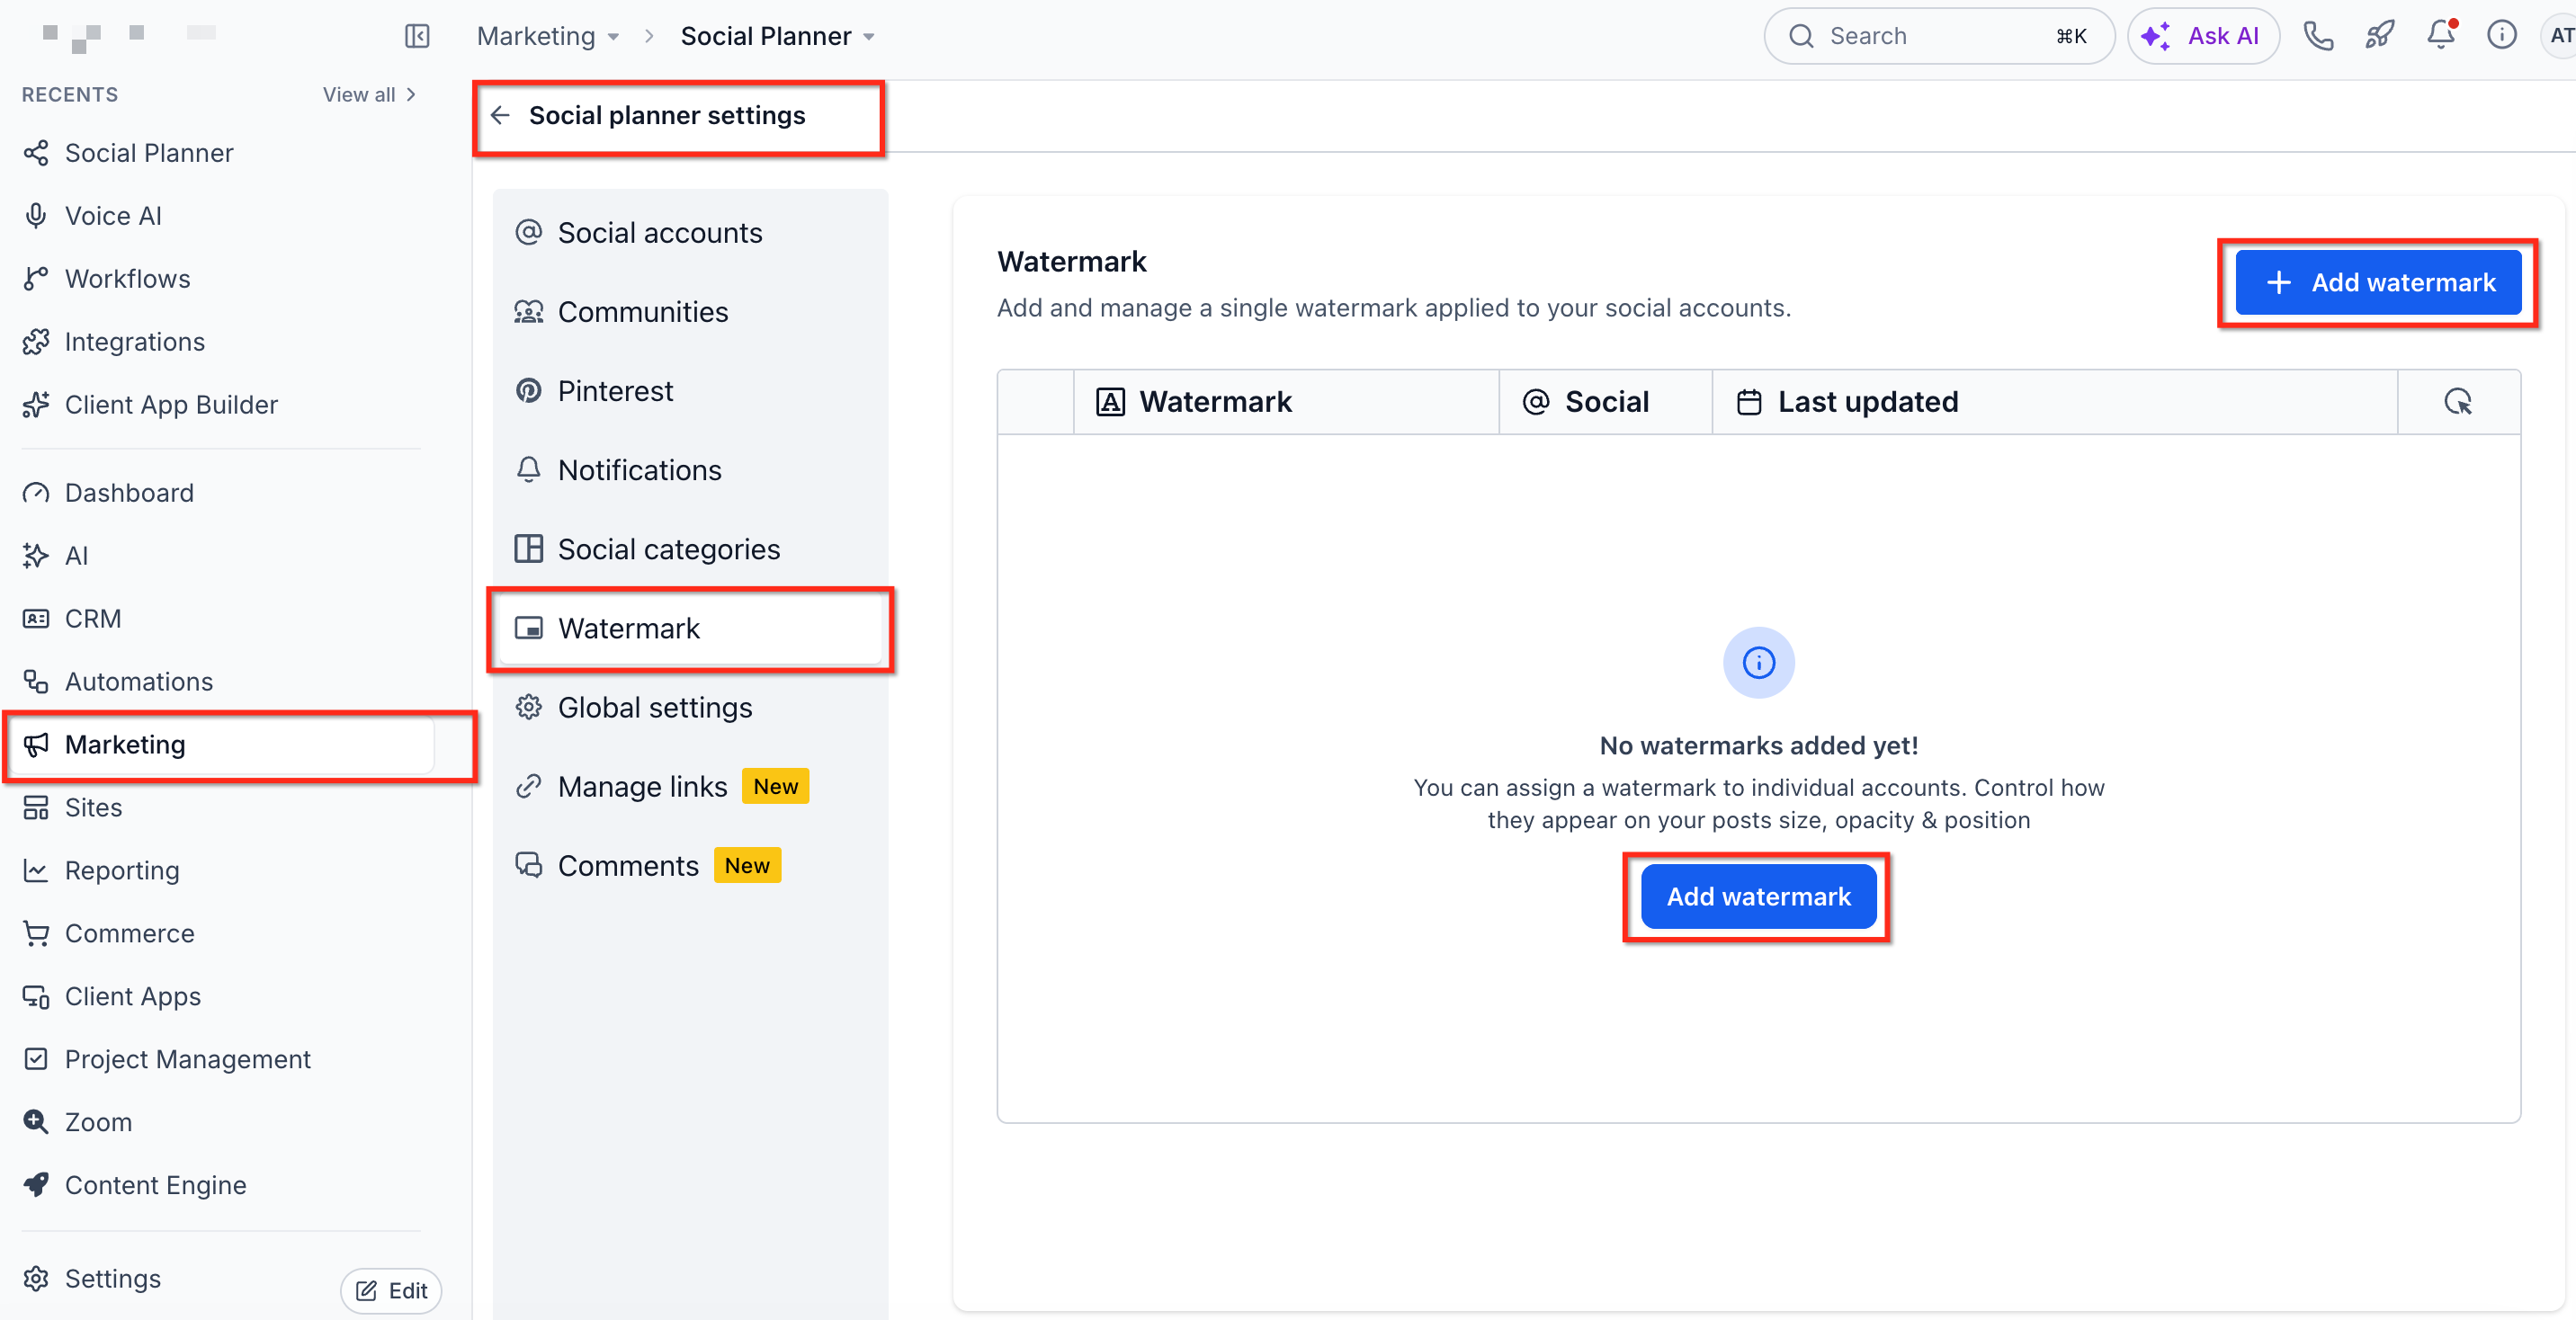
- Navigate to Marketing > Social Planner > Social Planner Settings > Watermark.
- Click the + Add watermark button.
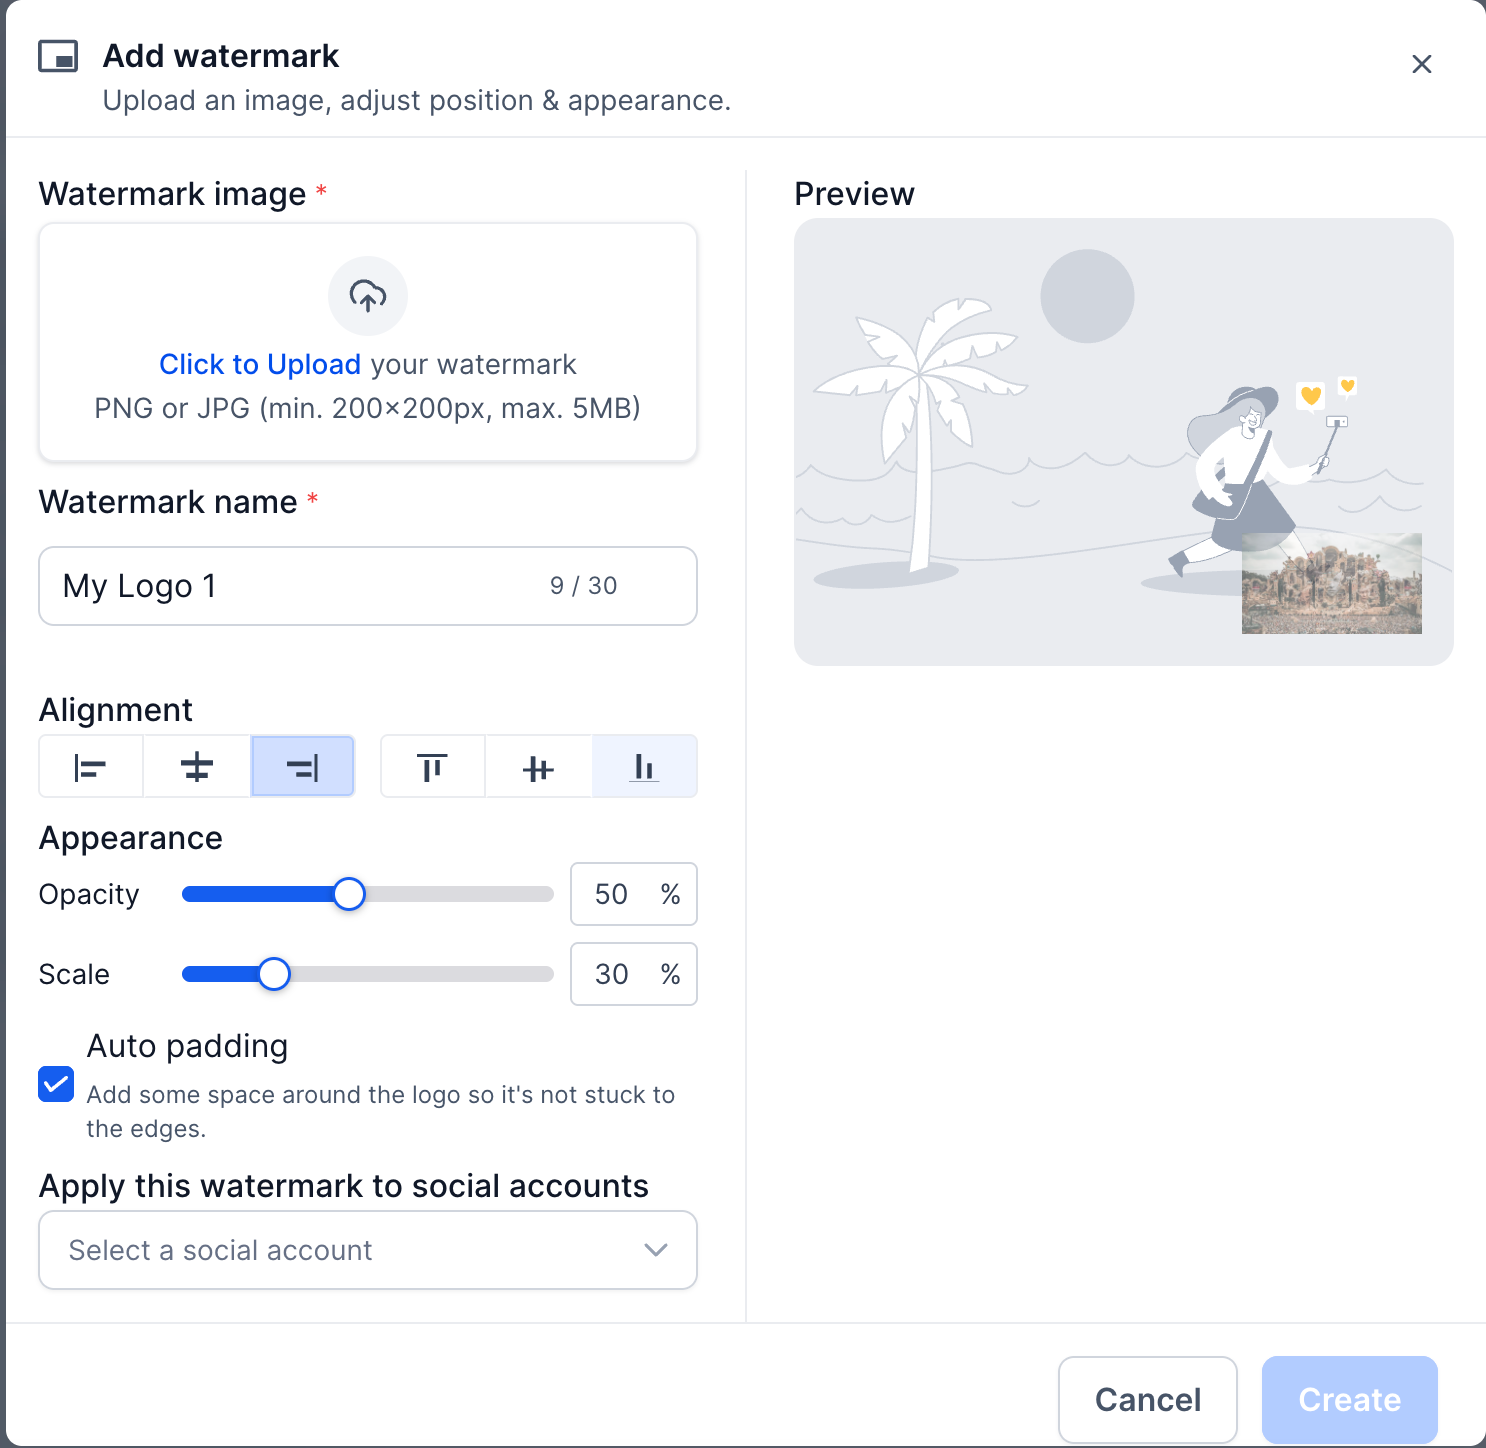
- Upload a PNG or JPG file that satisfies the size limits.
- Enter a name for the watermark, using up to 30 characters.
- Adjust alignment, opacity, scale, and auto padding as desired.
- Review the appearance in the preview panel.
- Select the social accounts that should receive this watermark.
- Press Create to save the watermark and apply it to the chosen accounts.
07What it looks like in HighLevel
08Settings that matter
- Alignment. Determines which corner or side of the image the watermark will appear in.
- Opacity. Controls how transparent the watermark looks on the image.
- Scale. Sets the overall size of the watermark relative to the image.
- Auto padding. Adds extra space around the watermark to keep it from touching the image edges.
09Things to know before you rely on it
- Watermark files must be PNG or JPG, at least 200 × 200 pixels, and no larger than 5 MB.
- Only one watermark can be assigned to a social account at a time.
- Changing a watermark assignment does not retroactively modify images already saved in scheduled posts.
- RSS and Review posts do not support watermarking.
- Watermarks apply only to supported image posts; they do not affect video posts.
10How it connects to the rest of HighLevel
- How to connect Facebook pages for Social Planner usage Connect Facebook
- Guide for linking Instagram via Facebook or direct integration Connect Instagram
- Image and video specifications for Social Planner content Content specs
Michael's take

Ever wonder if you really need a watermark for every brand you manage? In practice, a single, well placed logo can save you hours of manual editing and keep your feed looking professional across dozens of accounts.
If I were setting up a new client, I’d upload their logo, tweak the opacity so it doesn’t dominate the image, then assign it to the client’s Instagram and Facebook pages. Once that’s done, the system handles the rest, letting you focus on copy and strategy instead of pixel perfect graphics.