
01Who this is for
- Front office staff at service based businesses can capture intake data without asking the client to fill a separate page.
- Property managers can record renter information at the moment a reservation is entered, keeping records consistent.
- Consultants can gather project brief details during manual appointment entry, ensuring all needed fields are filled before confirming the meeting.
02In app booking forms, explained
The feature adds a Booking form section to the manual creation screen for Service and Rental appointments. When you choose a contact, HighLevel automatically fills first name, last name, email and phone into the form. You can accept the preselected form or pick another one from a dropdown, then complete any remaining fields and attach the form before finalising the booking. The attached response appears in the booking details panel once the appointment is saved. The form attachment works only during the creation of a new Service or Rental booking; existing bookings cannot be edited to add a form.
03How businesses use in app booking forms
- Dental practice. When scheduling a patient cleaning manually, the receptionist opens a new Service booking, selects the patient contact, attaches the intake form, fills any missing health questions, and then books the appointment. The completed form is stored with the visit record.
- Vacation rental agency. An agent creates a new Rental booking, chooses the renter’s contact, attaches the rental questionnaire, adds the required lease details, and saves the reservation. The form data can be reviewed later in the booking details.
- Marketing consultancy. A consultant enters a discovery call as a Service booking, selects the prospective client, attaches a brief questionnaire, completes any open fields, and confirms the appointment. The filled questionnaire is viewable from the appointment’s details panel.
04Before you start
- A HighLevel subaccount with Service or Rental booking permissions must be available.
- An intake form must already be created and available in the account.
05How to set up and use in app booking forms in HighLevel
Create a service booking with an attached form
- Open the appropriate HighLevel subaccount.
- Click Calendars in the left hand navigation.
- Select Calendar View.
- Choose Services from the scheduling type selector.
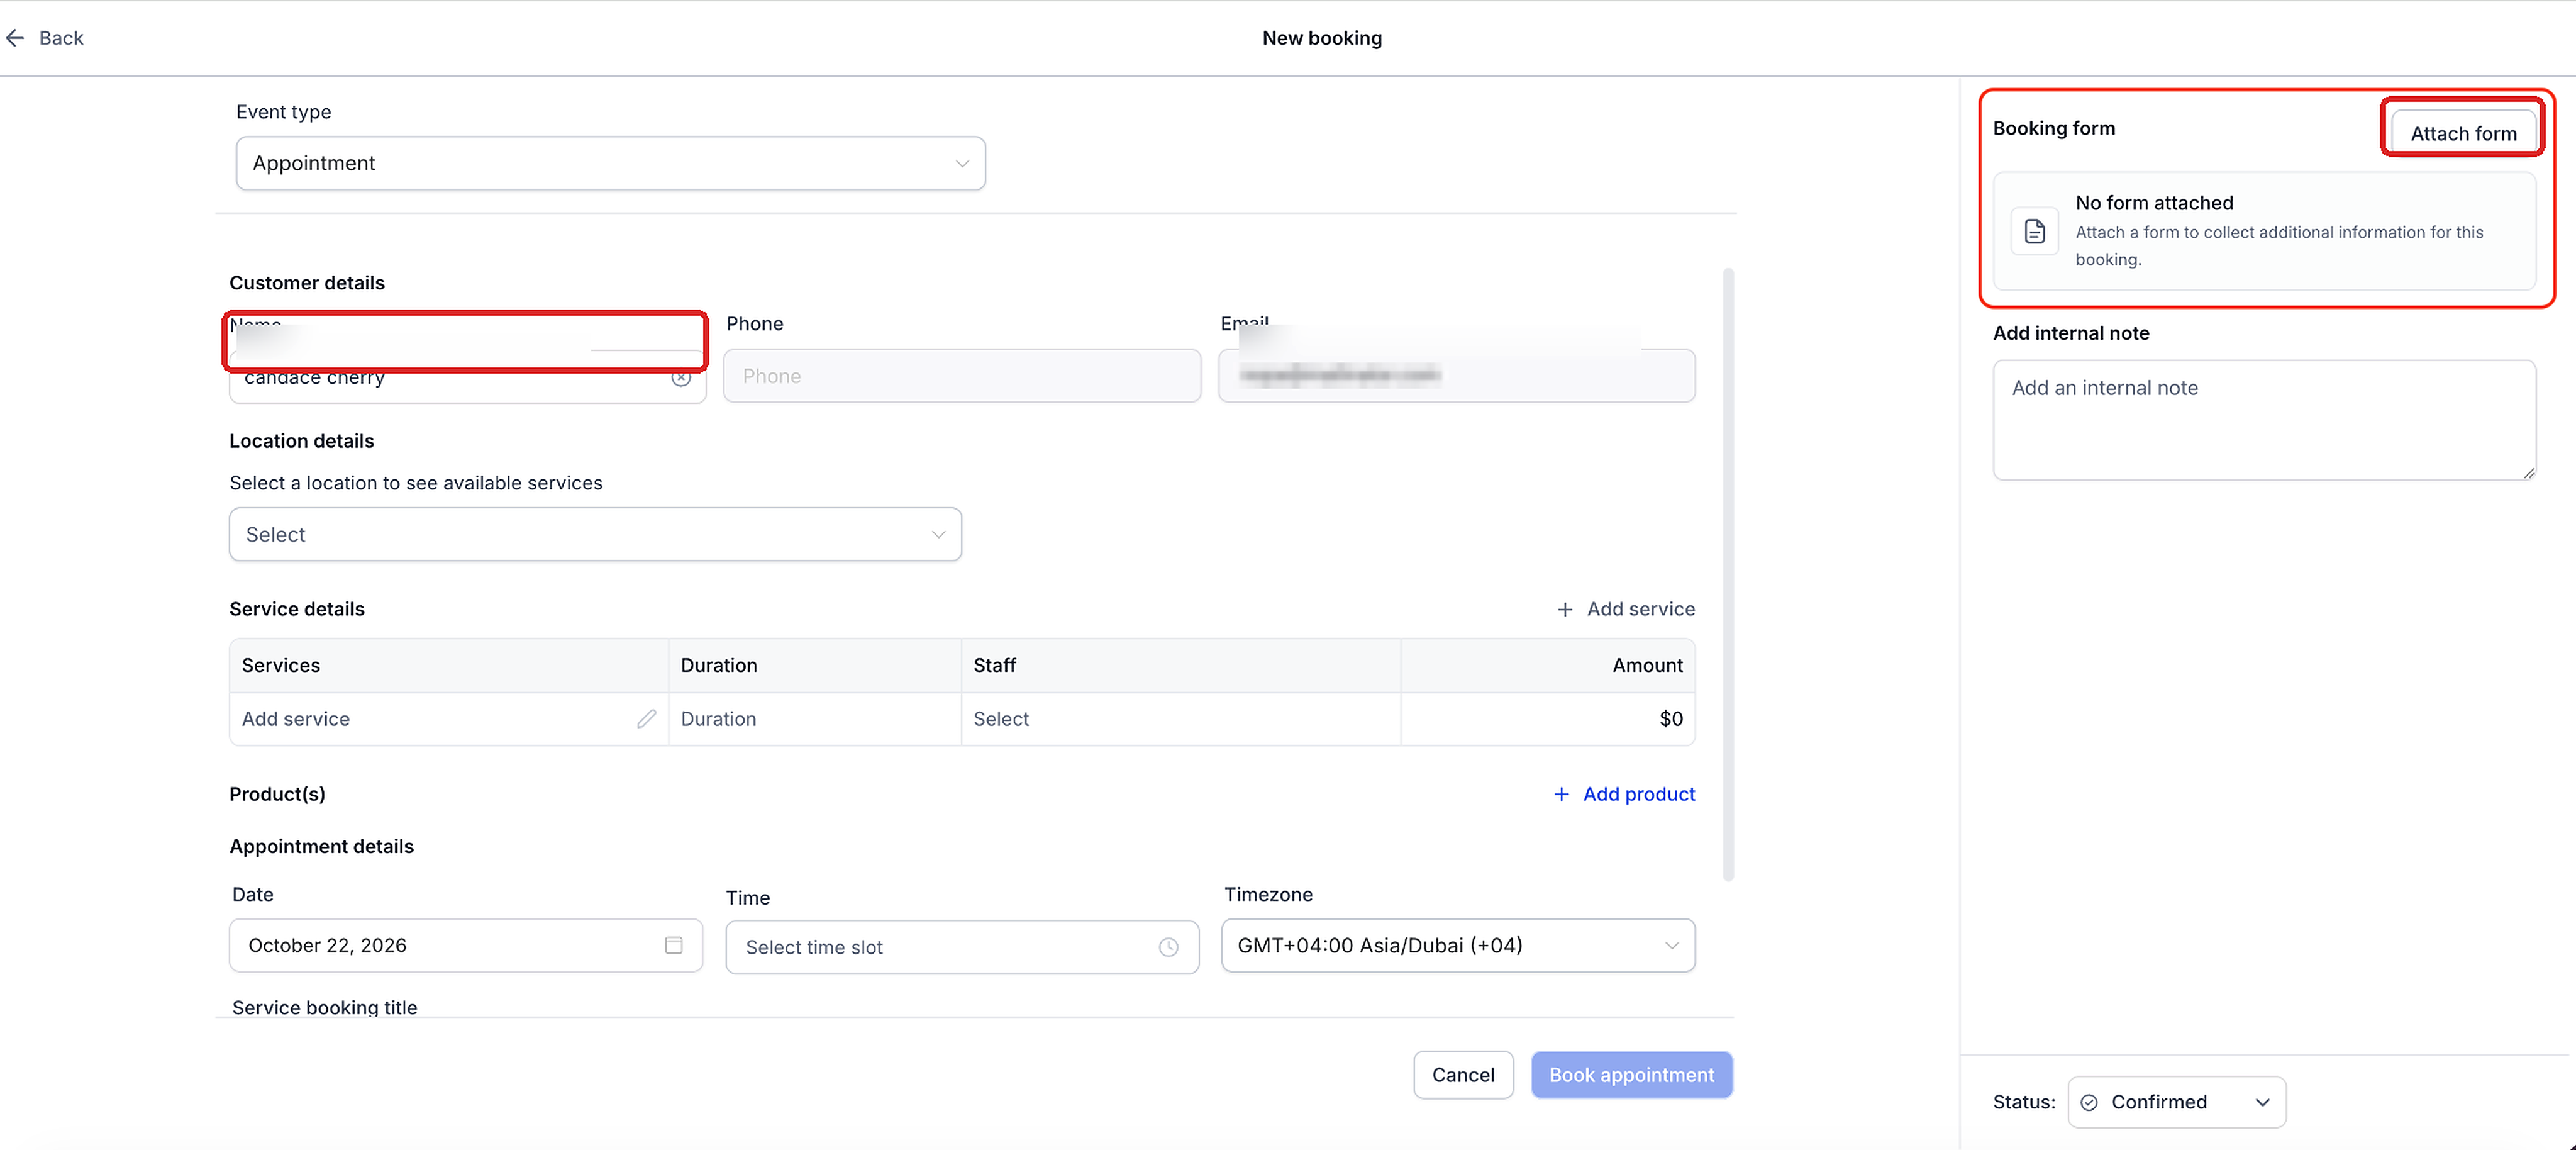
- Press the + New button to start a new booking.
- In the Customer details area, pick the contact.
- In the Booking form panel on the right, click Attach form.
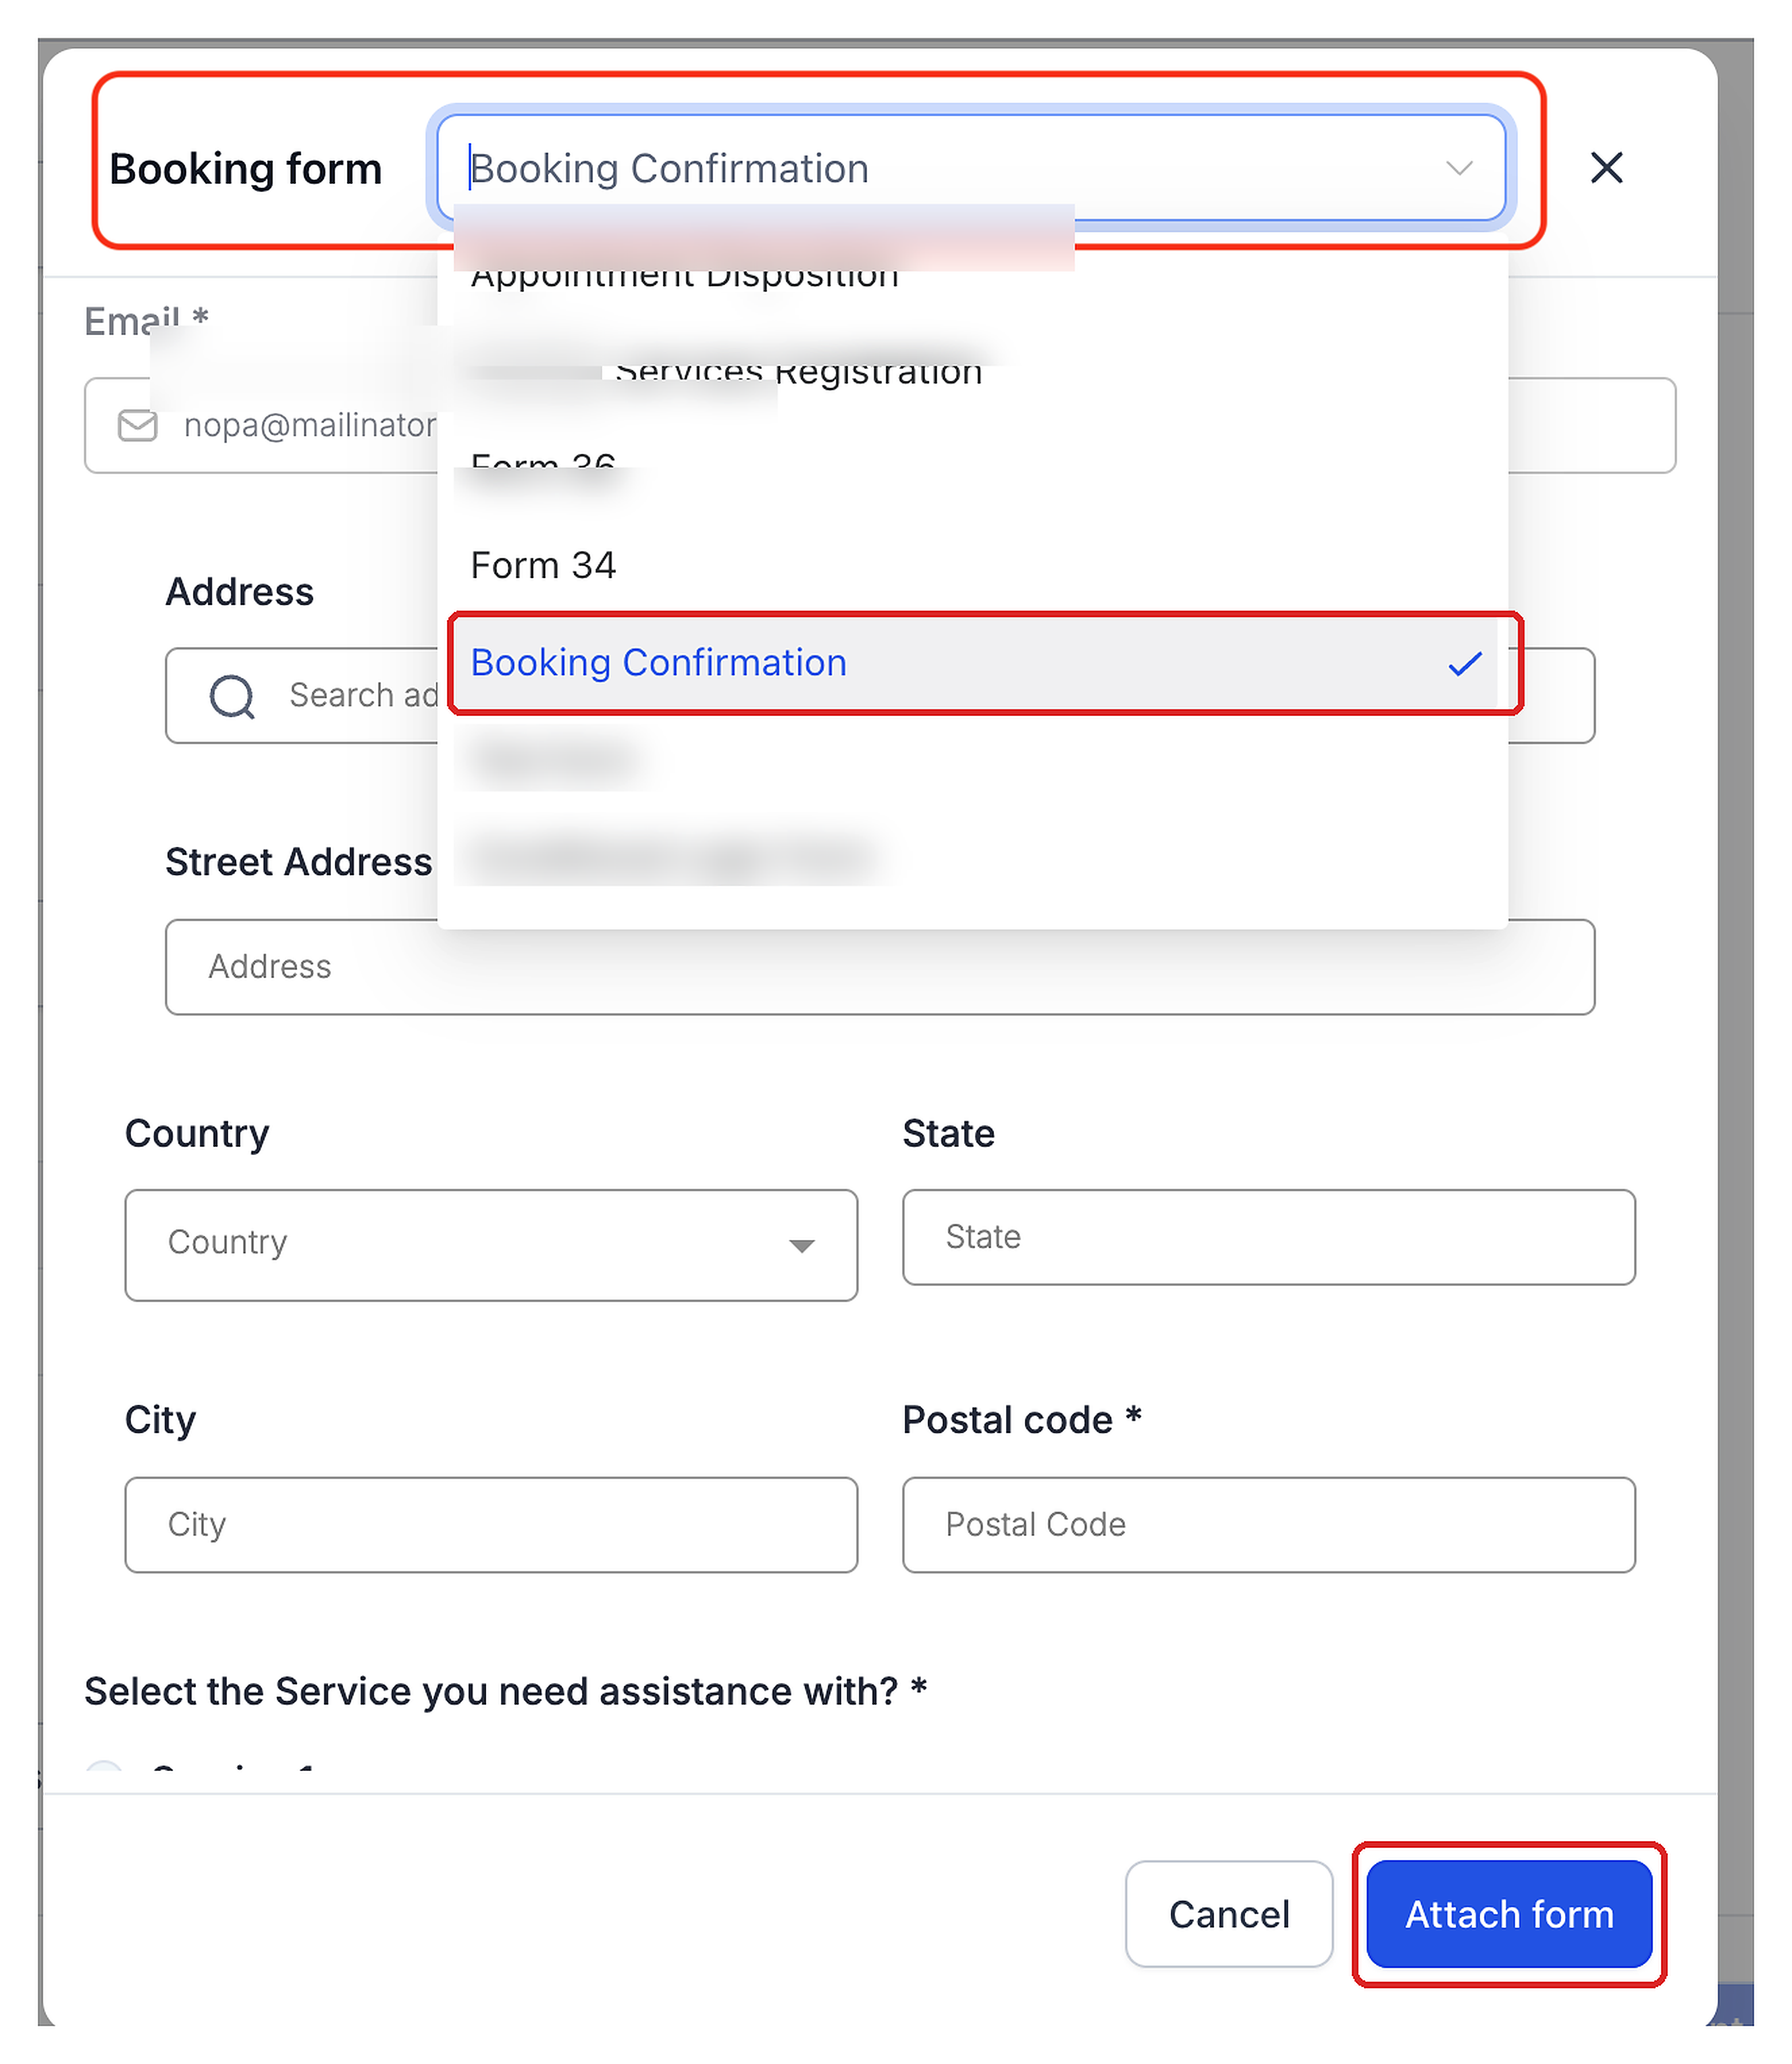
- Check the form that appears preselected in the Booking form dropdown.
- If needed, pick another available form from the dropdown list.
- Confirm the contact information is prefilled and fill any remaining fields for the client.
- Click the Attach form button at the bottom of the form window.
- Verify that the chosen form now shows in the Booking form section.
- Enter the location, service, staff member, date, time and any other required booking details.
- Review everything and click Book appointment.
- Review the form before completing the booking; forms cannot be added or edited after the booking is created.
Create a rental booking with an attached form
- Open the appropriate HighLevel subaccount.
- Click Calendars in the left hand navigation.
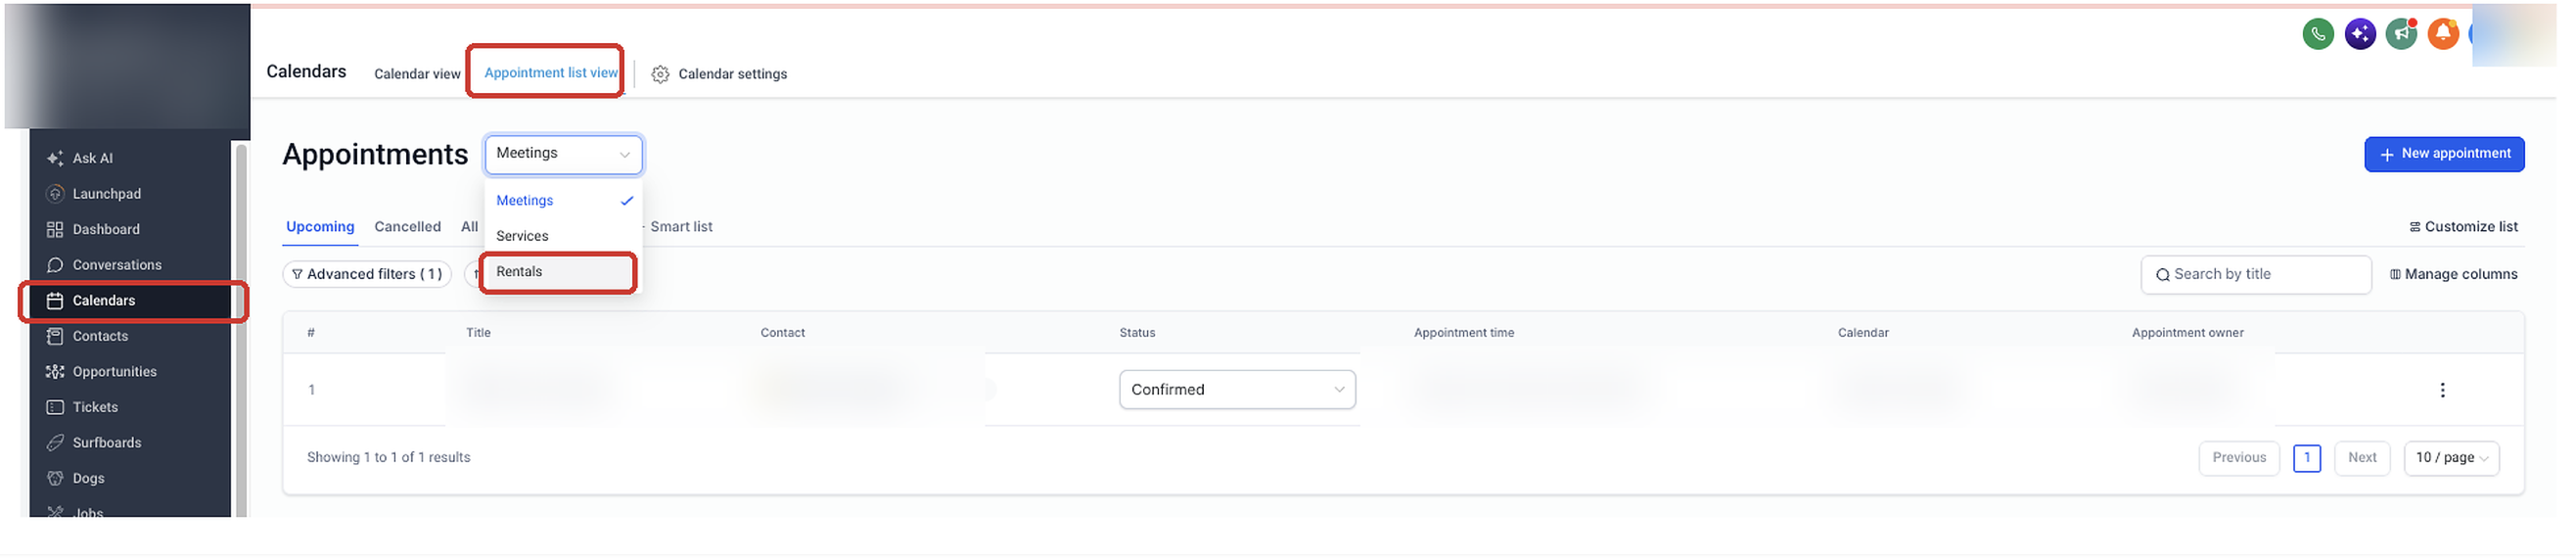
- Open Appointment List View.
- Select Rentals from the scheduling type dropdown.
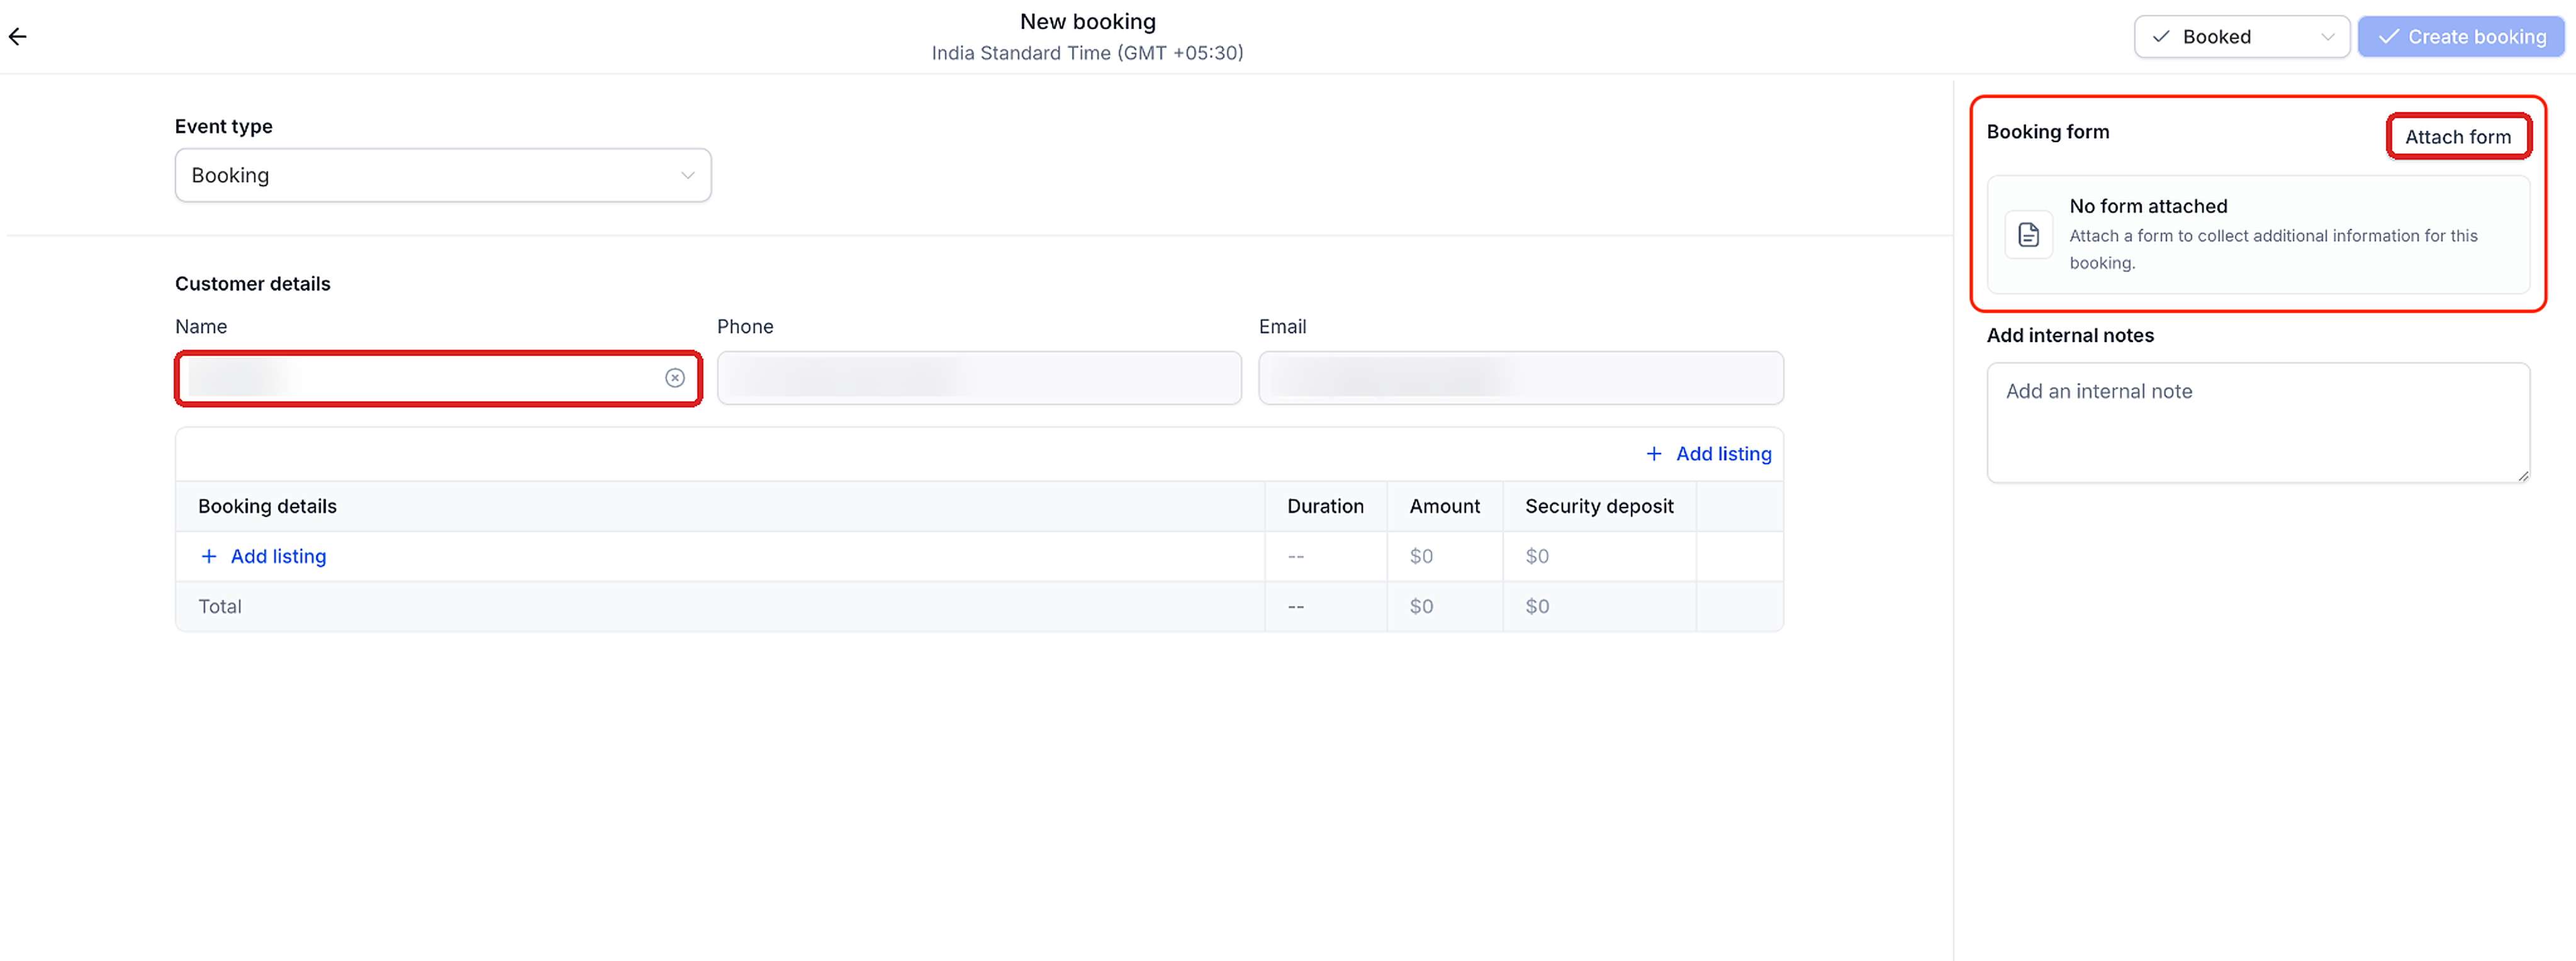
- Press the + Create Booking button to start a new rental entry.
- In the Customer details area, pick the contact.
- In the Booking form panel, click Attach form.
- Either accept the preselected form or choose another available form from the Booking form dropdown.
- Review the prefilled contact information and complete any remaining form fields.
- Click Attach form within the form window.
- Make sure the selected form now appears in the Booking form section.
- Under Booking details, click + Add listing and fill the required rental information.
- Select the appropriate booking status.
- Review the complete entry and click Create booking.
- Review the form before completing the booking; forms cannot be added or edited after the booking is created.
View a submitted booking form (service)
- Open the appropriate HighLevel subaccount.
- Select Calendars from the navigation.
- Open Calendar View and switch to Services.
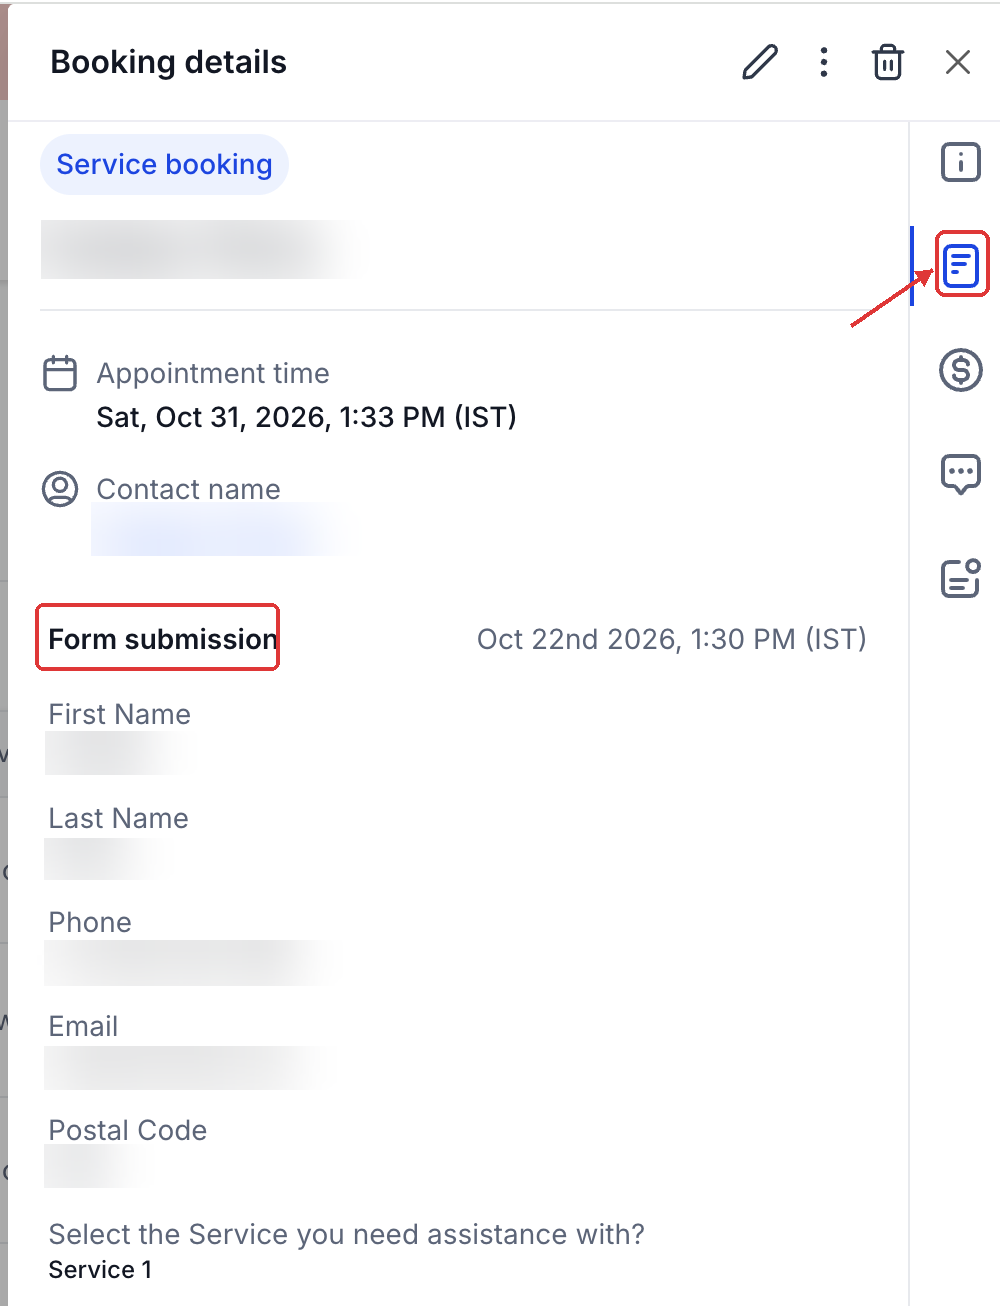
- Choose the saved appointment to open its Booking details.
- Click the form icon in the booking details panel to see the submitted form.
View a submitted booking form (rental)
- Open the appropriate HighLevel subaccount.
- Select Calendars from the navigation.
- Open Appointment List View.
- Select Rentals from the scheduling type dropdown.
- Locate the saved booking and select View to open its booking details.
- Review the attached form submission in the booking details.
06What it looks like in HighLevel
07Settings that matter
- Booking form dropdown. Lets you choose which form will be attached to the booking; the preconfigured form appears selected by default.
- Attach form button. Saves the completed questionnaire to the booking and displays it in the Booking form section.
08Things to know before you rely on it
- Only new Service and Rental bookings created in app can have a form attached.
- Attaching a form is optional; a booking can be saved without one.
- First name, last name, email and phone are automatically filled from the selected contact.
- CAPTCHA, product selling and payment fields are hidden inside the attached form.
- Forms cannot be added to or edited on an existing booking after it is created.
09How it connects to the rest of HighLevel
- Learn how to view form submissions from an appointment modal. View form submissions
- Add, edit, and manage appointment notes that appear alongside booking details. Appointment notes
- Configure the Book Appointment workflow action to automate bookings. Book Appointment workflow
Michael's take

When a staff member books a service or rental for a client, the challenge is getting all the needed intake details without sending the client back and forth to a separate page. In app booking forms let you capture the information right at the point of booking, keeping the process smooth and the data consistent.
The first setting I would get right is the default form that appears in the Booking form dropdown. Make sure it contains all the fields your team needs, then verify the contact prefill works for first name, last name, email and phone before you start attaching forms to bookings.