
01Who this is for
- Agency owners who host multiple client WordPress sites can monitor security centrally and resolve issues quickly.
- Solo entrepreneurs running a single storefront site gain early warnings and single click fixes to keep the site safe.
- IT managers within small firms can enforce hardening settings across all internal WordPress installations.
02Antivirus for WordPress Sites, explained
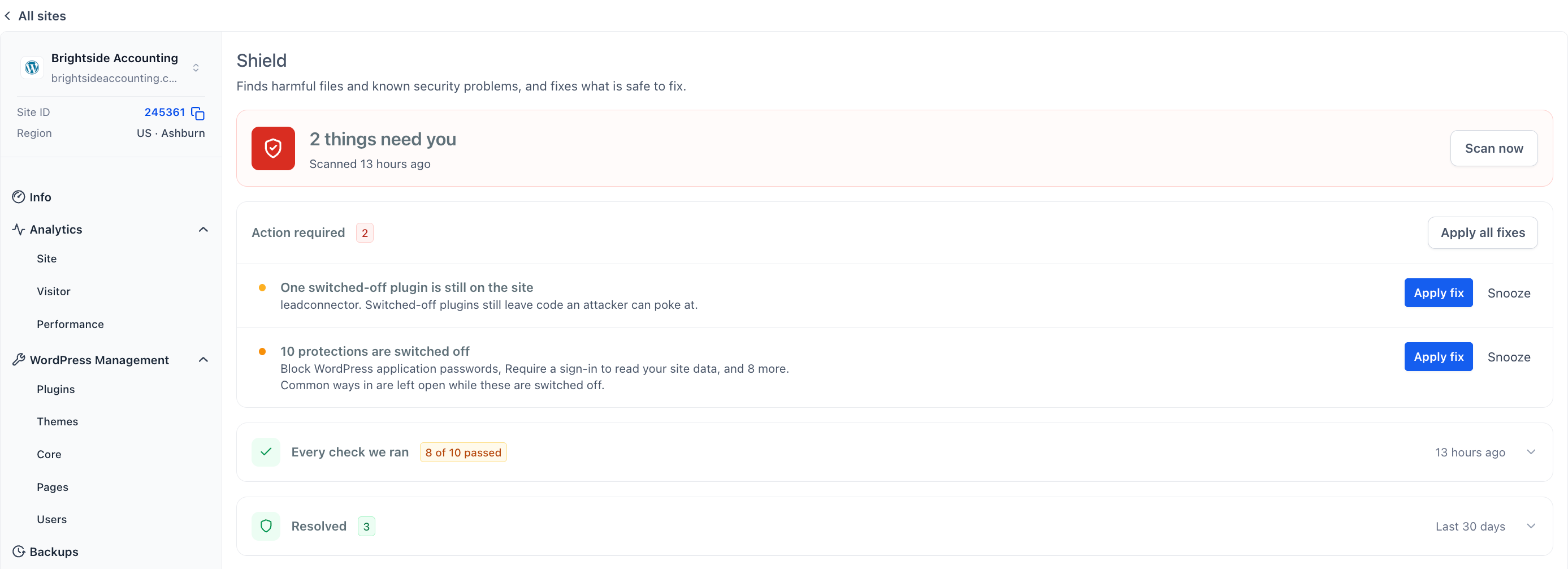
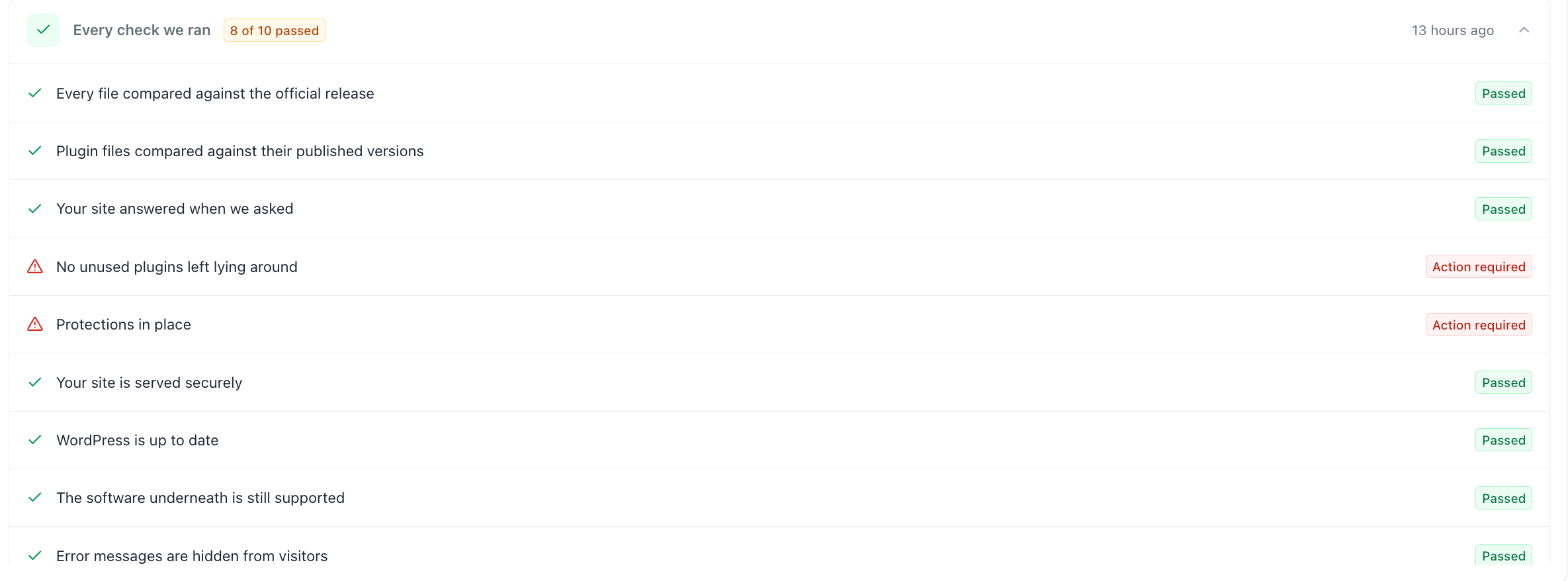
Antivirus appears as a menu item inside each WordPress site entry. It houses two sections: Shield, which runs scans and lists items needing attention, and Hardening, which provides toggle based protections. Shield displays a banner with the count of pending items and the last scan time, and it lets you run a fresh scan whenever needed.
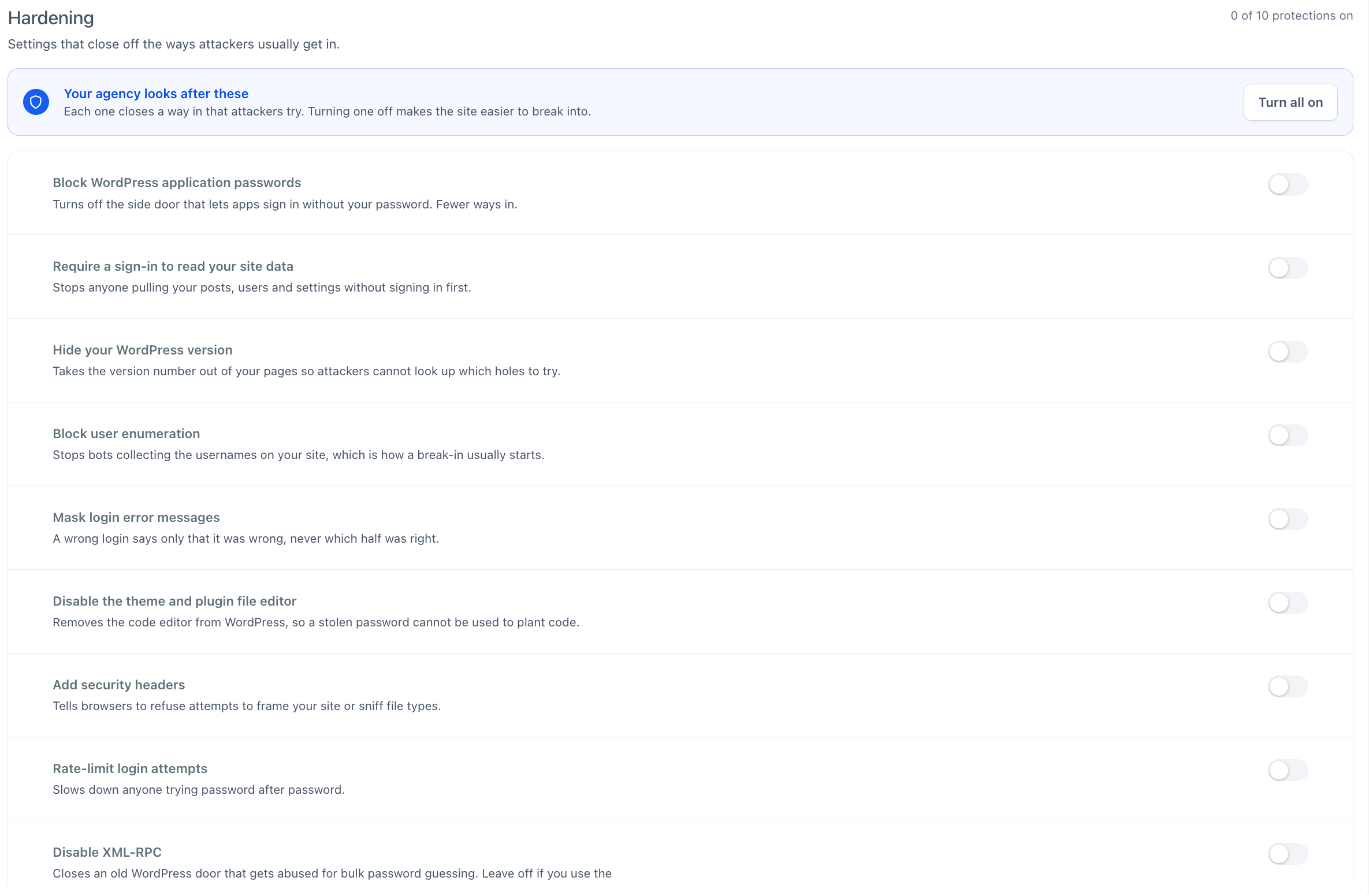
Hardening shows brief descriptions for each security measure. You can flip each toggle individually or activate every toggle with a single button. The protection list includes disabling application passwords, hiding the WordPress version, blocking user enumeration, and more. The feature lives under Sites > WordPress > Antivirus in the HighLevel navigation.
03How businesses use antivirus
- Digital marketing agency. The agency opens Antivirus for each client site, runs a Shield scan, and clicks Apply all fixes to resolve detected problems in one step. It then enables all Hardening protections with Turn all on to standardize security across the portfolio.
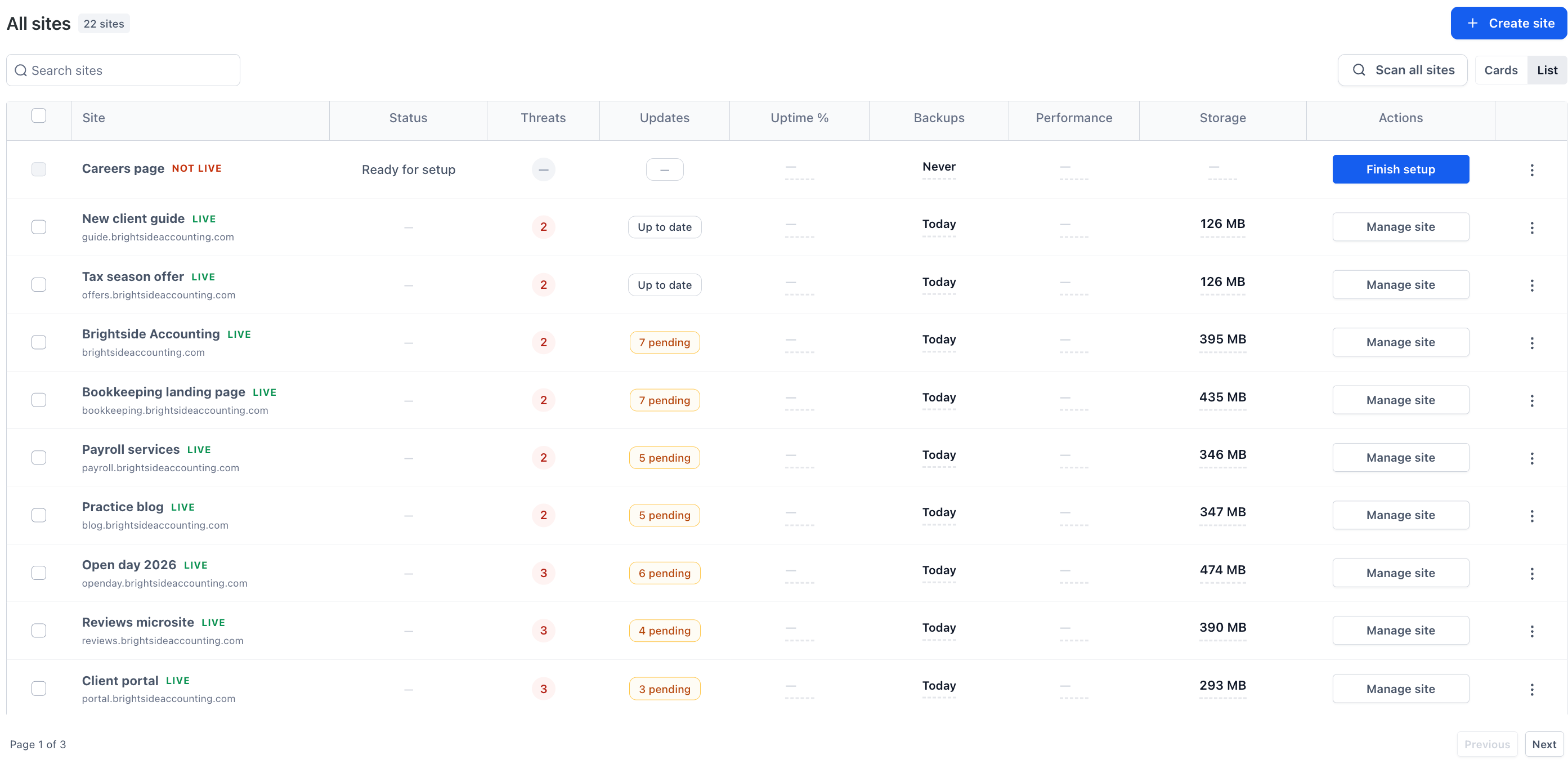
- Ecommerce boutique. The store owner checks the Threats column on the WordPress list, hovers over any count to view details, and runs Scan all sites before a product launch. Critical items are fixed individually after taking a backup.
- Local service provider (e.g., dentist). The provider reviews Shield’s results, snoozes non critical items for 30 days, and enables specific Hardening options like Hide WordPress version and Mask login errors, ensuring the site stays protected without affecting patient facing features.
04The numbers and rules that matter
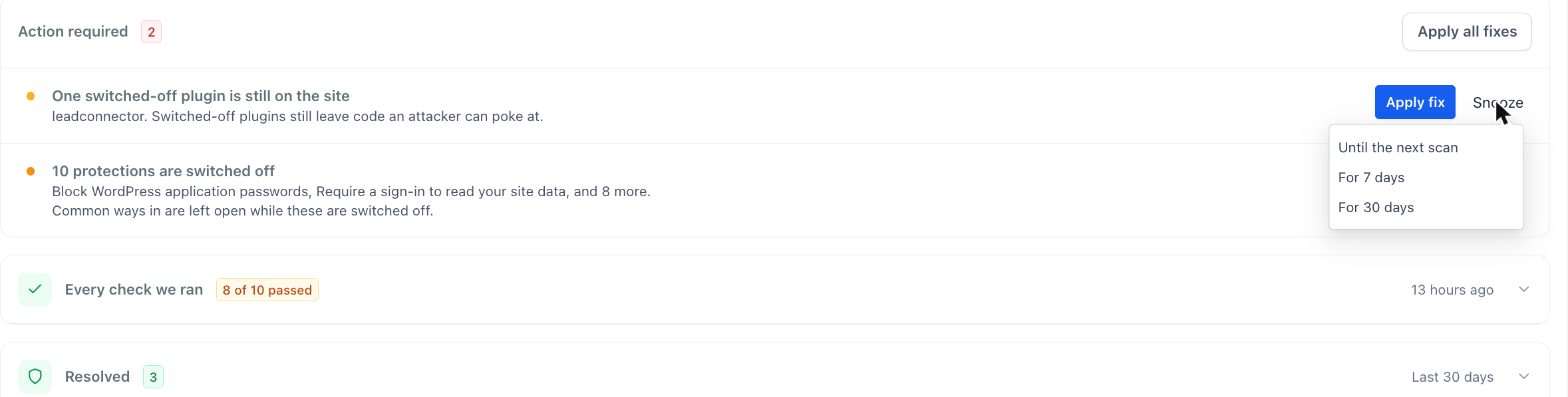
- Snooze options: Until the next scan, For 7 days, For 30 days.
05Before you start
- A WordPress site must already be set up in HighLevel.
06How to set up and use antivirus in HighLevel
Open Antivirus
- Navigate to Sites.
- Select WordPress and open the desired site.
- Click Antivirus in the left menu and choose Shield or Hardening.
Review and fix threats in Shield
- Read the banner at the top for the number of items and last scan date.
- Press Scan now to start a fresh scan.
- Look at the Action required count and read each item’s explanation.
- Click Apply fix on a single item or Apply all fixes to address every fixable issue.
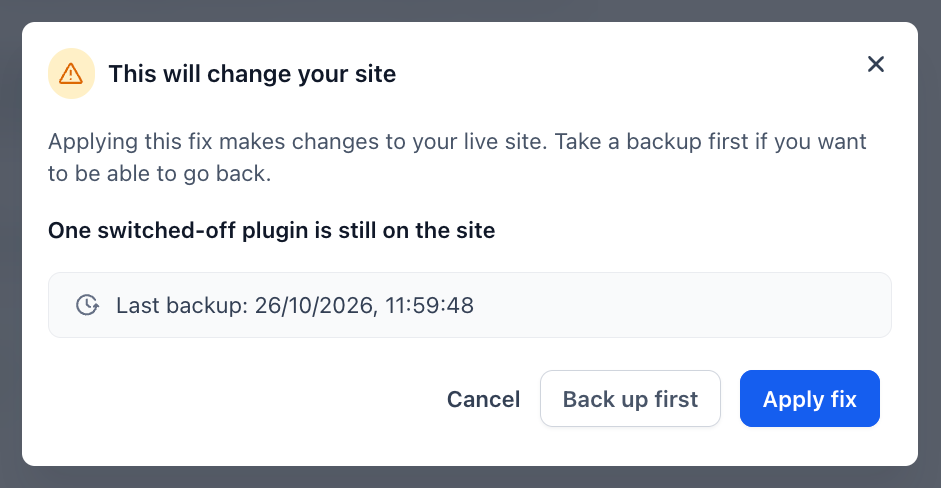
- In the confirmation window, choose Back up first to create a new backup or click Apply fix to proceed.
- Select Snooze on any item and pick Until next scan, For 7 days, or For 30 days.
Turn on hardening protections
- Open Antivirus and go to the Hardening tab.
- Read the one line description under each protection.
- Toggle each protection on or off as needed, or click Turn all on to enable every option.
See threats across all your sites
- Go to Sites > WordPress.
- Observe the Threats column for each site.
- Hover over a threat count to view details and click Check threats to open the view.
- Click Scan all sites to initiate a fresh scan for every WordPress site.
07What it looks like in HighLevel
08Settings that matter
- Block WordPress application passwords. Disables the alternative login method that lets apps sign in without a regular password.
- Require a sign, in to read your site data. Prevents unauthenticated users from accessing posts, user lists, or settings.
- Hide your WordPress version. Removes the version number from page source to reduce targeting by attackers.
- Block user enumeration. Stops bots from harvesting usernames from the site.
- Mask login error messages. Shows only a generic error when a login fails.
- Disable the theme and plugin file editor. Removes the built in code editor from the WordPress admin area.
- Add security headers. Inserts browser directives that block framing and type sniffing.
- Rate, limit login attempts. Limits how quickly repeated login tries can be made.
- Disable XML, RPC. Turns off the legacy XML RPC endpoint that can be abused for bulk password guessing.
- Harden your .htaccess. Adds rules to prevent code execution from uploads and to hide sensitive files.
09Things to know before you rely on it
- The Disable XML RPC protection should stay off if you rely on the WordPress mobile app.
- Applying a fix modifies the live site; a backup is recommended beforehand.
10If something goes wrong
- Applying a fix changes the live site. Use the Back up first option in the confirmation window before confirming the fix.
- Hardening protections cause a feature to stop working. Turn the specific protection off again to restore the affected functionality.
11How it connects to the rest of HighLevel
- Set up WordPress hosting for clients WordPress hosting guide
- Manage WordPress plugins and themes Plugin and theme management
- Start a 30 day trial of HighLevel 30 day trial
- Review HighLevel pricing and plans Pricing page
Michael's take

Antivirus for WordPress sites feels like a modest convenience. It gives you a clear view of what’s wrong and a single click way to clean it up, which is a nice time saver for anyone juggling multiple sites.
A boutique digital agency that builds and maintains client WordPress sites will find it useful. They can run a scan across all client sites, see the threat counts at a glance, and push fixes with one click, keeping the agencies’ portfolio secure without digging into each site manually.